
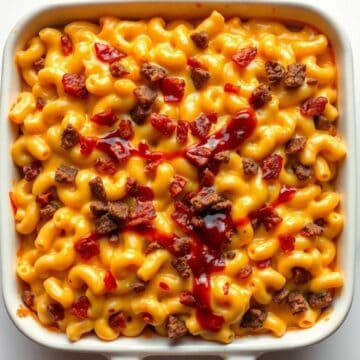
I made this for the first time on a Tuesday night when I had a pound of ground beef, leftover bacon from the weekend, and two kids who were refusing to agree on what they wanted for dinner. Saad wanted mac and cheese. Zainab wanted something with meat. I threw it all together, slid it into the oven, and honestly — it was one of those nights where the kitchen just worked out.
What makes this casserole work is the homemade cheese sauce. I know it sounds fussy but it's really just a basic roux — butter, flour, milk — and it takes maybe six minutes. That's the part that separates this from the boxed stuff. The BBQ sauce goes into the beef mixture, not the cheese sauce, so you get distinct layers of flavor instead of everything tasting the same. I use whatever BBQ sauce we have in the fridge, usually something from Walmart or Costco, nothing fancy.
My husband loves this with a cold beer and some garlic bread on the side. It reminds me a little of the filling in my Texas Toast Sloppy Joes — that same savory, BBQ-meets-beef combination — except here it's baked into something you eat with a spoon. We've had it three Fridays in a row now, which is basically my family's version of a five-star review.
One thing I'll warn you about upfront: don't overcook the pasta before it goes into the oven. I did that my first time — boiled it fully, then baked it — and it came out a little soft. Pull it out while it still has a bit of bite. It finishes cooking in the oven and you want it to hold its shape in all that creamy sauce.

Why You'll Love This Recipe
- One baking dish, minimal cleanup: I cook the beef and bacon in one skillet, make the cheese sauce in a small saucepan, then everything goes into a 9x13 baking dish. That's basically it. On nights when I'm already tired, the last thing I want is a pile of pots waiting for me after dinner. This keeps the mess manageable.
- Real ingredients, no specialty shopping: Ground beef, bacon, elbow macaroni, cheddar, mozzarella, milk, butter, flour, BBQ sauce — every single one of these lives in my grocery store's regular aisles. Nothing here requires a trip to a specialty store. I usually pick up a couple of extra ingredients while I'm already doing my weekly Walmart or Aldi run.
- It reheats well, which means great leftovers: A lot of baked pasta dishes dry out by day two. This one holds up really well because the cheese sauce keeps it moist. I add a small splash of milk before I microwave it and it comes back almost as creamy as the first night. My husband takes it to work the next day and he says it's better cold. I disagree, but that's his business.
- You can make it ahead for a busy week: I've assembled this the night before, covered it with foil, and refrigerated it overnight. The next evening I just pull it out while the oven preheats and bake it. It's about five minutes longer in the oven when it goes in cold, but other than that, no difference. This is the kind of recipe that makes Monday night dinner feel like you planned ahead.
- Kids actually eat it: I don't say this lightly. Both of my kids have phases where they reject things for no clear reason. This casserole has survived every phase. The mac and cheese element keeps it familiar enough that they don't interrogate it, and the bacon on top gives them something to feel excited about. I make a double batch when I know we'll have it for lunch the next day too, because a single 9x13 disappears fast.
Ingredients
- 12 oz elbow macaroni
- 1 lb ground beef
- 6 slices bacon, cooked and crumbled
- 1 small onion, diced
- 2 cloves garlic, minced
- 1 cup barbecue sauce (use whatever brand you like — sweet, smoky, or spicy all work)
- 2 cups shredded cheddar cheese (freshly shredded if you can — see Tips)
- 1 cup shredded mozzarella cheese
- 2 tablespoons butter
- 2 tablespoons all-purpose flour
- 2 cups milk (whole milk makes it creamier, but 2% works fine)
- Salt and pepper to taste
- 1 teaspoon smoked paprika (optional, but I always add it)
- 2 green onions, sliced, for garnish
Directions
- Cook the pasta: Boil your macaroni in well-salted water and pull it out about 2 minutes before the package says it's done — it should still have a firm bite. Drain and set aside. It'll finish cooking in the oven and you don't want it turning to mush.
- Cook the bacon: Fry your bacon in a large skillet until crispy, then drain on paper towels and crumble when cool. Keep a small amount of the bacon fat in the pan — maybe a teaspoon — it adds flavor when you cook the beef.
- Brown the beef: In the same skillet, cook the ground beef with the diced onion over medium-high heat until the beef is fully browned and the onion is soft. Drain any excess fat. Add the minced garlic and cook for another minute, stirring so it doesn't burn. Season with salt, pepper, and smoked paprika.
- Add the BBQ flavor: Stir the BBQ sauce and half of your crumbled bacon into the beef mixture. Mix well and take the pan off the heat. This is your cheeseburger layer — taste it here and adjust salt or add more BBQ sauce if you want it bolder.
- Make the cheese sauce: In a separate saucepan over medium heat, melt the butter. Whisk in the flour and let it cook for about a minute — this gets rid of the raw flour taste. Gradually pour in the milk, whisking constantly until the sauce is smooth and starts to thicken, about 4–5 minutes. Remove from heat and stir in the cheddar and mozzarella until melted and creamy. Season with a pinch of salt and pepper.
- Combine everything: In a large mixing bowl (or just directly in your 9x13 baking dish if it's big enough), mix together the cooked pasta, the beef and BBQ mixture, and the cheese sauce. Stir until everything is evenly coated.
- Bake: Transfer to a greased 9x13-inch baking dish. Scatter the remaining bacon over the top and sprinkle on a bit of extra shredded cheddar. Bake at 350°F (175°C) for 20–25 minutes until the top is bubbly and lightly golden at the edges.
- Serve: Let it sit for 5 minutes before serving — it helps it set up so it doesn't fall apart when you scoop it. Top with sliced green onions and serve hot.

Tips for Success
- Shred your own cheese: I know it's one extra step and the pre-shredded bags are convenient, but the bagged stuff has a starchy coating that makes it clump instead of melt smoothly into the sauce. The first time I made this with bagged cheese, my sauce was grainy. I switched to shredding a block of Tillamook cheddar myself and the difference was immediately obvious. It takes maybe three minutes with a box grater.
- Don't skip draining the beef: After browning the ground beef, tilt the skillet and spoon out the excess fat — or transfer the beef to a plate lined with paper towels for a minute. Too much grease in the mixture makes the whole casserole greasy rather than creamy. This is especially important if you're using regular ground beef rather than lean.
- Taste the beef mixture before combining: The BBQ sauce level is really personal. Some sauces are sweeter, some are tangier, some are smokier. I always taste the beef-and-BBQ mixture on its own before I mix it into the pasta. If it needs more sauce or a pinch more salt, now is the time to add it — once everything is baked together it's harder to adjust.
- Add milk before reheating leftovers: This is something I figured out after the second time making it. The pasta absorbs the cheese sauce as it sits, so leftovers can seem dry. A tablespoon or two of milk stirred in before microwaving brings the creaminess right back. Works in the oven too — cover with foil and add a small splash of milk to the dish before it goes in.
- Let it rest before scooping: I always want to dig in immediately because it smells so good coming out of the oven. But if you give it 5 minutes to rest, the sauce firms up slightly and you get clean scoops instead of a saucy pile. Not a dealbreaker if you skip it, but worth the wait.
Variations
- Spicy version: Add a finely diced jalapeño to the beef when you're cooking the onion, or swap the mozzarella for pepper jack cheese. My husband does this every time he makes his own plate — he adds a few dashes of hot sauce on top too. The BBQ sauce base handles the heat really well and the spice doesn't overwhelm the other flavors.
- Turkey bacon or ground turkey: If you want something a bit lighter, both swaps work here. Turkey bacon doesn't get quite as crispy as regular bacon but it still adds that smoky flavor. Ground turkey is a little leaner and the BBQ sauce does the heavy lifting flavor-wise so you don't really miss the fattier beef. I'm not saying it's the same, but it's still really good.
- Crispy breadcrumb topping: Mix ½ cup of panko breadcrumbs with a tablespoon of melted butter and scatter it over the top before baking. It bakes up golden and crunchy and adds a contrast to the creamy pasta underneath. My husband actually prefers this version — he says it makes it feel more "finished." I add a little garlic powder to the breadcrumbs too.
- Add vegetables: Diced bell peppers or mushrooms sautéed with the onion work really well in this. The bell pepper adds a little sweetness and color. I've also added a handful of spinach stirred in at the combine-everything stage — it wilts into the hot sauce and you barely notice it's there, which is useful when you're trying to get more vegetables into kids who claim they don't like vegetables.
- Different cheese blend: Gouda melts beautifully and adds a slightly nutty flavor. Smoked gouda takes it even further and complements the BBQ sauce really well. Monterey Jack is mild and creamy if you want something less sharp than cheddar. I've never made this exactly the same twice because I use whatever block cheese I have on hand — and honestly, it's always worked out.
Serving and Storage
Serving
Serve this hot straight from the baking dish with a simple green salad on the side — something with a sharp vinaigrette cuts through the richness nicely. Garlic bread also works really well here. If you're putting this on the table for a group, it pairs great alongside my Buffalo Chicken Wings — that combination disappears fast at any gathering. For a lighter contrast, a Cobb Pasta Salad on the side is a nice balance.
Storage
Store leftovers in an airtight container in the refrigerator for up to 3–4 days. To reheat, add a small splash of milk to the portion, cover loosely, and microwave in 60-second bursts, stirring in between. If you're reheating the whole dish, cover with foil and warm in a 325°F oven for about 15 minutes. For freezing: assemble the casserole but don't bake it, then cover tightly with plastic wrap and foil and freeze for up to 2 months. Thaw overnight in the fridge and bake as directed, adding 10 extra minutes since it's going in cold.

Frequently Asked Questions
Can I make this casserole the day before?
Yes, this is actually one of my favorite make-ahead dinners. Assemble everything in the baking dish, cover it tightly with foil, and refrigerate overnight. When you're ready to bake, pull it out while the oven preheats and add about 5–10 extra minutes to the bake time since it's starting cold. The flavors develop nicely overnight too.
Can I freeze this mac and cheese casserole?
You can freeze it before or after baking. I prefer freezing it unbaked — wrap the dish tightly in plastic wrap and then foil, and freeze for up to 2 months. Thaw it in the refrigerator overnight before baking. If it's already baked, it still freezes fine but the pasta texture softens a bit more on reheating, which most people don't mind.
What BBQ sauce works best for this recipe?
Honestly, use whatever you already like. I've made this with Sweet Baby Ray's, Stubb's, and a couple of store-brand smoky sauces and they've all worked. Sweeter sauces give a more classic BBQ flavor; smokier ones make it taste closer to something off a grill. What I'd avoid is a very thin or watery sauce — it gets lost in the beef mixture.
How do I keep the leftovers from drying out?
The pasta keeps absorbing the sauce as it sits in the fridge, so leftovers can seem thicker than when it first came out of the oven. The fix is simple: stir in a tablespoon or two of milk before reheating. It loosens the sauce right back up and you'd never know it had been sitting in the fridge overnight.
Can I use a different pasta shape?
Elbow macaroni is what I use because it's traditional for mac and cheese and the small size works well with the beef mixture. But I've also made this with penne and rotini and both were fine. Just stick to a small or medium pasta — something like farfalle or rigatoni would work, but avoid anything too large because it throws off the ratio of pasta to sauce and meat.
MUST-TRY BBQ BACON CHEESEBURGER MAC ‘N’ CHEESE CASSEROLE
Ingredients
- 12 oz elbow macaroni
- 1 lb ground beef
- 6 slices bacon cooked and crumbled
- 1 small onion diced
- 2 cloves garlic minced
- 1 cup barbecue sauce
- 2 cups shredded cheddar cheese
- 1 cup shredded mozzarella cheese
- 2 tablespoons butter
- 2 tablespoons all-purpose flour
- 2 cups milk
- Salt and pepper to taste
- 1 teaspoon smoked paprika optional
- 2 green onions sliced (for garnish)
Instructions
- Cook the Pasta: Boil macaroni according to package directions. Drain and set aside.
- Cook the Beef: In a large skillet, cook ground beef with diced onion until browned. Drain any excess fat. Add garlic and cook for 1 minute.
- Add BBQ Flavor: Stir in barbecue sauce and half of the cooked bacon. Mix well and set aside.
- Make the Cheese Sauce: In a saucepan, melt butter over medium heat. Stir in flour to make a roux. Gradually whisk in milk until smooth and thickened. Add cheddar and mozzarella cheese, stirring until melted. Season with salt, pepper, and paprika.
- Combine Everything: Mix cooked macaroni, beef mixture, and cheese sauce in a large bowl. Stir well to combine.
- Bake the Casserole: Transfer the mixture to a greased 9x13-inch baking dish. Sprinkle with remaining bacon and extra cheese on top.
- Bake: Bake at 350°F (175°C) for 20–25 minutes, until bubbly and golden.
- Serve: Garnish with sliced green onions and serve hot.
Notes
- Make Ahead: Prepare the casserole up to one day in advance and refrigerate. Bake before serving.
- Flavor Twist: Try using pepper jack cheese for a spicy kick or turkey bacon for a lighter version.
- Serving Suggestions: Pair with a crisp side salad or roasted veggies for a balanced meal.
- Storage Tips: Store leftovers in an airtight container in the refrigerator for up to 3 days. Reheat in the oven for best texture.
This casserole has become one of those recipes I make when I want dinner to feel like an event without actually spending hours in the kitchen. The combination of the homemade cheese sauce and the BBQ beef mixture is what makes it taste different from just dumping stuff into a pan — there's actual layering of flavor happening, and you can taste it. It's not a complicated dish, but it's a considered one.
I'm not going to pretend this is some traditional dish with roots in one cuisine — it's American comfort food through and through, and I say that as someone who grew up eating biryani. This is one of those recipes I learned entirely from cooking for my family in a Western kitchen, and it's become just as much a part of our regular rotation as anything I grew up with. If you're into this kind of hearty baked pasta, also check out my Million Dollar Spaghetti Squash Pasta for a lighter spin on a similar concept.
If you're planning a bigger spread — game night, a casual get-together, anything like



Comments
No Comments