
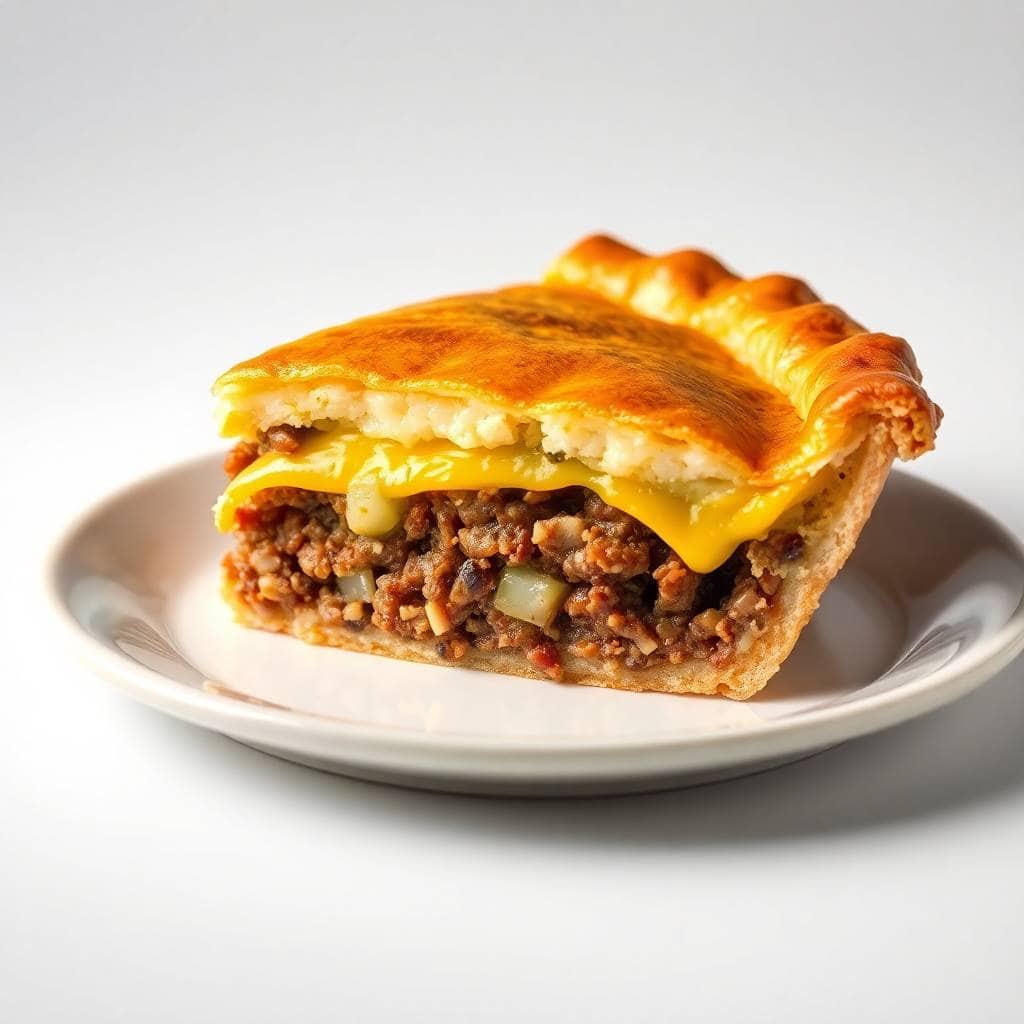
I first made this cheeseburger pie on a Thursday night when I had ground beef that needed to be used and absolutely zero energy to do anything complicated. I'd seen a version of it floating around and thought — pie crust in the freezer, beef in the fridge, cheese always — let's try it. What came out of the oven was this bubbling, golden, ridiculous dinner that my whole family went quiet over, which in my house means it's a win.
What makes this version work is the custard-style filling. It's not just meat dumped into a crust — the eggs, milk, and cream of mushroom soup bind everything together so it slices clean and holds its shape. The two-cheese combo of cheddar and mozzarella gives you that sharp flavor plus the gooey pull. I use a refrigerated pie crust from Walmart when I'm in a hurry, and honestly, nobody has ever complained.
My husband is the one who pushed me to add this to the regular rotation. He said it reminded him of a cheeseburger and a pot pie had a child, which is a strange way to describe dinner but also completely accurate. Saad ate two slices without being asked twice, which is saying something. I usually serve it alongside a simple salad — something like what I do with my Chili Verde nights where I want a hearty main and a light side to balance it out.
One thing I'll flag upfront: this pie needs to rest for at least 10 minutes after it comes out of the oven. I skipped that step the first time and the filling ran everywhere when I cut it. It still tasted fine but looked like a mess. Give it its resting time and it'll cut into actual clean slices like a proper pie.
Why You'll Love This Recipe
- It's a real dinner, not a snack: This pie is filling enough that you don't need to make three side dishes to keep everyone satisfied. The beef and double-cheese filling is substantial, and the crust adds enough body that even my husband — who usually wants rice with everything — was fine without it. One slice is genuinely enough for most people, which means a single pie gets us through dinner with leftovers for the next day.
- The custard filling is what sets it apart: A lot of cheeseburger pie recipes are just beef and cheese baked in a crust, and they turn out dry or crumbly. The eggs, milk, and cream of mushroom soup in this version create a filling that's almost quiche-like — it sets firmly but stays moist. It makes a huge difference in how it slices and how it reheats the next day.
- One dish, minimal cleanup: You brown the beef in a skillet, mix the filling in a bowl, pour it into the pie dish, and bake. That's it. I'm washing one skillet, one bowl, and a pie dish — and the pie dish barely needs scrubbing. On weeknights when I've already done homework battles and still need to get dinner on the table, this kind of recipe is the one I reach for.
- Leftovers reheat beautifully: I've had pies that turn into soggy disasters the next day. This one doesn't. I reheat slices in a 325°F oven for about 12 minutes and the crust crisps back up almost like it's fresh. Zainab actually prefers it the second day, slightly warmer than room temperature, with a little ketchup on the side.
- Works with pantry staples most people already have: Ground beef, eggs, milk, canned soup, shredded cheese, refrigerated pie crust — I can make this without a special grocery run. If you keep even basic pantry staples on hand, the only thing you might need to grab is the ground beef. Everything else is probably already in your kitchen.
Ingredients
- 1 lb ground beef (80/20 works best here)
- 1 small onion, finely chopped
- 1 cup shredded cheddar cheese
- 1 cup shredded mozzarella cheese
- 1 can (10.5 oz) cream of mushroom soup
- 3 large eggs
- 1 cup whole milk (2% works too)
- 1 refrigerated pie crust, or 1½ cups biscuit mix prepared per package (I use Pillsbury from Walmart)
- Salt and pepper, to taste
- Optional for serving: pickles, ketchup, or mustard
Directions
- Preheat the oven: Set your oven to 350°F (175°C) and grease a 9-inch pie dish. I use a little butter or cooking spray — either works. Getting the oven going first means it's fully up to temperature by the time you're ready to bake.
- Brown the beef and onion: In a skillet over medium heat, cook the ground beef and chopped onion together until the beef is fully browned and the onion has softened. Drain off the excess fat — don't skip this step or the filling will be greasy. Season with salt and pepper, then set it aside to cool slightly.
- Mix the filling: In a large bowl, whisk the 3 eggs and 1 cup of milk together until combined. Stir in the cream of mushroom soup, then fold in both cheeses and the cooked beef mixture. The soup is doing a lot of work here — it keeps everything moist and helps the filling set without going rubbery.
- Set up the crust: Press your pie crust into the bottom of the greased pie dish. If you're using biscuit mix, prepare it per the package directions and spread it evenly across the bottom — it will puff up and form a base as it bakes. You only need a bottom crust here; the filling becomes its own top layer as it bakes and browns.
- Pour in the filling: Carefully pour the beef and cheese mixture over the crust. Give the dish a gentle shake to even it out. It'll look very full — that's fine, it settles as it cooks.
- Bake: Bake for 35 to 40 minutes until the top is set and golden and a knife inserted in the center comes out clean. If the edges of the crust start browning too fast before the filling is done, loosely tent just the edges with a piece of foil.
- Rest before slicing: Let the pie sit for at least 10 minutes before cutting into it. I know it smells incredible and everyone is hovering — but this rest time is what lets the filling firm up enough to slice cleanly.

Tips for Success
- Drain the beef properly: I learned this the slightly greasy way — if you don't drain the fat well after browning, it pools in the filling and makes the whole thing oily. Tip the skillet and spoon out the fat, or transfer the beef with a slotted spoon to a paper towel for a minute. It takes 30 extra seconds and it matters.
- Don't skip the eggs: The eggs are what turn this from a casserole into a sliceable pie. They bind the filling so it holds together when you cut it. If you're out of eggs I genuinely don't have a workaround here — the texture won't be right without them. This is not a recipe where you can skip that ingredient.
- Let the beef cool before mixing in the eggs: If your beef is still steaming hot when you pour in the egg-milk mixture, you risk scrambling the eggs before the pie ever hits the oven. Just give the beef 5 minutes to cool down after draining — or mix the soup and cheese into the eggs first, then add the beef last.
- Use 80/20 ground beef, not extra lean: I've tried this with 93% lean beef thinking it would be healthier, and the filling was noticeably drier and less flavorful. The small amount of fat from 80/20 adds flavor and moisture to the filling. You drain off the excess anyway, so you're not eating as much of it as you'd think.
- Cover the crust edges if needed: If your crust edges are getting dark before the 35-minute mark, fold small strips of foil over just the rim. I've found this happens more often with thinner store-bought crusts. The filling takes the full bake time to set, so protecting the crust edges partway through makes a real difference.
Variations
- Add pickles and mustard to the filling: Stir ½ cup of chopped dill pickles into the beef mixture before adding the custard — this is the version that actually tastes most like a real cheeseburger. A teaspoon of yellow mustard in the filling works too. My husband does this every single time and I'll admit it's genuinely better with the pickles in.
- Swap in ground turkey: This works well if you want a lighter version. Use ground turkey in place of beef — the filling will be a little less rich but still flavorful, especially if you season it well with Worcestershire sauce and garlic powder. I'd go with 93% lean turkey rather than extra lean so it doesn't dry out.
- Pepper jack for heat: Swap the mozzarella for pepper jack and you get a subtle kick that runs through every bite. This is actually my preferred version when I'm making it just for the adults — the kids don't love the spice, but my husband always asks for it this way. Monterey jack also works if you want the meltiness without the heat.
- Biscuit crust base: If you don't have a pie crust on hand, use 1½ cups of biscuit mix (Bisquick works, so does the Aldi version) prepared per the package, spread into the bottom of the dish. It bakes up fluffy and slightly rustic rather than crisp and flaky, which is a different texture but still really good. This is actually closer to the original Pioneer Woman version of this type of recipe.
- Add diced bell peppers or mushrooms: Sauté ½ cup of diced green bell pepper or sliced mushrooms with the onion before adding the beef. It bulks up the filling and adds another layer of flavor. If you're cooking for people who pick around vegetables, I won't tell you to add them — but if your family is fine with it, it's a nice addition and stretches the pie a little further.
Serving and Storage
Serving
Slice the pie into 6 wedges and serve warm. I usually put a small bowl of pickles and ketchup on the table and let everyone add their own — it keeps the cheeseburger vibe going. A simple green salad on the side is all you need; the pie is filling enough that you don't need a starchy side. If you're serving this at a gathering, you can cut it into smaller wedges and serve it as a more substantial appetizer alongside something like Smoked Salmon Deviled Eggs for a spread that covers different tastes.
Storage
Let the pie cool completely before covering. Store leftovers in an airtight container in the fridge for up to 3 days. To reheat, put slices in a 325°F oven for 10 to 12 minutes — this keeps the crust from going soggy, which microwaving will definitely do. If you want to freeze it, bake the pie fully, cool it completely, wrap it tightly in plastic wrap and then foil, and freeze for up to 2 months. Thaw overnight in the fridge before reheating in the oven.

Frequently Asked Questions
Can I assemble this pie ahead of time?
Yes, and it actually works really well as a make-ahead meal. Assemble the whole thing — crust in the dish, filling poured in — then cover it with plastic wrap and refrigerate for up to 24 hours before baking. When you're ready to bake, pull it out of the fridge while the oven preheats and add about 5 extra minutes to the bake time since it's starting cold.
Can I freeze cheeseburger pie?
Yes. Bake it fully, let it cool completely, then wrap it tightly in plastic wrap followed by foil. It keeps in the freezer for up to 2 months. Thaw overnight in the fridge, then reheat in a 325°F oven until warmed through, about 20 minutes. I wouldn't freeze it unbaked — the custard filling doesn't thaw as well that way.
What can I serve with cheeseburger pie?
A simple green salad is the easiest option and it balances the richness of the pie well. Steamed broccoli or roasted vegetables work too. If you want to lean fully into the cheeseburger theme, serve it with oven-baked fries and pickles on the side — Zainab always votes for this option when she gets to choose.
Can I use cream of chicken soup instead of cream of mushroom?
Yes, that swap works fine. Cream of chicken gives a slightly lighter flavor; cream of mushroom has a little more earthiness. I've used both depending on what's in my pantry, and the texture of the filling is the same either way. If you're not a fan of condensed soups at all, you can substitute ¾ cup of sour cream instead — the pie will be tangier but still holds together.
How do I know when the pie is done?
The top should be golden and the center should not jiggle when you gently shake the dish. You can also insert a thin knife or toothpick into the center — if it comes out clean or with just a few moist crumbs, it's done. If the edges of the crust are getting very dark before the center is set, tent just the edges with foil and keep baking.

PIONEER WOMAN CHEESEBURGER PIE
Ingredients
- 1 lb ground beef
- 1 small onion finely chopped
- 1 cup shredded cheddar cheese
- 1 cup shredded mozzarella cheese
- 1 can 10.5 oz cream of mushroom soup
- 3 large eggs
- 1 cup milk
- 1 refrigerated pie crust or 1 ½ cups biscuit mix
- Salt and pepper to taste
- Optional: pickles or ketchup for serving
Instructions
Preheat Oven:
- Preheat oven to 350°F (175°C). Grease a 9-inch pie dish.
Cook Beef:
- In a skillet, cook ground beef and onion over medium heat until beef is browned and onion is soft. Drain excess fat. Season with salt and pepper.
Prepare Filling:
- In a bowl, whisk eggs and milk. Stir in cream of mushroom soup, cheddar, mozzarella, and cooked beef mixture.
Assemble Pie:
- Place pie crust or biscuit mix in the bottom of the pie dish. Pour the filling over it.
Bake:
- Bake for 35–40 minutes until set and golden on top.
Serve:
- Let cool slightly before slicing. Serve with pickles or ketchup if desired.
Notes
- Make Ahead: Assemble in advance and refrigerate before baking.
- Variations: Add diced bell peppers or use different cheese blends.
- Serving Suggestions: Serve with a fresh salad or steamed veggies.
- Allergy-Friendly: Contains dairy and eggs; use gluten-free crust for GF version.
This cheeseburger pie has become one of those dinners I keep in my back pocket for weeks when I need something reliable. It doesn't require anything special — no unusual ingredients, no equipment you don't already own, no technique that takes practice. You brown some beef, mix a filling, pour it into a crust, and bake it. That's genuinely the whole thing.
I'm not going to pretend it's the most sophisticated thing I make. It's not. But it's the kind of dinner that gets eaten completely, with people going back for the last slice, and that matters more to me than sophisticated. If you're looking for something to bring to a potluck or a neighbor's house, this travels well and feeds more people than you'd expect from a single pie dish. Pair it with something like Air Fryer Million Dollar Ravioli Bites as an appetizer and you've got a spread that covers everyone.
If you make it and you try the pickle variation — please do it. My husband was right about that one and I will reluctantly admit it. Start with the base recipe the first time, then the second time add the pickles into the filling. It's a different pie entirely in the best way. 🥧❤️
If you liked this, here are a few more recipes from my kitchen you might want to try next:
- Chili Verde — another hearty, deeply savory dinner that's just as easy to throw together on a weeknight
- Smoked Salmon Deviled Eggs — great for when you need a starter or party bite that looks fancier than the effort required
- Air Fryer Million Dollar Ravioli Bites — crispy, cheesy, gone in minutes at any gathering
- Homemade Chocolate Turtles — for when you want something sweet after a savory dinner like this one
- Cherry Limeade Cupcakes — my kids request these constantly,





Comments
No Comments