
Zainab asked me to make decorated sugar cookies for her school's Eid party, and that's when I realized I'd never written down my icing recipe. I'd been making it by feel for years — a little of this, a little of that — and every time someone asked me how I did it, I just shrugged. So I finally sat down and measured everything properly.
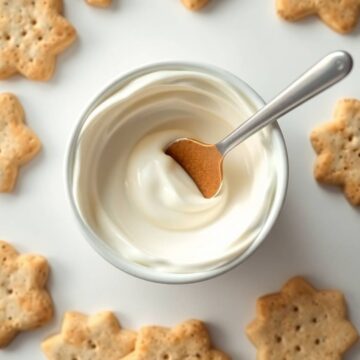
This is a royal-style cookie icing made with meringue powder, not raw egg whites, which means it's safe for kids and holds up better in warm kitchens. It dries to that firm, glossy finish you see on decorated cookies at bakeries — the kind where the design stays sharp even when you stack them. I've tried versions with just powdered sugar and milk before, and while those work in a pinch, this meringue powder version gives you a much more reliable set, especially if you're piping detailed designs.
We make decorated cookies a few times a year — Eid, Christmas (my husband's side of the family celebrates), and sometimes just because Zainab is in the mood for a project. This icing has become my go-to for all of it. If you're also looking for something to bake and decorate together, my Easy Strawberry Cake is another fun one to make with kids — though it requires a lot less precision than cookie decorating.
One thing I want to set expectations on: the drying time is real. Six to twelve hours is not an exaggeration. I once tried to pack cookies after four hours and the icing stuck to the wax paper and ruined half the batch. Give it the full time, especially if your kitchen is humid. Set them out before bed and they'll be ready in the morning.

Why You'll Love This Recipe
- It actually sets firm: This isn't the kind of icing that stays sticky or smears when you touch it. Once it dries fully, you can stack the cookies with wax paper between them and they travel without ruining the design. I've packed these in little gift boxes for Eid and they hold up perfectly.
- You can adjust the thickness easily: The same batch of icing can outline and flood — you just adjust how much water you add. Keep it thick for borders, thin it slightly for filling in. I use two separate bowls and adjust each one separately so I'm not constantly fiddling mid-session.
- Meringue powder means no raw eggs: This matters to me because Zainab is the one usually elbow-deep in the decorating process. Meringue powder gives you the same structure as egg whites without any food safety concerns. You can find it at Walmart, Michael's, or any baking aisle — it's usually near the cake decorating supplies.
- It takes color well: Gel food coloring works beautifully here and doesn't mess with the consistency the way liquid dye can. I split one batch into four small bowls and color each one differently. You can get really vibrant shades without adding much at all.
- Make it ahead and store it: I make this the night before a decorating session and keep it in the fridge in a sealed container. The next day I give it a quick whisk and it's ready to go. For holiday prep when I'm making multiple batches of cookies, this is a lifesaver.
Ingredients
- 2 cups powdered sugar, sifted
- 2 tablespoons meringue powder
- 4 tablespoons warm water
- ½ teaspoon vanilla extract (optional)
- Gel food coloring (optional)
Directions
- Step 1: Combine the dry ingredients — In a large bowl, whisk together the sifted powdered sugar and meringue powder until combined. Sifting the powdered sugar first matters here — any lumps will clog your piping bag or leave bumpy patches in the icing.
- Step 2: Add water and vanilla — Gradually pour in the warm water and vanilla extract while stirring. Start with 3 tablespoons of water and hold the last one back — you can always add more, but you can't take it away once it's in.
- Step 3: Beat until glossy — Using a hand mixer (or a stand mixer if you have one), beat on high speed for 5 to 7 minutes until the icing forms stiff peaks and turns glossy. This is what gives the icing its structure — don't skip this step or cut it short.
- Step 4: Adjust the consistency — Check the thickness. For outlining, it should hold its shape when you lift the beater. For flooding (filling in large areas), add water a few drops at a time until it's slightly looser. I keep two small bowls — one thick, one thinned — for a single decorating session.
- Step 5: Color the icing — Divide the icing into as many small bowls as you need colors. Add a toothpick-tip's worth of gel food coloring to each and stir until fully incorporated. Gel coloring is much more concentrated than liquid, so start with less than you think you need.
- Step 6: Decorate and dry — Transfer icing into piping bags or small zip-top bags with a corner snipped off. Decorate your cookies, then leave them uncovered at room temperature for at least 6 to 12 hours. Don't cover them while they're drying — trapped moisture will prevent the icing from setting properly.

Tips for Success
- Beat it long enough: The first time I made this, I stopped at three minutes because it looked done. It wasn't. The icing was grainy and didn't set smoothly on the cookies. The full 5 to 7 minutes of beating is what creates the glossy, smooth texture. Set a timer and don't rush it.
- Keep bowls covered while you work: Royal icing starts crusting the moment it's exposed to air. If you leave a bowl uncovered while you're busy decorating another cookie, the top will skin over and when you stir it back in, you get lumps in your icing. I keep plastic wrap pressed directly on the surface of each bowl I'm not actively using.
- Use gel food coloring, not liquid: Liquid food coloring adds moisture and throws off your consistency, especially when you're trying to keep the outlining icing stiff. Gel coloring from brands like Wilton or AmeriColor gives you intense color with just a tiny amount — you don't need much at all.
- Outline before you flood: Always pipe a border around the edge of the cookie first with your thicker icing and let it set for a few minutes. That border acts as a dam so the thinner flooding icing doesn't run off the edges. This is the technique that makes decorated cookies look bakery-clean instead of sloppy.
- Sift your powdered sugar: It seems like an extra step, but if your powdered sugar has any clumps, they'll clog a small piping tip mid-cookie and you'll lose your mind. I've been there. Two minutes of sifting upfront saves a lot of frustration later. A fine-mesh strainer over the bowl works perfectly — you don't need a fancy sifter.
Variations
- Almond extract instead of vanilla: Swap the vanilla for ½ teaspoon of almond extract and the icing takes on this warm, slightly nutty aroma that pairs really well with classic sugar cookies. It's a small change but it makes the cookies taste like they came from a bakery. My husband actually prefers this version.
- Lemon or orange extract: Add a drop or two of lemon or orange extract in place of vanilla for something brighter and more citrusy. This works especially well for spring-shaped cookies — flowers, butterflies, Easter eggs. It pairs nicely with lemon sugar cookie dough too.
- Chocolate icing: Sift 1 tablespoon of unsweetened cocoa powder in with your powdered sugar before mixing. The icing comes out a deep brown and tastes genuinely chocolatey. It's great for decorating cookies that are meant to look like chocolate — or just as a contrast color when you're doing two-tone designs.
- Maple glaze: Replace the vanilla with ¼ teaspoon of maple extract for a warm, cozy flavor that works well on fall-themed cookies — leaves, pumpkins, acorns. It's not overpowering, just a gentle warmth underneath the sweetness.
- Edible glitter finish: While the icing is still wet, dust edible glitter or luster dust over the surface with a dry brush. The glitter adheres as the icing dries and gives you a sparkly, metallic effect without much effort. Zainab is obsessed with this version — every cookie becomes a "princess cookie" in her words. If you're planning a big cookie decorating activity day, this pairs well with something like homemade modeling clay for the kids to use between decorating rounds.
Serving and Storage
Serving
These cookies need to be fully dry before you serve or pack them — that means the full 6 to 12 hours, not a hopeful four. Once dry, the icing is firm enough that you can handle the cookies without leaving fingerprints in the design. I serve them on a plate for parties or layer them in a box lined with wax paper for gifting. They look genuinely impressive with almost no effort once you get the hang of the outlining-and-flooding technique.
Storage
Leftover icing keeps in an airtight container in the fridge for up to one week. Press plastic wrap directly against the surface of the icing before sealing the lid — this stops a hard crust from forming on top. When you're ready to use it again, take it out of the fridge, let it come to room temperature for about 20 minutes, then whisk or beat briefly to restore the consistency. Fully decorated and dried cookies can be stored at room temperature in an airtight container for up to a week, or frozen for up to a month with layers of wax paper between them.

Frequently Asked Questions
Can I make this icing ahead of time?
Yes, and honestly I recommend it. Make the icing the night before, press plastic wrap against the surface, seal it in an airtight container, and refrigerate. The next day, let it sit out for 20 minutes, then give it a quick beat with a hand mixer or vigorous stir to bring it back together. The consistency holds well for up to a week in the fridge.
How long does the icing take to dry completely?
Plan for 6 to 12 hours at room temperature. Humidity in your kitchen and how thick you applied the icing both affect the timing. If you're in a rush, a small fan blowing gently over the cookies can speed things up. I usually decorate in the evening and leave them out overnight — they're always ready by morning.
Can I freeze decorated cookies?
Yes, but only once the icing is fully dry. Layer the cookies in an airtight container with wax paper between each layer and freeze for up to one month. To thaw, take them out and let them come to room temperature still inside the container — this prevents condensation from forming directly on the icing, which can make it tacky or spotty.
What's the difference between outlining icing and flooding icing?
It's the same icing, just different consistency. Outlining icing is thicker — it holds a clean line when piped and doesn't spread. Flooding icing has a bit more water added so it flows and fills in large areas smoothly. The trick is to outline the border first with thick icing, let it set for a few minutes, then flood the inside with the thinner version. The border acts as a wall that keeps the flood icing from running off the cookie.
Can I use water instead of milk in this icing?
This particular recipe already uses water as the liquid, so you're set. Some simpler cookie icing recipes use milk instead of meringue powder, and in those, water works as a substitute — though milk gives a slightly smoother result. For this meringue powder version, stick with warm water for best results.
COOKIE ICING RECIPE
Ingredients
- 2 cups powdered sugar sifted
- 2 tablespoons meringue powder
- 4 tablespoons warm water
- ½ teaspoon vanilla extract optional
- Food coloring optional
Instructions
Combine Ingredients:
- In a large bowl, mix powdered sugar and meringue powder.
Add Water and Vanilla:
- Gradually add warm water and vanilla extract while stirring.
Beat the Icing:
- Using an electric mixer, beat on high speed for 5-7 minutes until stiff peaks form and icing is glossy.
Adjust Consistency:
- If icing is too thick, add a few drops of water. If too thin, add more powdered sugar.
Color (Optional):
- Divide icing into small bowls and add food coloring as desired.
Use Immediately:
- Use icing to decorate cookies, then allow to dry completely for several hours.
Notes
- Storage: Keep icing covered with plastic wrap to prevent drying out.
- Tip: For flood icing, thin with a little more water; for outlining, keep icing thicker.
- Make Ahead: Icing can be stored in an airtight container for up to one week.
- Allergy Note: Meringue powder is egg-free; check packaging if allergic.
Cookie decorating is one of those activities that sounds like it should be complicated but really isn't once you understand the icing consistency. The outlining-and-flooding technique takes maybe two practice cookies to get right, and after that it's genuinely fun — not stressful. I've done this with Zainab on school holidays and she's better at the detail work than I am now.
The meringue powder version of this icing is worth it over the simple powdered-sugar-and-milk version if you're planning to give the cookies as gifts or if they need to survive any kind of travel or stacking. The set is firm, the gloss is real, and the colors stay vibrant. I've made batches during Eid prep where I was decorating four dozen cookies over two days, and the icing held well in the fridge the whole time.
If you're planning a baking day, you could pair these cookies with my Easy Strawberry Cake — that's another recipe that looks like it took more effort than it did. And if the kids are going to be involved in the kitchen all afternoon, the homemade modeling clay is a good way to keep them busy while the icing dries.
Give this a try the next time you have a batch of sugar cookies waiting to be decorated. Once you get the consistency right, you'll use this icing every time. 🍪✨
If you liked this recipe, you might also want to try these:
- Easy Strawberry Cake — a simple, crowd-friendly cake that decorates beautifully for any occasion
- Homemade Modeling Clay — a great kids' activity to pair with a cookie decorating day
- Banana Chocolate Peanut Butter Pie with Nutty Crust (No-Bake) — when you want something impressive without turning on the oven
- Baked Ham with Pineapple and Brown Sugar Glaze — if you're planning a holiday spread to go alongside your decorated cookie platters





Comments
No Comments