
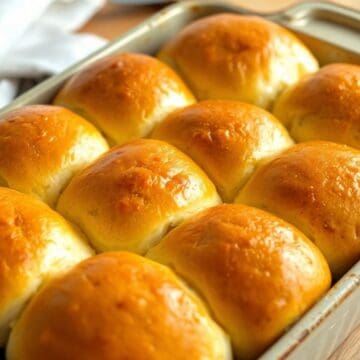
I made these eggless dinner rolls for the first time on a Friday evening when I realized I had no eggs and my kids were already asking when dinner would be ready. I figured a no-egg dough would turn out dense and sad — the kind of roll nobody reaches for a second time. I was completely wrong. They came out soft, pillowy, and golden, and Zainab kept pulling pieces off the pan before I could even get them to the table.
What makes this recipe work is the combination of warm milk and melted butter in the dough. The milk gives the rolls a slight richness, and the butter keeps the crumb tender even after they cool. I don't use a stand mixer — I knead by hand on a floured counter, and the dough comes together beautifully in about 10 minutes. The yeast does most of the actual work; your job is mostly just waiting.
These have become my go-to when I'm serving something saucy and hearty. They're wonderful alongside my Easy Taco Soup — the rolls soak up the broth in the most satisfying way. My husband tears them in half and dunks them in whatever bowl is in front of him. Saad just eats them plain with a slick of butter, which honestly I also understand.
One thing worth knowing before you start: yeast bread takes time. Not active time — most of it is just waiting for the dough to rise. I usually start the dough in the afternoon and bake before dinner. If you're a first-time bread baker, this is actually a forgiving recipe to begin with. The dough is soft and easy to handle, and even if your rolls aren't perfectly round, they taste just as good.

Why You'll Love This Recipe
- No eggs required: I know that sounds obvious given the name, but it actually matters — this isn't a recipe that "works without eggs," it's one that was developed without them from the start. The texture doesn't suffer. The rolls are just as soft and light as any egg-enriched dinner roll I've made. If you're cooking for someone with an egg allergy, you can serve these without hesitation.
- Pantry ingredients only: Flour, sugar, salt, yeast, milk, butter, oil — that's genuinely it. Nothing specialty, nothing you need to hunt down. I've made these on a completely ordinary grocery run. If you live somewhere without a South Asian grocery store nearby, this recipe doesn't ask you to go looking for one.
- No stand mixer needed: I knead this dough by hand every single time. It takes about 10 minutes on a floured counter and the dough ends up smooth and elastic without any machine. If you do have a stand mixer with a dough hook, it cuts that time to about 6 minutes — but I promise the hand-kneaded version is just as good.
- Make-ahead friendly: You can prepare the dough the night before and let it do its first rise in the fridge overnight. In the morning, pull it out, let it come to room temperature for about 30 minutes, shape the rolls, and do the second rise before baking. I've done this before holiday meals and it saves so much stress on the day itself.
- Genuinely versatile: I serve these with soups and stews, with pasta, alongside roasted chicken, and sometimes just warm out of the oven with jam. They work at a weeknight dinner and they work at a holiday table. I've also used day-old rolls to make little sandwiches for the kids' lunchboxes — they hold up well.
Ingredients
- 3 ½ cups all-purpose flour
- 1 packet (2 ¼ teaspoons) active dry yeast
- ¼ cup sugar
- 1 teaspoon salt
- ¾ cup warm milk (around 110°F — dairy or plant-based both work)
- ½ cup warm water (also around 110°F)
- ¼ cup unsalted butter, melted
- 2 tablespoons vegetable oil
- Extra melted butter for brushing after baking
Directions
- Activate the yeast: In a small bowl, combine the warm water, warm milk, sugar, and yeast. Stir gently and let it sit for 5–10 minutes. You're looking for a frothy, foamy top — that tells you the yeast is alive and working. If nothing happens after 10 minutes, your yeast may be old or your water was too hot; start fresh before proceeding.
- Mix the dry ingredients: In a large mixing bowl, whisk together the flour and salt. Make a well in the center — this just makes it easier to bring the dough together when you add the wet ingredients.
- Form the dough: Pour the yeast mixture, melted butter, and oil into the flour. Stir with a wooden spoon until a shaggy dough forms, then use your hands to bring it together into a rough ball. It'll look messy at first — that's fine.
- Knead the dough: Turn the dough out onto a lightly floured surface and knead for 8–10 minutes until it's smooth, soft, and springs back when you poke it. If you're using a stand mixer with a dough hook, 5–6 minutes on medium speed works. The dough shouldn't be sticky — add a little flour a tablespoon at a time if it's clinging to your hands.
- First rise: Shape the dough into a ball and place it in a lightly greased bowl. Cover with a damp cloth or plastic wrap and set it somewhere warm for 1–2 hours, until it's doubled in size. I put mine in the oven with just the light on — the gentle warmth is perfect.
- Shape the rolls: Punch the dough down to release the air. Divide it into 12 equal portions (I use a kitchen scale to keep them even, but eyeballing works too). Roll each piece into a smooth ball by cupping your hand over it and using circular pressure on the counter. Place them in a greased 9x13 baking dish with a little space between each roll.
- Second rise: Cover the shaped rolls with a damp cloth and let them rise for 30–45 minutes until they look puffy and have grown into each other slightly. Don't skip this step — it's what gives the rolls their soft, pull-apart texture.
- Bake: Preheat the oven to 375°F (190°C). Bake the rolls for 20–25 minutes, until the tops are golden brown. Every oven is different — start checking at 18 minutes.
- Brush with butter: Pull them out of the oven and immediately brush the tops generously with melted butter. This softens the crust slightly and gives them that glossy, bakery-style finish. Serve warm.

Tips for Success
- Check your liquid temperature: The first time I made these I used water that was too hot — I could tell because the yeast never foamed up. Anything above 115°F kills the yeast. I now use a simple instant-read thermometer I got for about $10 at Walmart, and I haven't had a failed activation since. If you don't have one, the liquid should feel warm on your wrist, not hot.
- Don't skip the second rise: I rushed this once when I was short on time and the rolls came out dense and a bit tough. Those 30–45 minutes of the second rise are when the gluten relaxes and the rolls develop their signature soft interior. Set a timer and go do something else — it's worth the wait.
- Knead until actually smooth: It can be tempting to stop kneading early when your arms get tired, but under-kneaded dough produces rolls with an uneven, slightly gummy crumb. You want the dough to pass the windowpane test — stretch a small piece between your fingers and it should stretch thin enough to see light through without tearing. That's when you know the gluten is properly developed.
- Brush butter immediately: The moment the rolls come out of the oven is when the butter matters most. The heat from the bread melts it in and softens the top crust while everything is still hot. If you wait until the rolls cool, the butter just sits on top instead of absorbing in. I keep a small bowl of melted butter ready right next to the oven.
- Use plant-based milk if needed: Oat milk and soy milk both work well here — I've tested both. Almond milk works too but gives the rolls a very slightly thinner crumb, which is still perfectly acceptable. Use the same quantity and temperature as you would dairy milk. This makes the recipe fully vegan if you swap the butter for a plant-based alternative.
Variations
- Garlic herb rolls: Add 1 teaspoon of garlic powder and 1 teaspoon of dried Italian herbs (or just dried rosemary) to the flour before mixing. Then brush the finished rolls with garlic butter instead of plain melted butter. These are the ones I make when we're having my Chicken in Basil Cream Sauce — the garlic in the rolls echoes the herbs in the sauce and the whole meal just clicks.
- Sweet honey rolls: Reduce the sugar to 2 tablespoons and stir 2 tablespoons of honey into the warm milk before adding it to the dough. The honey gives the rolls a gentle sweetness and makes the crust go beautifully golden. These are great for breakfast with jam or served alongside a holiday brunch spread.
- Cheesy rolls: Fold ½ cup of shredded sharp cheddar into the dough after kneading, and sprinkle another small handful on top of the rolls just before baking. The cheese melts into golden, slightly crispy patches on top and gets stringy inside. Saad goes absolutely wild for these.
- Whole wheat version: Replace 1 cup of the all-purpose flour with whole wheat flour. The rolls will be slightly denser and have a nuttier flavor, but they still rise well. Don't go beyond half-and-half or they become quite heavy. I make these when I want something a little more filling to go with a big pot of Chili Verde.
- Pakistani-style desi rolls: This is not traditional, but it works: add ½ teaspoon of nigella seeds (kalonji) and ½ teaspoon of sesame seeds to the dough, and sprinkle more seeds on top before baking. The nigella seeds give the rolls a subtle savory bite that goes beautifully with curry or daal. In Pakistan we'd serve bread like this alongside a lentil dish — these rolls do the same job.
Serving and Storage
Serving
Serve these rolls warm — that's when they're at their best. I put the whole baking dish on the table and let everyone pull their own. They go with almost any meal: alongside a bowl of soup, next to roasted chicken, or with a big pot of something saucy. If I'm serving a crowd, I'll double the batch because 12 rolls disappears faster than I expect. They're also surprisingly good the next morning toasted with butter and a little jam.
Storage
Store leftover rolls in an airtight container at room temperature for up to 3 days. To reheat, wrap them in a damp paper towel and microwave for 15–20 seconds — they come back soft and warm. For longer storage, wrap each roll individually in plastic wrap and freeze in a zip-lock bag for up to 2 months. Thaw at room temperature for a couple of hours, then warm in the oven at 300°F for about 8 minutes before serving.
Frequently Asked Questions
Can I make the dough the night before?
Yes, and I actually recommend it for busy days. After kneading, place the dough in a greased bowl, cover tightly with plastic wrap, and refrigerate overnight. The cold slows the yeast down and gives you a slow first rise that actually develops more flavor. The next day, let the dough sit at room temperature for 30–45 minutes before shaping, then proceed with the second rise and baking as normal.
Why didn't my rolls rise properly?
Nine times out of ten it's the yeast. Either it's expired, or the liquid was too hot and killed it before it got started. Always check the expiration date on your yeast packet, and make sure your water and milk are around 110°F — warm but not hot. If the yeast doesn't foam up in 5–10 minutes during activation, throw it out and start with a fresh packet before mixing the dough.
Can I use plant-based milk instead of dairy milk?
Absolutely. Oat milk and soy milk work best — they're closest to dairy milk in fat content and the rolls come out just as soft. Almond milk works too but produces a very slightly thinner crumb. Use the same quantity at the same temperature. If you also swap the butter for a plant-based alternative, the rolls are fully vegan.
How do I keep the rolls soft after baking?
Two things help: brush them with butter the moment they come out of the oven, and cover the pan with a clean kitchen towel for the first 10 minutes while they rest. The steam trapped under the towel keeps the crust soft. If your rolls do firm up while cooling, a quick 15-second zap in the microwave wrapped in a damp paper towel brings them right back.
Can I freeze these rolls?
Yes, they freeze really well. Let them cool completely first, then wrap each roll individually in plastic wrap and store them in a freezer bag. They keep well for up to 2 months. To serve, thaw at room temperature for a couple of hours and warm in a 300°F oven for about 8 minutes. They taste almost exactly like they came fresh out of the oven.
TASTY EGGLESS DINNER ROLLS RECIPE
Ingredients
- 3 ½ cups all-purpose flour
- 1 packet (2 ¼ tsp) active dry yeast
- ¼ cup sugar
- 1 teaspoon salt
- ¾ cup warm milk
- ½ cup warm water
- ¼ cup unsalted butter, melted
- 2 tablespoon vegetable oil
Instructions
- Activate Yeast:In a bowl, combine warm water, warm milk, sugar, and yeast. Let it sit for 5-10 minutes until frothy.
- Prepare Dough: In a large bowl, mix flour and salt. Add the yeast mixture, melted butter, and oil. Knead until a soft dough forms (about 8-10 minutes).
- Let Dough Rise: Place the dough in a greased bowl, cover, and let it rise for 1-2 hours or until doubled in size.
- Shape Rolls: Punch down the dough, divide it into 12 equal portions, and shape into balls. Place on a greased baking tray. Cover and let rise for 30 minutes.
- Bake: Preheat the oven to 375°F (190°C). Bake for 20-25 minutes, or until the tops are golden brown.
- Serve: Brush with melted butter while warm for a soft and shiny finish.
Notes
- Make Ahead: Prepare the dough ahead of time, let it rise, then refrigerate overnight. Bring to room temperature before baking.
- Customizing the Flavor: For a sweet variation, mix in 2 tablespoon of honey. Add garlic powder or dried herbs for a savory twist.
- Serving Suggestions: Serve warm with butter, jam, or as a side with soups, stews, or holiday meals.
- Storage Tips: Store in an airtight container at room temperature for up to 3 days or freeze for up to 2 months.
I've made a lot of dinner rolls over the years, and honestly this eggless version is the one I come back to most often. Partly because I almost always have the ingredients on hand, and partly because the result is so consistently good that I stopped second-guessing the recipe after the second time I made it. There's something really satisfying about pulling a pan of golden rolls out of the oven — the smell alone makes the whole house feel like dinner is something special.
If you're serving these with something hearty and saucy, my Crockpot Bourbon Chicken is a combination I keep coming back to. The sweet-savory sauce from the chicken is exactly what these rolls were made to soak up. They also work beautifully alongside a big pot of Easy Taco Soup — that's become a Friday night pairing in our house.
If you try these, I genuinely hope your kitchen smells as good as mine does when they come out of the oven. Bread baking has a way of making an ordinary evening feel like something worth sitting down for. 🍞🧈✨
If you liked this recipe, here are a few more from the site you might enjoy:
- Mountain Dew Biscuits — another quick bread that requires almost no effort and tastes way better than it has any right to
- Crockpot Bourbon Chicken — the saucy main dish these rolls were born to accompany
- Easy Taco Soup — a weeknight staple that pairs perfectly with warm bread on the side
- Chicken in Basil Cream Sauce — serve with the garlic herb roll variation and thank yourself later
- Chili Verde — hearty, deeply flavored, and exactly the kind of thing you want a soft roll to soak up





Comments
No Comments