
These Melted Snowman Biscuits are a whimsical and festive treat that will bring smiles to your holiday table. They start with a simple biscuit base—soft, buttery, and lightly sweetened. These are a hit with kids and adults alike.
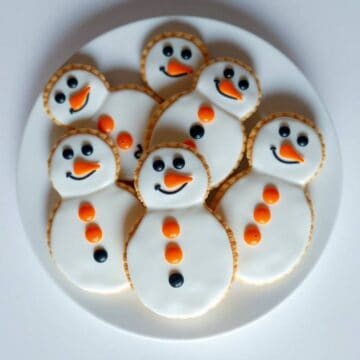
What makes them extra special is the adorable snowman decoration on top. With melted white chocolate or icing to mimic melting snow, marshmallow heads, and candy faces, they look like snowmen caught in the sun.
Each biscuit is an edible piece of art that doesn’t require professional decorating skills—just a bit of imagination. The process of decorating is part of the fun, making these biscuits a great holiday activity to do with family or friends.
You can customize the decorations with different sweets and colours, which makes each snowman unique. These are great for school events, cookie swaps, or as a fun dessert for your christmas dinner. They're cute, easy, and so much fun to make!
They store well, taste fantastic, and bring holiday cheer wherever they go. Whether you're baking for your kids or gifting holiday treats, these Melted Snowman Biscuits are guaranteed to delight.

WHY YOU WILL LOVE THIS RECIPE
- Festive and Fun Design: These biscuits look like adorable melted snowmen and add a creative twist to your holiday dessert table.
- Kid-Friendly Activity: Perfect for kids to decorate—great for Christmas parties, school events, or family baking afternoons during winter break.
- Customisable Decorations: Use various candies for scarves, noses, and eyes, making each snowman look different and adding personality.
- Simple Biscuit Base: The buttery biscuit is easy to make, delicious, and pairs well with the sweet decorations on top.
- Crowd-Pleasing Treat: Everyone from toddlers to adults will love the cute appearance and sweet, satisfying flavour of these biscuits.
- No Fancy Tools Required: You don't need any piping bags or special tools—just basic ingredients and a creative spirit to decorate.
- Perfect for Gifting: Wrapped in a festive box or tin, these biscuits make delightful homemade gifts for neighbours, teachers, and friends.
INGREDIENTS
- 2 cups all-purpose flour
- ½ cup unsalted butter, softened
- ½ cup granulated sugar
- 1 large egg
- 1 teaspoon vanilla extract
- 1 teaspoon baking powder
- ¼ teaspoon salt
- 1½ cups white chocolate or royal icing (for the melted effect)
- Large marshmallows (one per biscuit)
- Black edible marker or chocolate chips (for eyes and buttons)
- Orange sprinkles or mini M&M’s (for the noses)
- Licorice strings or sour strips (for scarves)
DIRECTIONS
- Step No.1: Make the biscuit dough
Cream together butter and sugar until light and fluffy. Beat in the egg and vanilla. In a separate bowl, whisk flour, baking powder, and salt. Combine wet and dry ingredients to form a dough.
- Step No.2: Chill and cut the dough
Wrap the dough in plastic and chill for 30 minutes. Roll out to ¼ inch thick and cut into circles using a cookie cutter or glass.
- Step No.3: Bake the biscuits
Preheat the oven to 350°F (175°C). Place circles on a parchment-lined tray and bake for 10–12 minutes until just golden. Cool completely.
- Step No.4: Prepare the melted snow effect
Melt white chocolate or prepare royal icing. Spoon it over the centre of each biscuit, letting it drip off the sides to mimic melting snow.
- Step No.5: Make the snowman heads
Place one marshmallow on top of each biscuit. Draw eyes and mouth with edible marker or use mini chocolate chips. Stick on an orange sprinkle for the nose.
- Step No.6: Add scarves and buttons
Use licorice or sour candy strips to wrap around the marshmallow base as a scarf. Add buttons with tiny candies or chocolate chips.
- Step No.7: Let set and serve
Allow icing or chocolate to fully set before serving or packing. Store in an airtight container at room temperature.

TIPS FOR SUCCESS
- Let Biscuits Cool Completely: Ensure the biscuits are fully cool before decorating, so icing or chocolate doesn’t melt further.
- Use Edible Markers for Details: Edible ink markers make drawing snowman faces simple and clean without extra mess.
- Don't Overbake: Light golden edges are ideal—overbaking will make them too hard and ruin the soft, buttery texture.
- Assemble Right Before Serving: If you're using soft candy decorations, assemble close to serving to prevent them from melting or getting soggy.
- Store in Single Layers: Use wax paper between biscuit layers in containers to avoid smudging your decorated snowmen.
- Add a Personal Touch: Personalise each snowman with names, hats, or funny expressions to delight kids and guests.
VARIATIONS
- Chocolate Base Biscuits: Use cocoa powder in the biscuit dough to make chocolate-flavoured snowman bases for a richer twist.
- gluten-free diet Option: Substitute with a gluten-free flour blend for biscuits everyone can enjoy at your festive gatherings.
- Add Flavour Extracts: Try almond, peppermint, or orange extract in the dough or icing to add unique seasonal flavours.
- Use Coloured Icing: Dye the “melting snow” icing light blue or silver for a frosty, magical winter wonderland look.
- Mini Snowmen Version: Make bite-sized biscuits and use mini marshmallows for fun, poppable treats or party snacks.
- Add Coconut for Snow Texture: Sprinkle desiccated coconut on the icing before it sets to give a realistic snow effect.
- Create Snowman Families: Vary the size of biscuits and marshmallows to make “dad,” “mum,” and “baby” snowmen on your cookie tray.
SERVING AND STORAGE
Serving
Serve on a holiday-themed tray with hot cocoa or milk as a fun, edible centrepiece or dessert at holiday parties.
Storage
Store in an airtight container at room temperature for up to 5 days. Place wax paper between layers to avoid smudging.

FAQ
Yes, store-bought plain cookies work well if you want a quicker version—just decorate them the same way.
You can use melted white chocolate or royal icing. Royal icing sets firmer, while white chocolate gives a softer finish.
You can make and decorate them up to 3–4 days in advance, as long as they’re stored in an airtight container.
Absolutely! This is a perfect recipe for kids to decorate—just prepare the biscuits and let them have fun with the faces.
You can freeze the undecorated biscuits. Decorated ones are best enjoyed fresh to preserve the appearance and texture.
From mixing the buttery dough to placing tiny chocolate-chip buttons and scarves, this recipe offers joy in every step.
They’re perfect for families looking to bond through baking, or for anyone who loves bringing a little extra creativity to the cookie plate.
They also make excellent edible gifts and are ideal for kids’ holiday events, bake sales, or cookie swaps.
The versatility of decorations lets you be as traditional or whimsical as you want—add coconut flakes, edible glitter, or even turn them into snowmen families.
Whether you serve them with hot cocoa on a snowy night or display them at a festive dessert table, these biscuits will stand out.
With just a few simple ingredients and a lot of love, you’ll have a tray full of personality and sweetness.
Make them once, and they’ll become part of your yearly Christmas tradition.
Happy baking and happy holidays!

MELTED SNOWMAN BISCUITS
Ingredients
- 2 ½ cups all-purpose flour
- 1 teaspoon baking powder
- ¼ teaspoon salt
- 1 cup unsalted butter softened
- ¾ cup granulated sugar
- 1 large egg
- 1 teaspoon vanilla extract
- White royal icing for decorating
- Black and orange icing or edible markers for eyes, mouth, and nose
- Mini chocolate chips or candy for buttons
Instructions
Preheat Oven:
- Preheat oven to 350°F (175°C). Line baking sheets with parchment paper.
Mix Dry Ingredients:
- In a bowl, whisk together flour, baking powder, and salt. Set aside.
Make Dough:
- In a large bowl, cream butter and sugar until light and fluffy. Beat in egg and vanilla. Gradually add dry ingredients and mix until combined.
Shape Biscuits:
- Roll dough into small balls, then flatten slightly on baking sheet to create the “melted” shape.
Bake:
- Bake for 10–12 minutes until edges are lightly golden. Cool completely.
Decorate:
- Use white royal icing to cover biscuits. Once dry, add eyes, mouth, nose, and buttons using icing or edible markers and candies.
Notes
- Make Ahead: Dough can be refrigerated for up to 2 days before baking.
- Decoration Tip: Use piping bags for neat icing designs or toothpicks for small details.
- Serving Suggestion: Serve with hot cocoa or milk for a cozy holiday snack.





Comments
No Comments