
Tiramisu was the first Italian dessert I ever attempted, and the first version was genuinely bad — the ladyfingers turned into mush because I left them in the espresso too long, and the cream was so loose it slid off the spoon. That was about seven years ago. I've made it so many times since then that I barely think about the steps anymore, and it comes out right every single time.
What I love about this recipe is that it doesn't require any baking, any fancy equipment, or any skills beyond knowing how to fold things gently. The whole thing takes maybe 30 minutes of actual hands-on time, and then the fridge does the rest. If you want a no-bake dessert that genuinely impresses people, this is the one I'd point you to — right up there with my Snowman Oreo Balls for easy crowd desserts that look way more complicated than they are.
My husband is the tiramisu fan in our house. He asks for it on his birthday every year without fail. Zainab is still in her "I don't like coffee" phase, so she usually steals the cream off the top and leaves the ladyfingers, which honestly just means more for us. I make a full 9x9-inch dish because it disappears in one sitting between the two adults, and I've learned not to bother making a smaller batch.
One thing I want to set expectations on: this tiramisu needs at least 4 hours in the fridge, and overnight is genuinely better. The flavors come together, the layers set, and you get clean slices instead of a creamy puddle. Plan for that. Make it the night before and you'll be glad you did.

Why You'll Love This Recipe
- No oven required: The whole dessert comes together without turning on the oven, which matters a lot in summer when my kitchen is already warm. You whip, fold, dip, layer — and then the fridge handles everything else. It's one of the most hands-off desserts I make.
- Make it the day before: I actually prefer making tiramisu the night before I need it. The flavors deepen overnight, the ladyfingers absorb just the right amount of coffee, and the cream firms up into clean, sliceable layers. It's the ideal make-ahead dessert when you're hosting and don't want to be scrambling in the kitchen the day of.
- The ingredients are easy to find: Mascarpone used to be harder to track down, but now I find it at Walmart and Trader Joe's without any trouble. Ladyfingers are usually in the cookie aisle or the international foods section. Nothing here requires a specialty Italian grocery store.
- Scales up easily for a crowd: When I'm making this for a dinner party, I double the recipe and use a 9x13-inch dish. The steps are the same — just more of everything. It has never failed me at that scale, and it's the dessert I bring to gatherings when I want something that feels a bit special.
- Genuinely forgiving to make: I've made this with slightly over-whipped cream, with coffee that wasn't perfectly cooled, with mascarpone I forgot to bring to room temperature — and it still turned out fine. There are a few things to watch (don't oversoak the ladyfingers, chill long enough), but overall this is a recipe that works even when you're distracted.
Ingredients
- 1 cup strong brewed coffee or espresso, cooled
- 3 tablespoons coffee liqueur, like Kahlúa (optional)
- 8 oz mascarpone cheese, softened slightly
- ½ cup granulated sugar
- 1 teaspoon vanilla extract
- 1 cup heavy whipping cream, kept cold until you're ready to whip
- 24 ladyfinger biscuits (Savoiardi)
- Unsweetened cocoa powder, for dusting
Directions
- Step 1: Brew and cool the coffee. Brew a strong cup of coffee or pull a double shot of espresso and let it cool completely at room temperature — or stick it in the fridge to speed things up. If you're using coffee liqueur, stir it in now. Dipping ladyfingers into hot coffee is how they get soggy and fall apart, so please don't skip the cooling step.
- Step 2: Make the mascarpone cream. In a large bowl, beat the mascarpone, sugar, and vanilla together until smooth and combined. I use a hand mixer on medium for about a minute — you want it smooth, not airy. Don't overbeat it at this stage or the mascarpone can get grainy.
- Step 3: Whip the cream. In a separate cold bowl, whip the heavy cream until stiff peaks form. This takes about 3–4 minutes with a hand mixer. Cold cream whips faster and holds better, so use it straight from the fridge. Once you have stiff peaks, gently fold the whipped cream into the mascarpone mixture in two or three additions, using a spatula and slow folding motions to keep it light.
- Step 4: Dip the ladyfingers. One at a time, briefly dip each ladyfinger into the cooled coffee — about 1 second per side. You want them damp, not soaked. Arrange them in a single layer in the bottom of a 9x9-inch dish. This is the step that ruined my first batch, so I'm repeating it: a quick dip, not a soak.
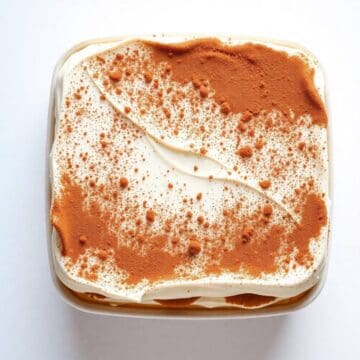
- Step 5: Layer the cream. Spread half the mascarpone cream evenly over the first layer of ladyfingers. Then add a second layer of dipped ladyfingers on top, followed by the remaining cream. Smooth the top as much as you can — this is your cocoa canvas.
- Step 6: Chill and finish. Cover the dish with plastic wrap and refrigerate for at least 4 hours, though overnight gives the best result. Just before serving, dust the top generously with unsweetened cocoa powder using a fine mesh sieve. I always dust right before serving, not in advance, so the cocoa stays dry and looks fresh.

Tips for Success
- Keep the cream cold until the last second: I pull the heavy cream out of the fridge right when I'm ready to whip it, not a minute before. Warm cream takes forever to whip and often doesn't hold peaks properly. If your kitchen is hot, you can even chill your mixing bowl in the freezer for 10 minutes first. It makes a real difference in the texture of the finished cream.
- The dip is everything: I cannot stress this enough — the ladyfinger dip should be fast. One second per side, maximum. If they sit in the coffee even a few extra seconds they become waterlogged, and then your whole bottom layer turns to mush. I keep a shallow bowl of coffee and move quickly. You'll get the hang of the timing after the first two or three.
- Fold, don't stir: When you're combining the whipped cream into the mascarpone, resist the urge to stir. Stirring knocks all the air out and you end up with a dense, flat cream instead of a fluffy one. Use a rubber spatula, go around the edges and then cut through the middle. It takes a bit longer but the result is noticeably lighter.
- Don't dust the cocoa too early: I made this mistake once — dusted the cocoa right after assembling and then covered it with plastic wrap. By morning, the cocoa had absorbed moisture and looked blotchy. Now I always dust immediately before serving. Takes 30 seconds with a fine sieve and makes the top look properly finished.
- Strong coffee makes a real difference: I use the darkest roast I have at home, brewed double strength. If you have an espresso machine, even better. Weak or light-roast coffee doesn't come through once the cream and cocoa are layered on top — you'll just taste sweet without that coffee depth. If you only have regular drip coffee, brew it extra strong and add a tablespoon of instant espresso powder to it.
Variations
- With coffee liqueur: Stir 3 tablespoons of Kahlúa or Tia Maria into the cooled espresso before dipping. It adds a warm, slightly boozy depth that makes this feel more like the restaurant version. My husband prefers it this way. Obviously skip this for a version you're serving to kids.
- Chocolate layer: Grate dark chocolate over the first layer of cream before adding the second layer of ladyfingers. I use about 2 oz of a good 70% bar. It adds a slightly bitter richness that works really well against the sweet cream. This is the version I make for dinner parties when I want it to feel a bit extra.
- Individual jars or glasses: Instead of one big dish, layer the tiramisu into small mason jars or dessert glasses. It's the same recipe, same steps — just prettier for serving at a party. No slicing required and everyone gets their own portion. I've done this for birthday dinners and it looks like something from a fancy café.
- Egg-free version: Skip any egg yolks entirely (this recipe doesn't use them to begin with, which keeps it simple) and just rely on the whipped cream and mascarpone base. If you're looking for an egg-free no-bake dessert at a similar difficulty level, my Ube Cinnamon Rolls with Cream Cheese Frosting are another great option for something a little different.
- Matcha version: Replace the espresso with warm milk and a tablespoon of high-quality matcha powder, then dust the top with matcha instead of cocoa. It's a completely different flavor profile — earthy and slightly sweet — but the technique is identical. I make this when I want something unusual for a gathering. It always gets comments.
Serving and Storage
Serving
Serve tiramisu straight from the fridge — it should be cold when it hits the plate. Dust the cocoa powder right before you bring it to the table, not hours earlier. I use a sharp knife dipped in hot water and wiped dry to get clean slices. A small offset spatula helps get the first piece out without it falling apart. Pair it with a small espresso if you're serving after dinner, or just eat it as-is because it really doesn't need anything alongside it.
Storage
Cover the dish tightly with plastic wrap and store in the refrigerator for up to 3 days. The texture is best on day 2 — everything has had time to set and the flavors have melded. Don't freeze it. I tried once out of curiosity and the mascarpone cream broke when it thawed — grainy, watery, not salvageable. Just keep it in the fridge and eat it within 3 days, which has never been a problem in my house.

Frequently Asked Questions
Can I make tiramisu the day before serving?
Yes, and I actually recommend it. Making it the night before gives the layers time to set properly and lets the coffee flavor work its way through the ladyfingers evenly. The cream firms up, the slices come out cleaner, and it just tastes better than one that's only had a few hours. Just hold off on the cocoa dusting until right before you serve.
Can I freeze tiramisu?
I wouldn't. I tried freezing a portion once and when it thawed, the mascarpone cream had separated and gone grainy. The ladyfingers also got strange and dense. It's not worth it. This keeps well in the fridge for 3 days, which is plenty of time to finish it — and in my house, it never lasts that long anyway.
What can I use instead of mascarpone?
In a pinch, you can blend full-fat cream cheese with a couple of tablespoons of heavy cream until smooth. It's not the same — mascarpone is richer and less tangy — but it works when you can't find mascarpone. Trader Joe's and most Walmarts carry mascarpone now, so it's worth checking before substituting. I'd avoid low-fat cream cheese; it gets watery when folded into whipped cream.
How long do the ladyfingers need to soak?
About one second per side — that's it. Dip, flip, dip, out. They'll absorb more moisture as the tiramisu chills in the fridge, so they don't need to be saturated when you layer them. If they feel soggy before you even assemble, the bottom layer of your tiramisu will turn to mush. I ruined my first batch exactly this way, so learn from my mistake and keep the dip quick.
Does this recipe contain raw eggs?
This particular version doesn't use egg yolks at all — it's just mascarpone, whipped cream, sugar, and vanilla. Traditional tiramisu recipes often include egg yolks whisked with sugar, but I've found this eggless version is just as creamy and much simpler. If you're serving this to anyone who needs to avoid raw eggs, this recipe already handles that for you.
CLASSIC EASY TIRAMISU
Ingredients
For the Tiramisu:
- 1 cup strong brewed coffee cooled
- 3 tablespoon coffee liqueur optional
- 8 oz mascarpone cheese softened
- ½ cup granulated sugar
- 1 teaspoon vanilla extract
- 1 cup heavy whipping cream chilled
- 24 ladyfingers
- unsweetened cocoa powder for dusting
Instructions
Prepare Coffee:
- Brew strong coffee and let it cool. Add coffee liqueur if desired.
Prepare Cream Mixture:
- In a bowl, beat mascarpone, sugar, and vanilla until smooth.
Whip Cream:
- In a separate bowl, whip heavy cream until stiff peaks form, then fold into mascarpone mixture.
Layer Ladyfingers:
- Quickly dip ladyfingers into coffee and arrange a layer in a 9x9-inch dish.
Add Cream Layers:
- Spread half of the cream mixture over the ladyfingers. Repeat layers and finish with cream on top.
Chill and Serve:
- Dust top with unsweetened cocoa powder. Cover and chill for at least 3–4 hours before serving.
Notes
- Make Ahead: Can be prepared a day in advance for best flavor.
- Variations: Add a layer of chocolate shavings or sprinkle instant espresso powder for extra flavor.
- Serving Suggestions: Serve chilled in individual cups or a large dish.
- Allergy-Friendly: Use lactose-free cream and mascarpone if needed.
- Storage Tips: Store in refrigerator up to 3 days. Do not freeze.
Tiramisu is one of those recipes I'm glad I kept trying after that first disaster. Seven years of making it has gotten me to a version I trust completely — one I can make on a Friday night without even pulling out a recipe card. It's not an intimidating dessert once you understand the few things that actually matter: cold cream, a quick dip, enough chill time.
I'll note that this isn't a strictly traditional Italian recipe — I know that in Italy they use raw egg yolks beaten with sugar, and some versions use Marsala wine. Mine is simpler and doesn't use eggs at all, which makes it faster and easier for a weeknight or for anyone cautious about raw eggs. It's my version, and our household loves it the way it is.
If you're looking for more no-bake or easy dessert ideas, my Snowman Oreo Balls are always a hit with kids, and the Bloody Red Velvet Cupcakes with Cream Cheese Frosting are one of my favorites when I want something a bit more dramatic. But for a dinner party dessert that always lands well — this tiramisu is the one I come back to every single time. 🍫☕✨
If you liked this recipe, here are a few more you might enjoy:
- Snowman Oreo Balls — no-bake, easy, and kids go absolutely wild for these
- Decadent Ube Cinnamon Rolls with Cream Cheese Frosting — for when you want something a little unexpected and stunning
- Bloody Red Velvet Cupcakes with Cream Cheese Frosting — a showstopper with cream cheese frosting and serious visual impact
- Christmas Sausage Rolls with Sage and Cranberry — if you need a savory party bite to balance out all the desserts
- Hobo Casserole with Ground Beef and Potatoes — a hearty one-pan dinner for when you need something completely different after a rich dessert weekend





Comments
No Comments