
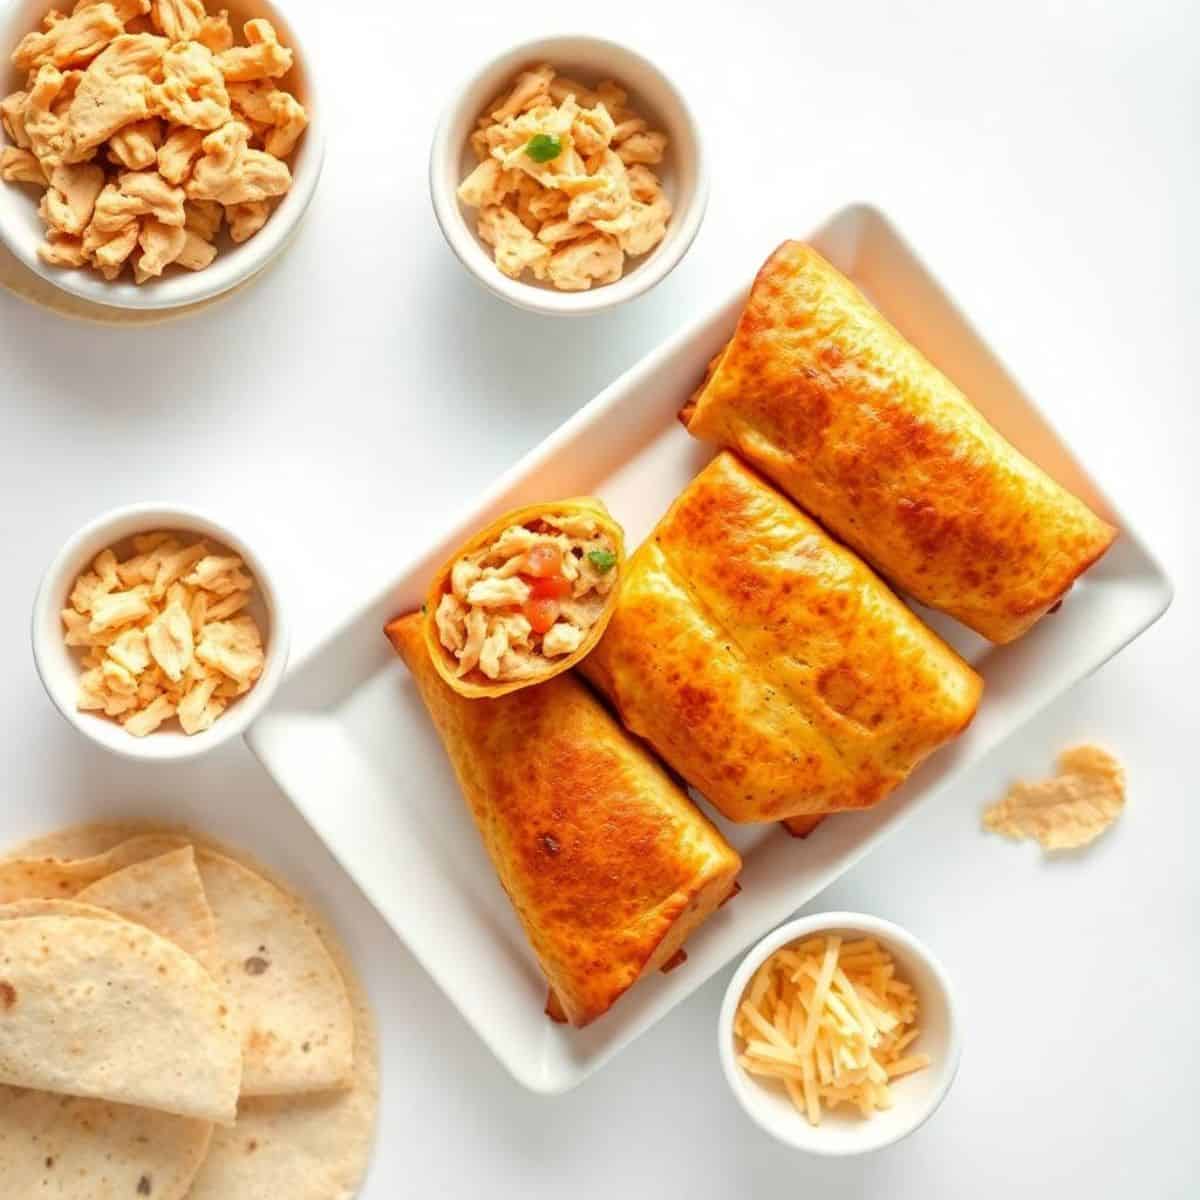
Chi-Chi’s Baked Chicken Chimichangas deliver a flavorful, crispy Mexican-inspired meal that is easy to make at home. Instead of frying, baking the chimichangas reduces oil and mess while maintaining their satisfying crunch and taste.
This recipe combines shredded chicken, spices, and melted cheese wrapped inside flour tortillas, then baked until golden. The result is a comforting, filling dish that’s perfect for family dinners or casual get-togethers.
Baked chimichangas pair well with salsa, sour cream, and guacamole, making them a crowd-pleasing appetizer or main course. You can customize the filling to suit your taste preferences or dietary needs.
The recipe is simple to prepare with mostly pantry staples, and baking keeps it healthier than traditional frying. The crispy outer shell contrasts nicely with the juicy, seasoned chicken inside, offering an exciting texture experience.
Enjoy these chimichangas fresh from the oven for the best taste and texture. They can also be made ahead and reheated, making them convenient for busy days or entertaining guests. They’re filled with tender chicken and a cheesy blend.
WHY YOU WILL LOVE THIS RECIPE
- Healthier Baking Method: Baked instead of fried, these chimichangas are crispy and delicious while cutting down on oil and fat content.
- Tender, Seasoned Chicken: The filling is packed with juicy, flavorful chicken seasoned perfectly for a bold and authentic Mexican taste.
- Cheesy, Melty Center: Melted cheese inside adds creaminess that perfectly complements the savory chicken and crispy tortilla exterior.
- Crispy Golden Tortillas: Baking gives the tortillas a crunchy texture that rivals frying but is lighter and less greasy overall.
- Quick and Simple Prep: Easy to assemble with basic ingredients, perfect for busy nights or feeding a hungry crowd without stress.
- Customizable Fillings: You can add beans, peppers, or spices to suit your preferences and create your ideal chimichanga.
- Great for Parties: These handheld chimichangas make excellent finger food for gatherings, potlucks, or game day celebrations.
INGREDIENTS
- 3 cups cooked shredded chicken
- 1 cup shredded cheddar cheese
- 1 cup shredded Monterey Jack cheese
- 1 small onion, finely chopped
- 1 teaspoon ground cumin
- 1 teaspoon chili powder
- ½ teaspoon garlic powder
- Salt and pepper, to taste
- 8 large flour tortillas
- Cooking spray or benefits of olive oil for brushing
- Optional: chopped cilantro for garnish
- Optional: salsa, sour cream, guacamole for serving
DIRECTIONS
- Step No.1: Preheat oven and prepare chicken filling
Preheat oven to 400°F (200°C). In a large bowl, mix shredded chicken, cheeses, chopped onion, cumin, chili powder, garlic powder, salt, and pepper until combined.
- Step No.2: Fill tortillas
Lay out tortillas on a flat surface. Spoon the chicken mixture evenly onto the center of each tortilla.
- Step No.3: Roll and secure chimichangas
Fold the sides over the filling, then roll tightly from one end to the other to enclose the filling fully.
- Step No.4: Prepare baking tray
Place rolled chimichangas seam-side down on a greased baking sheet. Lightly spray or brush tops with cooking spray or olive oil.
- Step No.5: Bake until crispy
Bake in the preheated oven for 20–25 minutes or until tortillas are golden brown and crispy.
- Step No.6: Garnish and serve
Remove from oven, garnish with chopped cilantro if desired, and serve hot with salsa, sour cream, and guacamole.

TIPS FOR SUCCESS
- Use warm cooked chicken: Helps cheese melt evenly and filling blend well.
- Don’t overfill tortillas: Keep filling moderate to prevent chimichangas from bursting open during baking and maintain a neat, sealed shape.
- Use fresh shredded chicken: Freshly cooked chicken offers better flavor and texture than canned or pre-packaged meat for a tastier filling.
- Brush tortillas lightly: A light oil brush on tortillas helps them bake to golden crispiness without becoming greasy or soggy.
- Turn chimichangas halfway: Rotate them during baking for even browning and a uniformly crispy exterior on all sides.
- Adjust spices carefully: Customize chili powder and cumin amounts to match your preferred heat and flavor intensity perfectly.
- Serve immediately: Enjoy chimichangas hot from the oven to retain maximum crispness and optimal taste experience.
- Add dipping sauces: Pair with sour cream, guacamole, or salsa to complement the flavors and add moisture to each bite.
VARIATIONS
- Add black beans: Including black beans increases protein, fiber, and adds a hearty texture to the filling, making it more filling and nutritious.
- Use pepper jack cheese: Swap cheddar with pepper jack for a spicy, creamy flavor twist that elevates the overall taste profile.
- Include corn kernels: Fresh or frozen corn adds sweetness and a pleasant crunch, enhancing the texture and flavor of the chimichangas.
- Make it vegetarian diet: Replace chicken with sautéed mushrooms, beans, or other vegetables to create a delicious meat-free version of the dish.
- Spice it up: Add diced jalapeños or hot sauce for an extra kick of heat that balances the creamy and crispy elements.
- Top with cilantro: Fresh cilantro adds aromatic freshness and a pop of color, enhancing the flavor and visual appeal of your chimichangas.
- Use whole wheat tortillas: Whole wheat tortillas offer a nuttier flavor and more fiber, making the dish healthier without sacrificing taste or texture.
SERVING AND STORAGE
Serving
Serve hot with fresh salsa, guacamole, and sour cream for a complete meal.
Storage
Store leftovers in an airtight container in the fridge for up to 3 days; reheat in oven for best texture.

FAQ
Yes, rotisserie chicken works perfectly for quick preparation.
Yes, freeze before baking; bake directly from frozen, adding extra baking time.
Salsa, sour cream, guacamole, or spicy crema complement chimichangas well.
Use gluten-free tortillas for a safe alternative.
Reheat in the oven, not microwave, to maintain crispness.
Chi-Chi’s Baked chicken chimichangas are a delicious, healthier alternative to fried versions, bringing satisfying crunch and rich flavors to your table.
Baking instead of frying makes cleanup simple and reduces calories without sacrificing texture.
Prepare these chimichangas fresh or ahead of time for convenient meals that please every appetite.
Enjoy the authentic Mexican flavors with a baked twist, perfect for sharing and satisfying hunger with every bite.

CHI-CHI’S BAKED CHICKEN CHIMICHANGAS
Ingredients
- 2 cups cooked shredded chicken
- 1 cup shredded cheddar or Mexican blend cheese
- ½ cup salsa mild or medium
- ½ teaspoon ground cumin
- ½ teaspoon garlic powder
- ½ teaspoon onion powder
- 6 large flour tortillas
- 2 tablespoons melted butter or cooking spray
- Optional toppings: sour cream guacamole, chopped green onions, diced tomatoes
Instructions
Preheat Oven:
- Preheat oven to 400°F (200°C). Line a baking sheet with parchment paper or foil.
Prepare Filling:
- In a bowl, mix shredded chicken, cheese, salsa, cumin, garlic powder, and onion powder until well combined.
Fill Tortillas:
- Spoon filling into the center of each tortilla. Fold sides in and roll up tightly like a burrito.
Bake Chimichangas:
- Place seam-side down on the baking sheet. Brush with melted butter or spray with cooking spray.
Bake:
- Bake for 25–30 minutes, or until golden brown and crispy.
Serve:
- Serve warm with your favourite toppings.



Comments
No Comments