
I made these for the first time on a rainy Friday evening when I had ground beef in the fridge, half a pack of bacon, and absolutely no energy to think about dinner. I had a tube of refrigerated biscuit dough sitting in the back of the fridge and I thought — why not just stuff everything inside it. Forty minutes later my kids were fighting over the last one.
The idea is simple: all the things you love about a cheeseburger — seasoned beef, crispy bacon, melted cheddar — sealed inside a soft biscuit dough ball and baked until golden. No grill, no buns, no mess. The filling comes together in one pan and the assembly takes maybe ten minutes. I've since made these with puff pastry too (the WPRM card below uses puff pastry if you have it), and both versions work really well depending on what you have on hand.
Saad declared these his new favourite snack after the first batch. My husband ate four of them standing over the kitchen counter before I could get them onto a plate. If you're looking for something that disappears fast at a gathering, these are it — I now make a double batch every single time because a single batch is just not enough. If you like this kind of handheld comfort food, my Baked Ham and Cheese Croissants use the same general idea and are just as easy.
One thing I'll say upfront: let your filling cool for at least five minutes before you start stuffing the dough. The first time I rushed this step, the warm filling made the biscuit dough soft and sticky and everything fell apart when I tried to seal it. Cool filling, tight seal, seam-side down on the tray — those three things are what make these work.

Why You'll Love This Recipe
- No grill required: I live in a flat with no outdoor space, so anything that delivers burger flavour without a grill is a win in my kitchen. These go from fridge to oven to table with nothing more than a skillet and a sheet pan. The oven does all the work while I clean up the one pan I used for the beef.
- Kids actually eat them: Saad is at the age where he wants to help in the kitchen, and stuffing these little dough balls is the perfect job for him. He takes it very seriously. The fact that he helped make them means he eats them without a single complaint, which is honestly half the battle at dinner.
- The dipping is half the fun: I set out a little bowl of ketchup, one of mustard, and one of burger sauce and everyone dips differently. My husband goes straight ketchup. Zainab mixes everything together. There's something about a dippable dinner that makes the whole thing feel like an event rather than just a meal.
- Ready in under 40 minutes: From the time I start browning the beef to pulling these out of the oven is about 35 minutes. I've made them on Tuesday nights after a long day and it genuinely doesn't feel like a big effort. Most of that time is just the oven doing its thing.
- The filling is flexible: This is really a template more than a strict recipe. I've added chopped pickles, swapped in pepper jack cheese, stirred in a spoonful of BBQ sauce with the beef — every version has worked. Once you know the basic method, you can stuff these with almost anything.
Ingredients
- 1 tablespoon olive oil
- ½ pound (about 225g) lean ground beef
- ½ teaspoon garlic powder
- ½ teaspoon onion powder
- ¼ teaspoon salt
- ¼ teaspoon black pepper
- ½ cup cooked bacon, crumbled (about 4–5 strips)
- 1 cup shredded cheddar cheese (or pepper jack if you want a kick)
- 1 tube refrigerated biscuit dough, 8-count (Pillsbury Grand's works great — find it at Walmart or most grocery stores)
- 2 tablespoons burger sauce, or mix ketchup and mustard if that's what you have
- 1 tablespoon melted butter, for brushing
- Sesame seeds and chopped parsley, optional garnish
Note: If you want to use puff pastry instead of biscuit dough, a standard 14 oz sheet of ready-rolled puff pastry cut into 12 squares works beautifully — brush with a beaten egg instead of butter for that glossy finish. The WPRM recipe card below uses that version.
Directions
- Step 1: Cook the beef — Heat olive oil in a skillet over medium heat. Add the ground beef along with garlic powder, onion powder, salt, and pepper. Cook, breaking it up as you go, until fully browned — about 7–8 minutes. Drain off any excess fat and remove from the heat.
- Step 2: Build the filling — Stir the crumbled bacon, shredded cheddar, and burger sauce into the warm beef. Mix until everything is combined and the cheese starts to melt into the mixture. Let this cool for at least 5 minutes before touching the dough — hot filling makes the dough sticky and hard to seal.
- Step 3: Prep the dough — Preheat your oven to 375°F (190°C) and line a baking sheet with parchment paper. Pop open the biscuit dough and flatten each round into a circle about 3–4 inches across using your hands or a rolling pin — no need to be precise here.
- Step 4: Fill and seal — Place about 1 heaped tablespoon of filling in the centre of each dough round. Pull the edges up around the filling and pinch them firmly together at the top, making sure there are no gaps. A loose seal means cheese all over your parchment — not terrible, but annoying.
- Step 5: Bake — Place the bombs seam-side down on the prepared baking sheet. Brush the tops with melted butter (or beaten egg if using puff pastry). Bake for 15–18 minutes, until the tops are deep golden and the dough is cooked through.
- Step 6: Rest briefly and serve — Let them sit for 2–3 minutes before serving — the filling inside is very hot. Sprinkle with sesame seeds or parsley if you like, and set out your dipping sauces alongside.

Tips for Success
- Cool the filling before stuffing: I mentioned this already but it's worth repeating because I ignored it the first time and paid for it. Warm filling softens the dough from the inside and makes it almost impossible to pinch shut without it tearing. Give it five minutes. Set a timer if you need to.
- Pinch the seam properly: Don't just press the edges together lightly — actually pinch and twist slightly to make sure they're sealed. If you hold the bomb up and press the seam with two fingers and it pops open, it'll definitely open in the oven. Take the extra five seconds per bomb to do this right.
- Don't overfill: One heaped tablespoon is genuinely enough. I tried pushing it to two tablespoons once because I had extra filling and three of the bombs burst open in the oven. The dough can only stretch so far. If you have leftover filling, save it — it's great scrambled into eggs the next morning.
- Use parchment paper: Even if nothing leaks, biscuit dough can stick to a plain metal tray. Parchment paper means the bombs lift off cleanly and you're not scrubbing the pan afterward. I keep a roll of it from Costco and use it constantly.
- Drain the beef well: Ground beef releases a fair amount of fat while cooking. If you skip draining it, the filling ends up greasy and the excess liquid can make the dough soggy at the bottom. Just tip the skillet and spoon out what pools up, or transfer the beef to a paper-towel-lined plate for a minute.
Variations
- BBQ bacon version: Swap the burger sauce for 1–2 tablespoons of your favourite BBQ sauce and add a small pinch of smoked paprika to the beef. This gives the whole thing a smoky-sweet edge that my husband loves. Pairs really well with the BBQ flavours from my Liberty Bell chicken drumsticks if you're doing a whole spread.
- Spicy jalapeño bombs: Mix a couple tablespoons of finely diced pickled jalapeños into the filling and swap the cheddar for pepper jack. The heat from the jalapeños is mellowed slightly by the dough but you definitely feel it. These are the ones I make when it's just me and my husband — the kids can't handle the heat.
- Breakfast bombs: Use scrambled eggs, cooked crumbled sausage, and cheddar as the filling instead of the beef mixture. I've done this for weekend brunch and they go faster than the dinner version. Serve with hot sauce on the side.
- Veggie version: Replace the ground beef with cooked green or brown lentils seasoned the same way — garlic powder, onion powder, salt, pepper. Add some sautéed mushrooms and onion for bulk. This isn't my go-to but I've made it for a friend who doesn't eat meat and she genuinely loved them. The cheese and bacon (swap for veggie bacon) carry a lot of the flavour.
- Pulled pork bombs: If you happen to have leftover pulled pork in the fridge, use that as the filling with a little cheddar and a spoonful of coleslaw tucked in. I got this idea after making my slow cooker pulled pork — the leftovers are perfect for this.
Serving and Storage
Serving
Serve these warm, straight from the oven after a 2–3 minute rest. Set out small bowls of ketchup, mustard, ranch, and burger sauce so everyone can dip as they like. In my house this is a full dinner with a simple green salad on the side — though they work just as well as a party snack or game-day spread. If you're serving them as appetisers at a gathering, I'd plan on 2–3 bombs per person minimum. People always go back for more.
Storage
Store cooled leftovers in an airtight container in the fridge for up to 3 days. To reheat, skip the microwave if you can — it makes the dough soft and a bit rubbery. Instead, pop them in a 350°F (180°C) oven for about 8–10 minutes and they come back close to how they were fresh. You can also freeze them after baking: let them cool completely, freeze on a tray until solid, then transfer to a zip-lock bag. Reheat from frozen at 350°F for 12–15 minutes.

Frequently Asked Questions
Can I assemble these ahead of time?
Yes — this is one of the things I love most about this recipe. Assemble the bombs all the way through the sealing step, place them seam-side down on a parchment-lined tray, cover loosely with plastic wrap, and refrigerate for up to 4 hours. When you're ready to bake, brush with butter or egg wash and put them straight in the oven. No need to bring them to room temperature first — just add a couple of extra minutes to the bake time.
Can I freeze these?
Absolutely. Bake them fully, let them cool completely, then freeze on a tray until solid before transferring to a freezer bag. They'll keep for up to 2 months. To reheat, place frozen bombs on a baking sheet and warm in a 350°F (180°C) oven for 12–15 minutes until heated through and the outside crisps back up. I wouldn't recommend microwaving from frozen — the texture suffers.
What cheese works best in these?
Shredded cheddar is my go-to because it melts easily and has enough sharpness to hold its own against the bacon and seasoned beef. Pepper jack is a great swap if you want heat. Mozzarella works but gives a milder flavour — it's fine but not my favourite here. Avoid pre-shredded bags if you can, because the anti-caking coating makes them melt slightly less smoothly. Block cheese you shred yourself makes a real difference.
Can I use homemade dough instead of store-bought?
Yes, any soft roll dough or homemade biscuit dough works fine. I use store-bought because it's genuinely quicker and the result is consistent — I've had homemade dough batches that were too sticky or too dense and didn't bake evenly. If you have a reliable roll dough recipe you trust, go for it. Just make sure it's not too thick or the centres won't bake through in 18 minutes.
Why did my bombs burst open in the oven?
Two reasons: either the seal wasn't tight enough, or they were overfilled. Make sure you're pressing the dough edges firmly together — really pinching them, not just touching them. And stick to about 1 heaped tablespoon of filling per bomb. I know it feels like not enough but the filling expands slightly as it heats and the cheese melts, so there's more volume than you think. If they do burst a little, the filling that oozes out just caramelises on the parchment — still tastes good, just messier.
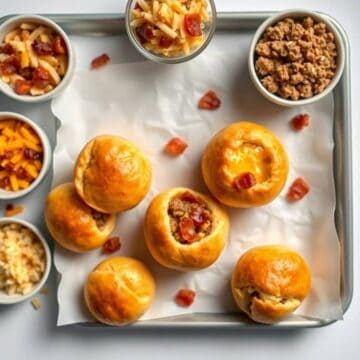
BACON CHEESEBURGER BOMBS
Ingredients
- 500 g lean ground beef
- ½ teaspoon salt
- ½ teaspoon black pepper
- 1 teaspoon garlic powder
- 1 teaspoon onion powder
- 8 slices bacon cooked crisp and chopped
- 1 cup about 100 g shredded cheddar cheese
- 1 sheet about 320 g ready‑rolled puff pastry or crescent roll dough
- 2 tablespoons burger sauce or ketchup + mustard mix
- 1 egg beaten (for egg wash)
- Sesame seeds optional
Instructions
Preheat Oven:
- Heat oven to 200 °C (400 °F). Line a baking tray with parchment paper.
Cook and Season Beef:
- In a skillet over medium heat, cook ground beef until browned. Drain excess fat, then stir in salt, pepper, garlic powder and onion powder. Remove from heat.
Assemble Filling:
- In a bowl, combine seasoned beef, chopped bacon, cheddar and burger sauce.
Cut and Fill Pastry:
- Unroll dough and cut into 12 equal squares. Place a heaped tablespoon of filling in the centre of each square.
Shape Bombs:
- Bring the corners of each square together and pinch to seal, forming a ball. Place seam‑side down on prepared tray.
Brush and Bake:
- Brush tops with beaten egg and sprinkle with sesame seeds if using. Bake for 15–18 minutes until puffed and golden.
Serve Warm:
- Allow to cool 2–3 minutes before serving so the filling isn’t too runny.
Notes
- Make Ahead:
Prepare bombs up to shaping step, refrigerate on tray for up to 4 hours, then brush with egg wash and bake. - Variations:
Mix in chopped pickles or a dash of hot sauce for extra tang. Swap cheddar for pepper jack. - Serving Suggestions:
Serve with extra burger sauce, ketchup, mustard or a small side of fries. - Allergy-Friendly Options:
Use dairy‑free cheese and a suitable pastry; check bacon is gluten‑free if necessary. - Storage Tips:
Store cooled bombs in an airtight container in the fridge for up to 2 days. Reheat in a 180 °C oven for 5 minutes to crisp.
These have become a regular in my kitchen rotation — not just because everyone loves them, but because I can prep the filling earlier in the day and have dinner on the table in under 20 minutes once I'm home. There's something satisfying about a recipe that looks like you put in more effort than you actually did. I've served these at small get-togethers and I've made them on ordinary Wednesdays. They work for both.
If you're planning a spread with these, I'd pair them with something like my French Onion Stuffed Potatoes — both are the kind of food that disappears before you can arrange it properly on a platter. Between the two, you'd have a genuinely satisfying spread for a game night or casual dinner with friends without spending hours in the kitchen.