
Homemade bubble gum is one of those recipes that sounds complicated but is actually surprisingly simple — and the result is a soft, chewy, customizable gum that tastes better than anything you can buy at a store. If you have ever wondered how to make bubble gum at home, this recipe walks you through every single step.
The secret is gum base — a food-safe, chewable base that gives homemade bubble gum its signature stretchy, elastic texture. Once you have it, the rest of the recipe comes together with simple pantry ingredients like powdered sugar, corn syrup, and your choice of flavoring extract. The whole process takes about 30 minutes plus a 24-hour rest time before chewing.
This homemade bubble gum recipe is a fantastic activity to do with kids — they love picking their own flavors and colors, rolling the pieces, and waiting impatiently to chew their creation. It also makes a unique homemade gift, party favor, or birthday treat that nobody else will think to bring.
Unlike store-bought gum which is packed with artificial sweeteners, preservatives, and synthetic flavors, this homemade version uses only ingredients you choose. You control the sweetness, the flavor intensity, and the color — making it completely personalized every single time.
If you love fun DIY candy projects like this, also check out our Homemade Dill Pickle Gummy Worms and our roundup of 21 Easy No-Bake Desserts for more creative treats to make at home.

WHAT IS GUM BASE AND WHERE TO BUY IT?
Gum base is the core ingredient that makes bubble gum chewy. It is a food-grade blend of elastomers, resins, and softeners that gives gum its stretchy, non-digestible chew. Without gum base, you cannot make real bubble gum — there is no substitute for it.
The good news is that food-grade gum base is easy to find online. Search for "gum base pellets" on Amazon or check specialty candy-making suppliers like CandylandCrafts or Bulk Candy Store. It typically comes in pellet or block form and a small bag goes a long way. It has no flavor of its own so all the taste comes from the extracts and sweeteners you add.
Chicle is the traditional natural gum base made from the sap of the sapodilla tree — if you want a more natural option, look for chicle-based gum base online. Either chicle or synthetic gum base will work perfectly in this recipe.
WHY YOU WILL LOVE THIS RECIPE
- Fun DIY treat: Making bubble gum at home is a hands-on activity the whole family can enjoy together. Kids absolutely love picking flavors, colors, and shapes for their own personalized gum.
- Fully customizable: Choose any flavor extract you like — classic pink bubble gum, watermelon, strawberry, grape, or even sour apple. Change the color to match. Make each batch completely unique.
- No artificial additives: You control every single ingredient. No artificial preservatives, no mystery chemicals, no synthetic sweeteners — just clean, simple, food-safe ingredients.
- Soft and chewy texture: Properly kneaded homemade bubble gum has a satisfying, stretchy chew that is ideal for blowing big bubbles. The texture rivals store-bought gum when made correctly.
- Perfect for parties and gifts: Wrap individual pieces in wax paper, tie with a ribbon, and you have a unique homemade party favor or gift that nobody else will think to make.
- Beginner friendly: Despite sounding complex, this recipe requires no special equipment beyond a double boiler. If you can melt chocolate, you can make bubble gum.
- Sugar-free option available: Swap powdered sugar for powdered xylitol or erythritol for a diabetic-friendly, sugar-free version that still tastes great and chews beautifully.
INGREDIENTS
Here is everything you need to make homemade bubble gum and what each ingredient does:
- 1 cup gum base pellets or chicle — The essential base ingredient that provides the chew. Available online or at specialty candy stores. Food-grade only — never use industrial gum base.
- 2 tablespoons corn syrup or glucose syrup — Adds sweetness and helps keep the gum soft and pliable. Corn syrup prevents the gum from becoming too hard or brittle over time. Glucose syrup is a perfect 1:1 substitute.
- ½ cup powdered sugar, plus extra for kneading — Sweetens the gum and acts as a non-stick dusting agent during kneading. Always use powdered sugar — granulated sugar will give your gum a gritty, unpleasant texture.
- 1 teaspoon bubble gum flavoring or fruit extract — This is where all the flavor comes from. Classic pink bubble gum flavoring is available on Amazon. You can also use LorAnn Oils fruit flavoring, peppermint extract, watermelon oil, or any food-safe flavor concentrate.
- Food coloring (optional) — Completely optional but makes the gum look fun and vibrant. Gel food coloring works better than liquid as it does not add extra moisture to the dough. Add it during the kneading stage.
You will also need: a double boiler or heat-safe bowl over a saucepan, a silicone spatula, parchment paper or a powdered sugar-dusted work surface, and food-safe gloves for kneading since the mixture gets warm and sticky.
DIRECTIONS
- Step No.1: Melt the gum base
Set up a double boiler by placing a heat-safe bowl over a saucepan of simmering water. Add the gum base pellets to the bowl and melt over low heat, stirring occasionally, until completely smooth and fully liquid. This typically takes 10 to 15 minutes. Do not rush this step — high heat can scorch the gum base and ruin the texture. If you do not have a double boiler, use a microwave in 20-second bursts, stirring between each interval.
- Step No.2: Add syrup and flavoring
Once the gum base is fully melted and smooth, remove from heat. Stir in the corn syrup until fully combined. Then add your bubble gum flavoring or extract and stir well. Add the flavoring while the mixture is still warm but off direct heat — this ensures even distribution throughout the entire batch. If you add it when too hot the flavor can evaporate.
- Step No.3: Mix in powdered sugar
Gradually add the powdered sugar to the warm gum base mixture, stirring continuously. Add it a little at a time rather than all at once to avoid lumps. Keep stirring until the mixture pulls away from the sides of the bowl and forms a thick, dough-like consistency that holds together. It should look similar to a very soft fondant or playdough at this stage.
- Step No.4: Cool the dough
Dust your work surface generously with powdered sugar. Transfer the warm gum dough onto the surface and allow it to cool for 3 to 5 minutes until it is warm but safe to handle with your hands. Do not let it cool completely at this stage or it will become too stiff to knead properly. Put on food-safe gloves now if you have them — the dough will be sticky.
- Step No.5: Knead the dough
Knead the gum dough with your hands, dusting with additional powdered sugar as needed to prevent sticking. Knead for a full 5 to 10 minutes — this step is crucial. The more thoroughly you knead, the more elastic and stretchy your gum becomes. You will feel it change from a rough, crumbly mass into a smooth, soft, pliable dough. If adding food coloring, add a few drops now and continue kneading until the color is fully and evenly distributed with no streaks.
- Step No.6: Shape the gum pieces
Roll the dough into a long log about the thickness of a pencil, then cut it into small pieces roughly 2 to 3 cm long. Alternatively, roll into small balls, flatten into sticks, or use small cookie cutters for fun shapes. Dust each piece lightly with powdered sugar to prevent sticking. Place on parchment paper in a single layer.
- Step No.7: Rest before chewing
This is the hardest part — you must wait. Leave the gum pieces uncovered at room temperature for a full 24 hours before chewing. This resting period allows the gum to firm up to the right consistency and the flavors to fully develop. Gum chewed before resting will be too soft and will not blow bubbles properly. After 24 hours wrap each piece individually in small squares of wax paper or parchment.

TIPS FOR SUCCESS
- Use food-grade gum base only: This is non-negotiable. Only use gum base specifically labeled as food-grade or food-safe. Industrial gum base is not safe for consumption. Check the product description carefully before purchasing.
- Low and slow on the heat: Melt the gum base over the lowest heat possible. High heat scorches it and produces a dark, bitter, unusable mass. If it starts to smell burnt, start over — there is no recovering scorched gum base.
- Knead longer than you think: Most people under-knead their gum dough. A full 5 to 10 minutes of kneading is what transforms a rough, sticky mass into smooth, elastic, bubble-blowing gum. Set a timer if needed.
- Add flavoring off heat: Always add your flavor extract after removing from direct heat. Flavor compounds are volatile — adding them while the mixture is too hot causes the flavor to evaporate and your gum will taste flat and bland.
- Use gel food coloring: Liquid food coloring adds too much moisture and can make the dough sticky and difficult to knead. Gel coloring gives vibrant results without affecting the texture.
- Wrap individually: Wrap each piece in wax paper or small foil squares immediately after the 24-hour rest. Unwrapped pieces will stick together and dry out within a day or two.
- Wear gloves: Food-safe gloves make kneading much easier and prevent the warm sticky dough from coating your hands. Lightly dusting your gloves with powdered sugar also helps.
VARIATIONS
- Classic pink bubble gum: Use classic bubble gum flavoring oil (LorAnn brand is excellent) and a few drops of pink or red gel food coloring for the iconic retro look and taste everyone recognizes.
- Fruit-flavored gum: Try strawberry, watermelon, cherry, grape, or blue raspberry extracts for vibrant, sweet fruit gum varieties. Match the food coloring to the flavor for a professional look.
- Minty chewing gum: Use peppermint or spearmint extract for a refreshing after-meal gum. Reduce the amount of extract slightly compared to bubble gum flavoring as mint oils are more concentrated and potent.
- Sugar-free bubble gum: Replace powdered sugar with powdered xylitol or powdered erythritol. Note that xylitol is toxic to dogs so keep these away from pets. The texture and chew are very similar to the regular version.
- Sour bubble gum: Add ½ teaspoon of citric acid powder to the dough while kneading for a sour punch. Dust the finished pieces in a mix of citric acid and powdered sugar for an extra sour coating similar to sour patch candy.
- Spicy cinnamon gum: Use cinnamon oil or clove oil for a warming, spicy gum with a pleasant kick. Start with just ½ teaspoon as cinnamon oil is very strong — you can always add more but you cannot take it away.
- Rainbow multicolor gum: Divide the kneaded dough into 3 or 4 portions and add a different food coloring to each. Twist or marble them together before rolling for a swirled, rainbow effect that looks incredible.
If you enjoy making homemade candy and sweet treats, also try our 27 Best Christmas Candy Recipes and our Easy Chocolate Balls for more fun homemade candy ideas.
SERVING AND STORAGE
Serving
After the 24-hour resting period your homemade bubble gum is ready to chew and blow bubbles with. Serve it in a small bowl as a fun party treat, wrap individual pieces in wax paper squares as party favors, or package a selection of flavors in a small jar as a unique homemade gift. This gum is a fantastic activity centerpiece at kids birthday parties — set up a DIY gum-making station and let kids make and flavor their own pieces to take home.
Storage
Store homemade bubble gum wrapped individually in wax paper inside an airtight container at room temperature for up to 2 weeks. Keep away from direct sunlight and heat which can soften the gum and cause pieces to stick together. Do not refrigerate — cold temperatures make the gum hard and difficult to chew. For longer storage, wrap tightly and freeze for up to 3 months. Thaw at room temperature for 30 minutes before chewing.

FAQ
Food-grade gum base pellets are available on Amazon, at specialty candy-making suppliers like CandylandCrafts or Bulk Candy Store, and at some health food stores. Search specifically for food-grade or food-safe gum base pellets. Chicle, the natural version made from sapodilla tree sap, is also available online for a more natural option. Always check that the product is labeled safe for human consumption before purchasing.
Bubble gum and chewing gum both use gum base but bubble gum contains more gum base and a softer, more elastic formulation that allows it to stretch and form bubbles when blown. Chewing gum is typically firmer and less stretchy. To make chewing gum instead of bubble gum with this recipe, reduce the corn syrup slightly and knead the dough less to produce a firmer texture.
Properly wrapped and stored in an airtight container at room temperature, homemade bubble gum lasts up to 2 weeks. After that the texture can become harder and the flavor starts to fade. For longer storage freeze for up to 3 months and thaw at room temperature before chewing. Do not refrigerate as cold temperatures make the gum stiff and unpleasant to chew.
The two most common reasons are under-kneading and not waiting the full 24 hours rest time. Kneading develops the elasticity that makes bubbles possible — if you knead for less than 5 minutes the gum will not have enough stretch to blow. Also make sure you waited the full 24 hours before chewing. Gum that has not rested properly will be too soft and sticky to form a proper bubble.
Yes, this recipe uses only food-safe ingredients and is completely safe for children. Always supervise young children while chewing gum and remind them not to swallow it. If making the sugar-free version with xylitol, keep it away from dogs as xylitol is toxic to pets. For children under 5, gum is generally not recommended as they may swallow it accidentally.
This recipe uses powdered sugar as the main sweetener. Simply follow the directions above — melt the gum base, stir in corn syrup and flavoring, then gradually mix in the powdered sugar until a dough forms. Knead thoroughly, shape into pieces, and rest for 24 hours. The powdered sugar sweetens the gum and also acts as a non-stick dusting agent during kneading and shaping.
Unfortunately not. Gum base is the only ingredient that gives bubble gum its non-digestible, chewy, elastic texture. There is no food substitute that replicates what gum base does. Recipes claiming you can make bubble gum without gum base typically result in a candy or taffy rather than true chewing gum. Gum base is easy to order online and a small bag makes many batches.
Homemade bubble gum is one of those projects that feels far more impressive than the effort it actually takes. Once you have made your first batch you will be hooked — experimenting with new flavors, colors, and combinations every time.
Whether you make the classic pink bubble gum flavor, go fruity with watermelon or strawberry, or get adventurous with sour or spicy cinnamon, every batch is a new creation that is entirely yours. It is the kind of recipe that turns a regular afternoon into a memorable kitchen adventure.
Ready to explore more fun homemade candy and snack ideas? Browse our 23 Best Copycat Recipes, try our Homemade Dill Pickle Gummy Worms, or check out our full collection of 21 Healthy Snacks for Kids for more recipes the whole family will love.

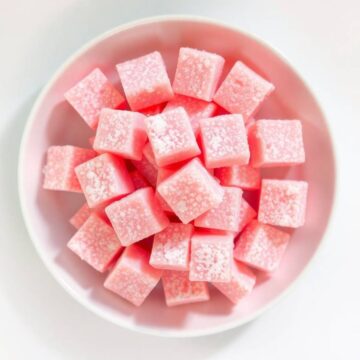
HOMEMADE BUBBLE GUM RECIPE
Ingredients
- ⅓ cup gum base pellets available online or in candy supply stores
- ¾ cup powdered sugar plus extra for dusting
- 2 tablespoons corn syrup
- ½ teaspoon glycerin optional for softness
- ¼ teaspoon citric acid optional for tartness
- ½ teaspoon bubble gum or fruit flavoring
- A few drops of food coloring optional
Instructions
Melt Gum Base:
- In a microwave-safe bowl, combine gum base pellets, corn syrup, glycerin, and citric acid. Microwave in 30-second bursts, stirring between each, until fully melted and smooth.
Add Flavor & Color:
- Stir in flavoring and food coloring. Mix well until evenly combined.
Add Sugar:
- Gradually stir in powdered sugar with a spoon or spatula until dough forms. When cool enough to handle, knead the mixture on a powdered sugar-dusted surface.
Shape Gum:
- Continue kneading until smooth and pliable. Roll into a log and cut into small pieces or shape as desired.
Wrap & Store:
- Wrap pieces in wax paper and store in an airtight container.
Notes
- Make Ahead: Store finished gum in a sealed container for up to 2 weeks.
- Customizing the Flavor: Try watermelon, strawberry, or mint extracts. Mix in edible glitter for fun!
- Serving Suggestions: Great for party favours or edible craft activities.
- Allergy-Friendly Options: Most gum base is gluten-free, but check the label to be sure.





Comments
No Comments