
Tuesday nights are my chaos nights. The kids have after-school stuff, my husband gets home late, and I have exactly zero mental energy left to make something elaborate. This crescent roll taco bake is what I cook on Tuesday nights — and honestly, most other nights too when I just need dinner to happen fast.
What I like about this one is how little it asks of you. You brown some ground beef, stir in taco seasoning, press crescent dough into a baking dish, pile everything on top, and let the oven do the rest. No rolling, no folding, no technique required. The dough bakes up flaky and golden on the bottom while the seasoned beef and melted cheddar do their thing on top. It's not fancy — it's just reliable, and that's what I need on a weeknight.
Saad discovered this one when I was testing it a few months ago and has asked for it pretty much every week since. My husband eats it with hot sauce and a pile of sliced jalapeños on top. I usually serve mine with a spoonful of sour cream and whatever salsa I have open in the fridge. If you're looking for more easy casserole-style dinners that come together fast, my fried cabbage with shrimp, sausage, and bacon follows the same logic — minimal effort, one pan, actual flavor.
One thing worth knowing upfront: make sure you press those crescent seams together firmly before adding the filling. The first time I made this I was lazy about it and the filling leaked into the gaps and made the bottom soggy in spots. Took me an extra 30 seconds the second time and it came out completely solid. Small step, big difference.
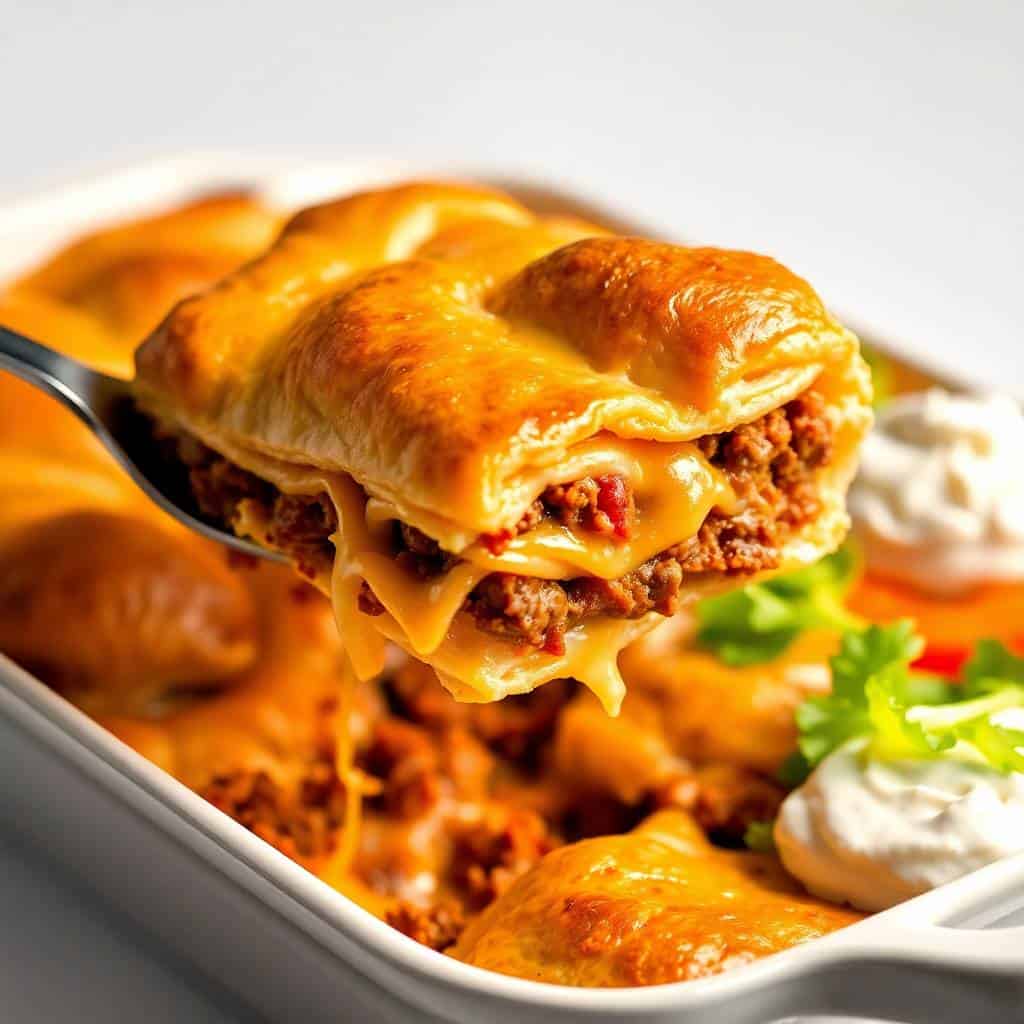
Why You'll Love This Recipe
- Dinner in 40 minutes: From opening the fridge to sitting down at the table, this takes about 40 minutes on a normal night. Most of that is the oven — the actual hands-on work is maybe 10 minutes. That matters when everyone in the house is hungry and you don't want to be standing at the stove for an hour.
- Kids actually eat it: I've made plenty of dinners that my kids push around their plates. This one disappears. The crescent crust is buttery and soft enough that even picky eaters don't complain, and the cheesy taco filling hits exactly the right notes for kids who've grown up eating tacos.
- Great use for leftover taco meat: If you've made tacos earlier in the week and have leftover seasoned beef sitting in the fridge, this is the perfect second life for it. Skip the browning step entirely and just go straight to assembling. Dinner is on the table even faster.
- Cheap ingredients, real meal: One tube of Pillsbury crescent rolls from Walmart, a pound of ground beef, a packet of taco seasoning, and some shredded cheddar. That's the whole thing. You probably already have most of this. I usually keep crescent roll tubes in my fridge because they're useful in so many situations — this being one of the best.
- Easy to customize: My husband wants it spicy so I add jalapeños to his half before baking. I sometimes do half beef, half black beans when I want to stretch it further. The base is flexible enough that you can change it based on who's eating and what you have on hand without the whole thing falling apart.
Ingredients
- 1 lb ground beef
- 1 packet taco seasoning (store-bought is totally fine)
- ½ cup water
- 1 tube Pillsbury crescent rolls (8 oz)
- 1 cup shredded cheddar cheese (or Mexican blend — both work)
- ½ cup salsa (optional, for serving or mixing into the filling)
- ½ cup sour cream (optional, for serving)
- ¼ cup chopped green onions (optional garnish)
- Sliced jalapeños, black olives, or diced tomatoes (optional toppings)
Directions
- Preheat the oven: Set your oven to 375°F (190°C) and lightly grease a 9x13-inch baking dish. A standard sheet cake pan or any similar-sized baking dish works here — you don't need anything special.
- Cook the beef: In a skillet over medium heat, brown the ground beef and drain the fat. Stir in the taco seasoning packet and ½ cup of water. Let it simmer for 3–5 minutes until the liquid absorbs and the mixture thickens up. It should look saucy but not watery.
- Press the dough: Unroll the crescent dough and press it into the bottom of your greased baking dish, sealing all the seams together firmly with your fingers. Don't skip this — gaps in the dough let the filling seep underneath and make the bottom soggy. Press the edges up slightly around the sides if you can.
- Add the filling: Spread the seasoned beef evenly over the crescent dough base. Sprinkle the shredded cheddar over the top in an even layer. If you're adding jalapeños or other toppings that you want baked in, add them now.
- Bake: Slide the dish into the oven and bake for 20–25 minutes, until the crescent crust is golden brown around the edges and cooked through. Keep an eye on it around the 20-minute mark — oven temperatures vary and you don't want the top to over-brown.
- Rest and serve: Let it sit for 5 minutes before slicing. This gives the filling time to set so it doesn't slide everywhere when you cut it. Serve with sour cream, salsa, green onions, or whatever toppings your family wants.

Tips for Success
- Seal those seams properly: I can't stress this enough because I learned it the hard way. The crescent dough comes perforated into triangles, and if you just lay them in the pan without pressing the seams closed, the filling falls right through the gaps. Take an extra minute to really press them together — use your fingers and go over the whole surface. It makes the crust behave like an actual base instead of falling apart when you slice it.
- Don't skip the simmer on the beef: After you add the taco seasoning and water, give it a full 3–5 minutes on the heat. I've rushed this step and ended up with watery filling that made the crust soggy. You want the liquid mostly absorbed and the beef mixture looking thick and saucy before it goes into the pan.
- Let it rest before slicing: Five minutes feels like forever when you're hungry, but it genuinely makes a difference. The filling tightens up slightly as it cools and you get clean slices instead of everything sliding off. I usually use that five minutes to set out the toppings so it doesn't feel like wasted time.
- Use block cheese if you have time: Pre-shredded bags from the store are convenient and I use them often, but they have a coating that makes them melt slightly less smoothly. If you have a block of cheddar and a box grater, freshly shredded cheese melts better and gets that nice gooey pull. Either works — just a small upgrade if you feel like it.
- Watch the oven in the last five minutes: Crescent dough goes from golden to over-browned faster than you'd expect. Start checking at 20 minutes. The crust should be deep golden around the edges and the cheese should be fully melted and starting to bubble. If the edges look done but the center is still pale, give it another 2–3 minutes and check again.
Variations
- Chicken taco bake: Swap the ground beef for shredded rotisserie chicken mixed with taco seasoning. This is my go-to shortcut when I don't feel like browning meat — pick up a rotisserie chicken, shred it, toss it with seasoning and a splash of water, and you're done. My husband actually prefers this version and it comes together even faster than the beef.
- Veggie version: Use one can of drained black beans and one cup of frozen corn (thawed) in place of the beef. Add ½ cup of diced peppers if you have them. Season the bean mixture with the full taco seasoning packet the same way you would with the meat. It's a genuinely filling meatless dinner and takes even less time since there's nothing to brown.
- Extra cheesy filling: Mix 2–3 tablespoons of cream cheese into the hot beef mixture before spreading it on the dough. It melts right in and makes the filling richer and creamier — almost like a queso-stuffed taco situation. This version is Saad's absolute favorite and the reason I sometimes make a double batch.
- Spiced up version: Use hot salsa instead of water in the beef, add a diced jalapeño to the filling, and top with pepper jack cheese instead of cheddar. My husband made this suggestion and he was right — it genuinely tastes like a spicier, more interesting version without much extra effort. If you like heat, this is worth trying. Pairs well alongside something cooling like my antipasto pasta salad if you're feeding people with different spice tolerances.
- Beans and beef combo: Add ½ cup of refried beans or drained black beans directly into the beef mixture before spreading it on the dough. It stretches the filling further, adds more substance, and makes the whole thing a bit heartier. This is what I do when I'm feeding more people than one pound of beef would normally cover.
Serving and Storage
Serving
Serve this straight from the baking dish, sliced into squares. I put out a spread of toppings on the table — sour cream, salsa, sliced jalapeños, green onions, diced tomatoes — and let everyone build their own plate. It works well as a standalone dinner, but if you want to round it out, tortilla chips on the side are great for scooping up any filling that falls off. A simple green salad alongside keeps it from feeling too heavy.
Storage
Store leftovers in an airtight container in the fridge for up to 3 days. The crescent crust softens overnight but the flavor is still completely good the next day. To reheat, use the oven at 350°F for about 10 minutes to get the crust slightly crisp again — the microwave works in a pinch but does make it softer. You can also freeze this baked and cooled, wrapped tightly, for up to a month. Thaw overnight in the fridge and reheat in the oven.

Frequently Asked Questions
Can I use crescent dough sheets instead of the perforated rolls?
Yes, and honestly they're a bit easier to work with for this. Crescent sheets come as one solid piece without the perforations, so you just lay it in the dish and press it to fit — no seam-sealing required. If your store carries them (Walmart and Trader Joe's usually do), grab those instead. Same dough, less hassle.
Can I assemble this ahead of time?
You can put the whole thing together — dough, beef, cheese — cover it tightly, and refrigerate it for up to a day before baking. When you're ready to bake, add 5 extra minutes to the bake time since it's going in cold. This is genuinely useful when you want to prep in the morning and just slide it into the oven at dinner time.
What cheese works best besides cheddar?
Monterey Jack melts beautifully and has a mild flavor that works well here. A Mexican blend (usually a mix of cheddar, Monterey Jack, asadero, and queso quesadilla) is my personal favorite because it melts evenly and has more depth than plain cheddar alone. Pepper jack is great if you want heat built into every bite.
Can I freeze this taco bake?
Yes. Let it cool completely after baking, then wrap it tightly and freeze for up to a month. Thaw overnight in the fridge and reheat in a 350°F oven for 15–20 minutes. The crust won't be quite as flaky as it was fresh, but the flavor holds up well. I've done this with leftovers and it makes for a genuinely easy lunch the next week.
How do I make this spicier?
Use hot salsa in place of the water when cooking the beef, and add a diced jalapeño directly into the filling before it goes on the dough. Swapping regular cheddar for pepper jack adds another layer of heat. My husband uses all three of these tricks and then adds more sliced jalapeños on top after baking — it's very much his version of the recipe at that point.

PILLSBURY CRESCENT ROLL TACO BAKE
Ingredients
- 1 lb ground beef
- 1 packet taco seasoning
- ½ cup water
- 1 tube Pillsbury crescent rolls
- 1 cup shredded cheddar cheese
- ½ cup sour cream optional
- ½ cup salsa optional
- ¼ cup chopped green onions optional
- Sliced black olives jalapeños, or diced tomatoes for garnish (optional)
Instructions
Preheat Oven:
- Preheat oven to 375°F (190°C). Lightly grease a 9x13-inch baking dish.
Cook the Beef:
- In a skillet over medium heat, cook ground beef until browned. Drain fat. Stir in taco seasoning and water. Simmer until thickened, about 3–5 minutes.
Assemble the Bake:
- Unroll crescent dough and press into the bottom of the baking dish to form a crust, sealing seams. Spread taco meat evenly over the crust.
Add Cheese:
- Sprinkle shredded cheese over the taco meat.
Bake:
- Bake for 20–25 minutes or until the crescent crust is golden brown and cooked through.
Top and Serve:
- Let cool slightly. Slice and top with sour cream, salsa, green onions, or other toppings as desired.
Notes
Assemble the taco bake up to a day ahead and refrigerate. Bake just before serving. Customizing the Flavor:
Swap beef for ground turkey or beans. Add taco sauce or chopped green chilies for more heat. Serving Suggestions:
Serve with tortilla chips, guacamole, or a fresh green salad. Allergy-Friendly Options:
Use dairy-free cheese and gluten-free crescent dough to meet dietary needs. Storage Tips:
Store leftovers in an airtight container in the fridge for up to 3 days. Reheat in the oven for best texture.
This is one of those recipes that earns its place on a regular rotation not because it's impressive, but because it's genuinely useful. It works on nights when you have energy and want to load it up with toppings and make a whole spread. It works equally well on nights when you just need food on the table and don't want to think too hard. Both versions taste good.
I also appreciate that it travels well if you need to bring something to a potluck or a casual gathering. I've brought this to a few family dinners and it holds up fine in a covered dish — just reheat it in the oven for 10 minutes when you get there. It looks more put-together than you'd expect for something that takes 40 minutes.
If you're in a baking mood after dinner, my caramel brownie cheesecake is what I'd make for dessert on a night like this — it's a project, but it's worth every minute. And if you're on the hunt for more weeknight dinners that don't require a lot of effort, keep reading below. I've got some good ones.
This one's staying in the regular rotation at my house. Hope it earns a spot in yours too. 🧀🌮✨
If you liked this, you'll probably like these too:
- Fried Cabbage with Shrimp, Sausage & Bacon — one skillet, big flavor, weeknight staple
- Cottage Cheese Flatbread Pizza — high protein, low effort, ready in 15 minutes
- Antipasto Pasta Salad — great alongside anything spicy or hearty
- Caramel Brownie Cheesecake — for when dinner went well and you want to keep the streak going
-
{"@context":"https://schema.org","@type":"Article","headline":"PILLSBURY CRESCENT ROLL TACO BAKE","description":"This taco bake uses Pillsbury Crescent Rolls for a quick, cheesy, and delicious twist on taco night—perfect for busy families.","datePublished":"2025-04-24T20:13:11+00:00","dateModified":"2026-05-04T03:57:05+00:00","author":{"@type":"Person","name":"Sana Umer","url":"https://forfoodiefriends.com/about/","description":"Self-taught home cook with 10+ years of kitchen experience. Mom of two who develops every recipe in her own kitchen.","jobTitle":"Recipe Developer & Food Blogger","image":"https://forfoodiefriends.com/wp-content/uploads/sana-umer-author-photo.jpg"},"publisher":{"@type":"Organization","name":"For Foodie Friends","url":"https://forfoodiefriends.com/","logo":{"@type":"ImageObject","url":"https://forfoodiefriends.com/wp-content/uploads/forfoodiefriends-logo.png"}},"mainEntityOfPage":{"@type":"WebPage","@id":"https://forfoodiefriends.com/pillsbury-crescent-roll-taco-bake/"},"image":"https://forfoodiefriends.com/wp-content/uploads/2025/04/PILLSBURY-CRESCENT-ROLL-TACO-BAKE.jpg"}





Comments
No Comments