
Lunch is the meal I think about least and rely on most. Dinner gets all the attention — the planning, the family time, the actual recipes. But lunch is the meal that determines whether I make it to 4pm without crashing, whether Saad has energy left for soccer practice, whether my husband stops at a drive-thru on his way home from work. Skipping lunch or eating something sad and convenient adds up to a worse day every time.
What I've figured out after years of packing school lunches and feeding my own desk-job afternoons is that most "easy lunch recipes" online aren't actually easy. They're 30-minute weeknight dinners reframed as lunch ideas. A real easy lunch is something you can throw together in 10 minutes, pack the night before, or pull out of the freezer at noon and have ready by 12:15. The bar should be that low.
This list of 33 covers every kind of lunch I actually make. Wraps and sandwiches for the truly fast days. Grain bowls and salads when I want something that holds up in a fridge container. Hot ramen and casseroles for cold weather. A few international dishes — Thai basil tofu, Moroccan chickpeas, Japanese onigiri — for when sandwich fatigue sets in. Every recipe has full ingredients and step-by-step instructions inline so you're not clicking off to another site. For more weekday meal planning, my freezer-friendly fajita bowls are the meal-prep base I build around.
Quick honest note before the list: the best lunch is the one you'll actually eat. The fanciest grain bowl in the world is useless if it sits in your fridge while you order Uber Eats. I've learned to lean into the lunches my family genuinely wants — wraps Saad will finish, sandwiches my husband takes to work, leftovers I'll happily reheat. The recipes below are the ones that have earned a permanent place in our rotation by passing that test.
33 Easy Lunch Recipes for Quick and Tasty Meals
What Makes a Real Easy Lunch
Three principles I follow when I'm planning the week's lunches. Once you internalize these, you'll stop wasting time on recipes that look good on Instagram but never actually get made.
Match the format to your schedule. Wraps and sandwiches are for "I have 8 minutes between meetings" days. Grain bowls and salads are for "I prepped on Sunday and just need to grab and go" days. Hot dishes like ramen, casseroles, and quesadillas are for "I work from home and want a real warm lunch" days. Most lunch plans fail because people try to make a grain bowl on a 5-minute day, get frustrated, and order takeout. Pick the format that fits the day you're actually having.
Build a sandwich/wrap better than you think. The thing that separates a sad desk sandwich from a real lunch is layering and condiment quality. Spread mayo, mustard, or sauce on BOTH slices of bread (this seals against moisture from tomato or pickles and adds flavor in every bite). Use thin slices of cheese in two layers instead of one thick slice. Add a fresh element like cucumber, sprouts, or pickled onions for crunch. Salt and pepper any vegetable you put in. These tiny upgrades cost no extra time and make a sandwich taste 50% better.
Cold rice is your friend. The biggest unlock for fast lunches is keeping cooked rice in the fridge. Make a big pot on Sunday — basmati, jasmine, or brown — and store it in a sealed container. Cold rice becomes fried rice in 8 minutes, grain bowls in 5 minutes, onigiri in 10 minutes, or rice-based salads in zero cook time. Stand at the fridge with a container of cold rice and a few proteins and vegetables, and lunch assembles itself.
One more thing — keep a "lunch protein" prepped at all times. A rotisserie chicken from the grocery store, hard-boiled eggs, a can of chickpeas, leftover roasted chicken from dinner, a block of tofu. The protein is what turns "a snack" into "a lunch." If you have a protein ready to go, building a lunch around it takes minutes. If you have to cook protein at 12:15pm, you'll skip lunch.
33. Cranberry Apple Buckwheat Salad

A grain salad built on cooked buckwheat groats with dried cranberries, crisp apple, toasted nuts, and a light lemon-maple dressing. Buckwheat has a nutty, slightly earthy flavor that holds up against the sweetness of the cranberries and apple. This is one of those lunches that gets better as it sits — the flavors meld over an hour or two, which makes it ideal for meal prep. Keeps 3 days in the fridge.
Toast the buckwheat in a dry pan for 2-3 minutes before boiling — this single step transforms the flavor from bland to nutty. Untoasted buckwheat tastes flat in salads; toasted buckwheat tastes intentional. Use a tart-crisp apple like Granny Smith or Honeycrisp; soft apples turn mushy in the dressing and lose their textural contrast. Add the apple right before serving, not in advance, or it'll oxidize and brown.
Ingredients (serves 4):
- 1 cup buckwheat groats (kasha, raw)
- 2 cups water
- ½ teaspoon salt
- 1 large crisp apple (Granny Smith or Honeycrisp), diced
- ½ cup dried cranberries
- ⅓ cup toasted walnuts or pecans, chopped
- ¼ cup red onion, finely diced
- 2 tablespoon fresh parsley, chopped
- Dressing: 3 tablespoon olive oil, 2 tablespoon lemon juice, 1 tablespoon maple syrup, 1 teaspoon Dijon mustard, ½ teaspoon salt, ¼ teaspoon black pepper
Instructions:
- Toast buckwheat groats in a dry pan over medium heat for 2-3 minutes, stirring, until fragrant. Add 2 cups water and ½ teaspoon salt. Bring to a boil, reduce to low, cover and simmer 12-15 minutes until water is absorbed. Fluff with a fork and cool completely (spread on a sheet pan for faster cooling).
- Whisk dressing ingredients in a small bowl until emulsified.
- In a large bowl, combine cooled buckwheat, dried cranberries, toasted nuts, red onion, and parsley. Pour dressing over and toss to coat.
- Fold in diced apple just before serving. Taste and adjust salt and lemon. Serve at room temperature or chilled.
32. Pimento Cheese Sandwiches (4 Ways)

The classic Southern pimento cheese — sharp cheddar, cream cheese, mayonnaise, and diced pimentos — spread thick on white or whole-wheat bread. This recipe makes a big batch of the spread (lasts a week in the fridge) and four ways to use it: classic cold sandwich, grilled hot, on a bagel with bacon, or open-faced under the broiler. The spread itself takes 5 minutes and goes on everything once you have it.
Shred the cheddar yourself from a block, not pre-shredded. Pre-shredded cheese has cellulose powder that prevents the pimento spread from getting truly smooth and creamy. Use sharp or extra-sharp cheddar — the spread's flavor lives in the cheese. Drain the pimentos thoroughly; wet pimentos make the spread runny. Let the spread rest in the fridge for at least an hour before using; the flavors deepen and the texture firms up.
Ingredients (makes about 2 cups spread, serves 6-8 sandwiches):
- 2 cups freshly shredded sharp cheddar (from a block)
- 4 oz cream cheese, softened
- ⅓ cup mayonnaise
- 1 jar (4 oz) diced pimentos, drained well
- 1 tablespoon Dijon mustard
- 1 teaspoon Worcestershire sauce
- ½ teaspoon garlic powder
- ½ teaspoon smoked paprika
- ¼ teaspoon cayenne pepper
- Salt and black pepper to taste
- White or whole-wheat bread for sandwiches
Instructions:
- In a large bowl, beat softened cream cheese until smooth. Add mayonnaise, Dijon, Worcestershire, garlic powder, smoked paprika, and cayenne. Mix until creamy.
- Fold in shredded cheddar and drained pimentos. Season with salt and pepper. Refrigerate at least 1 hour.
- For the classic cold sandwich: spread thick on two slices of bread, sandwich, eat.
- For grilled hot: spread on bread, butter the outsides, grill in a skillet over medium heat 3 minutes per side until golden and the cheese is melted. For bacon variation: add 2-3 strips of cooked bacon to a grilled version. For open-faced: spread on toast, broil 2 minutes until bubbly and golden.
31. Chicken Apple Salad Lettuce Wraps
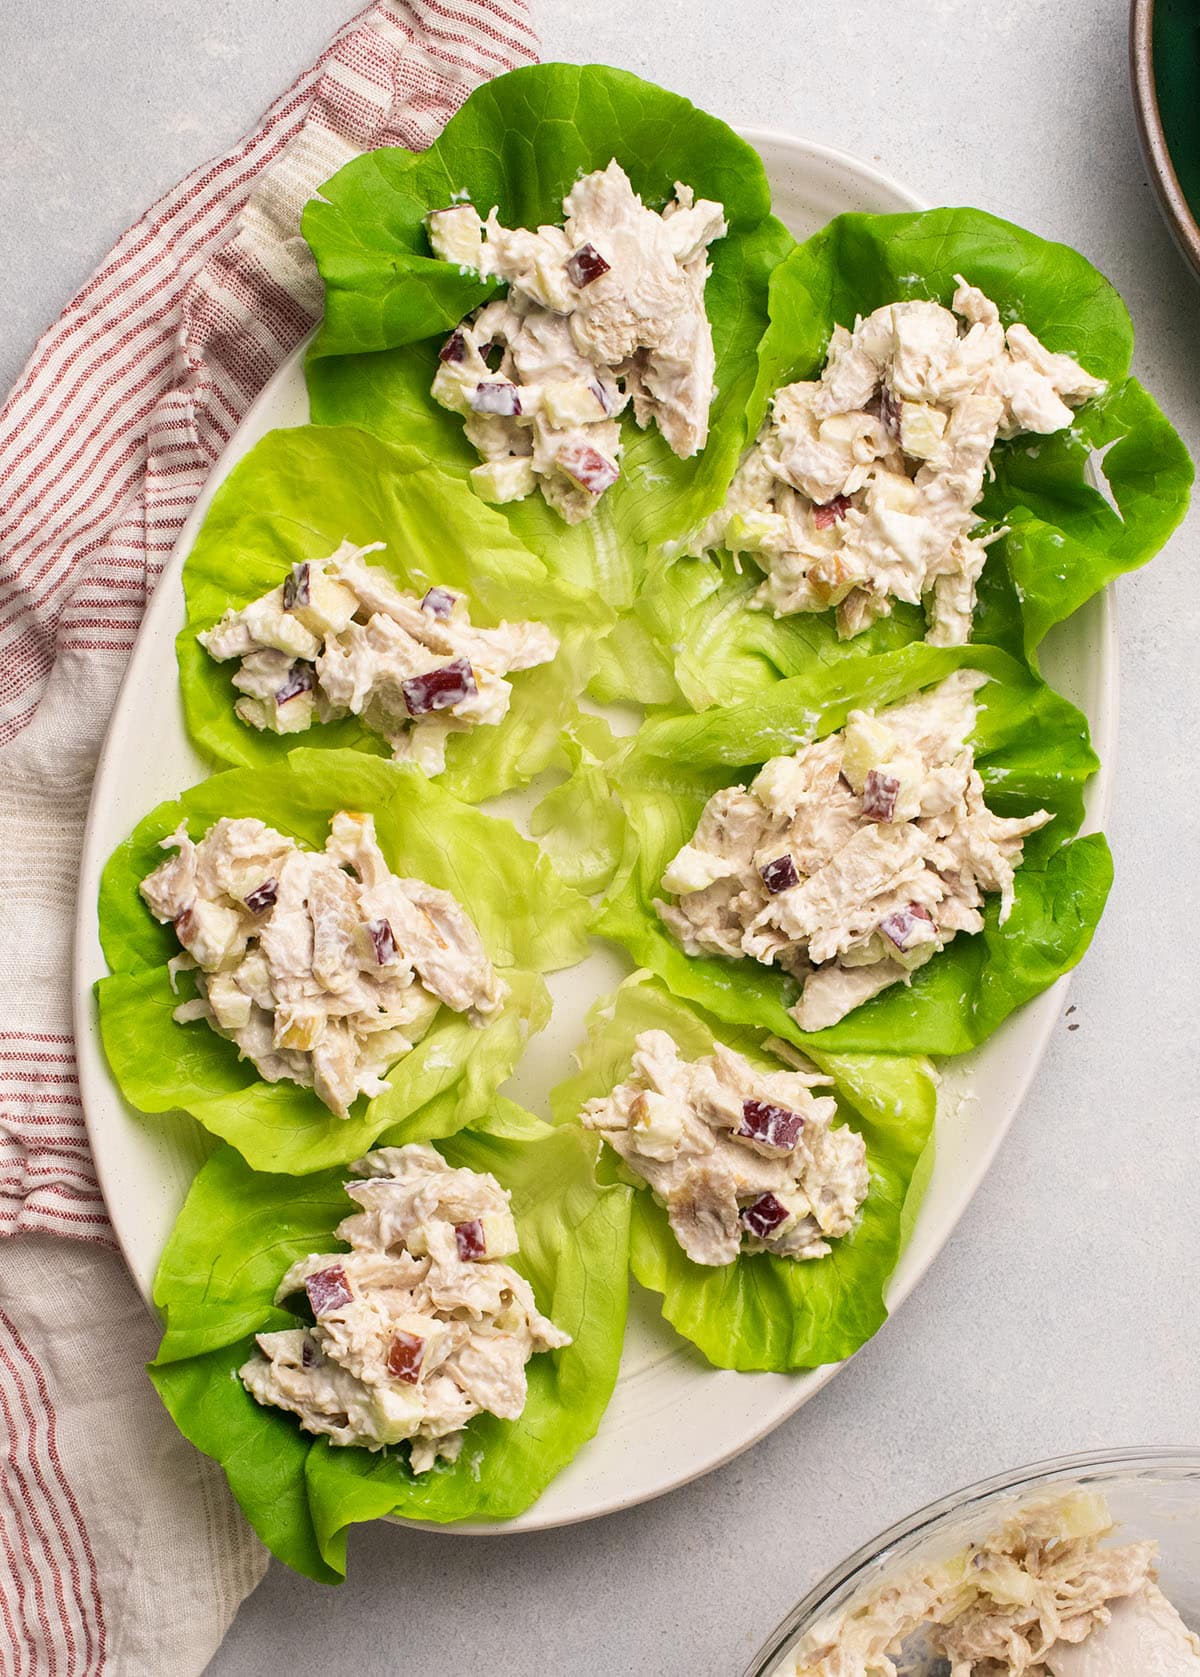
A chicken salad with diced apple, celery, and toasted almonds, dressed in a light Greek-yogurt-and-mayo dressing, served in crisp butter lettuce cups instead of bread. The lettuce wraps make this lunch-portable and lower-carb than a traditional sandwich. The sweetness of the apple and the crunch of the almonds make this version distinct from the other chicken salad on this list (#20). For more chicken salad variations, my dedicated chicken salad roundup has plenty more.
Use shredded rotisserie chicken if you can — the texture is better than poached chicken breast, and it costs about the same when factored against the prep time. Pull the meat off while it's still warm; cold rotisserie chicken shreds unevenly. Choose butter lettuce or romaine hearts for the wraps; iceberg is too crunchy and breaks, leafy greens like spring mix are too floppy. Butter lettuce holds its shape and feels substantial.
Ingredients (serves 4):
- 2 cups cooked chicken, shredded (rotisserie works perfectly)
- 1 medium crisp apple, diced
- 2 stalks celery, finely diced
- ⅓ cup toasted sliced almonds
- ¼ cup red onion, finely diced
- 2 tablespoon fresh chives, chopped
- 1 head butter lettuce or 2 romaine hearts (leaves separated)
- Dressing: ⅓ cup plain Greek yogurt, 2 tablespoon mayonnaise, 1 tablespoon lemon juice, 1 teaspoon Dijon mustard, ½ teaspoon salt, ¼ teaspoon black pepper, pinch of curry powder (optional)
Instructions:
- Toast almonds in a dry pan over medium heat for 3-4 minutes, stirring, until golden and fragrant. Set aside.
- Whisk all dressing ingredients in a large bowl until smooth.
- Add shredded chicken, diced apple, celery, red onion, and chives. Fold gently to coat. Add toasted almonds last (reserve a few for topping).
- Spoon the chicken salad into butter lettuce leaves. Top with reserved almonds and extra chives. Serve immediately, or refrigerate the chicken salad up to 2 days and assemble lettuce wraps fresh.
30. Easy Spinach Apple Salad with Maple Dijon Dressing
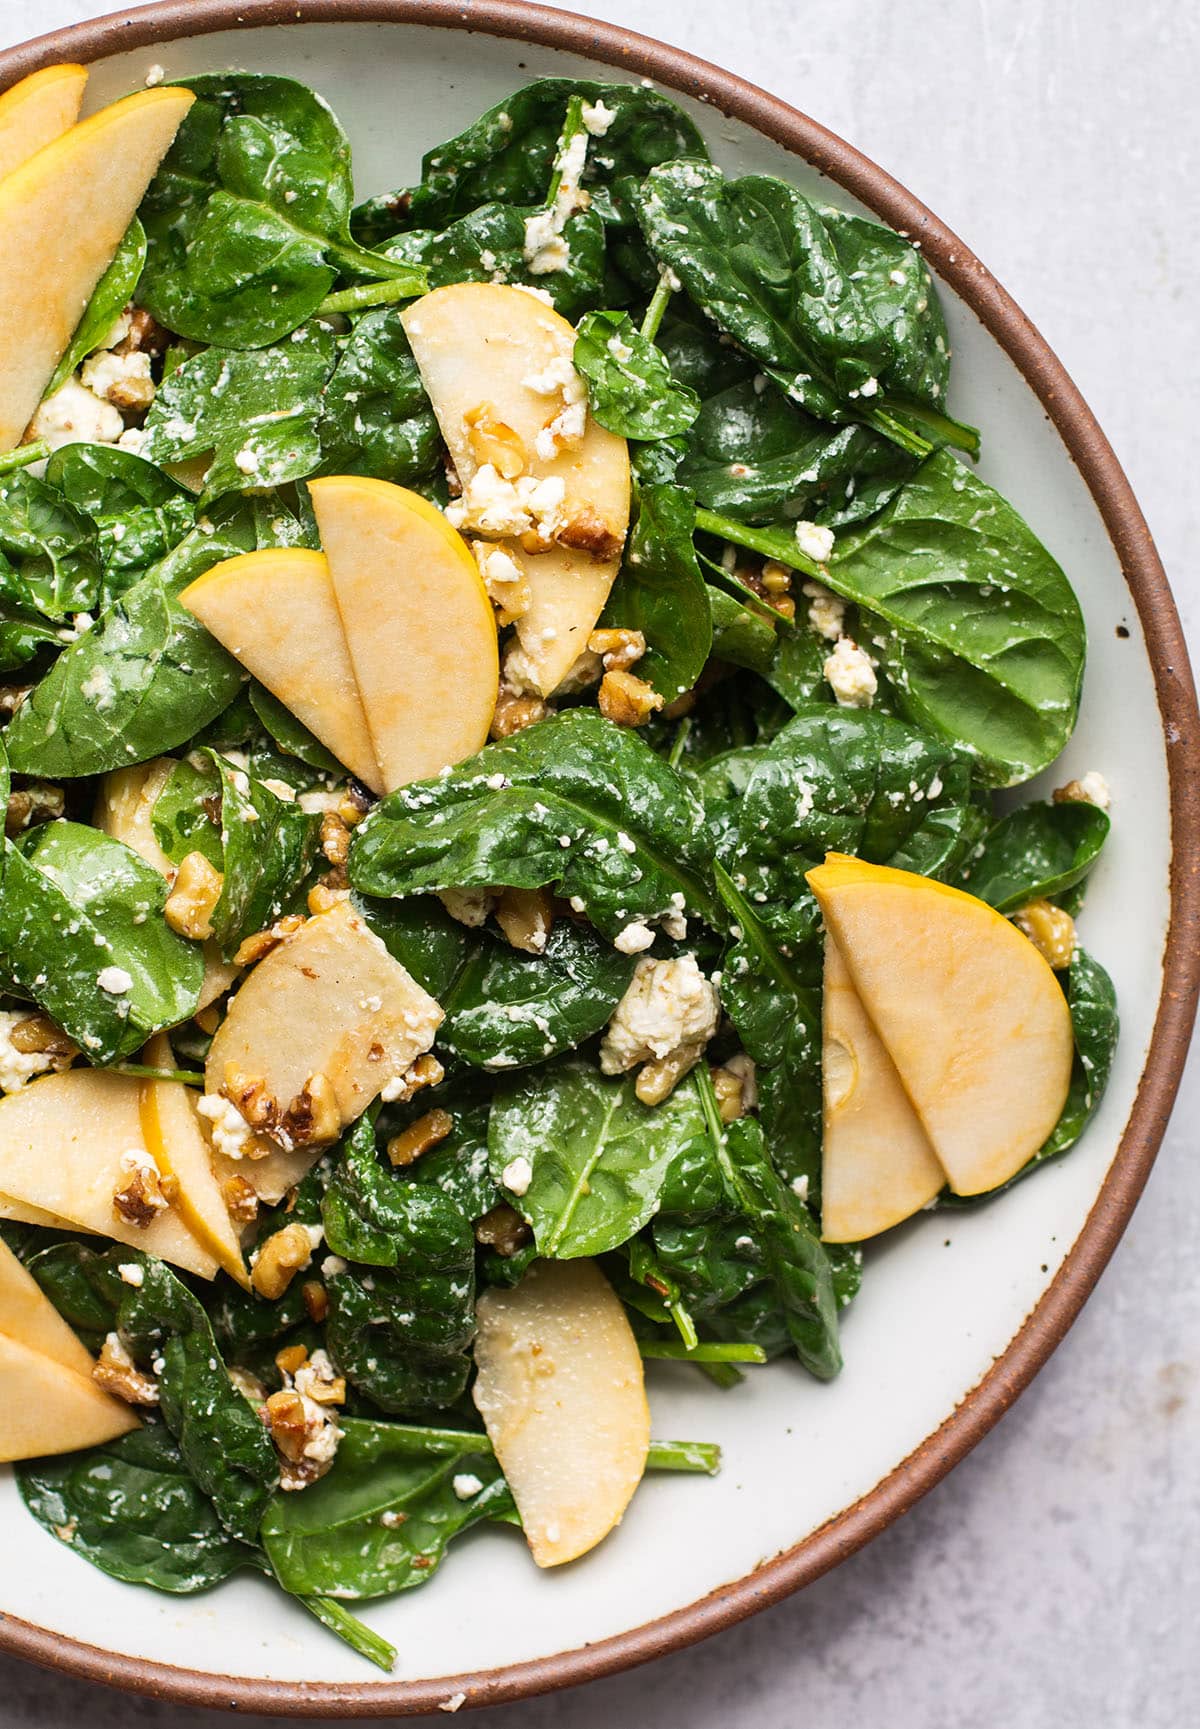
A simple but genuinely good salad — fresh baby spinach, sliced apple, crumbled feta, toasted pecans, and dried cranberries, tossed in a maple-Dijon vinaigrette. This is my no-thinking lunch when I want something fresh and filling but don't want to assemble anything complicated. The maple and Dijon balance perfectly — sweet, sharp, slightly mustardy. Five minutes to throw together if your spinach is already washed.
Dress the salad right before eating, not in advance. Spinach wilts dramatically once dressed — within 30 minutes you'll have a sad, soggy pile instead of a crisp salad. If you're packing this for work, put the dressing in a separate small container (a clean condiment cup or empty jam jar works) and dress at lunchtime. Pre-toasting the pecans matters too; raw pecans taste flat against the sharp feta.
Ingredients (serves 4):
- 6 cups fresh baby spinach
- 1 crisp apple (Honeycrisp or Gala), thinly sliced
- ½ cup crumbled feta cheese
- ⅓ cup pecans, toasted and chopped
- ⅓ cup dried cranberries
- ¼ cup red onion, thinly sliced
- Maple Dijon Dressing: ¼ cup olive oil, 2 tablespoon apple cider vinegar, 2 tablespoon maple syrup, 1 tablespoon Dijon mustard, 1 small garlic clove minced, ½ teaspoon salt, ¼ teaspoon black pepper
Instructions:
- Toast pecans in a dry pan over medium heat for 3-4 minutes, stirring, until fragrant. Cool and chop coarsely.
- Whisk olive oil, apple cider vinegar, maple syrup, Dijon, garlic, salt, and pepper in a small bowl or jar until emulsified.
- In a large bowl, combine spinach, sliced apple, feta, toasted pecans, dried cranberries, and red onion.
- Drizzle dressing over and toss gently. Serve immediately. If packing for lunch, keep dressing separate until ready to eat.
29. Creamy One-Pot Sundried Tomato White Beans ("Marry Me" White Beans)
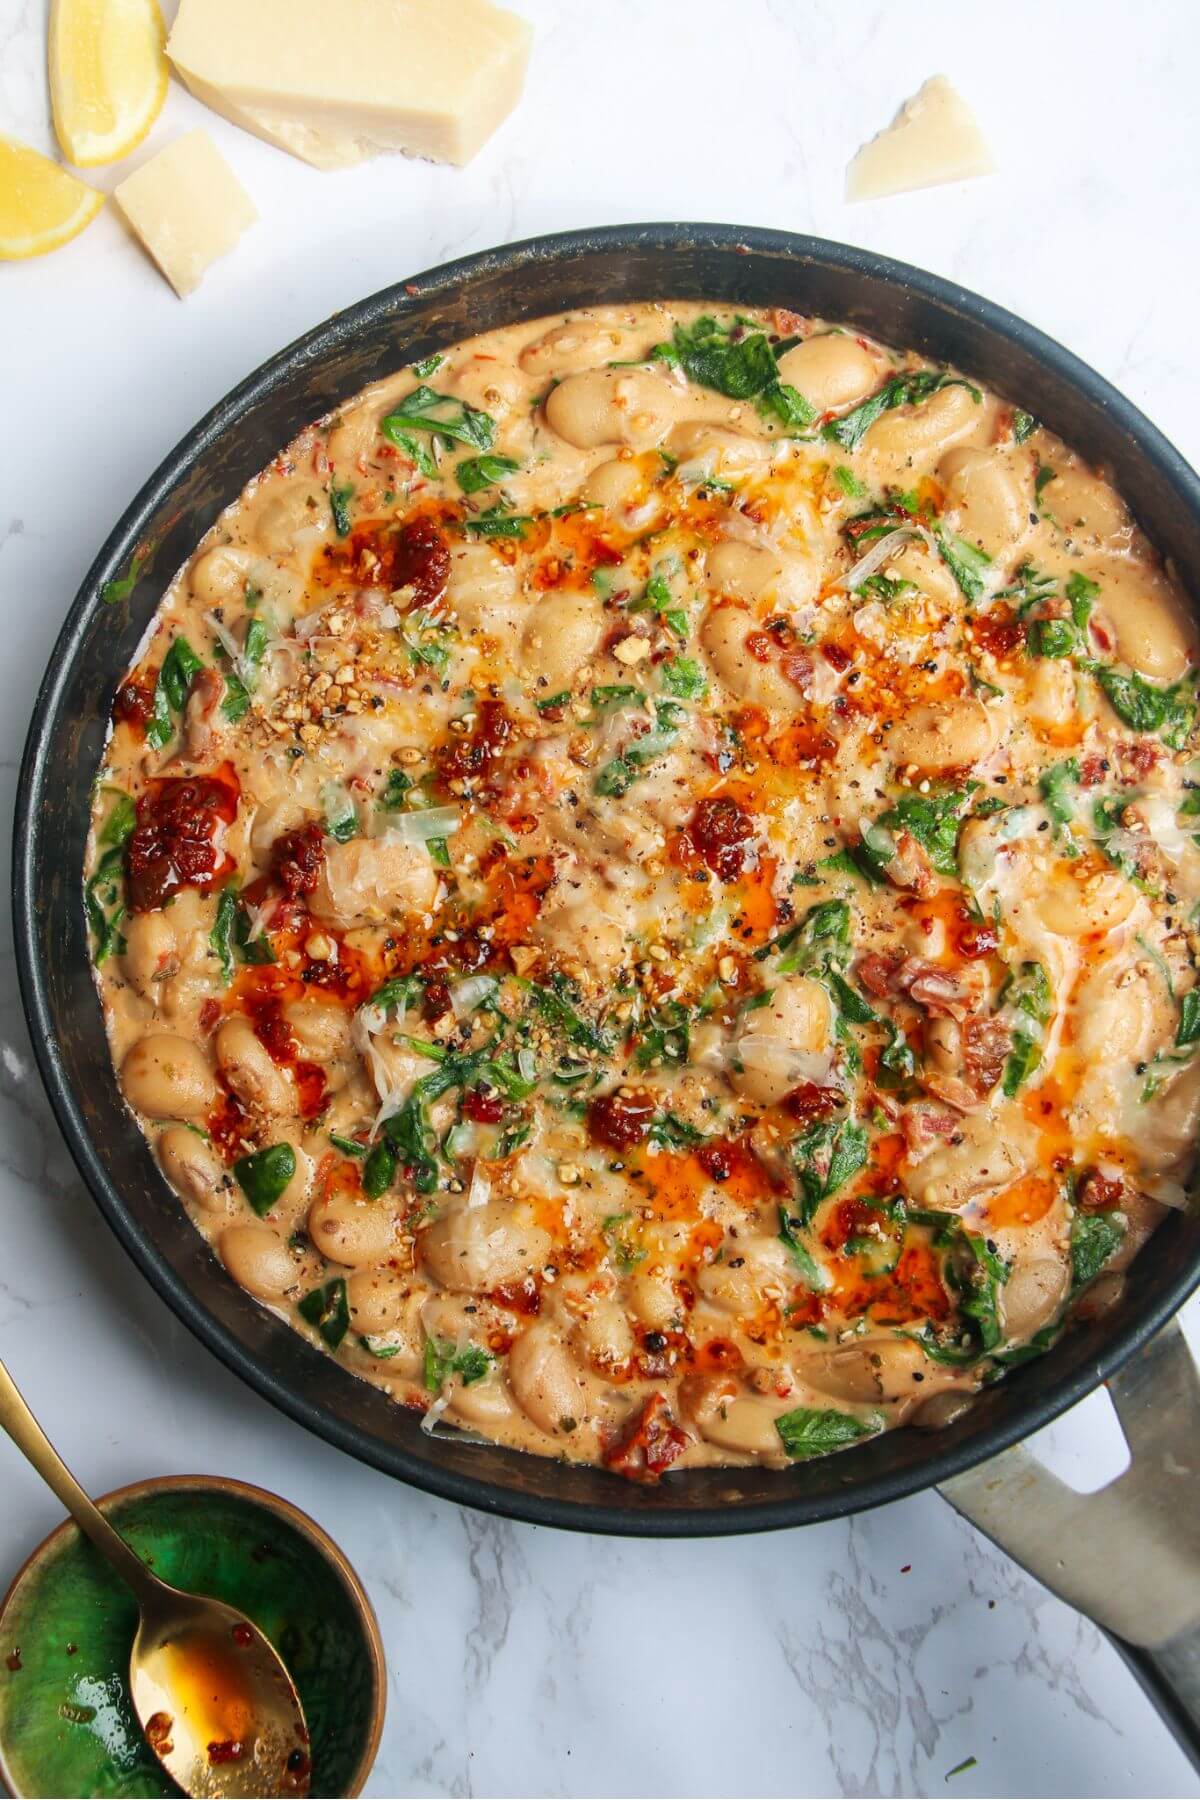
A creamy one-pot vegetarian dish with white beans (cannellini or great northern) simmered in a sundried tomato cream sauce with garlic, Parmesan, and fresh basil. Called "Marry Me" beans because the recipe is so good it's allegedly proposal-worthy — and honestly, my husband does ask me to make this on weeknights more than almost any other vegetarian dish. Around 18g of protein per serving from the beans alone. Serve over pasta or rice, or with crusty bread for dipping.
Use sundried tomatoes packed in oil, not dry-packed. Drain the oil but save 1-2 tablespoons — sauté the garlic in the reserved tomato oil at the start, which builds an aromatic base you can't get from regular olive oil. Cannellini beans are creamier than other white beans; great northern work too. Skip if all you have is butter beans — they're too soft and break apart in the sauce.
Ingredients (serves 4):
- 2 cans (15 oz each) cannellini beans, drained and rinsed
- ⅔ cup oil-packed sundried tomatoes, drained (reserve 2 tablespoon oil)
- 4 cloves garlic, minced
- 1 small shallot, finely diced
- 1 cup heavy cream
- ½ cup chicken or vegetable broth
- ½ cup grated Parmesan
- 2 teaspoon Italian seasoning
- 1 teaspoon red pepper flakes (optional)
- 1 teaspoon salt
- ½ teaspoon black pepper
- 2 cups fresh baby spinach (optional)
- ¼ cup fresh basil, chopped
- Crusty bread or pasta for serving
Instructions:
- Heat the reserved 2 tablespoon sundried tomato oil in a large skillet over medium heat. Add shallot, cook 3 minutes until softened. Add garlic, cook 30 seconds until fragrant.
- Stir in chopped sundried tomatoes, Italian seasoning, red pepper flakes, salt, and pepper. Cook 2 minutes.
- Add broth and bring to a simmer, scraping up browned bits. Pour in heavy cream and bring back to a gentle simmer. Reduce 3-4 minutes until slightly thickened.
- Stir in drained beans and Parmesan. Simmer 5 minutes. Fold in spinach (if using) at the end until wilted. Top with fresh basil. Serve hot over pasta, rice, or with crusty bread.
28. Easy Bacon and Egg Picnic Slice
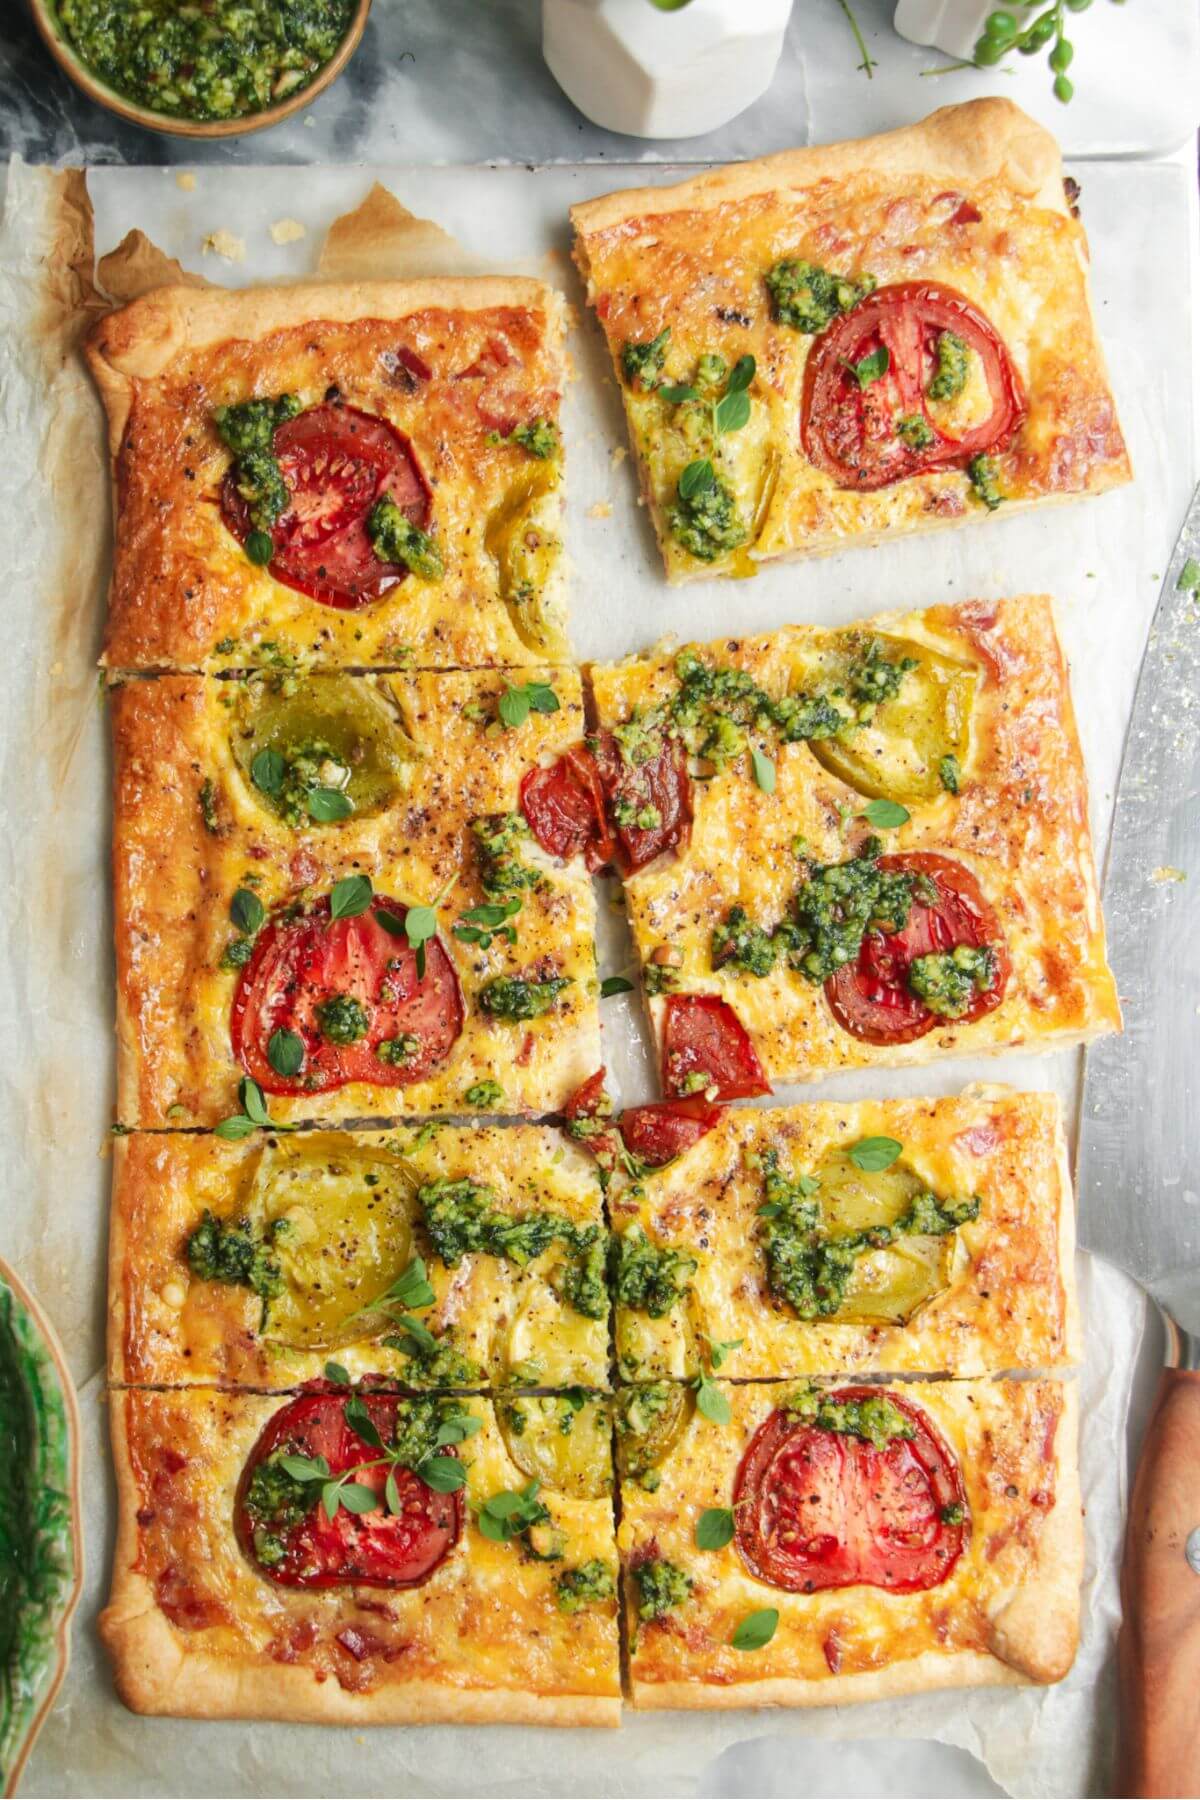
A savory bacon-and-egg slice baked in puff pastry — crispy bacon, beaten eggs, sharp cheddar, and chives, all encased in flaky golden pastry. Like a free-form quiche, but easier and better for portability. This is my Sunday-prep lunch for the week: bake a tray on Sunday, slice into squares, and pack for weekday lunches. Holds up at room temperature for hours, which makes it ideal for actual picnics, kids' lunches, or work bags without an ice pack.
Use store-bought puff pastry (Pepperidge Farm sells it in most US freezers; Trader Joe's all-butter pastry is even better if you can find it). Thaw overnight in the fridge, not at room temperature — counter-thawed puff pastry gets soggy. Pre-cook the bacon to crispy before adding to the egg mixture; raw bacon on top of the pastry releases too much fat as it bakes and makes the bottom soggy. Drain the bacon on paper towels before chopping.
Ingredients (serves 6-8):
- 1 sheet puff pastry (about 10×10 inches), thawed
- 8 strips bacon, cooked crispy and chopped
- 6 large eggs
- ¼ cup whole milk or heavy cream
- 1 cup shredded sharp cheddar
- 3 tablespoon fresh chives, chopped
- 2 green onions, sliced (whites and greens)
- ½ teaspoon salt
- ½ teaspoon black pepper
- 1 egg + 1 tablespoon water (for egg wash)
Instructions:
- Heat oven to 400°F. Cook bacon in a skillet until very crispy. Drain on paper towels and chop.
- Whisk 6 eggs, milk, salt, and pepper in a bowl. Stir in chopped bacon, shredded cheddar, chives, and green onions.
- Roll out puff pastry on a parchment-lined sheet pan to about 11×11 inches. Fold the edges in by ½ inch to make a small border. Pour the egg mixture into the center, spreading evenly inside the border.
- Whisk the additional egg with 1 tablespoon water and brush over the pastry borders. Bake 25-28 minutes until pastry is golden and the egg filling is set (no jiggle in the center). Cool 10 minutes, slice into squares. Serve warm, room temperature, or chilled.
27. Tuna Cucumber Sandwich
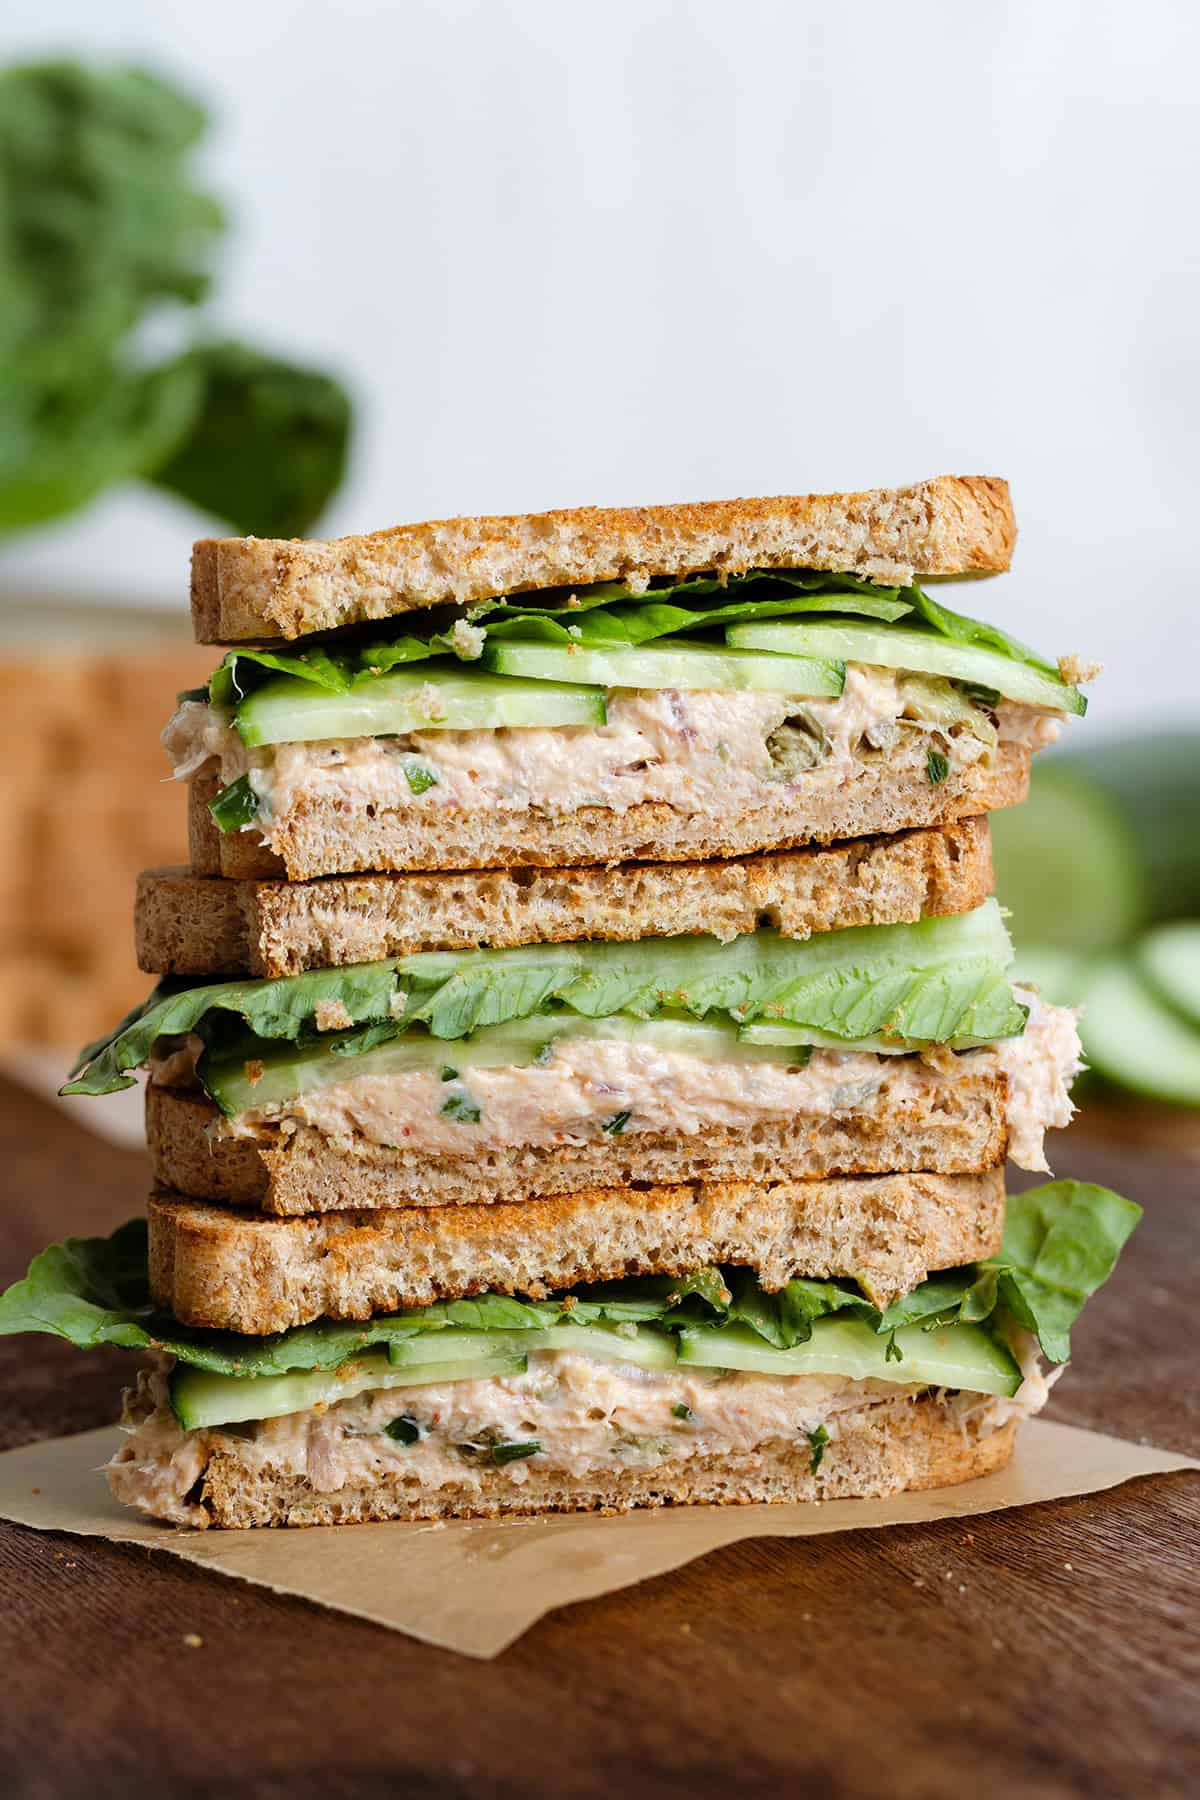
An upgraded tuna sandwich with thin cucumber slices layered through the middle for crunch and freshness. Most tuna sandwiches are one-note — creamy tuna against soft bread — and adding cucumber transforms the texture into something that actually feels satisfying to eat. This is my desk lunch when I want fast and don't want to think. Five minutes start to finish if your tuna is already mixed. For more cucumber-based lunch ideas, my salad roundup has plenty.
Use a thinner, watery cucumber (English or Persian) and slice it on a mandoline or with a sharp knife to about ⅛ inch thick. Salt the cucumber slices lightly and let them sit on paper towels for 5 minutes before assembling — this draws out water that would otherwise soak the bread. Use tuna packed in oil rather than water; oil-packed tuna has more flavor and a richer texture. Drain it but don't rinse.
Ingredients (serves 2):
- 1 can (5 oz) oil-packed tuna, drained
- 3 tablespoon mayonnaise
- 1 tablespoon Dijon mustard
- 1 tablespoon fresh lemon juice
- 2 tablespoon red onion, finely diced
- 1 stalk celery, finely diced
- 2 tablespoon fresh dill or parsley, chopped
- Salt and pepper to taste
- 4 slices good bread (sourdough, whole-wheat, or rye)
- 1 English or Persian cucumber, thinly sliced
- Butter or extra mayonnaise for the bread
- Lettuce leaves (optional)
Instructions:
- Slice cucumber thin and lay on paper towels. Sprinkle lightly with salt, let sit 5 minutes, then pat dry.
- In a bowl, flake drained tuna with a fork. Add mayonnaise, Dijon, lemon juice, red onion, celery, dill, salt, and pepper. Mix gently.
- Spread a thin layer of butter or extra mayonnaise on all four slices of bread (this protects the bread from getting soggy).
- Pile tuna mixture on two slices, top with cucumber slices and lettuce leaves (if using), close with the other slices. Slice in half and serve.
26. Canned Salmon Salad Sandwich
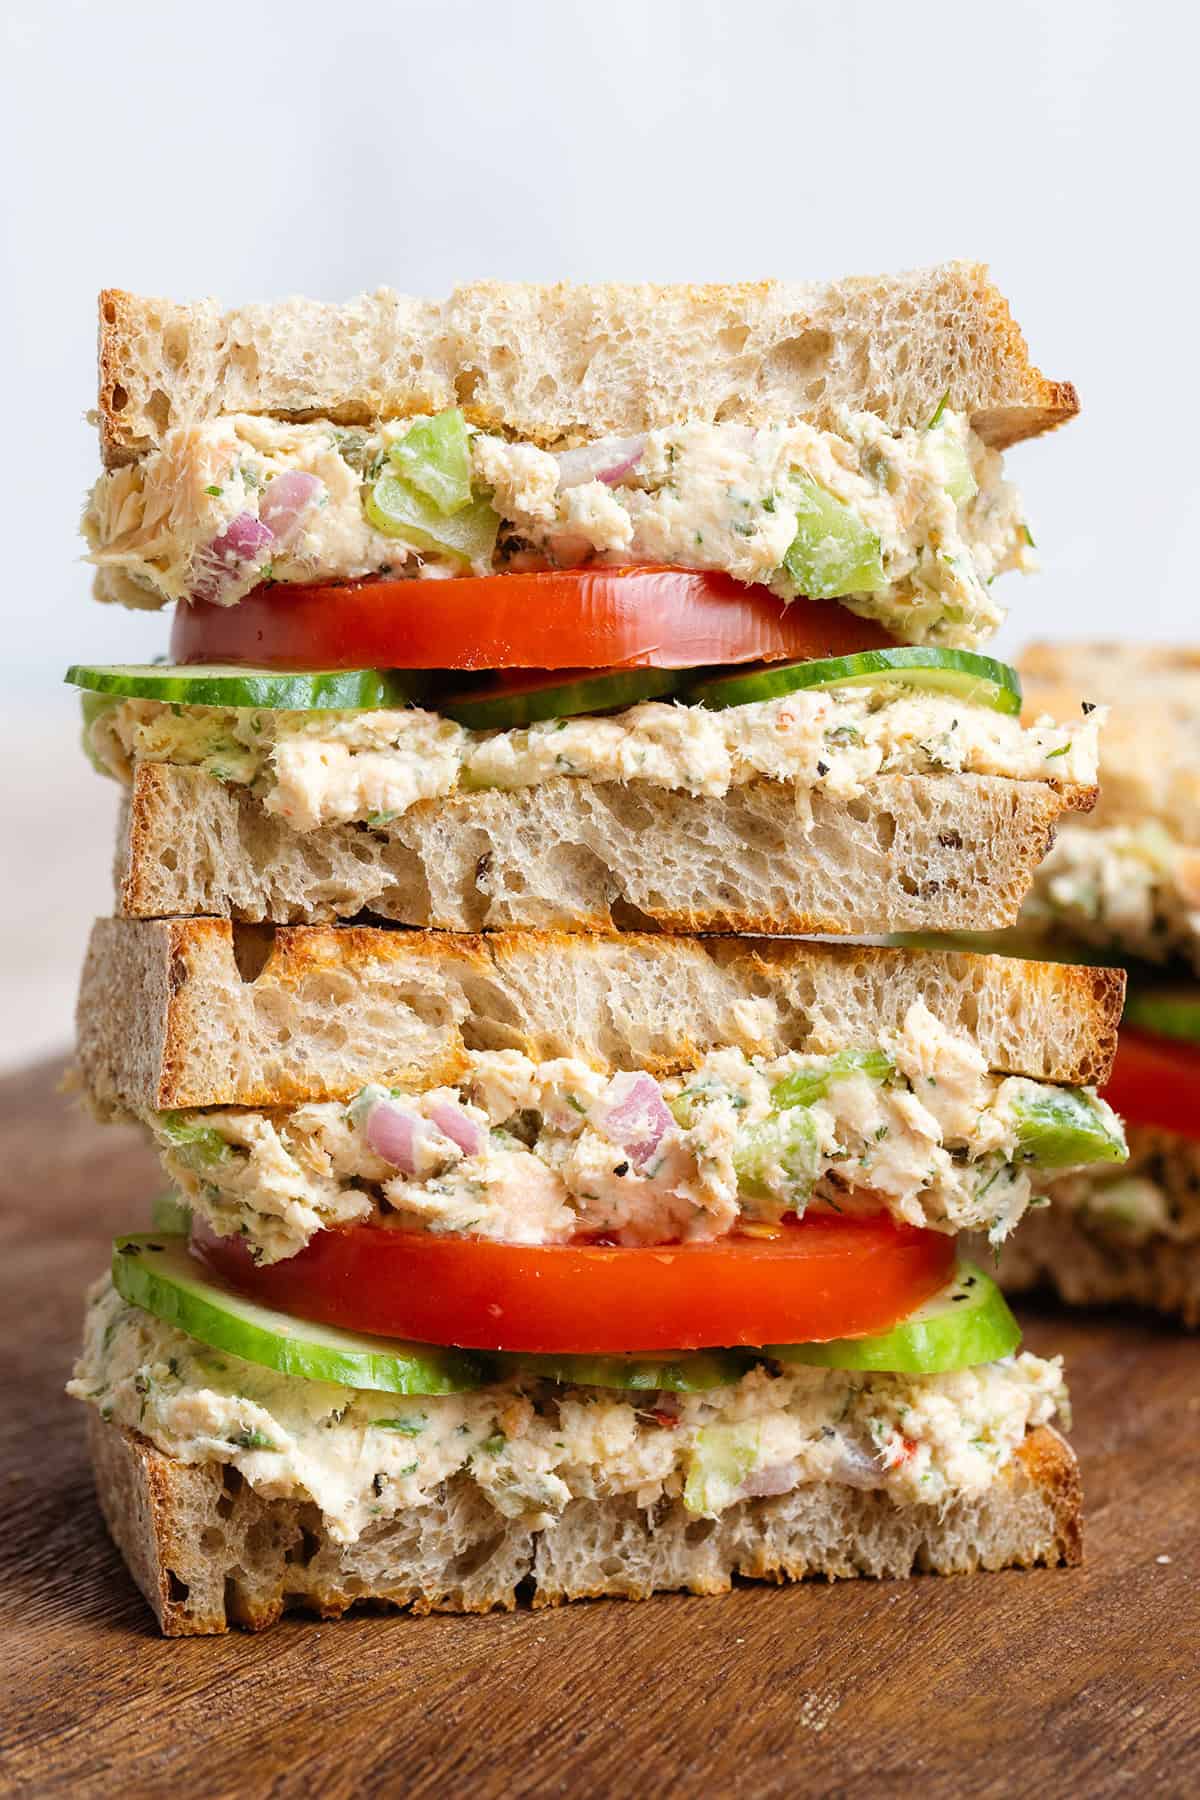
Canned salmon is one of the most underrated pantry proteins — packed with omega-3s, fully cooked, and about half the price of fresh salmon. Mixed with mayo, Dijon, lemon, dill, and capers, it becomes a sandwich filling that's more interesting than tuna and feels slightly more elevated. This is my "I want salmon but it's Tuesday" lunch. Costs about $3 a sandwich, takes 5 minutes.
Buy boneless, skinless canned salmon if you can find it (Wild Planet and Bumble Bee both make good versions) — the bone-in kind requires picking through, which adds time. If you only have bone-in, the soft bones are actually edible and full of calcium, but most people prefer to remove them. Drain the salmon thoroughly. Capers are the secret ingredient — they add a briny, tangy punch that elevates the whole sandwich. Don't skip them if you have them.
Ingredients (serves 2):
- 1 can (6 oz) boneless skinless salmon, drained
- 3 tablespoon mayonnaise
- 1 tablespoon Dijon mustard
- 1 tablespoon fresh lemon juice
- Zest of ½ lemon
- 1 tablespoon capers, drained
- 2 tablespoon red onion, finely diced
- 2 tablespoon fresh dill, chopped
- 1 stalk celery, finely diced
- Salt and pepper to taste
- 4 slices good bread (sourdough or whole-grain)
- Butter or extra mayonnaise for the bread
- Lettuce, sliced tomato, and thinly sliced red onion for serving
Instructions:
- Drain salmon thoroughly. Flake in a bowl with a fork.
- Add mayonnaise, Dijon, lemon juice, lemon zest, capers, red onion, dill, and celery. Mix gently — don't over-mash. Season with salt and pepper.
- Spread a thin layer of butter or mayonnaise on all four slices of bread.
- Pile salmon mixture on two slices. Top with lettuce, sliced tomato, and red onion. Close with the other slices, slice in half, and serve.
25. German Vegan Potato Pancakes (Kartoffelpuffer)
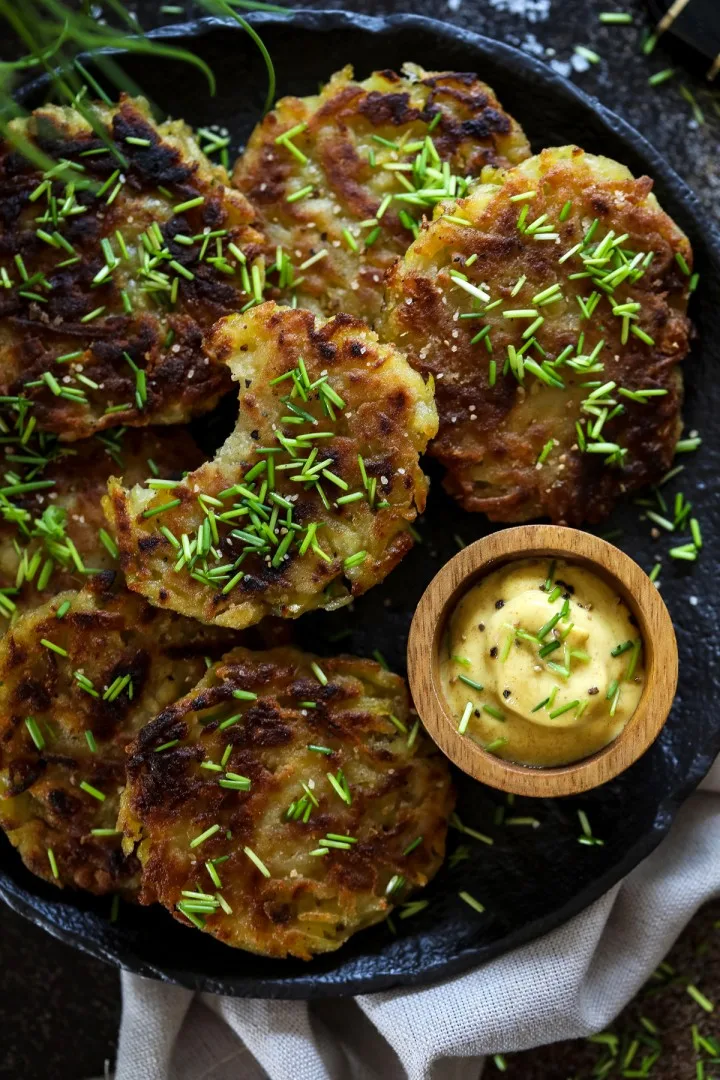
Crispy, golden German potato pancakes — Kartoffelpuffer — made entirely with grated potato, onion, and a binder, pan-fried until shatter-crispy at the edges. The traditional German version uses egg as a binder; this vegan version uses flour and a flax egg, which works surprisingly well. Serve with applesauce on the side (the classic German way) for a sweet-savory contrast, or with mustard for something more savory. Holds up beautifully reheated for lunch the next day.
Squeeze the grated potato bone-dry before frying. Potatoes are mostly water, and wet potato shreds steam in the pan instead of crisping. Grate the potato and onion on the large holes of a box grater, transfer to a clean kitchen towel, and wring out hard over the sink. You'll be amazed at how much liquid comes out. The drier the potato, the crispier the pancake. Use a starchy potato (russet or Yukon gold) — waxy potatoes don't bind together as well.
Ingredients (serves 4, makes about 12 pancakes):
- 2 lbs russet or Yukon gold potatoes, peeled and grated
- 1 medium yellow onion, grated
- 1 tablespoon ground flaxseed + 3 tablespoon water (flax egg)
- ⅓ cup all-purpose flour
- 1½ teaspoon salt
- ½ teaspoon black pepper
- ¼ teaspoon ground nutmeg
- Neutral oil (canola, sunflower) for frying
- Applesauce or Dijon mustard for serving
Instructions:
- Mix flaxseed with 3 tablespoon water in a small bowl; set aside 5 minutes to thicken into a "flax egg."
- Grate potatoes and onion on the large holes of a box grater. Transfer to a clean kitchen towel and wring out over the sink — squeeze hard. Should remove about 1 cup of liquid.
- Combine squeezed potato and onion in a bowl with flax egg, flour, salt, pepper, and nutmeg. Mix well.
- Heat ¼ inch of oil in a heavy skillet over medium-high heat. Drop ¼-cup portions of potato mixture into the pan, flattening with a spatula to ½-inch thick rounds. Fry 4-5 minutes per side until deeply golden and crispy. Drain on paper towels. Serve hot with applesauce or mustard.
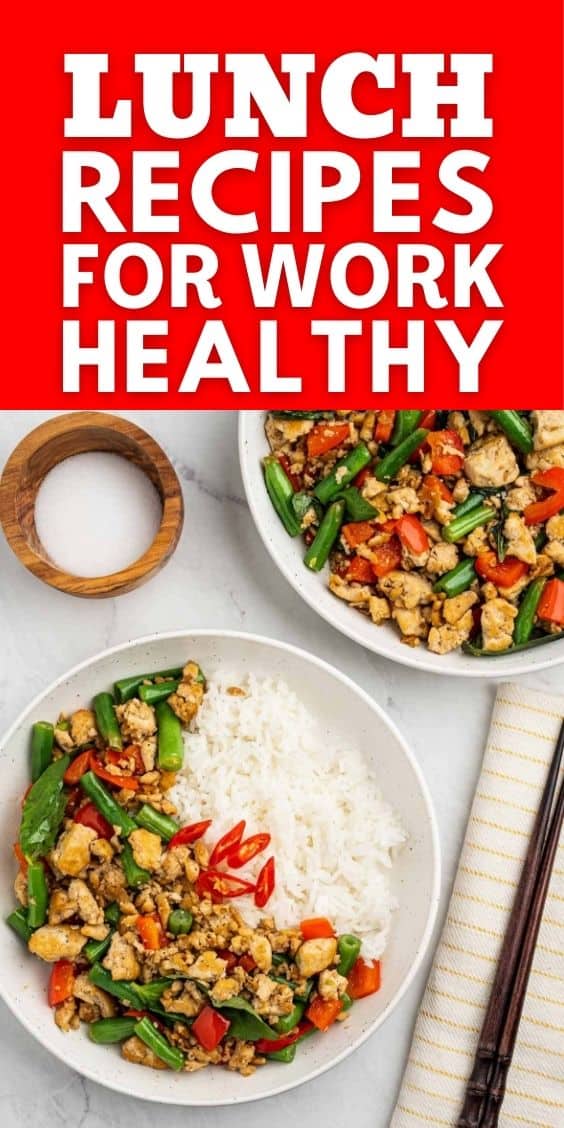
24. Thai Basil Tofu (Pad Krapow)
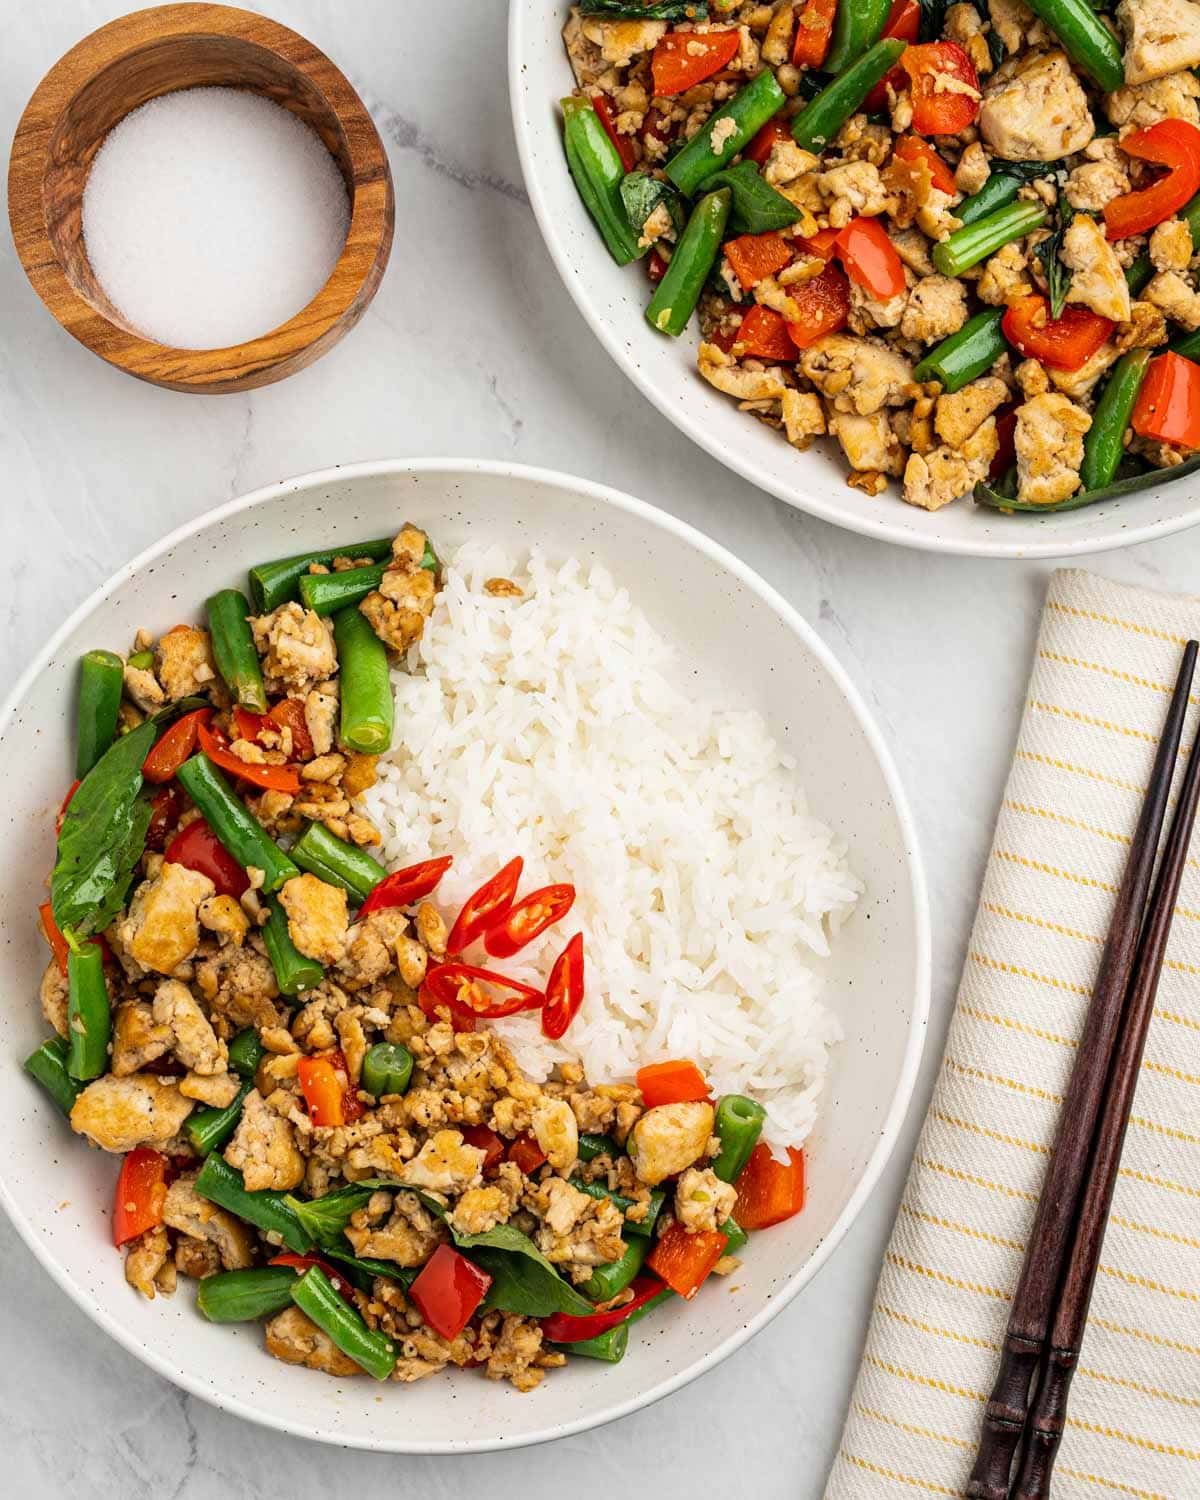
A spicy Thai stir-fry — crumbled firm tofu cooked hard in a wok with garlic, Thai chilies, soy sauce, oyster sauce, and a huge handful of holy basil (or regular Thai basil) added at the end. This is the lunch I make when I want serious flavor in 15 minutes. Authentic Thai street-food vibes. Serve over jasmine rice with a fried egg on top for the traditional pad krapow experience. The dish you order at every Thai restaurant for under $12 made at home for under $5.
Press the tofu first. Wrap firm tofu in paper towels, weight it with a heavy pan for 15 minutes, then crumble it into rough chunks (not cubes — pad krapow uses a crumbled texture). Pressed tofu absorbs sauce and develops crispy edges in the wok; un-pressed tofu just steams. Use a very hot pan — high heat is what gives this dish its signature flavor. The Thai basil leaves go in at the very end, just for 10 seconds, to release their aroma without losing their fresh punch.
Ingredients (serves 2-3):
- 14 oz block firm tofu, pressed and crumbled
- 3 tablespoon neutral oil (peanut, vegetable)
- 6 cloves garlic, minced
- 2-4 Thai chilies, minced (or 1 jalapeño for milder)
- 1 small shallot, finely diced
- 3 tablespoon soy sauce
- 1 tablespoon oyster sauce (or vegan oyster sauce)
- 1 tablespoon fish sauce (or vegan fish sauce)
- 2 teaspoon brown sugar
- 1 tablespoon dark soy sauce (for color, optional)
- 1 cup Thai basil leaves (holy basil if available)
- Cooked jasmine rice for serving
- Fried egg per person (optional, traditional)
Instructions:
- Press tofu wrapped in paper towels under a heavy pan for 15 minutes. Crumble into rough ½-inch chunks.
- Mix soy sauce, oyster sauce, fish sauce, brown sugar, and dark soy sauce in a small bowl. Set aside.
- Heat oil in a wok or large skillet over high heat until smoking. Add crumbled tofu, spread in a single layer. Cook 4-5 minutes without stirring until edges are crispy and golden. Stir and cook another 2 minutes.
- Push tofu to one side. Add garlic, chilies, and shallot to the empty side. Cook 30 seconds. Pour the sauce mixture in, toss everything together for 1 minute. Off the heat, fold in Thai basil leaves — they should wilt slightly but stay bright green. Serve immediately over rice with a fried egg.
23. Vietnamese Lemongrass Chicken

Chicken thighs marinated in lemongrass, garlic, fish sauce, soy, and a touch of sugar, then grilled or pan-seared until charred at the edges. The lemongrass is the soul of this dish — bright, citrusy, slightly grassy, and unlike anything else. This is the Vietnamese restaurant chicken (gà nướng sả) that comes on a plate with broken rice or in a bánh mì sandwich. Marinate overnight if you can. The leftovers are gold — pack into rice paper rolls, slice into salads, or stuff into sandwiches.
Fresh lemongrass is non-negotiable for the real flavor — bottled "lemongrass paste" tastes off. Look for fresh lemongrass stalks at most US grocery stores in the produce section near the herbs (around $1.50 a stalk), or at any Asian grocery for cheaper. Trim the woody top and root end, peel off the dry outer layers, and only use the tender inner pale-yellow part — finely minced or pulsed in a food processor. The fish sauce is also non-negotiable; it adds umami depth that nothing else replaces.
Ingredients (serves 4):
- 1½ lbs boneless skinless chicken thighs
- 3 stalks fresh lemongrass, tender parts only, finely minced (about 3 tbsp)
- 4 cloves garlic, minced
- 2 small shallots, finely diced
- 2 tablespoon fish sauce
- 2 tablespoon soy sauce
- 2 tablespoon brown sugar
- 2 tablespoon neutral oil (plus more for cooking)
- 1 tablespoon fresh lime juice
- 1 teaspoon black pepper
- 1 teaspoon turmeric (for color)
- 1 Thai chili or ½ teaspoon red pepper flakes (optional)
- Cooked rice, fresh herbs (cilantro, mint), sliced cucumber for serving
Instructions:
- Prep lemongrass: trim away the woody top and root end. Peel off the dry outer layers until you reach the tender pale-yellow center. Mince finely or pulse in a food processor.
- In a bowl or zip-top bag, combine minced lemongrass, garlic, shallots, fish sauce, soy sauce, brown sugar, 2 tablespoon oil, lime juice, pepper, turmeric, and chili. Add chicken thighs, coat thoroughly. Marinate at least 2 hours, ideally overnight.
- Heat a grill or cast iron pan to medium-high. Brush with oil. Remove chicken from marinade, letting excess drip off. Grill or pan-sear 5-6 minutes per side until charred at edges and internal temp reads 175°F.
- Rest 5 minutes, then slice against the grain. Serve over rice with fresh cilantro, mint, sliced cucumber, and extra lime wedges.
22. Stir-Fried Eggplant and Tofu

A Chinese-style stir-fry with Japanese eggplant and firm tofu in a soy-garlic-ginger sauce with a touch of chili oil. The eggplant gets silky and almost creamy when stir-fried properly, the tofu absorbs the sauce, and the whole thing comes together in 20 minutes. Different from the Panda Express-style eggplant tofu later in the list (#2) — that version has a thicker sweet-and-savory glaze, while this one is brighter and more vegetable-forward.
Use Japanese or Chinese eggplant (the long, thin purple ones) rather than the fat globe eggplants common in US grocery stores. Globe eggplants are seedier and more bitter, and they need salting and draining before cooking. Japanese eggplants can be cooked straight from cutting — no salting needed, no bitter aftertaste. Cut them on a diagonal into 1-inch pieces. Pan-fry the tofu first to develop a golden crust, then add the eggplant.
Ingredients (serves 4):
- 14 oz block firm tofu, pressed and cubed
- 2 Japanese or Chinese eggplants, cut diagonally in 1-inch pieces (about 1 lb)
- 3 tablespoon neutral oil, divided
- 4 cloves garlic, minced
- 1 tablespoon fresh ginger, minced
- 3 green onions, sliced (whites and greens separated)
- 3 tablespoon soy sauce
- 1 tablespoon rice vinegar
- 1 tablespoon brown sugar
- 1 tablespoon Shaoxing wine or dry sherry
- 1 teaspoon toasted sesame oil
- 1 teaspoon chili oil or chili crisp (optional, for heat)
- 1 teaspoon cornstarch + 2 tablespoon water (slurry)
- Sesame seeds for topping
- Cooked rice for serving
Instructions:
- Press tofu 15 minutes, then cube into 1-inch pieces. Cut eggplant diagonally into 1-inch pieces.
- Mix sauce: soy sauce, rice vinegar, brown sugar, Shaoxing wine, sesame oil, and chili oil. Mix cornstarch with 2 tablespoon water in a separate small bowl.
- Heat 2 tablespoon oil in a wok or large skillet over medium-high. Add tofu cubes in a single layer. Cook 6-7 minutes, turning to brown all sides until golden and crispy. Transfer to a plate.
- Add remaining 1 tablespoon oil and the eggplant. Stir-fry 6-8 minutes until tender and slightly caramelized. Add garlic, ginger, and green onion whites. Cook 30 seconds. Return tofu to the pan, pour sauce in, toss to coat. Add cornstarch slurry and stir until thickened (about 30 seconds). Top with green onion greens and sesame seeds. Serve over rice.
21. Quick Flatbread Pizza Margherita

A 15-minute Margherita pizza built on store-bought naan or flatbread — crushed tomatoes, fresh mozzarella, basil, and a drizzle of balsamic reduction. Crispy, cheesy, and faster than ordering delivery. This is my "I have 20 minutes, the kids want pizza, I don't want to call Domino's" lunch. Saad and Zainab both ask for this and treat it like a special dinner even though it costs me about $3 a pizza to make.
Use a good flatbread — Stonefire naan is widely available and the right thickness for crispy bottoms; thin pita gets too crispy and breaks. Bake the flatbread alone for 2 minutes first before adding toppings — this pre-crisps the bottom so it doesn't get soggy from the sauce. Use fresh mozzarella in slices (not shredded), patted dry to remove excess moisture, which would otherwise pool on the pizza. Tear basil leaves rather than chopping; chopping bruises them and turns them dark.
Ingredients (serves 2, makes 2 pizzas):
- 2 large naan or flatbreads
- ½ cup crushed San Marzano tomatoes (or marinara sauce)
- 1 tablespoon olive oil, plus more for drizzling
- 2 cloves garlic, minced
- 1 teaspoon Italian seasoning
- ½ teaspoon salt
- 8 oz fresh mozzarella, sliced and patted dry
- ¼ cup grated Parmesan
- 1 cup fresh basil leaves, torn
- 2 tablespoon balsamic glaze (store-bought or homemade)
- Pinch of red pepper flakes
Instructions:
- Heat oven to 425°F. Place flatbreads directly on the oven rack or a sheet pan. Bake 2 minutes to pre-crisp.
- Mix crushed tomatoes with olive oil, minced garlic, Italian seasoning, and salt.
- Remove the pre-crisped flatbreads from the oven. Spread the sauce mixture thin on each, leaving a ½-inch border. Top with sliced fresh mozzarella and grated Parmesan.
- Bake 8-10 minutes until the cheese is melted and bubbly with golden spots. Top with torn basil, balsamic glaze, red pepper flakes, and a final drizzle of olive oil. Slice and serve immediately.
20. Chicken Salad Recipe (No Celery)

A classic creamy chicken salad without celery — for the celery-haters in your life. Built on shredded chicken, mayonnaise, Greek yogurt, fresh herbs, and a touch of Dijon, with grapes and pecans for sweetness and crunch instead of celery for texture. This is the chicken salad my husband requests because he's never been a celery person. Different from the apple-and-lettuce-wraps version at #31 — this one is the classic sandwich-and-cracker version with grapes instead of apple.
Use a mix of Greek yogurt and mayo (about 50/50) rather than all mayo — the yogurt adds tang without making the salad heavy, and cuts the fat without losing creaminess. Cut grapes in half rather than leaving them whole; whole grapes are too big a bite and roll around in the salad. Toast the pecans first; raw pecans taste flat against the chicken and dressing. Refrigerate for at least 30 minutes before serving — the flavors deepen and the salad firms up.
Ingredients (serves 4):
- 3 cups cooked chicken, shredded or diced (rotisserie works)
- ⅓ cup mayonnaise
- ⅓ cup plain Greek yogurt
- 1 tablespoon Dijon mustard
- 1 tablespoon fresh lemon juice
- 1 cup red grapes, halved
- ½ cup pecans, toasted and chopped
- ¼ cup red onion, finely diced
- 3 tablespoon fresh chives or dill, chopped
- 1 teaspoon salt
- ½ teaspoon black pepper
- ½ teaspoon garlic powder
- Bread, croissants, lettuce cups, or crackers for serving
Instructions:
- Toast pecans in a dry pan over medium heat for 3-4 minutes until fragrant. Cool and chop.
- Whisk mayonnaise, Greek yogurt, Dijon, lemon juice, salt, pepper, and garlic powder in a large bowl until smooth.
- Add shredded chicken, halved grapes, toasted pecans, red onion, and chives. Fold gently to coat.
- Cover and refrigerate at least 30 minutes (overnight is even better). Serve on bread, croissants, in lettuce cups, or with crackers.
19. Moroccan Chickpeas with Spinach
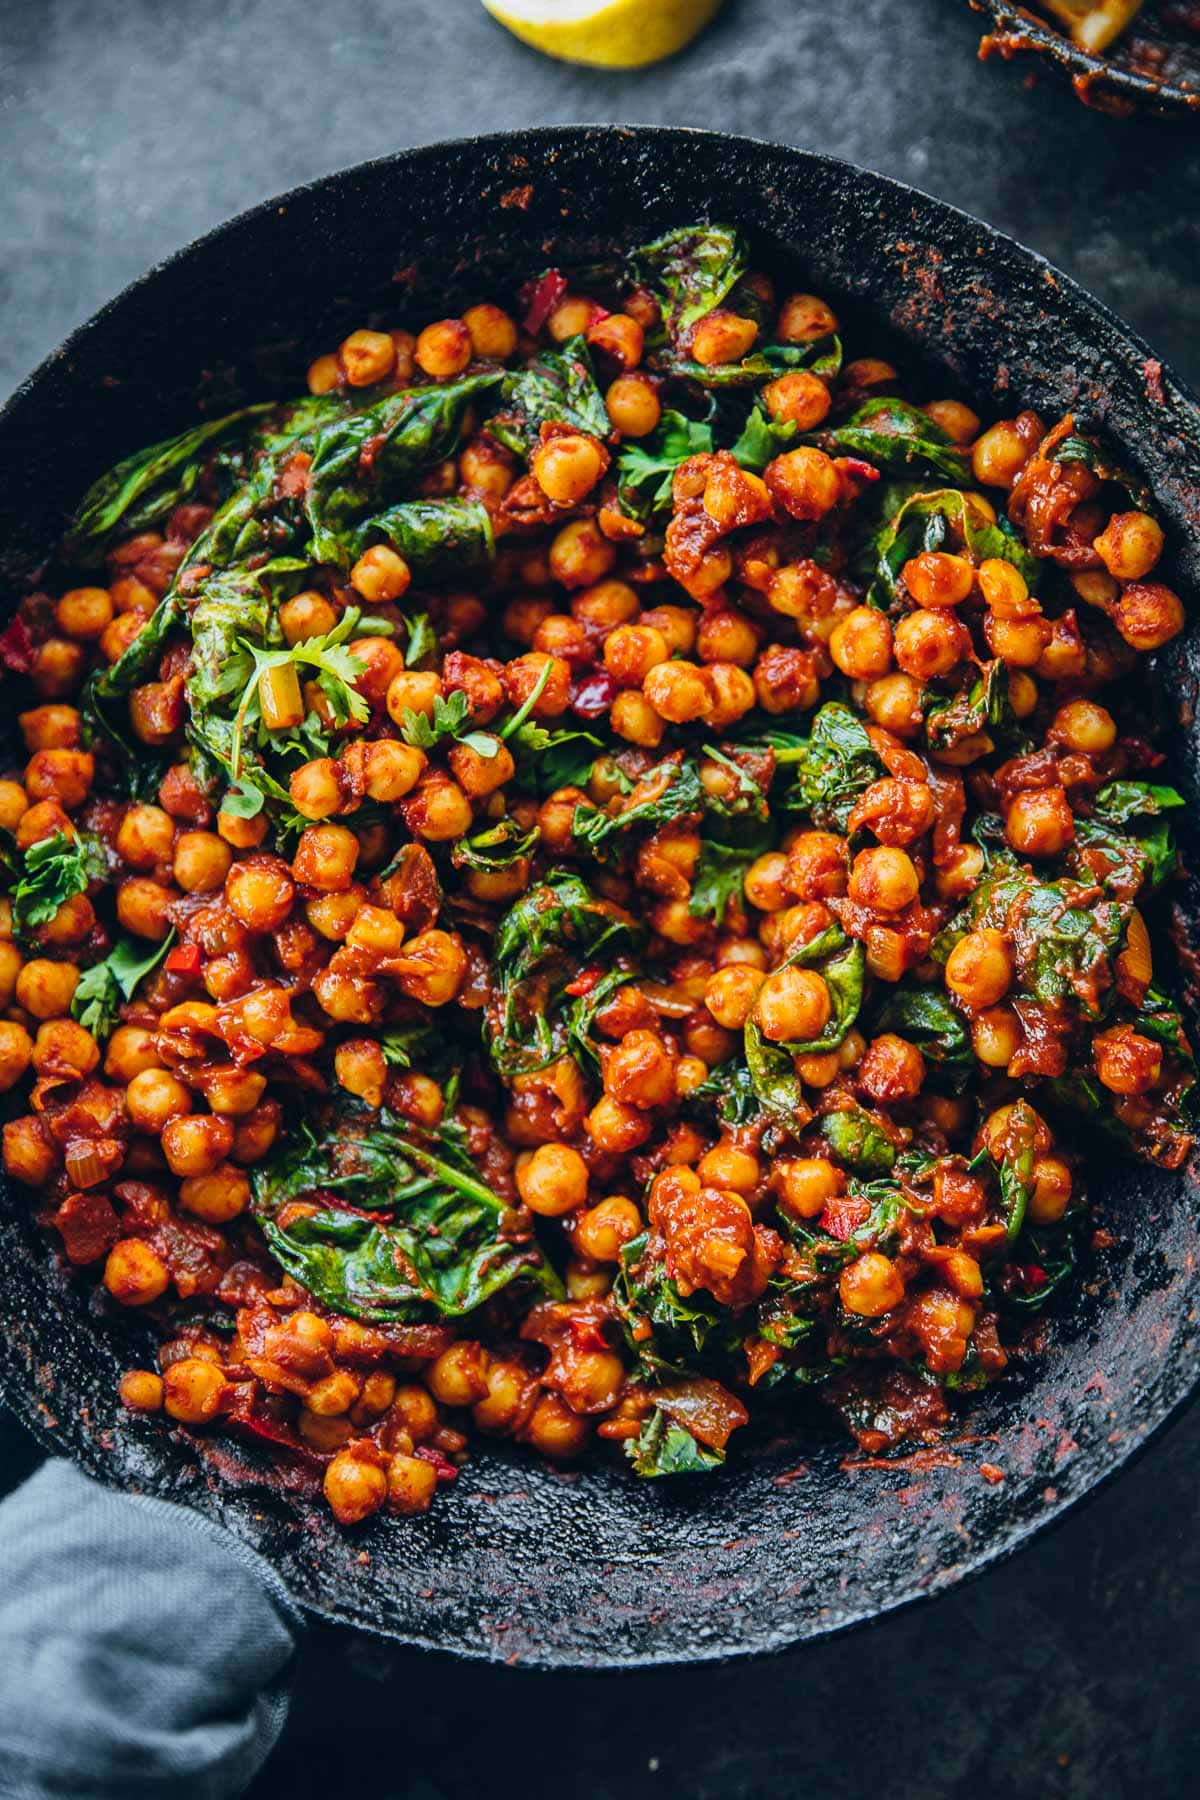
A warm, spiced chickpea stew with onion, garlic, tomato, cumin, paprika, cinnamon, and a handful of fresh spinach wilted at the end. Moroccan flavors are layered, warm, and a little sweet from the cinnamon — completely different from Indian curry spice profiles, despite using some of the same spices. Around 14g of protein per serving and almost no actual cooking skill required. This is my go-to vegetarian pantry lunch when I haven't been to the grocery store. Two cans of chickpeas, a can of tomatoes, spices I already have, done in 20 minutes.
Add a pinch of cinnamon — yes, really. Moroccan and North African cooking uses warm spices like cinnamon in savory dishes, and the small amount (¼ teaspoon for two cans of chickpeas) is what makes this taste authentic rather than just spiced. Skip it and the dish tastes like generic curried chickpeas. The lemon at the end is also essential; the acid brightens the rich tomato base and balances the warm spices. Don't skip either.
Ingredients (serves 4):
- 2 cans (15 oz each) chickpeas, drained and rinsed
- 2 tablespoon olive oil
- 1 medium yellow onion, finely diced
- 4 cloves garlic, minced
- 1 can (14 oz) diced tomatoes
- 2 tablespoon tomato paste
- 2 teaspoon ground cumin
- 2 teaspoon smoked paprika
- 1 teaspoon ground coriander
- ¼ teaspoon ground cinnamon
- ¼ teaspoon cayenne (optional)
- 1½ teaspoon salt
- ½ teaspoon black pepper
- 1 cup vegetable broth or water
- 4 cups fresh baby spinach
- 2 tablespoon fresh lemon juice
- ¼ cup fresh cilantro or parsley, chopped
- Couscous, rice, or warm pita for serving
Instructions:
- Heat olive oil in a deep skillet over medium heat. Add diced onion, cook 5-6 minutes until softened and golden. Add garlic, cook 30 seconds.
- Add cumin, smoked paprika, coriander, cinnamon, cayenne, salt, and pepper. Stir for 30 seconds until fragrant. Add tomato paste, cook 1 minute.
- Pour in diced tomatoes and broth. Bring to a simmer. Add drained chickpeas, stir, and simmer 8-10 minutes until slightly thickened.
- Fold in baby spinach in handfuls, letting each batch wilt before adding more. Off the heat, stir in lemon juice. Top with chopped cilantro or parsley. Serve over couscous, rice, or with warm pita.
18. Poor Man's Lobster Roll
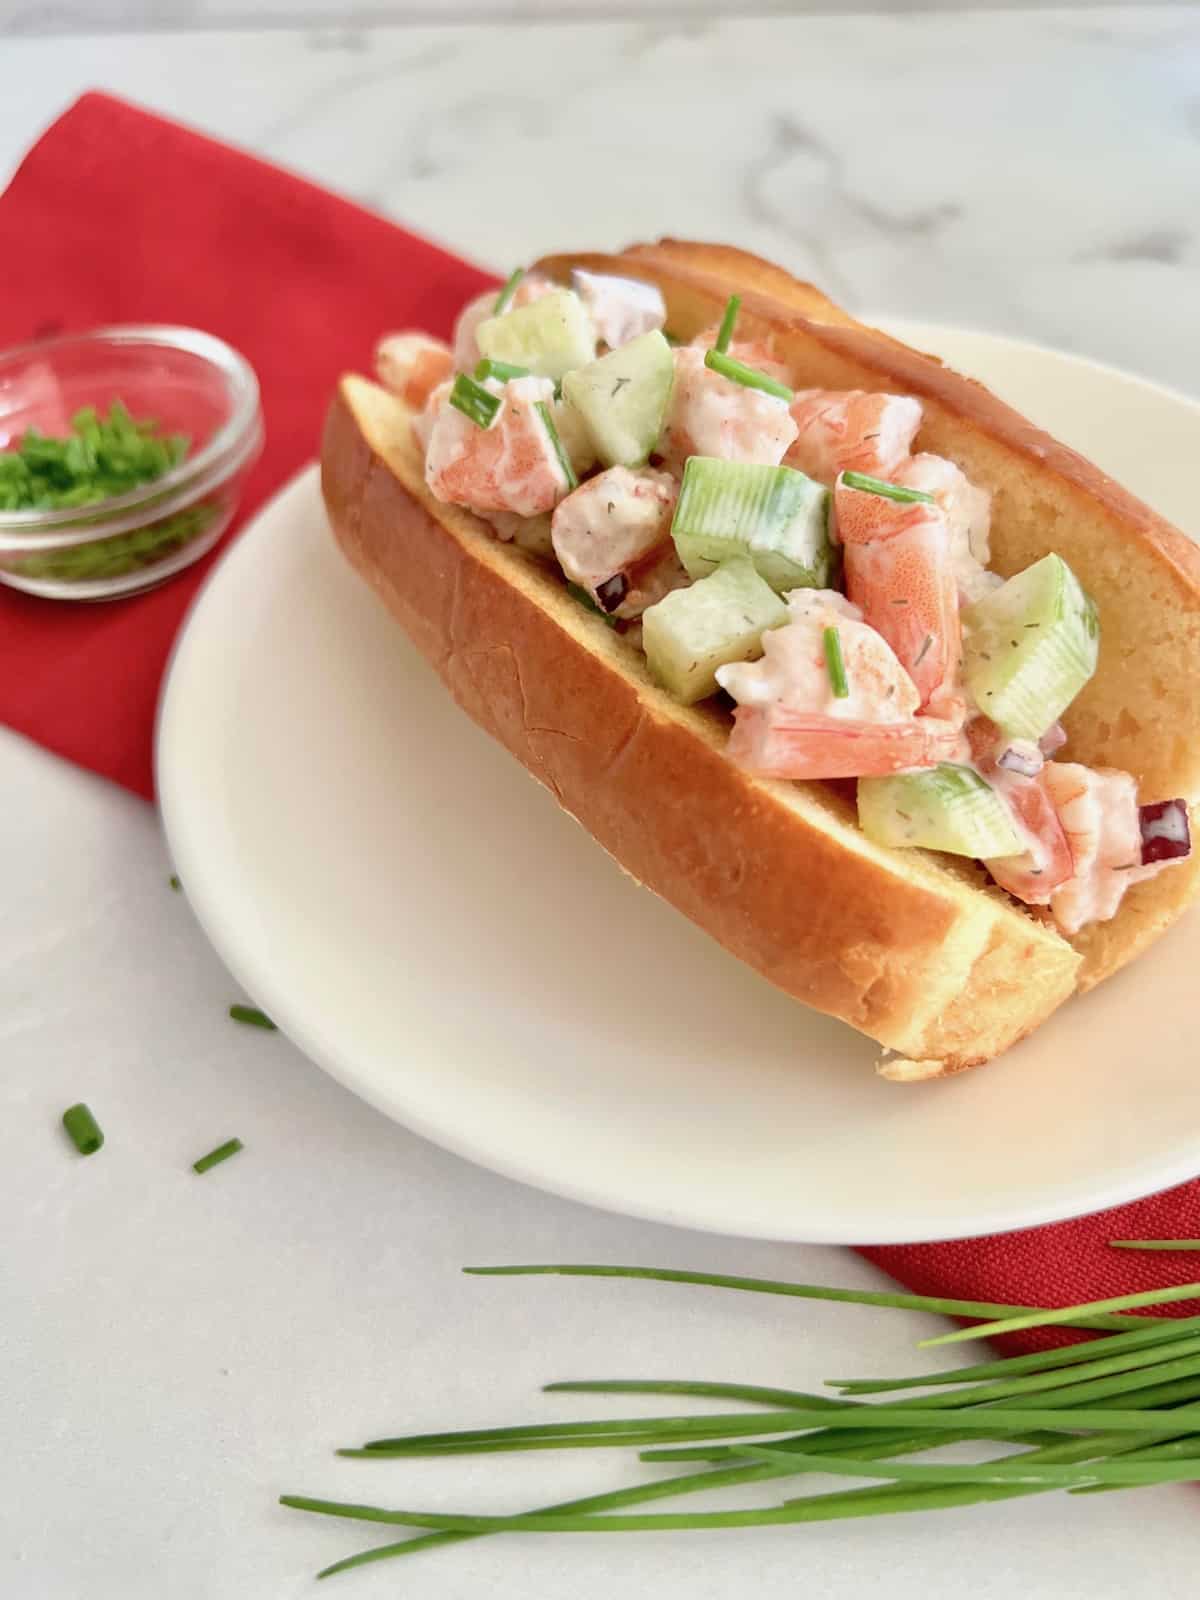
A budget-friendly lobster roll made with poached pollock or cod (around $6/lb instead of $30/lb lobster), dressed in butter and lemon and served on a buttered toasted brioche bun. The poaching technique mimics lobster's tender texture, and the butter-and-lemon treatment gives you that coastal Maine flavor without the coastal Maine price tag. Serves a family of four for around $15 total. Tastes like vacation. More summer dinner ideas in the dedicated summer roundup if you want to build a New England-style spread.
Use Old Bay seasoning in the poaching liquid — this is the New England secret that ties the fish to that coastal-seafood flavor profile. Without Old Bay, the cod tastes like cod; with it, the cod tastes like cheap lobster. The poaching liquid should be barely simmering, not boiling — boiling toughens the fish. Pull it at 8-10 minutes when it flakes easily. Toast the brioche buns in butter in a skillet (not in the toaster) — the buttery-griddled surface is part of the experience.
Ingredients (serves 4):
- 1 lb pollock, cod, or haddock fillets
- 4 cups water
- 2 tablespoon Old Bay seasoning
- 1 lemon, sliced
- 2 bay leaves
- 1 teaspoon salt
- 4 brioche hot dog buns
- 4 tablespoon butter, divided
- Dressing: 3 tablespoon mayonnaise, 1 tablespoon fresh lemon juice, 1 teaspoon Dijon mustard, 2 tablespoon fresh chives chopped, 1 stalk celery finely diced, ½ teaspoon salt, ¼ teaspoon black pepper, pinch of Old Bay
Instructions:
- Bring water, Old Bay, lemon slices, bay leaves, and salt to a simmer in a wide pan. Add fish fillets in a single layer. Reduce heat to maintain a bare simmer (not a boil). Poach 8-10 minutes until fish flakes easily. Drain and cool slightly.
- Flake the fish into chunks (don't shred — chunks mimic lobster meat). Refrigerate 15 minutes to fully cool.
- Whisk dressing ingredients in a bowl. Add cooled fish, fold gently to coat.
- Melt 2 tablespoon butter in a skillet over medium heat. Open brioche buns and place cut-side down in the butter. Toast 2-3 minutes until golden. Repeat with remaining butter and buns. Pile dressed fish into toasted buns. Top with extra chives and a pinch of Old Bay. Serve immediately.
17. Microwave Grilled Cheese
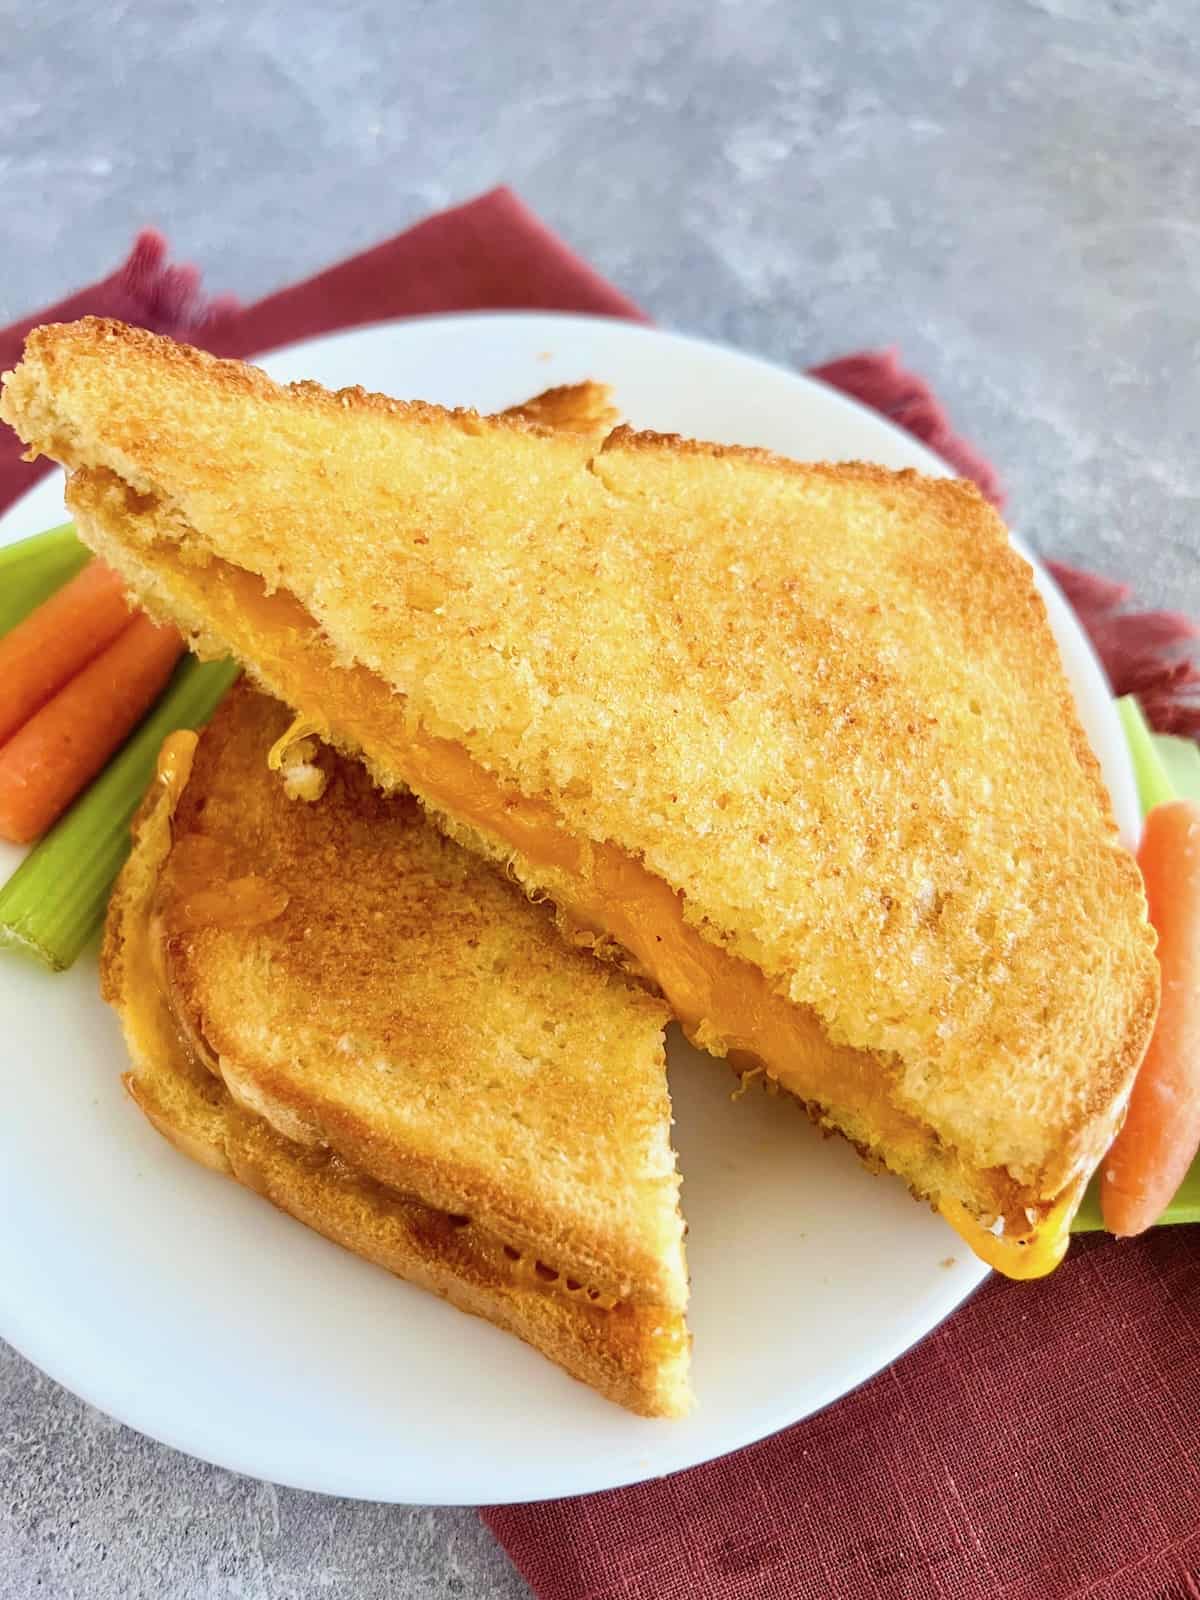
A surprisingly good grilled cheese made in the microwave — for the office worker without a stovetop, the college student in a dorm, or the work-from-home lunch where you don't want to wash a pan. Three minutes total, no skillet, no spatula, no flipping. The trick is the order of assembly and a specific microwave technique. Won't replace a real cast-iron grilled cheese, but it's genuinely better than you'd expect for a microwave lunch.
The non-negotiable trick: butter the OUTSIDE of the bread, not just inside. Most microwave grilled cheese fails because people only butter the inside, which means the bread stays pale and steamy on the outside. Brushing both outer slices with melted butter and microwaving directly on a paper towel gives you bread that crisps as the cheese melts. Don't skip this. Use a good melting cheese — American, cheddar, or Monterey Jack — not a hard cheese like Parmesan that won't melt smoothly.
Ingredients (serves 1):
- 2 slices good sandwich bread (sourdough or whole-wheat)
- 2 slices sharp cheddar or American cheese
- 1 tablespoon butter, melted
- Pinch of salt
- Optional: 1 teaspoon Dijon mustard, 1 thin slice tomato, 1 strip cooked bacon
Instructions:
- Brush the OUTSIDE of both slices of bread with melted butter and sprinkle lightly with salt.
- Lay one slice of bread butter-side-down on a microwave-safe plate lined with a paper towel. Spread Dijon on the inside (if using), then layer cheese, optional tomato, bacon, and the second slice of cheese.
- Top with the second slice of bread, butter-side-up.
- Microwave on high for 45-60 seconds until cheese is fully melted. Let sit 30 seconds (the bread crisps slightly as it cools). Slice diagonally and serve. For extra crispness, finish under a broiler for 60 seconds.
16. Baked BBQ Chicken Tenders
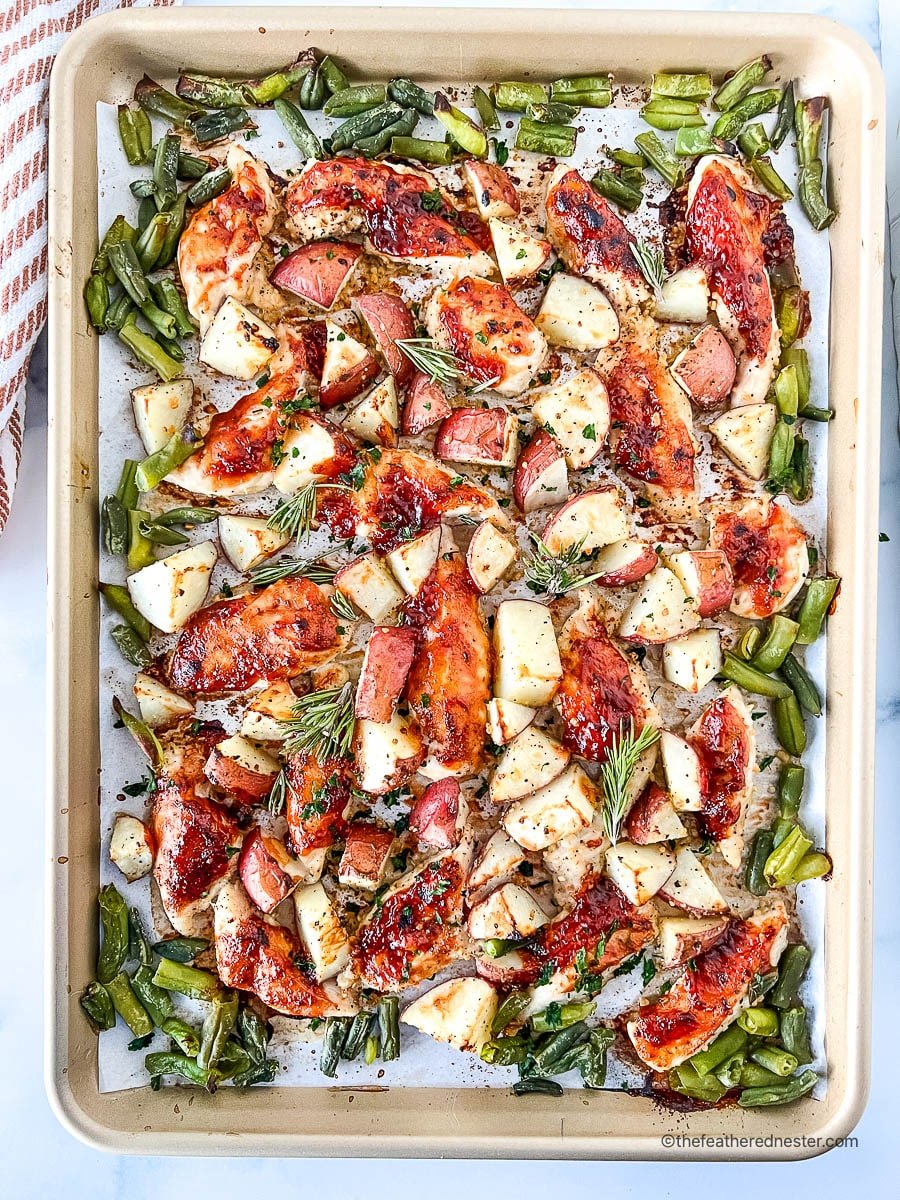
Tender chicken strips coated in BBQ sauce and a spice rub, baked on a sheet pan until sticky and caramelized at the edges. Lunch-friendly because they're hand-held — perfect for dipping in extra BBQ sauce or ranch, pairing with a small side salad, or stuffing into a wrap. Saad calls these "BBQ chicken nuggets" and treats them like a special meal. About 25 minutes total. For more easy baked chicken recipes in the same fast-weeknight category, my dedicated chicken roundup has plenty more variations.
Use chicken breast tenderloins (the small strips on the underside of the breast, often sold separately) or slice chicken breasts lengthwise into ½-inch strips. Don't use chicken thighs cut into strips — they cook unevenly because the muscle structure is different and the tenders won't sear the same way. Brush BBQ sauce on twice during baking: once at the 12-minute mark and once at the 18-minute mark. Single coats burn before they get sticky; double coats build that lacquered finish.
Ingredients (serves 4):
- 1½ lbs chicken breast tenders (or breasts sliced lengthwise into strips)
- 2 tablespoon olive oil
- 1 tablespoon brown sugar
- 1 teaspoon smoked paprika
- 1 teaspoon garlic powder
- 1 teaspoon onion powder
- ½ teaspoon chili powder
- 1 teaspoon salt
- ½ teaspoon black pepper
- 1 cup BBQ sauce of choice (Sweet Baby Ray's or homemade)
- Fresh parsley for serving
- Extra BBQ sauce and/or ranch for dipping
Instructions:
- Heat oven to 425°F. Line a sheet pan with parchment paper or foil for easy cleanup.
- Pat chicken tenders dry. Toss with olive oil. Mix brown sugar, smoked paprika, garlic powder, onion powder, chili powder, salt, and pepper in a small bowl. Sprinkle over chicken and toss to coat.
- Arrange tenders in a single layer on the sheet pan. Bake 12 minutes. Brush with half the BBQ sauce, flip the tenders. Bake 6 more minutes.
- Brush with remaining BBQ sauce. Bake 5-6 more minutes until internal temp reads 165°F and edges are caramelized. Top with chopped parsley. Serve with extra BBQ sauce or ranch for dipping.
15. Beefy Green Bean Casserole with Tater Tots
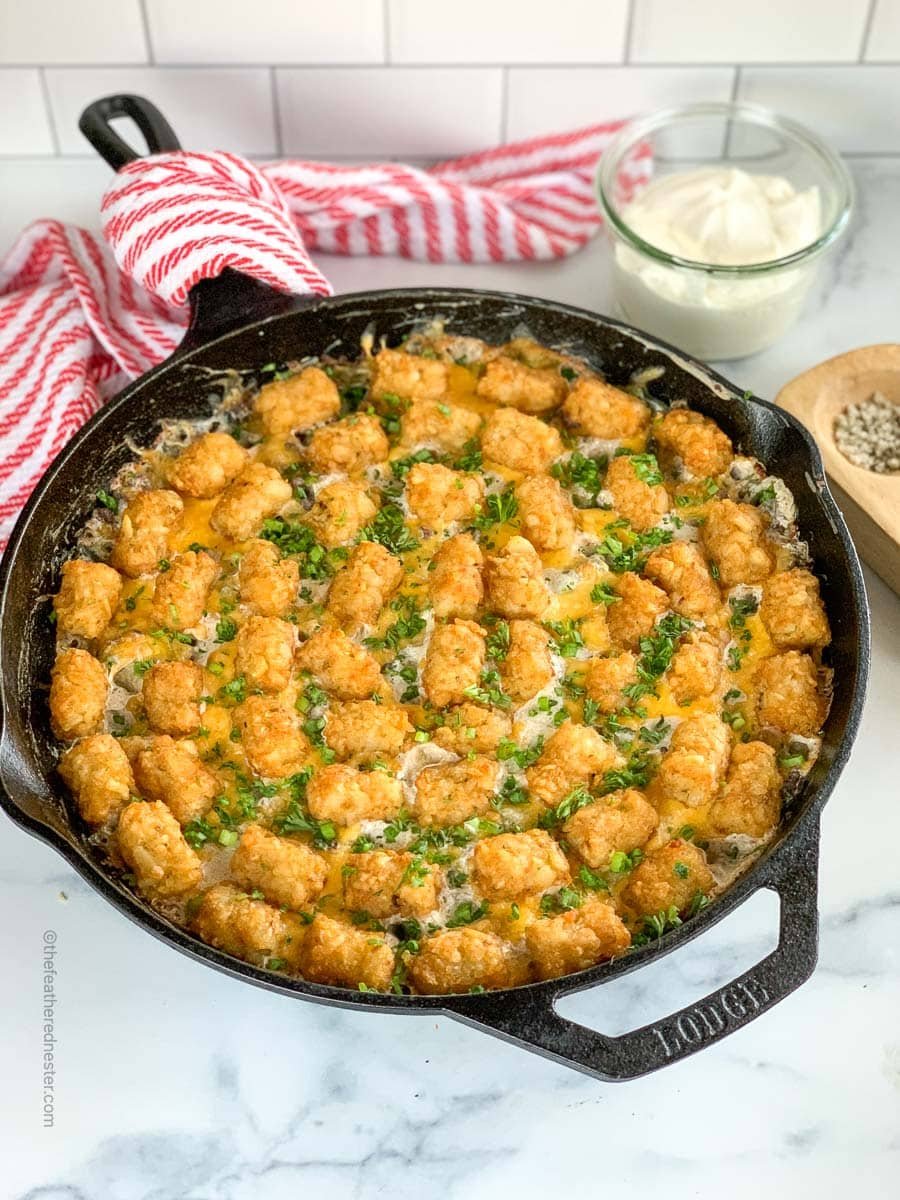
A retro Midwestern casserole — seasoned ground beef, French-cut green beans, cream of mushroom soup, and shredded cheddar, topped with crispy tater tots. The kind of warm, hearty lunch that uses up freezer staples and feeds a family of four for under $10. Saad and Zainab both ask for this by name. It's not winning any culinary awards but it is winning the "everyone clears their plate" award, which on a Tuesday counts for more.
Brown the ground beef thoroughly before adding to the casserole — undercooked beef releases water into the casserole and dilutes the cream of mushroom soup. Cook beef until no pink remains and most of the moisture has evaporated. Drain excess fat. For the tater tot topping, place them in a tight single layer (not piled up) and don't cover the casserole — the tots need direct oven heat to crisp. Cover with foil only if the tots are getting too brown before the casserole bubbles through.
Ingredients (serves 6):
- 1½ lbs ground beef (85% lean)
- 1 medium yellow onion, diced
- 3 cloves garlic, minced
- 1 can (10.5 oz) cream of mushroom soup
- ½ cup whole milk
- 2 cans (14.5 oz each) French-cut green beans, drained
- 2 cups shredded sharp cheddar, divided
- 1 teaspoon Worcestershire sauce
- 1 teaspoon garlic powder
- 1 teaspoon onion powder
- 1 teaspoon salt
- ½ teaspoon black pepper
- 1 bag (32 oz) frozen tater tots
- Fresh chives or green onions for topping
Instructions:
- Heat oven to 400°F. Brown ground beef with diced onion in a large skillet over medium-high heat for 8-10 minutes, breaking it up, until fully cooked and most moisture has evaporated. Drain excess fat. Add garlic, cook 30 seconds.
- Stir in cream of mushroom soup, milk, Worcestershire, garlic powder, onion powder, salt, and pepper. Fold in drained green beans and 1 cup of the cheddar.
- Transfer to a 9×13 baking dish. Top with remaining 1 cup cheddar, then arrange tater tots in a tight single layer.
- Bake 35-40 minutes until tater tots are deeply golden and crispy and the casserole is bubbling at the edges. Top with chopped chives or green onions. Serve hot.
14. Sheet Pan Frozen Salmon (20 Minutes, Zero Thawing)
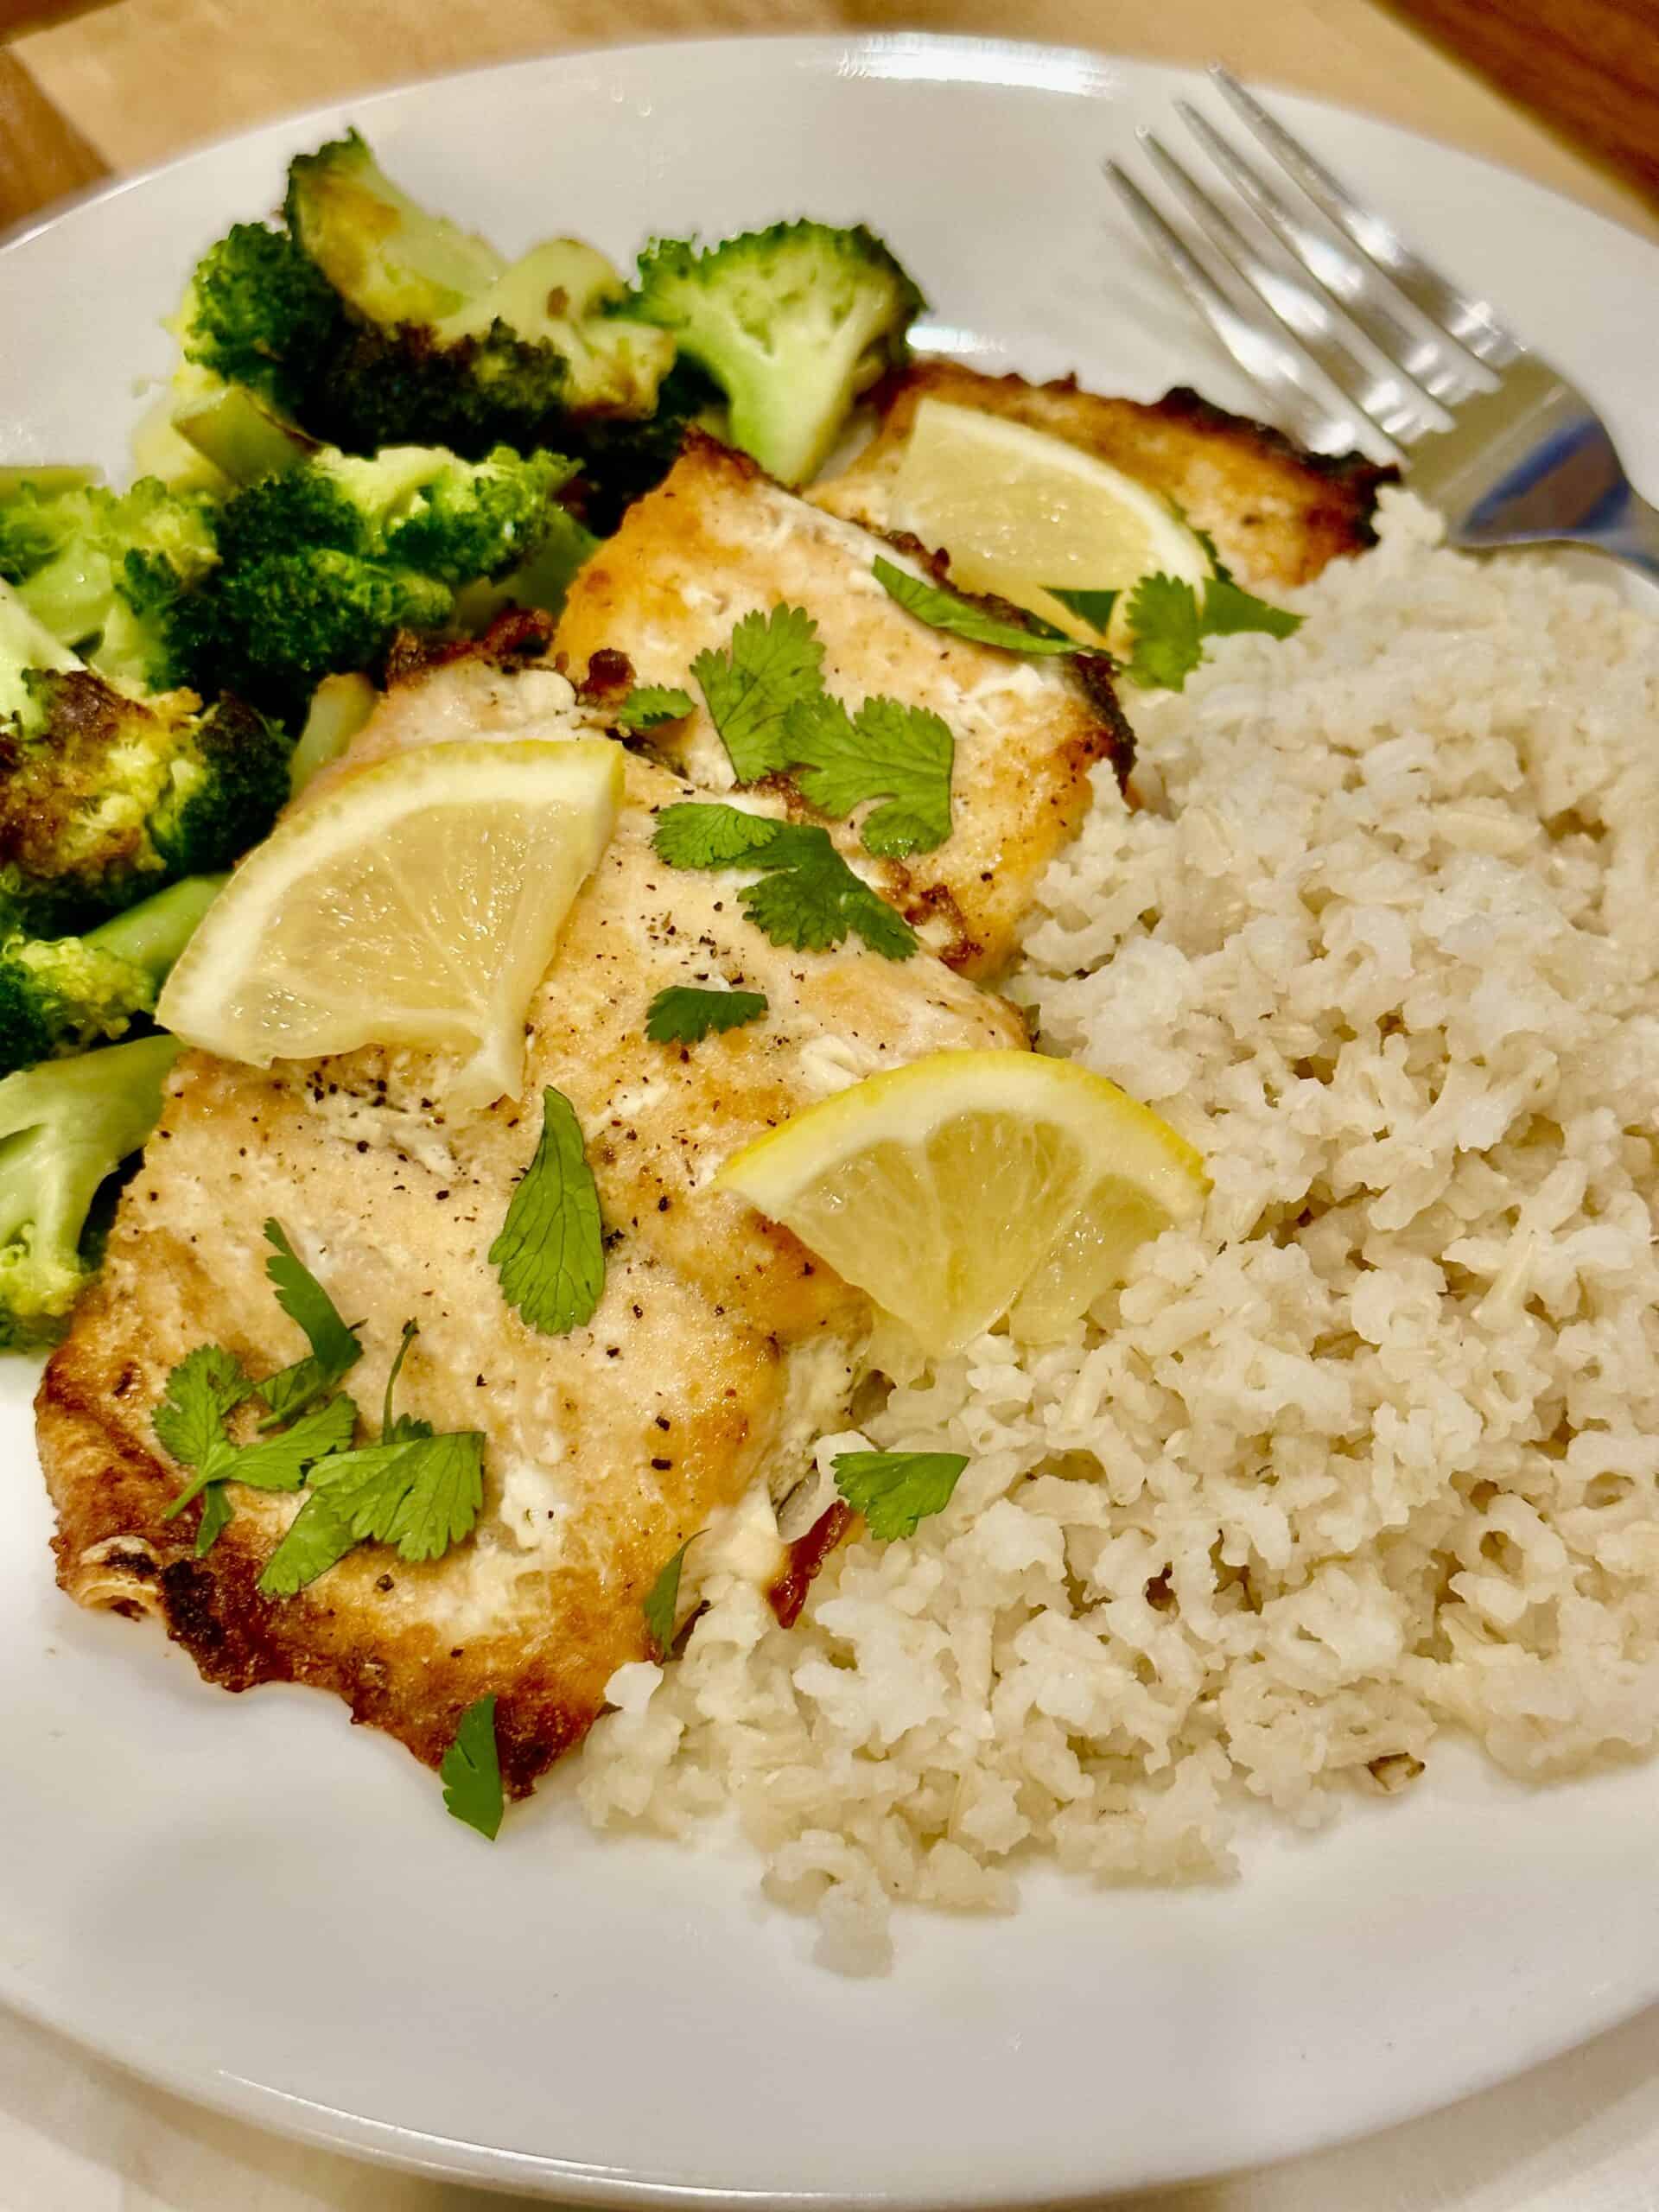
Frozen salmon fillets baked straight from the freezer with a simple lemon-garlic-butter sauce — no thawing, no marinating, no thinking. This is the "I forgot to plan dinner" lunch when there's nothing in the fridge but a bag of frozen salmon in the freezer. Twenty minutes from frozen brick to flaky golden fillets. Costco's frozen salmon portions ($15 for 6 fillets) are the cheapest way to keep salmon as a regular lunch protein. Around 30g of protein per fillet.
Rinse frozen salmon fillets under cold water for 30 seconds before baking — this removes the ice glaze that frozen salmon comes coated in. Skipping this step means the ice melts in the oven and steams the salmon instead of letting it bake properly. Pat dry with paper towels after rinsing. The two-stage bake (covered first, then uncovered) is what makes frozen salmon work — covered to thaw and start cooking, uncovered to develop a flavorful crust.
Ingredients (serves 4):
- 4 frozen salmon fillets (about 6 oz each), skin on or off
- 3 tablespoon butter, melted
- 2 tablespoon olive oil
- 4 cloves garlic, minced
- 2 tablespoon fresh lemon juice
- Zest of 1 lemon
- 1 teaspoon dried oregano (or 1 tablespoon fresh herbs)
- 1 teaspoon smoked paprika
- 1 teaspoon salt
- ½ teaspoon black pepper
- 2 tablespoon fresh parsley, chopped
- Lemon wedges for serving
Instructions:
- Heat oven to 425°F. Rinse frozen salmon fillets under cold water for 30 seconds to remove the ice glaze. Pat dry with paper towels.
- Whisk melted butter, olive oil, garlic, lemon juice, lemon zest, oregano, smoked paprika, salt, and pepper in a small bowl.
- Place salmon fillets on a foil-lined sheet pan. Brush half the sauce over the tops.
- Cover the pan tightly with foil and bake 8 minutes. Remove foil, brush with remaining sauce, and bake uncovered another 8-10 minutes until fish flakes easily with a fork and internal temp reads 130-135°F. Top with fresh parsley. Serve with lemon wedges.
13. Mediterranean Chicken Pesto Wrap

A wrap built around grilled chicken, basil pesto, sun-dried tomatoes, baby spinach, feta cheese, and a squeeze of lemon. Mediterranean flavors packed into something you can eat one-handed at your desk. This is the wrap I make when I want to feel like I had a proper lunch even on a chaotic day. Holds up well in a fridge for 3-4 hours if you assemble in the morning — the pesto acts as a protective barrier between the bread and the wet ingredients.
Spread pesto on BOTH sides of the wrap, not just one. This is the trick that keeps the tortilla from getting soggy if you're packing this for later. The pesto's oil creates a moisture barrier; one-sided pesto leaves the other side of the bread exposed to the wet feta and tomatoes. Use refrigerated fresh pesto from the deli case (Trader Joe's makes one that's genuinely great), not the shelf-stable kind in glass jars — the fresh kind tastes like actual basil instead of dried herbs in oil.
Ingredients (serves 2):
- 2 large flour tortillas or wraps (10-inch)
- 1½ cups cooked chicken, shredded or sliced (rotisserie works)
- 4 tablespoon fresh basil pesto (refrigerated kind)
- ⅓ cup oil-packed sundried tomatoes, drained and chopped
- ½ cup crumbled feta cheese
- 2 cups fresh baby spinach
- ¼ red onion, thinly sliced
- ½ cup roasted red peppers from a jar, sliced
- 1 tablespoon fresh lemon juice
- Pinch of salt and black pepper
Instructions:
- Warm tortillas briefly (10 seconds in the microwave or 30 seconds in a dry skillet) — this makes them more flexible and less likely to crack when rolled.
- Spread 2 tablespoon pesto across the entire surface of each tortilla, edge to edge.
- Layer chicken, sun-dried tomatoes, feta, baby spinach, red onion, and roasted red peppers down the center third of each tortilla. Drizzle with lemon juice, sprinkle with salt and pepper.
- Fold the bottom edge up over the filling, then fold the sides in, then roll tightly from the bottom upward. Slice diagonally and serve. Pack in parchment paper if taking to work.
12. Zucchini Feta Egg Bake
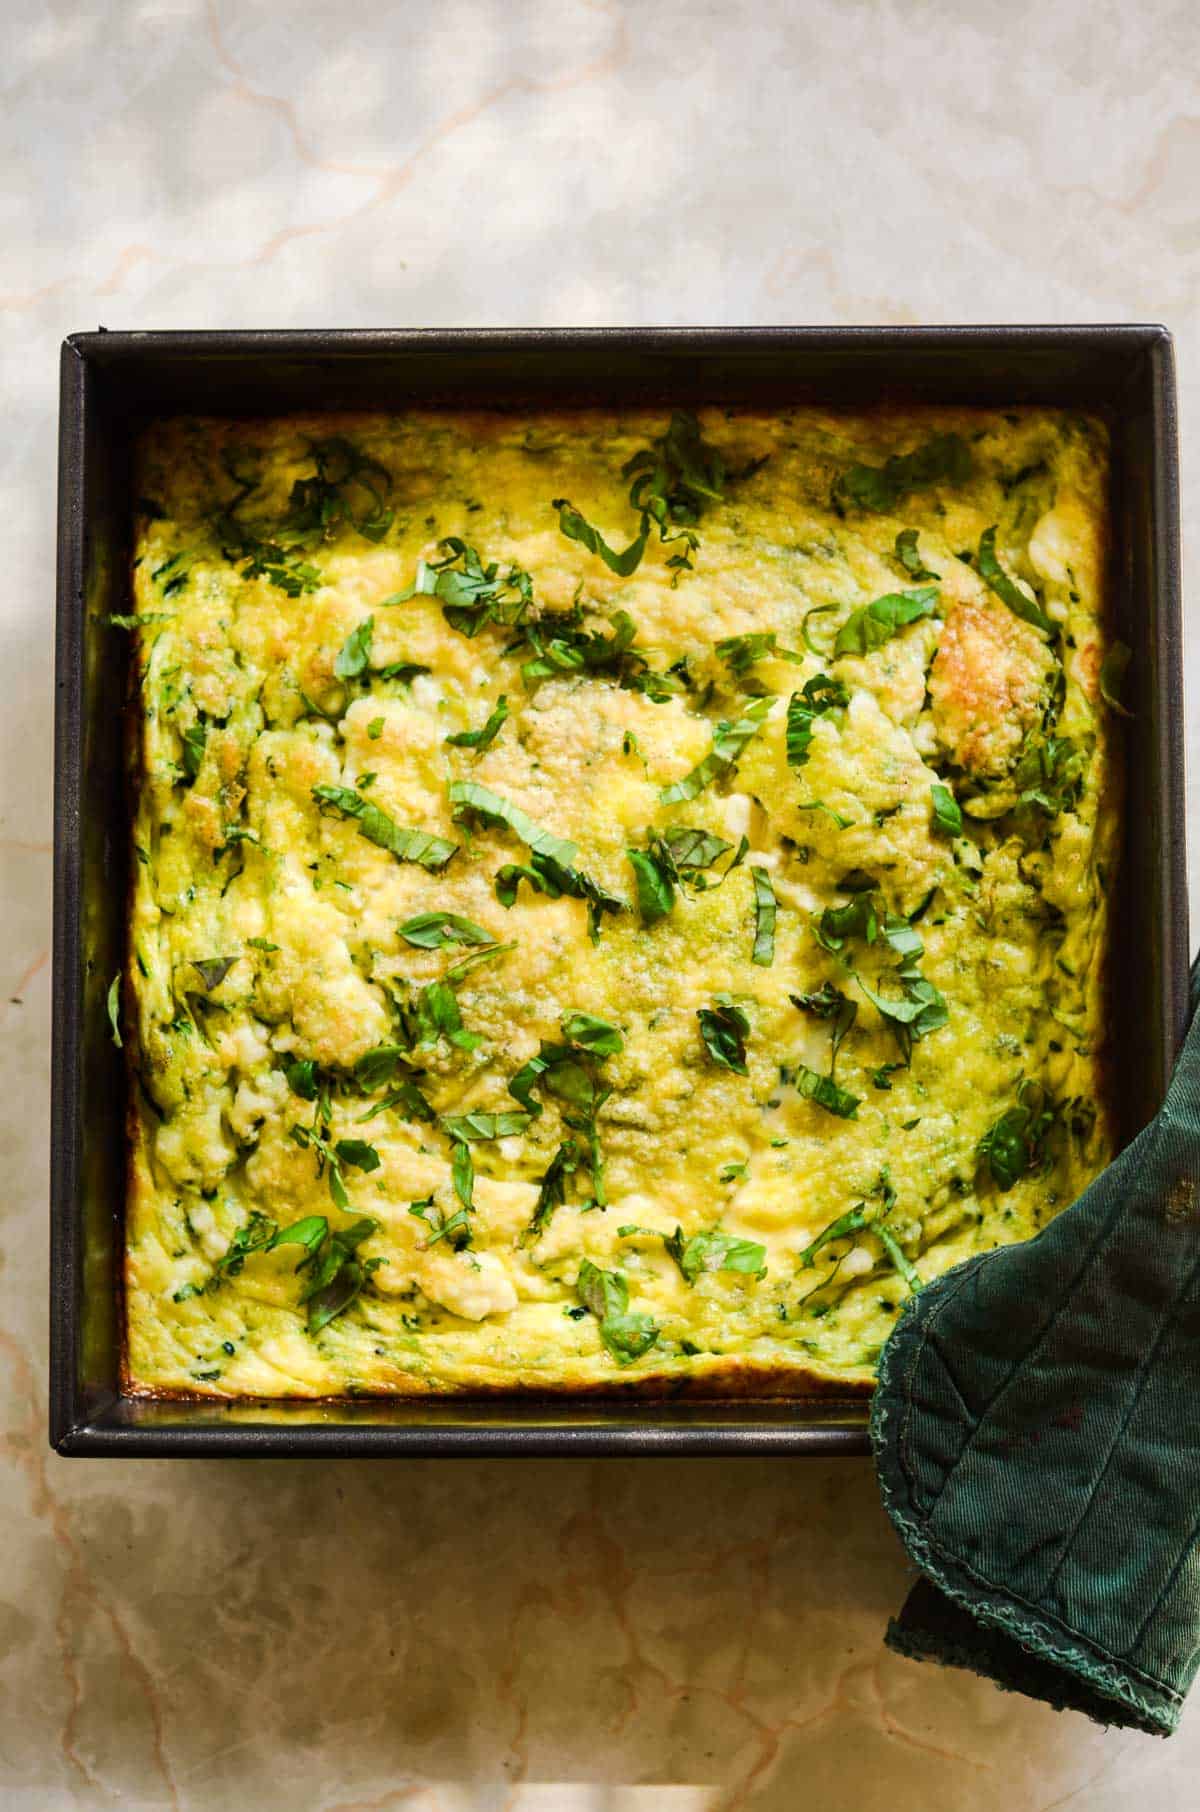
A crustless egg bake with grated zucchini, crumbled feta, fresh dill, and green onions — like a frittata, but more vegetable-forward and easier to portion. Bake once on the weekend, slice into squares, refrigerate, and pack for lunches all week. Around 14g of protein per serving with vegetables built in. This is the meal-prep lunch my husband takes to work three times a week. The zucchini disappears into the eggs (which Saad doesn't notice and which is why he eats his serving without complaint).
Squeeze the grated zucchini bone-dry before adding to the eggs. This is the most important step. Zucchini is 95% water, and wet zucchini turns the egg bake into something soggy and rubbery. Grate on the small holes of a box grater, transfer to a clean kitchen towel, and wring out hard over the sink — you'll be amazed how much liquid comes out. Use whole-milk feta packed in brine, not pre-crumbled feta which is drier and less flavorful.
Ingredients (serves 6):
- 2 medium zucchini, grated and squeezed dry (about 1½ cups squeezed)
- 8 large eggs
- ½ cup whole milk or heavy cream
- 1 cup crumbled feta cheese
- ½ cup grated Parmesan
- 4 green onions, sliced
- 3 tablespoon fresh dill, chopped
- 2 tablespoon fresh chives, chopped
- 2 cloves garlic, minced
- 1 teaspoon salt
- ½ teaspoon black pepper
- ¼ teaspoon red pepper flakes (optional)
- 2 tablespoon olive oil (for greasing the dish)
Instructions:
- Heat oven to 375°F. Grease a 9×13 baking dish with olive oil.
- Grate zucchini on the small holes of a box grater. Wring out in a kitchen towel over the sink — squeeze hard until almost no water comes out.
- Whisk eggs and milk in a large bowl until smooth. Stir in feta, Parmesan, green onions, dill, chives, garlic, salt, pepper, and red pepper flakes. Fold in squeezed zucchini.
- Pour into the greased baking dish. Bake 30-35 minutes until the top is golden, the center is set (no jiggle), and a knife inserted in the middle comes out clean. Cool 10 minutes, slice into squares. Serve warm or refrigerate up to 4 days for meal prep.
11. Crockpot Shredded Chicken Sandwiches

Chicken breasts slow-cooked in BBQ sauce and seasonings until they fall apart into juicy shreds, piled onto soft buns with pickles, slaw, and extra sauce. Set the crockpot in the morning, come home to dinner-ready chicken, and pack the leftovers for sandwich lunches all week. The chicken keeps 4 days in the fridge and gets better as it sits. Around $2 per sandwich at typical grocery prices.
Use chicken breasts here, not thighs, despite my usual preference for thighs. Slow-cooked chicken breasts shred more cleanly than thighs and absorb the BBQ sauce better — thighs hold their shape and the sauce coats the surface rather than penetrating. Cook on LOW for 6-7 hours; high heat for shorter times makes the chicken tough. Shred the chicken IN the crockpot, then let it sit in the sauce for another 15 minutes to absorb everything.
Ingredients (serves 8):
- 2 lbs boneless skinless chicken breasts
- 1½ cups BBQ sauce of choice
- ½ cup chicken broth
- 3 tablespoon brown sugar
- 1 tablespoon Worcestershire sauce
- 1 tablespoon apple cider vinegar
- 1 teaspoon smoked paprika
- 1 teaspoon garlic powder
- 1 teaspoon onion powder
- 1 teaspoon salt
- ½ teaspoon black pepper
- 8 soft sandwich buns (brioche or potato)
- Sliced pickles, coleslaw, and extra BBQ sauce for serving
Instructions:
- Whisk BBQ sauce, chicken broth, brown sugar, Worcestershire, apple cider vinegar, smoked paprika, garlic powder, onion powder, salt, and pepper in the bottom of a crockpot.
- Add chicken breasts, turning to coat in the sauce. Cover and cook on LOW for 6-7 hours (or HIGH for 3-4 hours, but LOW is better).
- Shred the chicken with two forks directly in the crockpot — the meat should fall apart easily. Stir to coat with the sauce. Cover and let sit for 15 minutes off heat to absorb.
- Pile shredded chicken on toasted buns. Top with pickles, coleslaw, and extra BBQ sauce. Serve immediately or refrigerate the chicken up to 4 days for sandwich lunches all week.
10. Chicken Bacon Ranch Wrap
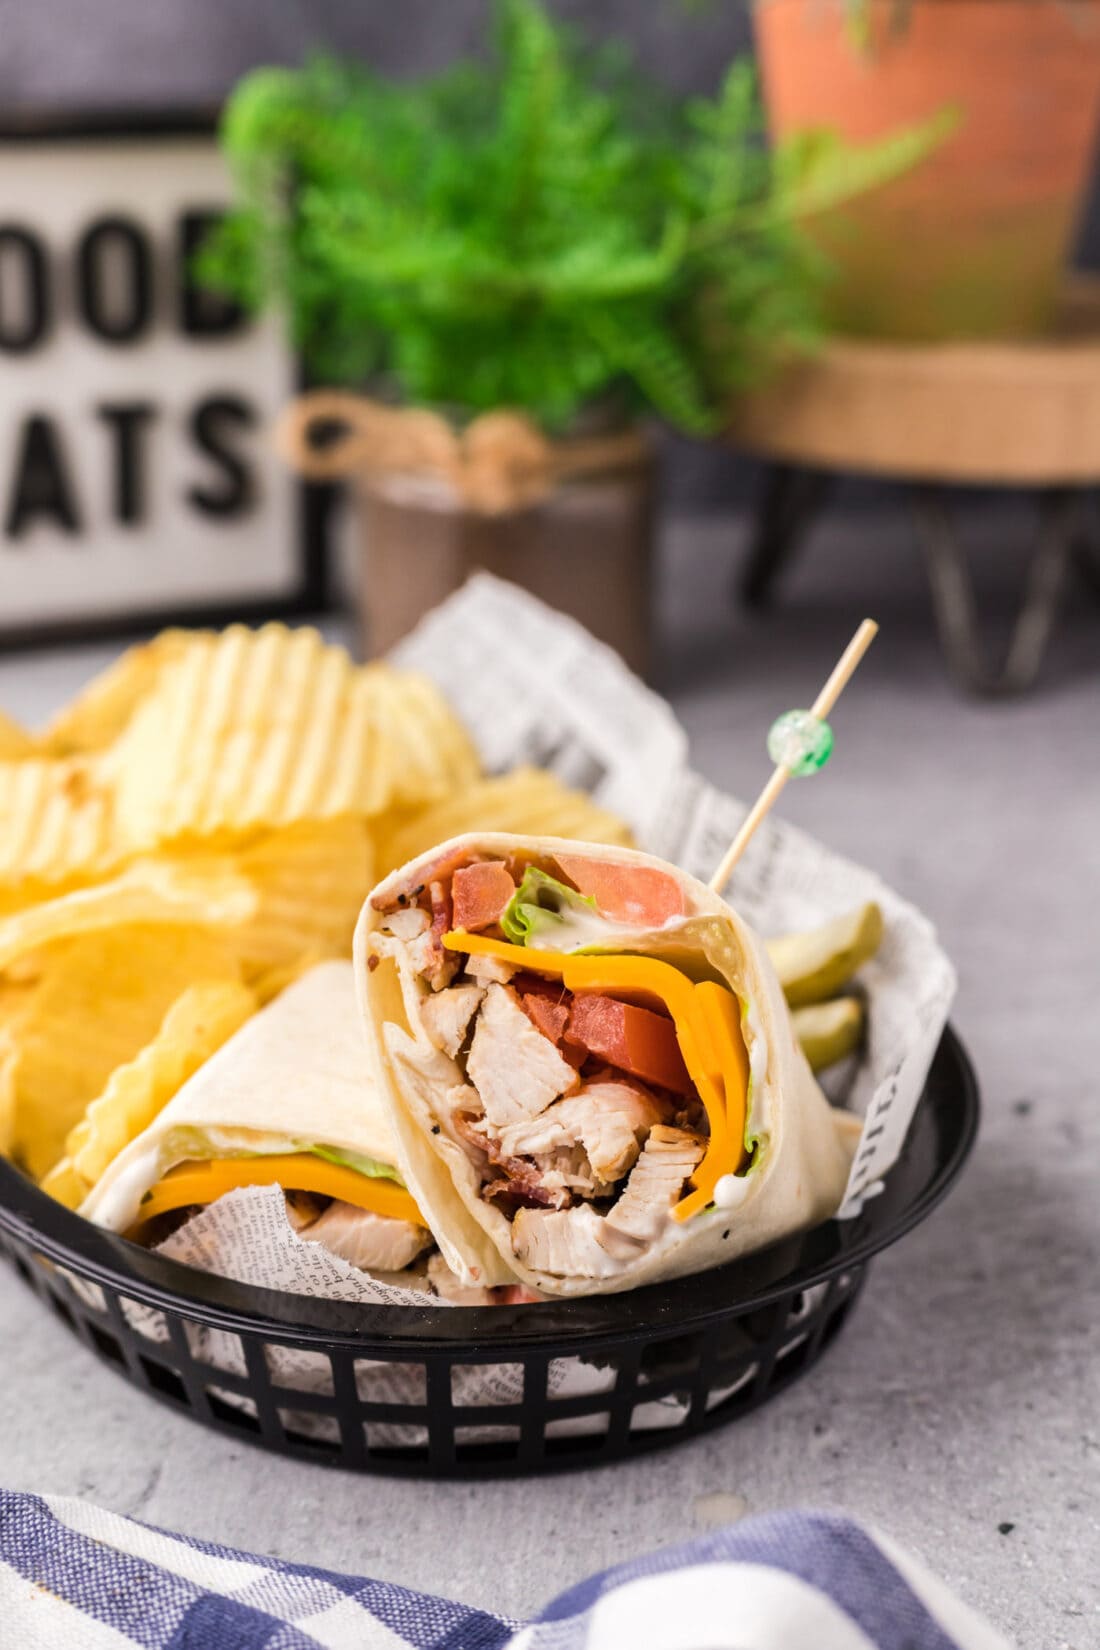
A loaded wrap with grilled chicken, crispy bacon, ranch dressing, lettuce, tomato, and shredded cheddar. The flavor profile every American kid loves and most adults secretly love too. This is my husband's preferred work lunch — he takes one of these about twice a week. Five minutes to assemble if your chicken and bacon are already cooked. Pack it the night before; it holds up surprisingly well overnight wrapped tightly in parchment.
Cook the bacon crispier than you would for a BLT — limp bacon disappears into a wrap, but truly crispy bacon stays noticeable in every bite. Eight to ten minutes in a 400°F oven on a sheet pan does this without standing over a skillet. Use a thick-style ranch (Hidden Valley refrigerated cup, or the bottled "ranch dressing & dip" version), not the thin pourable kind — thin ranch soaks through the tortilla. The thick version stays put inside the wrap.
Ingredients (serves 2):
- 2 large flour tortillas (10-inch)
- 1½ cups cooked chicken, sliced or shredded
- 6 strips bacon, cooked very crispy
- 4 tablespoon ranch dressing (thick style)
- 1 cup shredded romaine or iceberg lettuce
- 1 medium tomato, diced
- ½ cup shredded sharp cheddar
- ¼ red onion, thinly sliced (optional)
- Pinch of black pepper
Instructions:
- If cooking bacon fresh: arrange on a sheet pan and bake at 400°F for 8-10 minutes until very crispy. Drain on paper towels.
- Warm tortillas briefly (10 seconds in the microwave or 30 seconds in a dry skillet) — this makes rolling easier.
- Spread 2 tablespoon ranch dressing across each tortilla, edge to edge.
- Layer chicken, bacon, lettuce, diced tomato, shredded cheddar, and red onion down the center. Sprinkle with black pepper. Fold the bottom up, fold in the sides, then roll tightly. Slice diagonally and serve.
9. Chili Oil Ramen
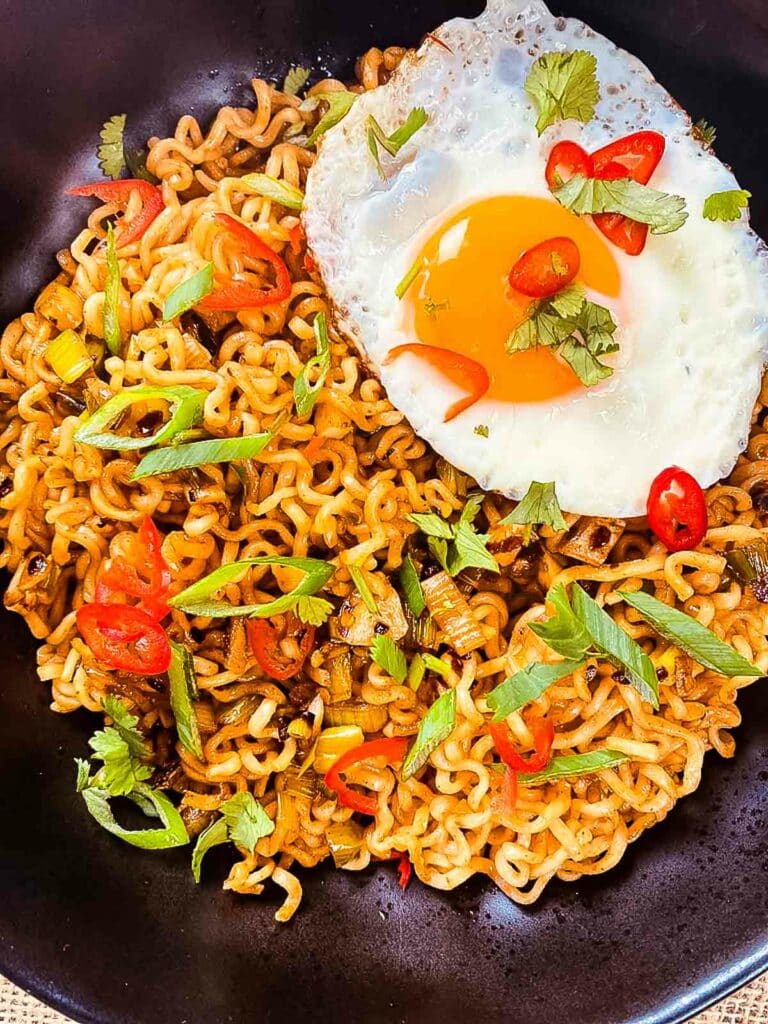
A 10-minute ramen lunch built on instant noodles, soy sauce, garlic, and a generous spoonful of chili oil — the dressing-up of a $1 packet of ramen into something that tastes like restaurant noodles. The chili oil is the entire game. A good Chinese chili oil (Lao Gan Ma is the classic, Fly By Jing is the upgrade) transforms basic noodles into a deeply flavored dish in seconds. Skip the seasoning packet that comes with the ramen — that's the part you're upgrading away from.
Cook the noodles in PLAIN water, not the seasoning packet liquid. Drain them. Then build the sauce separately in the serving bowl — chili oil, soy sauce, black vinegar, garlic, sugar, sesame oil — and toss the hot drained noodles into it. This is the difference between flavored broth (boring) and noodles coated in sauce (great). Reserve 2 tablespoons of pasta water and add it to the sauce; the starchy water helps the sauce cling to the noodles instead of pooling at the bottom.
Ingredients (serves 1):
- 1 packet instant ramen noodles (seasoning packet discarded)
- 2 tablespoon chili oil with crispy bits (Lao Gan Ma or Fly By Jing)
- 1 tablespoon soy sauce
- 1 teaspoon Chinese black vinegar (or rice vinegar)
- 1 teaspoon brown sugar
- 1 teaspoon toasted sesame oil
- 2 cloves garlic, microplaned or finely minced
- 2 green onions, sliced
- 2 tablespoon reserved pasta water
- Optional toppings: soft-boiled egg, sliced cucumber, peanuts, sesame seeds, cilantro
Instructions:
- Boil ramen noodles in plain water (no seasoning packet) for 3 minutes. Reserve 2 tablespoon pasta water before draining.
- While noodles cook, combine chili oil, soy sauce, black vinegar, brown sugar, sesame oil, and microplaned garlic in a serving bowl. Whisk to combine.
- Add reserved pasta water to the sauce and whisk until silky.
- Add hot drained noodles to the sauce, toss thoroughly to coat. Top with sliced green onions and any optional toppings. Eat immediately.
8. Tuna and Potato Patties
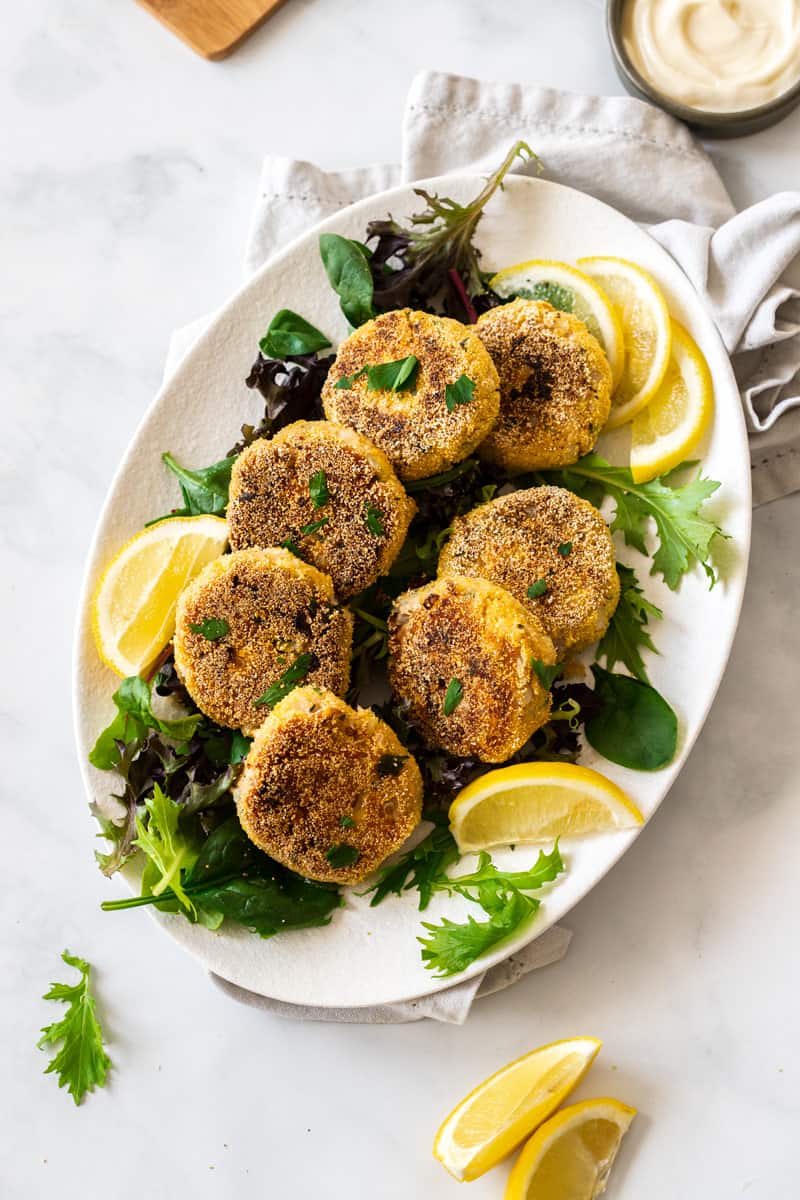
Crispy pan-fried patties made from canned tuna, mashed potato, egg, fresh herbs, and lemon zest. The mashed potato binds everything together and gives the patties a soft, almost croquette-like interior with a crackling-crisp golden exterior. This is the pantry lunch I make when there's nothing fresh in the fridge — canned tuna, potatoes from the bottom drawer, an egg, and we're eating in 25 minutes. Around 18g of protein per serving. Serve with lemon wedges and a dollop of tartar sauce or yogurt.
Cool the mashed potato completely before mixing with the tuna and egg. Hot mashed potato will cook the egg on contact, turning your patty mixture lumpy and grainy instead of smooth. If you're starting fresh, boil potatoes in the morning and refrigerate; if you have leftover mashed potato from dinner, even better. Use a non-stick or well-seasoned cast iron pan and don't flip the patties too early — let them form a deep golden crust on the first side (4-5 minutes) before flipping.
Ingredients (serves 4, makes 8 patties):
- 2 cans (5 oz each) tuna, drained well
- 2 cups cold mashed potatoes (about 2 large potatoes, boiled and mashed)
- 1 large egg, beaten
- ¼ cup all-purpose flour
- ¼ cup grated Parmesan
- 3 green onions, sliced
- 3 tablespoon fresh parsley or dill, chopped
- Zest of 1 lemon
- 2 teaspoon Dijon mustard
- 1 teaspoon salt
- ½ teaspoon black pepper
- ½ teaspoon garlic powder
- 3-4 tablespoon neutral oil for frying
- Lemon wedges, tartar sauce, or plain yogurt for serving
Instructions:
- If making fresh mash: peel and cube 2 large potatoes. Boil in salted water 15 minutes until tender. Drain, mash, and spread on a plate to cool completely (15-20 minutes).
- In a large bowl, combine cooled mashed potato, drained tuna, beaten egg, flour, Parmesan, green onions, parsley, lemon zest, Dijon, salt, pepper, and garlic powder. Mix gently until combined.
- Shape into 8 patties about ½-inch thick. If the mixture feels too soft to handle, refrigerate 15 minutes to firm up.
- Heat oil in a large skillet over medium heat. Fry patties 4-5 minutes per side until deeply golden and crispy. Drain briefly on paper towels. Serve with lemon wedges and tartar sauce.
7. Ranch Chicken Bites

Bite-sized chicken thighs coated in dry ranch seasoning and pan-seared until crispy and golden. Snack-sized pieces of protein perfect for dipping in extra ranch or BBQ sauce — basically chicken nuggets for grown-ups. Saad loves these as his lunch protein when paired with cucumber sticks, baby carrots, and a wedge of pita. Around 30g of protein per serving and ready in 15 minutes. Make a double batch on Sunday and pack them for kids' lunches all week.
Use chicken thighs (not breasts) for this one. Cubed chicken breast pieces dry out almost immediately when pan-seared in small pieces because there's no fat to protect the meat. Thighs cut into 1-inch cubes stay juicy and develop a much better crust. The Hidden Valley dry ranch packet is the standard, but you can mix your own: 2 tablespoon dried parsley, 1 tablespoon dried dill, 1 tablespoon onion powder, 1 tablespoon garlic powder, 1 teaspoon salt, ½ teaspoon black pepper. Same flavor, no MSG-adjacent ingredients if that matters to you.
Ingredients (serves 4):
- 1½ lbs boneless skinless chicken thighs, cut in 1-inch cubes
- 1 packet (1 oz) dry ranch seasoning (or homemade mix, see headnote)
- 2 tablespoon olive oil
- 2 tablespoon butter
- 4 cloves garlic, minced
- 2 tablespoon fresh parsley, chopped
- Pinch of black pepper
- Ranch dressing or BBQ sauce for dipping
Instructions:
- Cut chicken thighs into 1-inch cubes. Pat dry with paper towels — dry surfaces sear better.
- Toss chicken with dry ranch seasoning until evenly coated.
- Heat olive oil in a large skillet over medium-high heat. Add chicken in a single layer (work in batches if needed — crowding causes steaming). Sear 4-5 minutes without stirring, then turn pieces and cook another 3-4 minutes until golden and cooked through (internal temp 175°F).
- Reduce heat to medium. Add butter and minced garlic, swirl in the pan until the butter foams and garlic is fragrant (about 30 seconds). Toss chicken to coat. Top with parsley and serve with ranch or BBQ sauce.
6. Beef Quesadilla

A loaded beef quesadilla — seasoned ground beef, two kinds of cheese, diced onion and bell pepper, all sandwiched between two crispy flour tortillas griddled in butter until golden and the cheese is melted to gooey perfection. This is my husband's favorite quick lunch. Twenty minutes including cooking the beef. Cuts into wedges for kid-friendly portions, eats one-handed at a desk for grown-ups. More Mexican-inspired recipes if you want to round out a full Mexican lunch spread with sides and dips.
Use two kinds of cheese — sharp cheddar for flavor and Monterey Jack for melt. Pure cheddar gets greasy and clumpy in a quesadilla; pure Monterey Jack tastes flat without the cheddar's sharpness. The 50/50 blend gives you both. Cook the quesadilla in butter (not oil) over medium-low heat — high heat burns the tortilla before the cheese melts. Patience is the entire technique. Press down gently with a spatula while cooking to seal the layers.
Ingredients (serves 4):
- 1 lb ground beef (85% lean)
- 1 small yellow onion, finely diced
- 1 red bell pepper, finely diced
- 3 cloves garlic, minced
- 1 tablespoon taco seasoning (or 1 teaspoon each: cumin, chili powder, smoked paprika)
- 1 teaspoon salt
- ½ teaspoon black pepper
- 2 tablespoon tomato paste
- ¼ cup chicken or beef broth
- 8 large flour tortillas (10-inch)
- 1½ cups shredded sharp cheddar
- 1½ cups shredded Monterey Jack
- 4 tablespoon butter, for cooking
- Sour cream, salsa, guacamole, and cilantro for serving
Instructions:
- Brown ground beef with diced onion and bell pepper in a skillet over medium-high heat for 8-10 minutes, breaking it up. Drain excess fat. Add garlic, cook 30 seconds.
- Stir in taco seasoning, salt, pepper, tomato paste, and broth. Cook 3-4 minutes until thickened. Remove from heat.
- Mix the two cheeses together. Sprinkle ¾ cup of the cheese blend on a tortilla, add ½ cup of the beef mixture spread evenly, sprinkle another ¼ cup cheese on top, then cover with a second tortilla.
- Melt 1 tablespoon butter in a large skillet over medium-low heat. Slide the quesadilla into the pan. Cook 3-4 minutes pressing gently with a spatula. Flip carefully, add another small piece of butter under the second side, and cook 3-4 more minutes until both sides are golden and cheese is fully melted. Repeat with remaining tortillas. Slice into wedges. Serve with sour cream, salsa, guacamole, and cilantro.
5. Quick Bolognese Sauce

A 30-minute weeknight bolognese — ground beef, soffritto (onion, carrot, celery), tomato, a splash of milk, and a generous handful of Parmesan. Not the traditional 4-hour Italian version, but a faithful weeknight rendition that hits 90% of the same flavors in a fraction of the time. Serves over pasta, in a baked ziti, on toast, or even on rice. The leftovers freeze beautifully in single-portion containers for grab-and-go lunches.
The soffritto — finely diced onion, carrot, and celery sautéed slowly in olive oil — is the soul of bolognese. Don't skip the carrot. A common shortcut is to skip the soffritto entirely and just sauté onion, but the carrot's subtle sweetness and the celery's vegetal note are what give bolognese its layered, complex flavor. Take 10 minutes to cook the soffritto until truly soft and golden — this is where the depth comes from. Also: a splash of whole milk added before the tomato is non-negotiable. It tenderizes the meat and rounds out the acid in the tomatoes.
Ingredients (serves 4-6):
- 1 lb ground beef (or mix of beef and pork)
- 3 tablespoon olive oil
- 1 medium yellow onion, finely diced
- 1 large carrot, finely diced
- 2 stalks celery, finely diced
- 4 cloves garlic, minced
- ¼ cup tomato paste
- ½ cup whole milk
- ½ cup dry red wine (optional, or extra broth)
- 1 can (28 oz) crushed tomatoes
- 1 cup beef or chicken broth
- 1 teaspoon dried oregano
- 1 teaspoon Italian seasoning
- 1½ teaspoon salt
- ½ teaspoon black pepper
- 2 bay leaves
- ½ cup grated Parmesan, plus more for serving
- Fresh basil for serving
- Cooked pasta (pappardelle, tagliatelle, or rigatoni) for serving
Instructions:
- Heat olive oil in a deep skillet or Dutch oven over medium heat. Add diced onion, carrot, and celery. Cook 10 minutes, stirring occasionally, until softened and lightly golden — this is the soffritto. Add garlic, cook 30 seconds.
- Push the vegetables to the side. Add ground beef to the empty side, breaking it up. Brown 6-8 minutes until no pink remains. Drain excess fat.
- Stir in tomato paste, cook 1 minute. Pour in milk, simmer 2-3 minutes until mostly absorbed. Add red wine (if using), simmer 3 minutes.
- Add crushed tomatoes, broth, oregano, Italian seasoning, salt, pepper, and bay leaves. Bring to a simmer, reduce heat to low, and simmer 20-25 minutes, stirring occasionally. Remove bay leaves. Stir in Parmesan. Serve over cooked pasta with extra Parmesan and fresh basil.
4. Easy Lentil Vegan Wraps
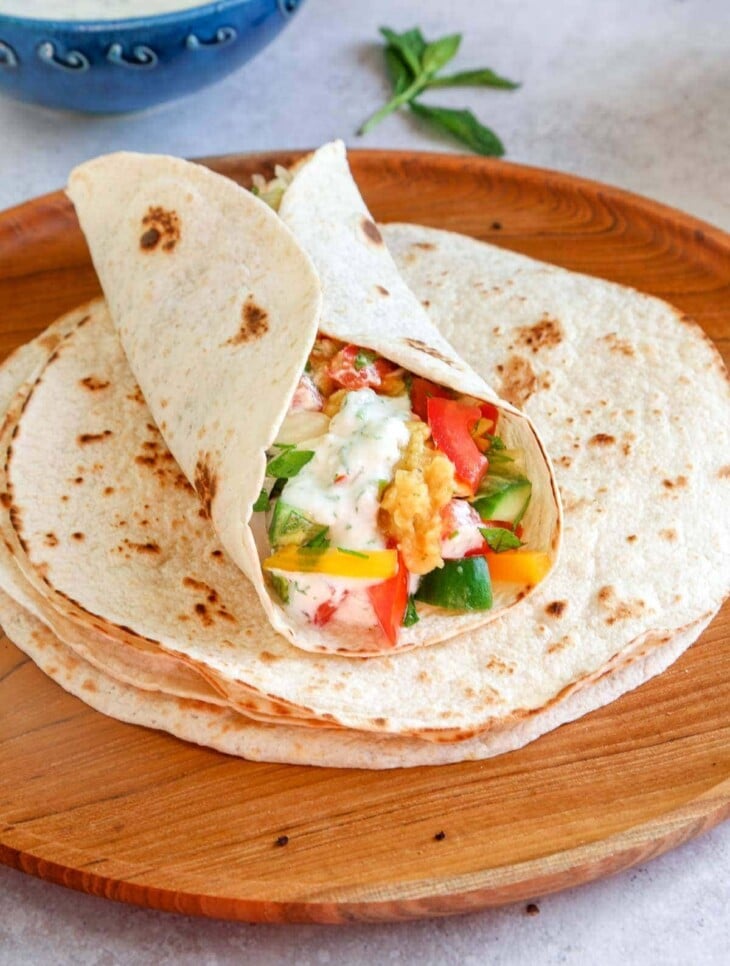
Spiced cooked lentils, fresh vegetables, tahini sauce, and pickled red onions, all wrapped in a soft flour tortilla or warm pita. Plant-based, protein-packed (lentils have around 18g per cup), and substantial enough that you don't miss the meat. This is one of my favorite lunches to pack for work — the flavors hold up overnight in the fridge and the tahini sauce keeps everything moist without making the wrap soggy. Around $2 a wrap to make. More high-protein lunch ideas if you want similar plant-forward options.
Cook lentils until tender but not mushy — French green lentils (Le Puy) or black beluga lentils hold their shape best for wraps. Regular brown lentils work but tend to fall apart. Cook in vegetable broth instead of water for more flavor. Add the lemon juice after cooking, not before — acid added to cooking lentils makes them never soften properly. Pickled red onions are the secret weapon: thinly slice a red onion, cover with apple cider vinegar and a pinch of salt and sugar, let sit 30 minutes. Keeps a week in the fridge.
Ingredients (serves 4):
- 1 cup dried green or black lentils (or 2 cans cooked lentils, drained)
- 3 cups vegetable broth
- 2 cloves garlic, smashed
- 1 bay leaf
- 1 teaspoon ground cumin
- 1 teaspoon smoked paprika
- 1 teaspoon salt
- 2 tablespoon fresh lemon juice
- 2 tablespoon olive oil
- Tahini sauce: ¼ cup tahini, 3 tablespoon lemon juice, 1 small garlic clove minced, ½ teaspoon salt, 3-4 tablespoon warm water (to thin)
- Pickled red onions: 1 red onion thinly sliced, ½ cup apple cider vinegar, 1 teaspoon salt, 1 teaspoon sugar
- 4 large flour tortillas or warm pita
- 2 cups fresh baby spinach or arugula
- 1 cup cherry tomatoes, halved
- 1 cucumber, sliced
- ¼ cup fresh parsley or cilantro
Instructions:
- Pickle the onions: combine sliced red onion, apple cider vinegar, salt, and sugar in a jar. Let sit at least 30 minutes (or up to a week in the fridge).
- Cook lentils: bring broth to a boil with garlic, bay leaf, cumin, smoked paprika, and salt. Add lentils, reduce to a simmer, cook 20-25 minutes until tender but holding shape. Drain, remove bay leaf and garlic, stir in lemon juice and olive oil.
- Make tahini sauce: whisk tahini, lemon juice, minced garlic, and salt. Add warm water 1 tablespoon at a time until silky and pourable.
- Warm tortillas. Spread tahini sauce on each, layer with spinach, cooked lentils, cherry tomatoes, cucumber, pickled onions, and fresh herbs. Roll tightly. Slice diagonally and serve, or pack for lunch.
3. Onigiri (Japanese Rice Balls)

Triangular Japanese rice balls made from short-grain rice, lightly salted, often filled with a savory center (umeboshi plum, tuna mayo, salmon flakes) and wrapped in a strip of nori. Easy to make, easy to pack, and perfect for school lunches or work bags. Saad calls these "rice triangles" and asks for them as snacks too. The rice itself is the star — short-grain Japanese rice that gets sticky enough to hold together when shaped.
Use Japanese short-grain rice (Calrose, Nishiki, or Tamaki Gold brands at most US grocery stores) — long-grain rice will not hold together. Rinse the rice until the water runs clear before cooking; this is essential for getting that signature sticky-but-not-gluey texture. Wet your hands and lightly salt them before shaping — this prevents the rice from sticking to your hands and seasons the outside. Shape while the rice is still warm; cool rice doesn't compress as well.
Ingredients (serves 4, makes 8 onigiri):
- 2 cups Japanese short-grain rice (Calrose, Nishiki, or Tamaki Gold)
- 2½ cups water
- 1 teaspoon salt (for hands while shaping)
- 1 sheet nori, cut into 8 strips (about 1 inch wide each)
- Filling options (pick one or mix): 1 can tuna drained + 2 tablespoon Japanese mayo + 1 teaspoon soy sauce; OR ¼ cup furikake seasoning (mixed in); OR 1 umeboshi pickled plum per onigiri; OR 4 tablespoon salmon flakes
Instructions:
- Rinse rice in a fine-mesh strainer until water runs clear (about 60 seconds). Drain well.
- Combine rice and water in a pot. Bring to a boil, reduce to lowest heat, cover, and cook 18 minutes. Off the heat, leave covered 10 more minutes to steam. Fluff gently.
- If using tuna mayo filling, mix the ingredients. Let rice cool slightly (still warm but not hot enough to burn).
- Wet your hands with cold water, dip into salt, and shake off excess. Take ½ cup of rice, flatten into your palm, place 1 tablespoon of filling in the center, then cup your hands and gently shape into a triangle. Press firmly but not so hard the rice gets mashed. Wrap a strip of nori around the bottom. Repeat with remaining rice. Eat the same day for best texture.
2. Panda Express Copycat Eggplant Tofu
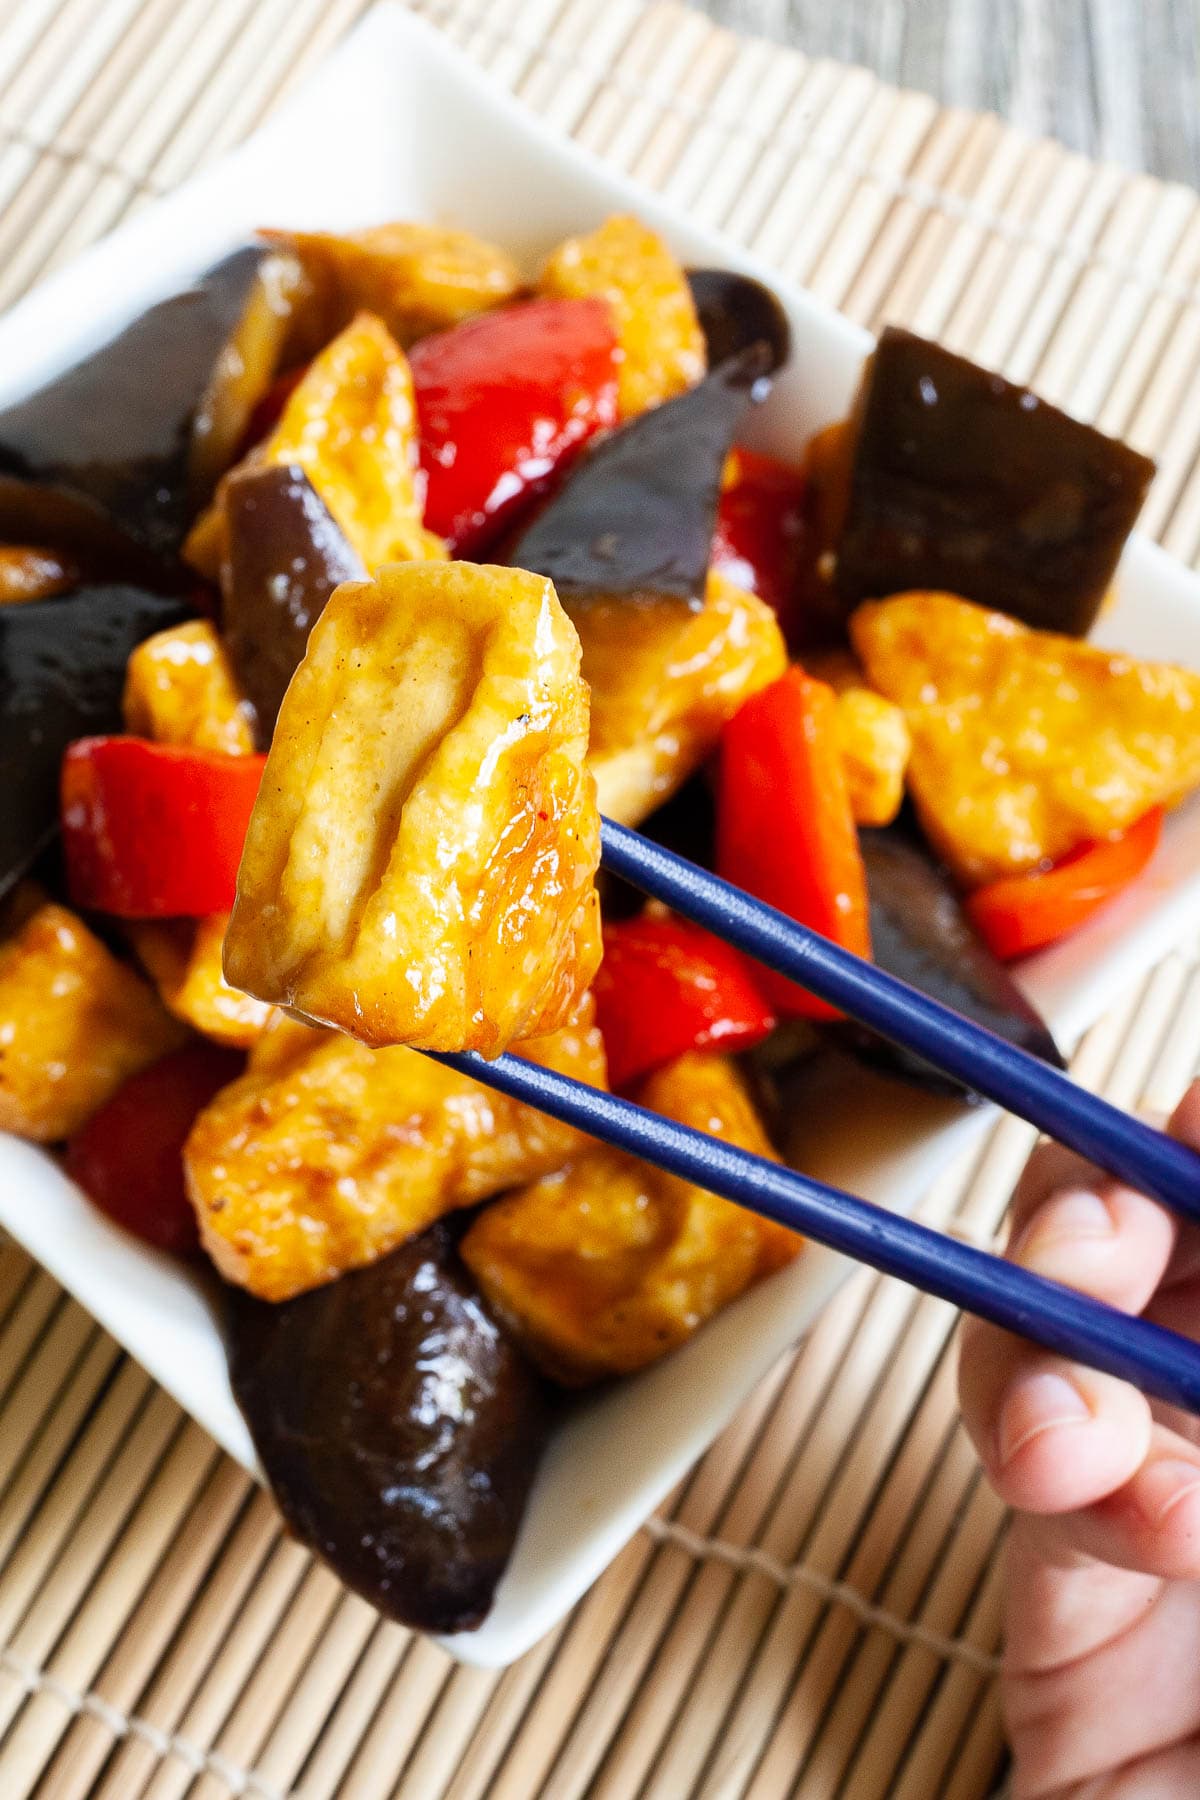
A copycat of the Panda Express eggplant tofu — crispy fried tofu and tender eggplant in a thick, glossy sweet-and-savory sauce with hints of garlic and ginger. Different from the brighter Chinese-style stir-fry at #22, this version has Panda Express's signature thicker glaze that coats every piece in shiny sauce. Restaurant-style flavor for about a third of the price. The cornstarch coating on the tofu is what gives it that distinctive crispy-on-outside, soft-on-inside texture.
Dredge the tofu in cornstarch (not flour) before frying. Cornstarch creates a thin, crackling shell that holds up against the sauce; flour makes a softer, breading-like coating that gets soggy. Press the tofu first to remove excess water — wet tofu won't crisp. Use Japanese eggplant for the right texture and color; globe eggplant gets too soft in this sauce. Add the sauce only at the very end — the eggplant and tofu cook first, the sauce thickens for 30 seconds, everything tosses together.
Ingredients (serves 4):
- 14 oz block firm tofu, pressed and cubed in 1-inch pieces
- 2 Japanese eggplants, cut in 1-inch cubes (about 1 lb)
- ¼ cup cornstarch (for coating tofu)
- 4 tablespoon neutral oil, divided
- 4 cloves garlic, minced
- 1 tablespoon fresh ginger, minced
- 3 green onions, sliced (whites and greens separated)
- Sauce: ⅓ cup soy sauce, 3 tablespoon brown sugar, 2 tablespoon rice vinegar, 2 tablespoon hoisin sauce, 1 tablespoon Shaoxing wine or dry sherry, 1 teaspoon toasted sesame oil, 1 teaspoon cornstarch + 2 tablespoon water (slurry)
- Cooked white rice for serving
- Sesame seeds for topping
Instructions:
- Press tofu 15 minutes, then cube. Toss with cornstarch until evenly coated on all sides.
- Mix sauce: soy sauce, brown sugar, rice vinegar, hoisin, Shaoxing wine, sesame oil. Mix cornstarch with water separately for slurry.
- Heat 2 tablespoon oil in a wok or large skillet over medium-high heat. Add cornstarch-coated tofu in a single layer. Fry 6-8 minutes, turning, until all sides are deeply golden and crispy. Transfer to a plate.
- Add remaining 2 tablespoon oil and eggplant cubes. Stir-fry 8 minutes until softened and golden. Add garlic, ginger, and green onion whites. Cook 30 seconds. Return tofu to the pan. Pour sauce in, then immediately add cornstarch slurry. Toss for 30-60 seconds until the sauce thickens and coats everything. Top with green onion greens and sesame seeds. Serve over rice.
1. 20-Minute Cauliflower Steak with Peppercorn Sauce
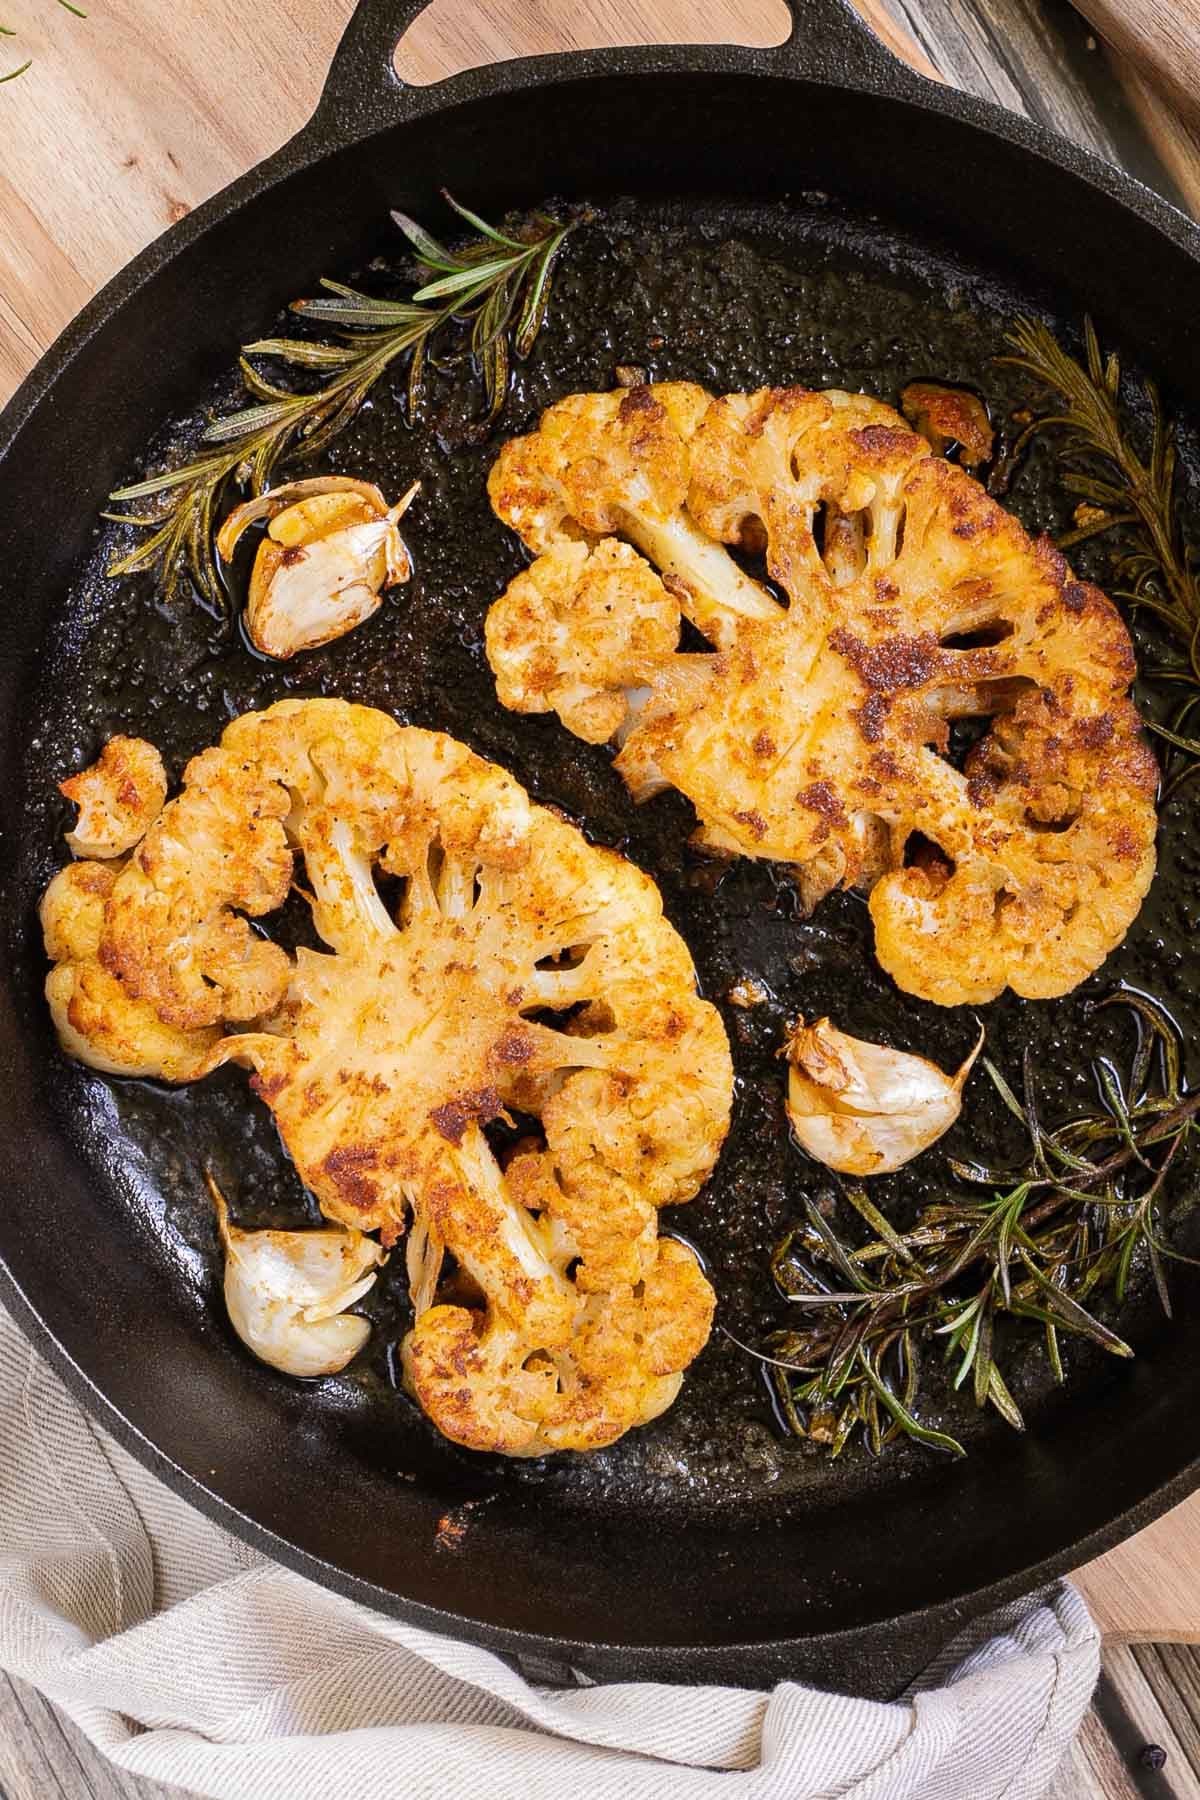
My number one because it's the lunch that most surprises people who think they don't like vegetables. Thick slabs of cauliflower seared in a hot pan until deeply golden and tender, finished with a creamy peppercorn sauce that turns the whole thing into a genuinely satisfying lunch. Around $3 a serving and ready in 20 minutes. The pan-searing develops nutty, caramelized flavor in the cauliflower that you cannot get from roasting alone. Pair with a side salad and crusty bread.
Cut the cauliflower head through the stem end to get steak-shaped slabs that hold together — slicing across the head gives you florets that fall apart. You'll usually get 2-3 true steaks per head plus extra florets, which you can roast separately. Pan-sear in a hot pan first to develop the crust, then finish in the oven to cook through. Cauliflower goes from raw to tender at around 175°F internal — check with a knife in the thickest part. The peppercorn sauce is what makes this feel like a meal rather than just a vegetable side.
Ingredients (serves 2-3):
- 1 large head cauliflower
- 3 tablespoon olive oil
- 1 teaspoon salt
- ½ teaspoon black pepper
- 1 teaspoon smoked paprika
- ½ teaspoon garlic powder
- Peppercorn sauce: 2 tablespoon butter, 1 small shallot finely diced, 2 cloves garlic minced, 1 tablespoon whole peppercorns (cracked), ½ cup vegetable broth, ½ cup heavy cream (or coconut cream for vegan), 1 teaspoon Dijon mustard, 1 tablespoon brandy or white wine (optional), 1 teaspoon salt
- Fresh parsley and crusty bread for serving
Instructions:
- Heat oven to 400°F. Trim the leaves off the cauliflower but leave the stem intact. Stand the head on its stem end and slice down through the center to make 2-3 thick steaks (1-inch slabs). Save the leftover florets for another use.
- Brush both sides of each steak with olive oil. Season generously with salt, pepper, smoked paprika, and garlic powder.
- Heat a large oven-safe skillet (cast iron works best) over medium-high heat. Sear cauliflower steaks 4-5 minutes per side until deeply golden. Transfer the pan to the oven and roast 10-12 minutes until tender when pierced with a knife.
- Make sauce: melt butter in a separate small saucepan over medium heat. Add shallot, cook 3 minutes. Add garlic and cracked peppercorns, cook 30 seconds. Pour in brandy (if using) and let it cook off for 30 seconds. Add broth and bring to a simmer. Pour in cream and Dijon, simmer 3-4 minutes until thickened. Season with salt. Pour sauce generously over cauliflower steaks. Top with fresh parsley. Serve with crusty bread to mop up the sauce.
Final Thoughts
Thirty-three lunch recipes is more than anyone needs in regular rotation. The point of a list like this isn't to make every one — it's to give you something to flip through when you're standing in the kitchen at 11:50am and have no idea what to eat. Bookmark the five or six that match your week and let the rest live on the page.
If you only take one thing away: good lunches aren't about elaborate recipes; they're about having the right components on hand. Cooked rice in the fridge, a rotisserie chicken, eggs, a few good cheeses, a stash of canned tuna or salmon, and a couple of jars of pesto, hummus, and pickles. From those ingredients you can build any of these lunches in under 20 minutes without a recipe. The recipes are training wheels — once you've made them a few times, you start improvising your way to something specific to your day.
My family's most-requested from this list are the chicken bacon ranch wrap (#10), the beef quesadilla (#6), the chili oil ramen (#9) for me at my desk, and the chicken salad without celery (#20) my husband takes to work. Yours will probably be different. Save this one for the next Monday morning when you're trying to figure out the week ahead. 🥪🥗🍜
If you liked this roundup, here are a few more from the site you might want next:
- 21 Easy Lunch Ideas for Kids — packable, kid-approved school lunches 🍎
- 13 Best Meal Prep Lunch Ideas — Sunday-prep approach to weekday eating 📅
- 15 High-Protein Lunch Ideas — keep you full till dinner 💪
- 21 Easy 30-Minute Meals — fast dinners for busy weeks ⏱️
- 27 Best Chicken Thigh Recipes — the protein base for half this list 🍗
Frequently Asked Questions
What are some quick lunch recipes I can make in under 15 minutes?
The fastest lunches on this list are the chili oil ramen (10 minutes), microwave grilled cheese (3 minutes), tuna cucumber sandwich (5 minutes), canned salmon salad sandwich (5 minutes), and the spinach apple salad with maple dijon (5 minutes). All built around pantry ingredients or fast-assembly techniques. The quick flatbread pizza Margherita comes in at about 15 minutes and feels much more elaborate than its actual cook time.
What are the healthiest lunch options in this roundup?
For high-protein lunches, look at the ranch chicken bites, the Vietnamese lemongrass chicken, and the zucchini feta egg bake. For vegetarian protein, the Moroccan chickpeas with spinach, the lentil vegan wraps, and the avocado hummus all deliver substantial plant-based protein. For lighter fresh options, the spinach apple salad with maple dijon and the avocado corn salsa are bright and vegetable-forward.
Which of these lunches are good for meal prep?
The strongest meal-prep candidates on this list are the zucchini feta egg bake (slice and pack squares), the bacon and egg picnic slice (same concept), the crockpot shredded chicken sandwiches (chicken keeps 4 days), the Moroccan chickpeas (gets better as it sits), and the cranberry apple buckwheat salad (3-day fridge life). The chicken salad recipes also store well — just keep the bread separate until ready to eat.
Are there vegetarian and vegan lunch options in this list?
Yes, plenty. The Moroccan chickpeas, Marry Me white beans, German potato pancakes, Thai basil tofu (sub vegan oyster and fish sauce), stir-fried eggplant and tofu, lentil vegan wraps, and Panda Express copycat eggplant tofu are all vegetarian or vegan. The cauliflower steak and onigiri can be either depending on preparation. The flatbread pizza Margherita is vegetarian as written.
What's the best lunch to pack for work?
Wraps and sandwiches hold up best for desk lunches — the chicken bacon ranch wrap, Mediterranean chicken pesto wrap, and lentil vegan wraps all pack and travel well wrapped tightly in parchment. The zucchini feta egg bake and bacon-egg picnic slice are also excellent packed lunches because they hold at room temperature and don't need reheating. Avoid anything with crispy textures (like the cauliflower steak) for packing — they suffer from sitting.
Can I make these lunches without a microwave?
Almost all of them — only the microwave grilled cheese specifically requires a microwave. Everything else is cooked on the stovetop, in the oven, in the air fryer, on a grill, or assembled cold. For office workers without microwave access, the salads (33, 30, 26), all the wraps, the sandwiches, and the rice-based dishes (onigiri, chili oil ramen if assembled cold) work without reheating. Cold leftover bolognese, quesadillas, and chicken bites all taste fine straight from the fridge.





Comments
No Comments