
Sunday afternoons in my kitchen used to feel like a scramble — I'd stare into the fridge at noon on Monday, realize I had nothing ready, and end up eating whatever I could throw together in five minutes. That was before I got serious about meal prep lunches. Now I spend a couple of hours on the weekend cooking, portioning, and stacking containers in the fridge, and the whole week just runs smoother. Not perfectly — I've definitely forgotten a container on the counter overnight and had to start over — but smoother.
A good meal prep lunch needs to tick a few boxes for me: it has to hold up in the fridge for at least 3-4 days without turning sad and soggy, it has to reheat well (or be good cold), and it has to actually feel like food — not like I'm punishing myself for wanting to eat well. I've tried the sad salad-in-a-jar phase. It didn't last. What does last are hearty, flavorful recipes that travel well and don't require me to stand over a stove at 6am. If you want more ideas for getting ahead in the kitchen, my post on easy meal prep ideas is a good place to start.
This list covers a real range — there's Crock Pot Salsa Chicken for when you want the slow cooker to do all the work, Lentil Curry for a plant-based option that's genuinely filling, Thai Chicken and Rice for when you want something a little different from your usual rotation, and Keto Kung Pao Chicken for anyone watching carbs. You'll also find a White Chicken Chili that's become my cold-weather staple. I've also linked to some of my other weeknight favorites like easy chicken dinner recipes and healthy dinner recipes in case you want to double up and prep dinner at the same time.
Here are the 13 recipes I keep cycling through — pick one or pick three and build your week around them.
Top 13 Meal Prep Lunch Recipes
1. Crock Pot Salsa Chicken
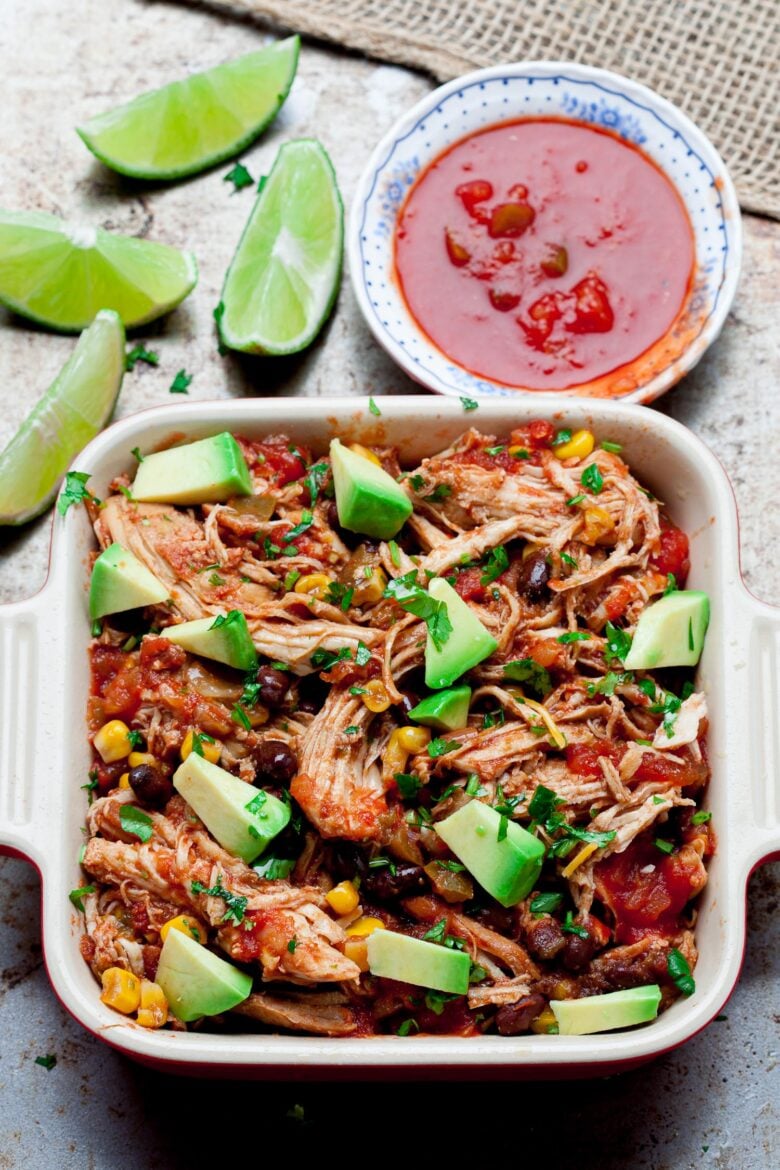
Three ingredients, a slow cooker, and you're done — this is the one I come back to every single week when I need lunches sorted without thinking too hard. You dump the chicken in, pour salsa over it, and walk away. By the time it's done, the chicken is so tender it shreds with zero effort and drinks up all those spiced tomato juices. I portion it into containers Sunday evening and use it all week in tacos, rice bowls, wraps, or just on its own with a simple salad — it never gets old.
- 2 lbs boneless, skinless chicken breasts
- 1½ cups salsa (store-bought works great — I use a medium heat chunky jar from Walmart)
- 1 teaspoon garlic powder
- 1 teaspoon cumin
- ½ teaspoon salt
- ¼ teaspoon black pepper
- Juice of ½ lime
- Place the chicken breasts in a single layer in the bottom of your slow cooker. Season with garlic powder, cumin, salt, and pepper.
- Pour the salsa over the chicken, making sure it's well coated. Squeeze the lime juice over the top.
- Cook on LOW for 6-7 hours or HIGH for 3-4 hours, until the chicken is cooked through and pulls apart easily.
- Use two forks to shred the chicken directly in the slow cooker, then stir it into the salsa juices. Let it sit for 5 minutes so it absorbs all that flavor before portioning.
- Divide into meal prep containers and refrigerate for up to 4 days, or freeze in portions for up to 2 months.
- Tip: Use a chunky salsa rather than a smooth one — the texture holds up much better after hours of slow cooking.
- Tip: If you're freezing portions, leave out toppings like sour cream or shredded cheese and add those fresh when you reheat.
- Tip: No slow cooker? Bake the chicken with the salsa covered tightly in foil at 375°F for about 35-40 minutes, then shred — works just as well.
2. Thai Chicken and Rice (One Pan)
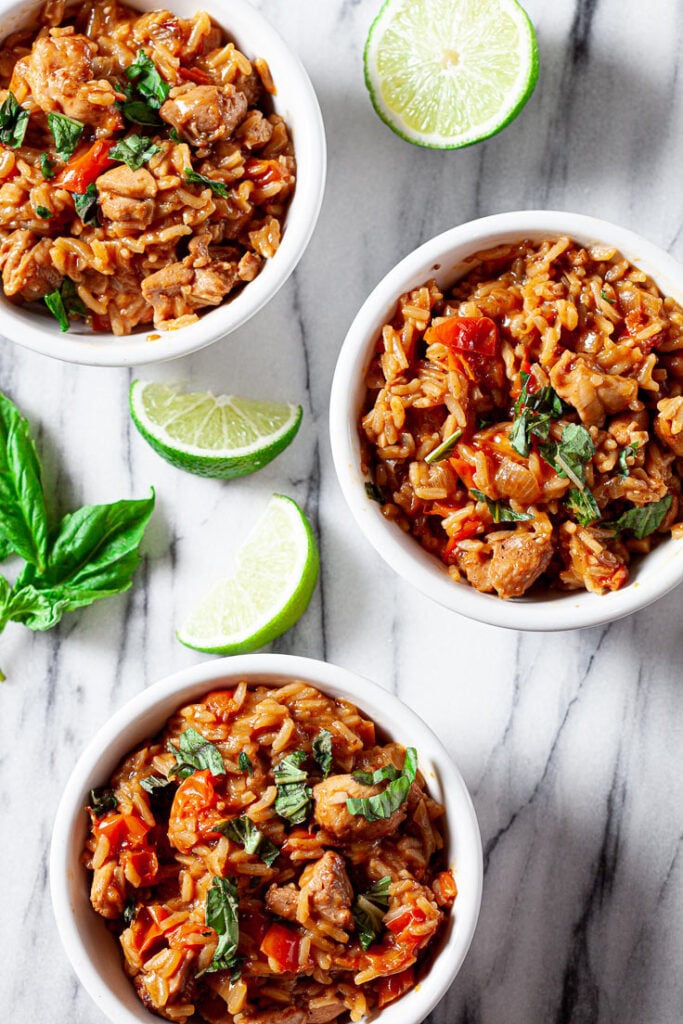
I started making a double batch of this because a single one was reliably gone by Wednesday — and I'm the only one in my house eating it for lunch. The coconut milk cooks right into the rice, making it creamy in a way that plain rice just isn't, and the ginger-garlic base gives the whole thing that warm, fragrant quality that makes it feel like actual cooking rather than meal prep autopilot. One pan, one cleanup, and five days of lunches that reheat without turning sad and dry.
- 1½ lbs boneless, skinless chicken thighs, cut into bite-sized pieces
- 1½ cups jasmine rice, rinsed
- 1 can (13.5 oz) full-fat coconut milk
- 1 cup chicken broth
- 4 cloves garlic, minced
- 1 tablespoon fresh ginger, grated (or ½ teaspoon ground ginger)
- 2 tablespoons soy sauce
- 1 tablespoon fish sauce (optional but worth adding if you have it)
- 1 teaspoon sesame oil
- 2 tablespoons neutral oil (vegetable or canola)
- Green onions and lime wedges for serving
- Heat the neutral oil in a large deep skillet or Dutch oven over medium-high heat. Add the chicken pieces and cook for 4-5 minutes until golden on the outside — they don't need to be fully cooked yet. Remove and set aside.
- In the same pan, sauté the garlic and ginger for about 1 minute until fragrant. Add the rinsed rice and stir for 30 seconds to coat it in the aromatics.
- Pour in the coconut milk and chicken broth. Stir in the soy sauce, fish sauce, and sesame oil. Bring to a gentle boil.
- Nestle the chicken back into the pan, reduce heat to low, and cover with a tight-fitting lid. Cook for 18-20 minutes until the rice has absorbed all the liquid and the chicken is cooked through.
- Let it rest covered for 5 minutes off the heat, then fluff with a fork. Portion into containers and refrigerate for up to 5 days.
- Tip: Chicken thighs are the better choice here — they stay juicy even after being reheated several times, which breasts just don't.
- Tip: Can't find fish sauce or don't want to buy a whole bottle? Skip it — the soy sauce carries the flavor on its own without any issue.
- Tip: Add a small splash of water when reheating — the rice tightens up in the fridge and that little bit of moisture brings it right back.
3. White Chicken Chili (CrockPot)
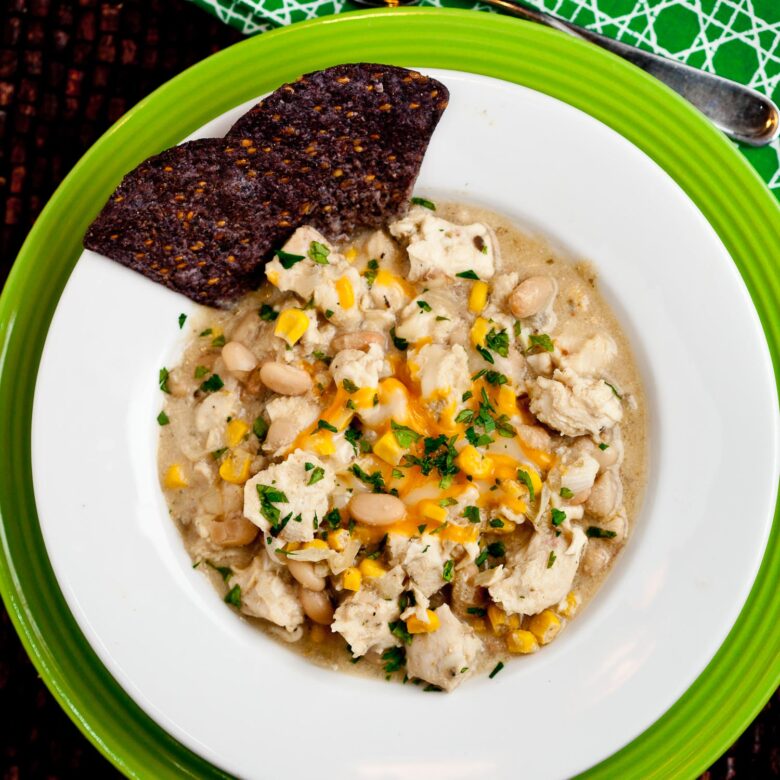
White chicken chili sounds fancier than it is, and I mean that as the highest possible compliment. Everything goes into the slow cooker in the morning and by lunchtime you have something genuinely hearty — the white beans thicken the broth naturally, the green chilis give it warmth without being aggressive, and the cream cheese stirred in at the end makes the whole thing feel creamy and rich in a way that surprises people every time. Zainab eats this without complaint, which in my house is a meaningful endorsement.
- 1½ lbs boneless, skinless chicken breasts
- 2 cans (15 oz each) white beans (cannellini or Great Northern), drained and rinsed
- 1 can (4 oz) diced green chilis
- 2 cups chicken broth
- 1 medium onion, diced
- 3 cloves garlic, minced
- 1 teaspoon cumin
- 1 teaspoon chili powder
- ½ teaspoon oregano
- 4 oz cream cheese, cubed and softened
- Salt and pepper to taste
- Add the chicken breasts, white beans, green chilis, onion, garlic, chicken broth, and all the spices to your slow cooker. Give it a quick stir to combine.
- Cook on LOW for 6-8 hours or HIGH for 3-4 hours, until the chicken is fully cooked and pulls apart easily.
- Remove the chicken, shred it with two forks, then return it to the pot.
- Add the cream cheese cubes and stir until fully melted into the chili — this is what makes it creamy, don't skip it. Cook uncovered on HIGH for another 15 minutes to thicken slightly.
- Season with salt and pepper, then portion into meal prep containers. Refrigerate for up to 5 days or freeze for up to 3 months.
- Tip: Keep toppings like sour cream, shredded cheese, and tortilla chips separate and add them only when serving so nothing goes soggy.
- Tip: For a thicker chili, mash about half a can of beans before adding them to the pot — it thickens the broth naturally without any flour or cornstarch.
- Tip: This goes really well with a side of cornbread — bake a batch on Sunday and you have a complete lunch setup ready for the whole week.
4. Pepper Crusted Roast Beef
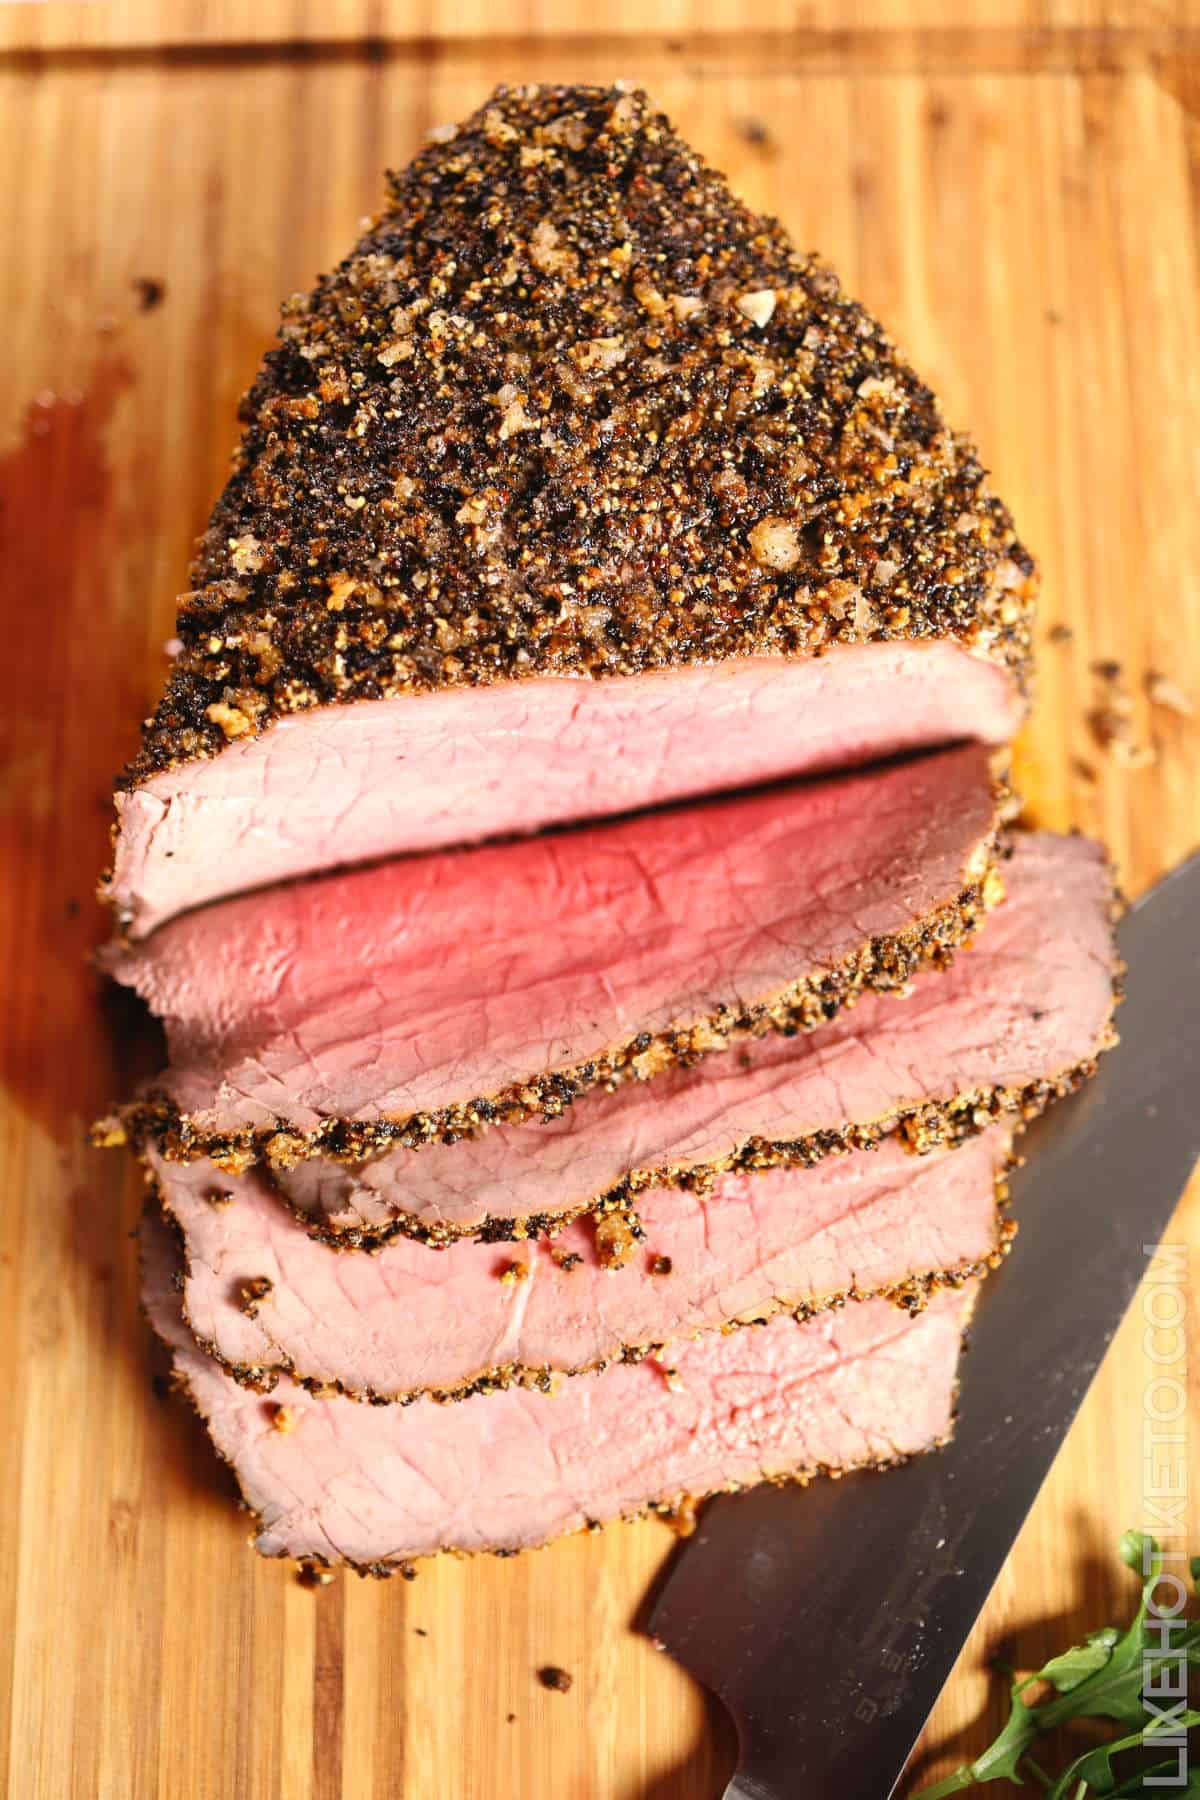
Roast beef for meal prep sounds like a lot, but once you've done it you'll stop buying those thin, pale deli slices forever. The pepper crust gives the outside of the beef incredible texture — crackly, aromatic, deeply savory — while the inside stays tender and pink. Slice it thin on Sunday and you have solid protein sorted for the entire week: into sandwiches, alongside roasted potatoes, or honestly eaten cold straight from the container with a little mustard. I've done all three.
- 2-3 lb beef sirloin roast
- 2 tablespoons coarsely cracked black pepper
- 1 tablespoon kosher salt
- 1 teaspoon garlic powder
- 1 teaspoon onion powder
- 1 teaspoon smoked paprika
- 2 tablespoons olive oil
- Pull the roast out of the fridge 30 minutes before cooking so it comes closer to room temperature — this helps it cook more evenly all the way through. Preheat your oven to 450°F.
- Mix the cracked pepper, salt, garlic powder, onion powder, and smoked paprika in a small bowl. Rub the olive oil all over the roast, then press the spice mixture firmly onto every surface so it forms a proper crust.
- Place the roast on a rack set over a sheet pan. Roast at 450°F for 15 minutes to get the crust going, then reduce the oven to 325°F and continue roasting for 45-60 minutes until an instant-read thermometer reads 135°F for medium-rare or 145°F for medium.
- Remove from the oven and let it rest uncovered for at least 15 minutes before slicing — this step is not optional, the juices need time to settle back into the meat.
- Slice thinly against the grain and store in airtight containers in the fridge for up to 4 days.
- Tip: No pepper grinder? Crack peppercorns using the flat bottom of a heavy skillet — the coarse texture makes a much better crust than pre-ground pepper.
- Tip: Save a small container of the pan drippings — drizzle a little over the sliced beef when you reheat it and it comes back to life immediately.
- Tip: A meat thermometer is genuinely worth buying for this — you can find a reliable one for under $15 at Walmart and it removes all the guesswork from roasting.
5. Italian Style Meatball Kabobs

These kabobs are one of those meal prep ideas that feel way more exciting than they have any right to be for a Tuesday lunch. You make a batch of Italian-seasoned meatballs, skewer them with bell peppers and zucchini, then cook everything until you get those slightly charred edges that make the whole thing smell incredible. My husband saw these sitting in the fridge one evening and ate half of them cold, standing at the counter — which tells you everything you need to know. Pack them in containers with some pasta or a simple green salad and you've got lunch sorted for most of the week.
- 1 lb ground beef (or a mix of beef and pork)
- ¼ cup breadcrumbs
- 1 egg
- 2 cloves garlic, minced
- 1 teaspoon Italian seasoning
- ½ teaspoon salt and ¼ teaspoon black pepper
- 1 red bell pepper, cut into 1-inch pieces
- 1 zucchini, cut into thick rounds
- 1 tablespoon olive oil
- Combine ground beef, breadcrumbs, egg, garlic, Italian seasoning, salt, and pepper in a bowl. Mix until just combined — don't overwork it or the meatballs get tough.
- Roll into 1½-inch balls (you should get about 16-18). Thread them onto skewers, alternating with bell pepper and zucchini pieces. Brush everything lightly with olive oil.
- Grill over medium-high heat for 10-12 minutes, turning every few minutes, until the meatballs are cooked through and the veggies have some char on them. You can also broil these on a sheet pan at 450°F for 15 minutes if you don't have a grill.
- Let them cool completely, then divide into meal prep containers. Refrigerate for up to 4 days. Reheat in the microwave for 90 seconds or in a 350°F oven for 8 minutes.
- Tip: Soak wooden skewers in water for 30 minutes before using so they don't burn under the broiler.
- Tip: These pair really well with a side of marinara sauce for dipping — just portion it into a small container alongside.
- Tip: Swap the zucchini for mushrooms or cherry tomatoes depending on what you have.
6. Healthier Chicken Alfredo Spaghetti Squash (with Cottage Cheese)

I was skeptical about the cottage cheese sauce the first time I saw this idea — I genuinely thought it would taste like a sad diet version of something good. I was wrong. When you blend cottage cheese until it's completely smooth, it becomes this thick, creamy sauce that coats the spaghetti squash strands almost exactly like a proper Alfredo. Combined with seasoned chicken and a little parmesan, it's filling and genuinely satisfying, not just "healthy satisfying." This is a low-carb lunch option that works for people watching their intake without making them feel like they're eating diet food.
- 1 medium spaghetti squash (about 3 lbs)
- 2 boneless, skinless chicken breasts
- 1 cup full-fat cottage cheese
- ¼ cup grated parmesan cheese
- 2 cloves garlic, minced
- ½ teaspoon Italian seasoning
- Salt and black pepper to taste
- 1 tablespoon olive oil
- Preheat oven to 400°F. Halve the spaghetti squash lengthwise, scoop out the seeds, drizzle with olive oil, season with salt and pepper, and place cut-side down on a sheet pan. Roast for 35-40 minutes until the strands pull away easily with a fork.
- While the squash roasts, season the chicken breasts with salt, pepper, and Italian seasoning. Cook in a skillet over medium heat with a little olive oil for 6-7 minutes per side until cooked through. Let rest, then slice or shred.
- Blend the cottage cheese, parmesan, and minced garlic in a blender or food processor until completely smooth — about 60 seconds. Taste and adjust salt.
- Use a fork to scrape the spaghetti squash strands into a bowl. Add the cottage cheese sauce and toss to coat, then top with the sliced chicken. Divide into 3-4 meal prep containers and refrigerate for up to 4 days.
- Tip: If you don't have a blender, use a hand immersion blender right in a tall cup — it works just as well for the cottage cheese sauce.
- Tip: The sauce thickens as it cools, so add a splash of water when reheating and stir it through.
- Tip: Rotisserie chicken from Costco or Walmart cuts your prep time in half here.
7. Vegan Tacos
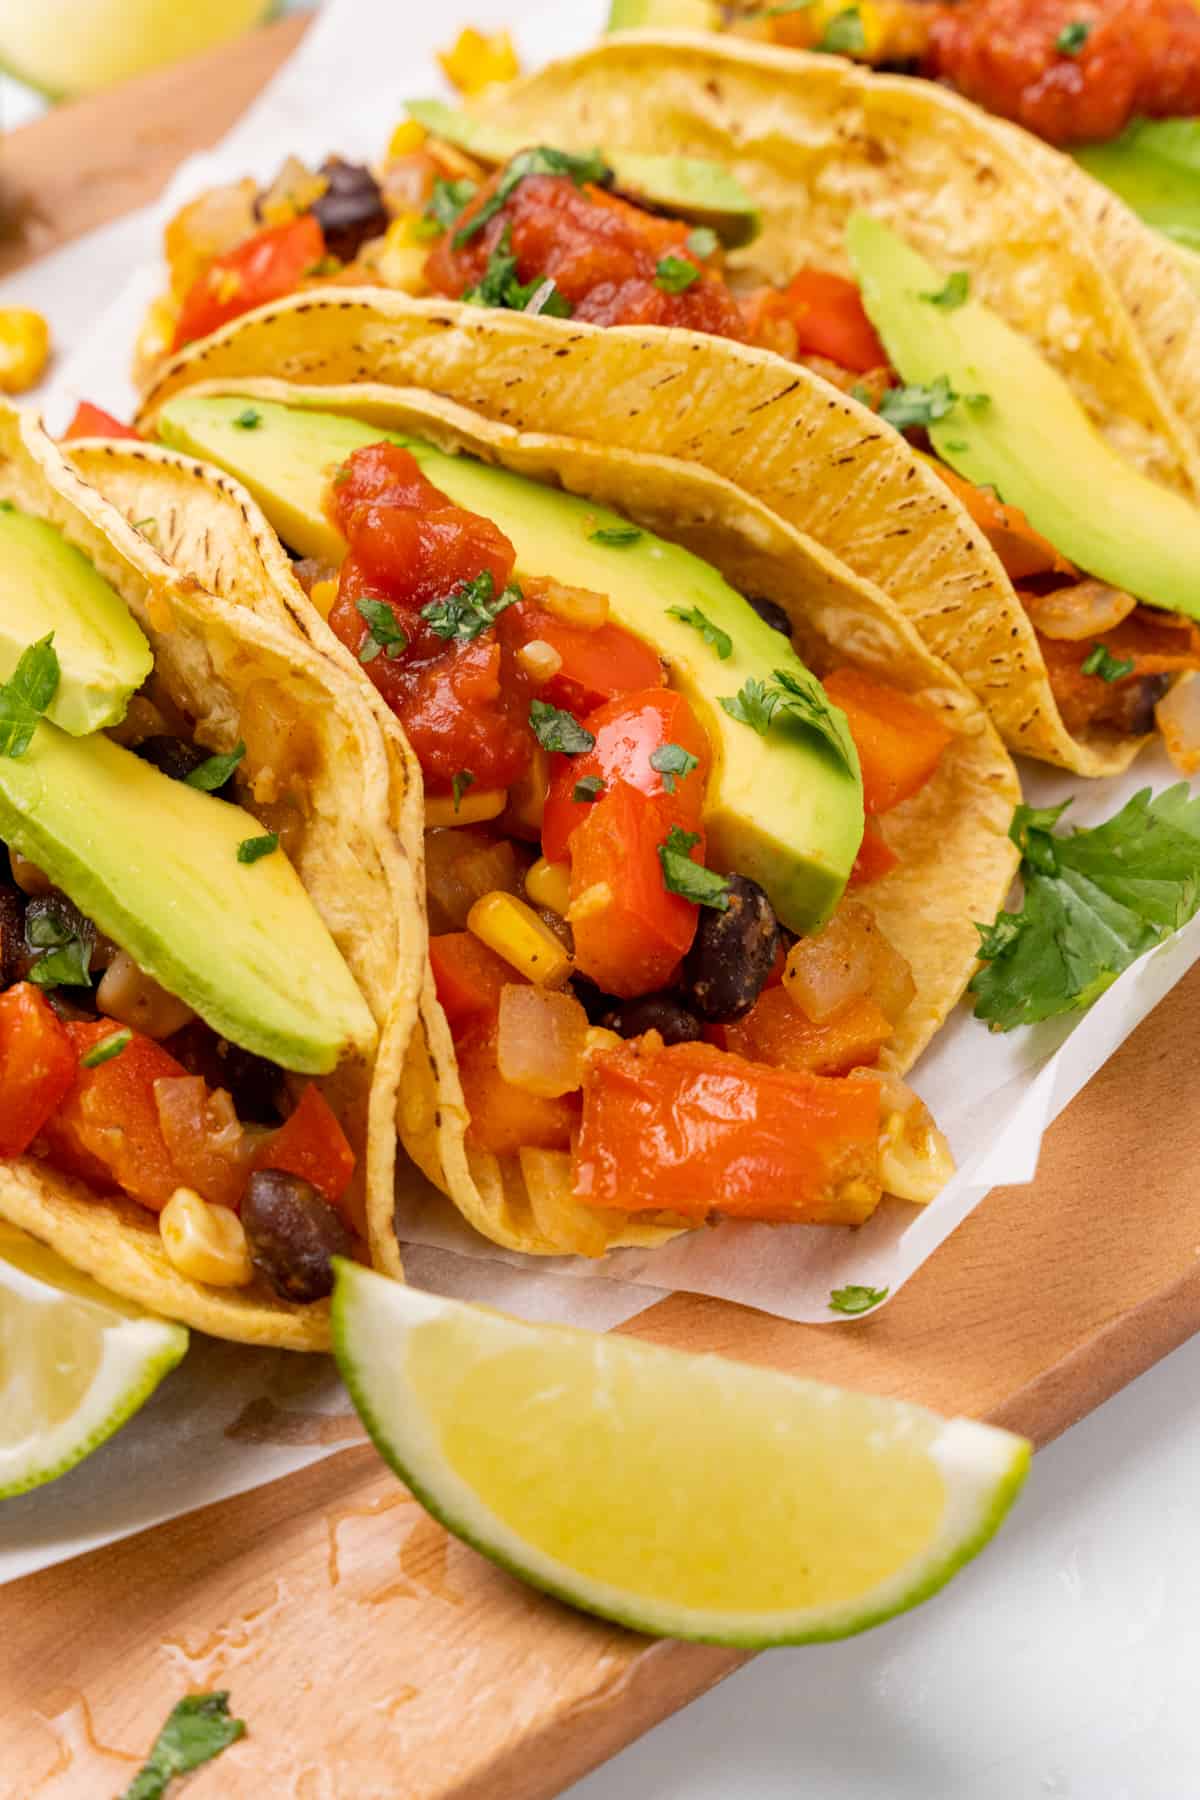
The smart thing about prepping tacos for the week is keeping everything separate until you're ready to eat. You prep the fillings — spiced black beans, sautéed peppers and onions, roasted corn, sliced avocado — store them in individual containers, and then the assembly takes about 90 seconds at lunchtime. The shells stay crisp because they never sit next to wet ingredients. Zainab actually helped me figure this out after I made the mistake of pre-building tacos one Sunday and finding soggy shells by Tuesday — lesson learned. These are genuinely satisfying even without meat, especially once you load up on the avocado.
- 1 can (15 oz) black beans, drained and rinsed
- 1 teaspoon cumin
- ½ teaspoon chili powder
- 1 red bell pepper, sliced
- 1 small red onion, sliced
- 1 cup corn kernels (frozen and thawed, or canned and drained)
- 2 avocados, sliced or roughly mashed
- Juice of 1 lime
- 8-10 small taco shells or corn tortillas
- Salt, pepper, and 1 tablespoon olive oil
- Warm the olive oil in a skillet over medium heat. Add the sliced peppers and onion, season with salt and pepper, and cook for 6-8 minutes until softened and slightly caramelized. Set aside.
- In the same pan, add the black beans with cumin and chili powder. Stir and cook for 3-4 minutes until warmed through and lightly coated in the spices. Add a splash of water if they start sticking.
- Toss the corn in the pan for 2 minutes just to warm it. Squeeze lime juice over the avocado and season with salt to keep it from browning too fast.
- Store the bean mixture, pepper mixture, corn, and avocado in separate containers. Keep the taco shells in their original packaging. At lunchtime, warm the fillings for 60-90 seconds in the microwave and assemble. Fillings keep for up to 4 days in the fridge.
- Tip: Press plastic wrap directly onto the surface of the avocado before sealing the container — it significantly slows down browning.
- Tip: Add canned jalapeños or a drizzle of hot sauce to the beans if you want a bit of heat.
- Tip: Swap black beans for canned chickpeas if that's what you have — seasoned the same way, they work great.
8. Lentil Curry
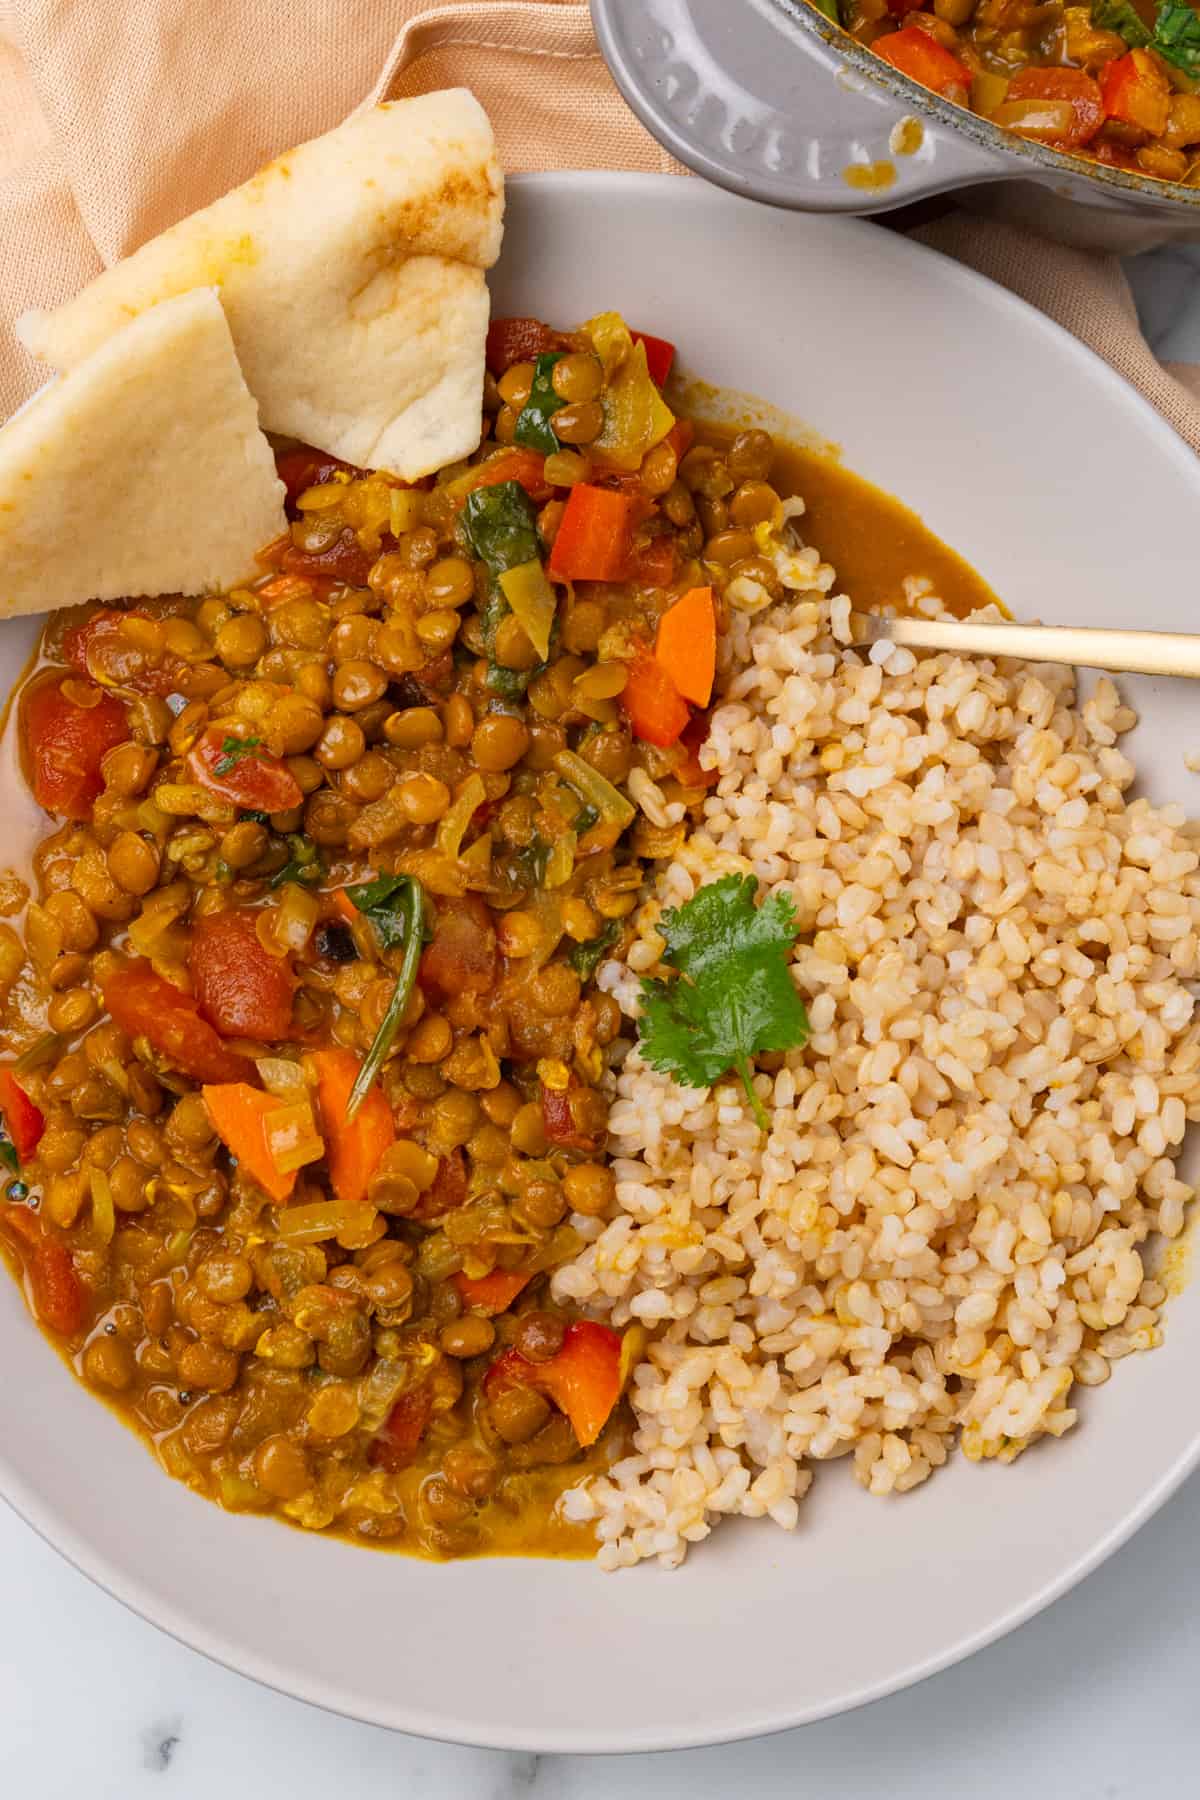
Lentil curry is something I grew up eating in Pakistan and it's genuinely one of the best meal prep options out there — cheap, packed with protein, and it tastes better on day three than it does on day one once the spices have had time to settle in. I make a double batch every Sunday because it disappears fast in my house. This isn't a complicated restaurant-style curry; it's an everyday dal-style dish with red lentils, tomatoes, and a handful of warming spices. Serve it over rice or scoop it up with flatbread — either way it works, and it keeps beautifully in the fridge for five days.
- 1½ cups red lentils, rinsed well
- 1 can (14 oz) diced tomatoes
- 1 medium onion, finely diced
- 3 cloves garlic, minced
- 1 teaspoon fresh ginger, grated (or ½ teaspoon ground ginger)
- 1 teaspoon cumin
- 1 teaspoon turmeric
- 1 teaspoon coriander powder
- ½ teaspoon red chili flakes (optional)
- 3 cups water or vegetable broth
- 2 tablespoons oil and salt to taste
- Heat the oil in a heavy-bottomed pot over medium heat. Add the diced onion and cook for 8-10 minutes, stirring occasionally, until golden. Don't rush this step — the caramelized onion is where a lot of the flavor comes from.
- Add garlic and ginger, stir for 1 minute. Add all the dry spices and stir for another 30 seconds until fragrant. Pour in the canned tomatoes and cook for 5 minutes, stirring, until the mixture thickens slightly.
- Add the rinsed lentils and water or broth. Bring to a boil, then reduce heat to low, cover partially, and simmer for 20-25 minutes until the lentils are completely soft and the curry has thickened. Stir occasionally and add more water if it gets too thick.
- Season with salt, stir, and let it cool before dividing into meal prep containers. Refrigerate for up to 5 days. Reheat with a splash of water and stir — lentils absorb liquid as they sit.
- Tip: Red lentils are available at most mainstream grocery stores now — check the dried beans aisle at Walmart or Aldi.
- Tip: A squeeze of fresh lemon juice stirred in right before eating makes a big difference — brightens the whole dish.
- Tip: This freezes really well for up to 3 months, so it's worth making a big pot when you have time.
9. Keto Kung Pao Chicken
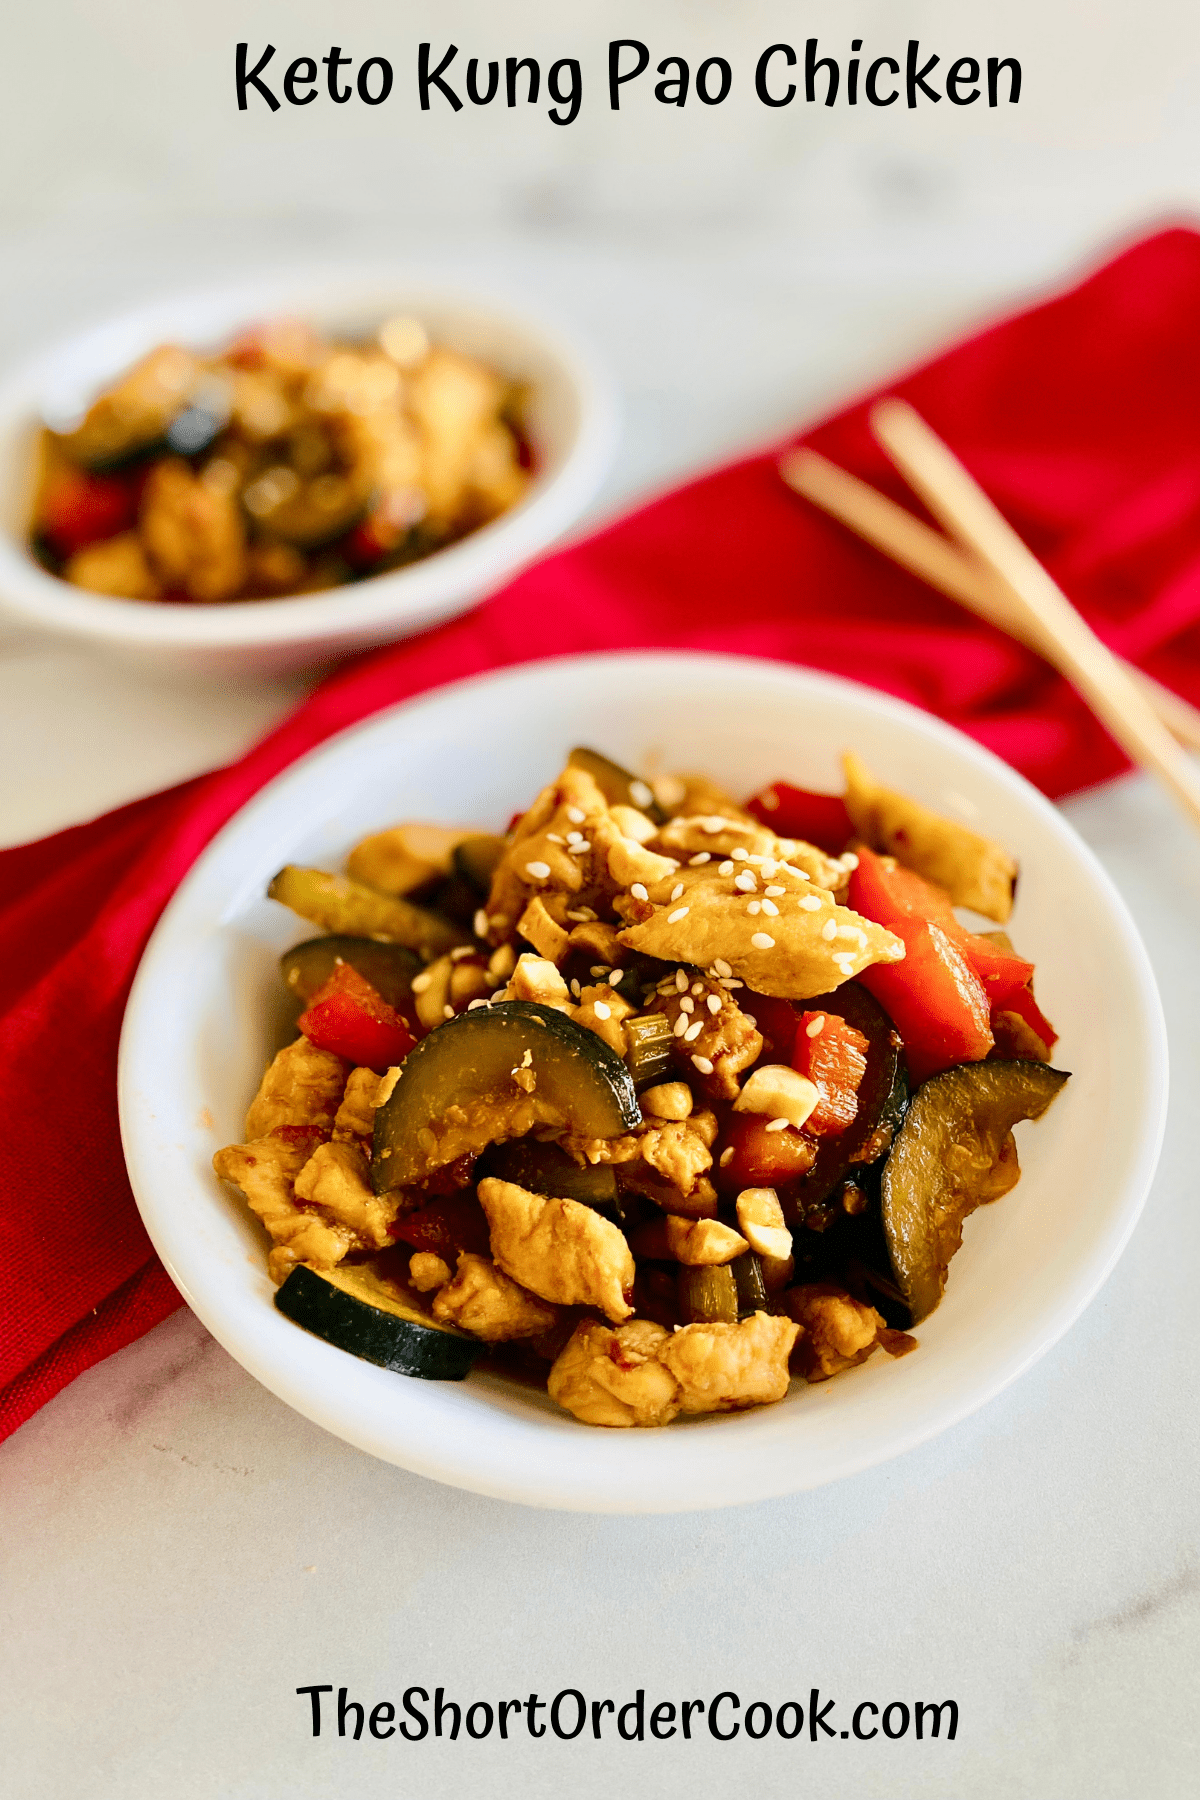
I grew up eating Chinese food that my mother made her own way — never quite authentic, always delicious — so I have a soft spot for recipes like this one. Kung Pao chicken is one of those dishes that translates beautifully to meal prep because the bold sauce actually deepens in flavor as it sits in the fridge. This keto version swaps out the sugar and cornstarch for low-carb alternatives and packs in a solid punch of heat, crunch from peanuts, and that signature sweet-savory-spicy balance. Pair it with low-carb sides and you've got a full week of satisfying lunches.
- 1½ lbs boneless, skinless chicken thighs, cut into 1-inch cubes
- 3 tablespoons soy sauce (or coconut aminos for a lower-sodium option)
- 1 tablespoon rice vinegar
- 1 tablespoon sesame oil
- 1 teaspoon monk fruit sweetener or erythritol (or 1 teaspoon honey if not strictly keto)
- 1 tablespoon chili garlic sauce
- 3 cloves garlic, minced
- 1 teaspoon fresh ginger, grated
- 1 red bell pepper, diced
- 2 tablespoons neutral oil
- ⅓ cup roasted unsalted peanuts
- 4-6 dried red chili peppers (optional, for extra heat)
- Whisk together the soy sauce, rice vinegar, sesame oil, sweetener, and chili garlic sauce in a small bowl. Set the sauce aside.
- Heat the neutral oil in a large skillet or wok over high heat. Add the chicken pieces in a single layer and cook without stirring for 2-3 minutes until browned on the bottom, then stir and cook another 2-3 minutes until cooked through. Remove the chicken from the pan and set aside.
- In the same pan over medium-high heat, add the garlic, ginger, and dried chili peppers if using. Stir for 30 seconds, then add the diced bell pepper and cook for 2 minutes until just slightly softened.
- Return the chicken to the pan and pour the sauce over everything. Toss well and cook for 1-2 minutes until the sauce coats the chicken and thickens slightly. Remove from heat and stir in the peanuts.
- Let cool completely before dividing into meal prep containers. Refrigerate for up to 4 days. Reheat in the microwave for 90 seconds, stirring halfway through.
- Tip: Chicken thighs hold up much better than breasts in meal prep — they stay juicy even after reheating, so don't swap them out if you can help it.
- Tip: Store the peanuts separately and add them at lunchtime if you want to keep their crunch through the week.
- Tip: Serve over cauliflower rice to keep it fully keto, or over regular rice if you're just looking for a lower-sugar stir-fry.
9. Gluten Free Orange Chicken

My kids would eat orange chicken every day if I let them — and honestly, this homemade version is so much better than the takeout box they're imagining. The trick is rice flour for the coating: it gets genuinely golden and crisp in a hot skillet without any deep frying, and it's naturally gluten-free so it works for anyone in the house with a sensitivity. The sauce comes together in minutes — fresh orange juice, tamari, honey, ginger — and you just pour it over the cooked chicken and let it thicken. Day one it's crispy and glossy. Day two and three it's saucier, which is still completely good over rice. I stopped feeling like gluten-free had to mean boring the day I made this.
- 1½ lbs boneless, skinless chicken thighs or breasts, cut into 1-inch pieces
- ½ cup rice flour (or any gluten-free all-purpose flour blend)
- ½ teaspoon garlic powder
- ½ teaspoon salt
- 2 tablespoons neutral oil for pan-frying
- ½ cup fresh orange juice (about 2 medium oranges)
- 2 tablespoons gluten-free soy sauce or tamari
- 2 tablespoons honey
- 1 teaspoon fresh ginger, grated
- 1 teaspoon cornstarch mixed with 1 tablespoon cold water
- Sesame seeds and sliced green onions for topping
- Toss the chicken pieces in rice flour, garlic powder, and salt until evenly coated. Shake off any excess — too much flour sitting on the surface will turn gummy in the sauce.
- Heat oil in a large skillet over medium-high heat. Cook chicken in a single layer for 4–5 minutes per side until golden and cooked through. Work in batches if needed — crowding the pan is what kills the crisp.
- In a small bowl, whisk together orange juice, tamari, honey, and ginger. Pour into the same skillet over medium heat and bring to a simmer.
- Stir in the cornstarch slurry and cook for 1–2 minutes until the sauce thickens and turns glossy. Add the chicken back in and toss to coat.
- Divide over cooked rice in your meal prep containers. Top with sesame seeds and green onions. Store in the fridge for up to 4 days.
- Tip: Keep the sauce separate if you want the coating to stay crisper for day one — pour it on just before eating.
- Tip: Chicken thighs reheat better than breasts here — they stay juicy even after a few days in the fridge.
- Tip: No fresh oranges? Bottled 100% orange juice works fine — just avoid anything with added sugar since the honey is already doing that job.
Thirteen recipes might sound like a lot, but honestly, you don't need to make all of them at once. Pick two or three that match what you already have in your fridge, batch them on a Sunday afternoon, and you're set for most of the week. That's the whole point of meal prep lunch — less thinking on busy mornings, more actual eating during the day.
I'll be honest: I resisted meal prepping lunches for a long time because I thought everything would taste sad by Wednesday. What changed my mind was learning which recipes actually hold up — things with sturdy grains, proteins that reheat well, and dressings kept separate until you're ready to eat. Most of the recipes on this list pass that test. A few are even better on day three when everything has had time to sit together. Saad thinks my cold sesame noodles taste better the next day, and he's right.
If you're just starting out with meal prep, grab one container recipe and one wrap or sandwich option — that variety alone keeps you from getting bored midweek. Once you find your rhythm, doubling batches becomes second nature. These lunches are meant to make your week easier, not add to your Sunday stress. Start small, see what works for your schedule, and go from there. 🥗🍱✨
More Recipes to Explore
- Meal Prep Recipes — a full collection of make-ahead meals worth bookmarking
- Easy Chicken Recipes — solid weeknight proteins that double beautifully as next-day lunch
- Healthy Dinner Recipes — dinners that make great leftovers if you intentionally cook extra
- Salad Recipes — ideas for hearty, filling salads that actually keep well in the fridge
- Recipe Roundups — browse all my curated recipe lists by category
Frequently Asked Questions
How many days ahead can I prep these lunches?
Most of these recipes keep well for 3 to 5 days in the fridge when stored in airtight containers. Grain bowls, pasta salads, and protein boxes tend to hold up the longest. Anything with avocado or fresh greens mixed in should be eaten within 2 days — or keep the greens separate and add them right before eating.
What containers work best for meal prep lunches?
I use glass containers with snap-on lids for anything saucy or oily — they don't stain and they stack cleanly. For drier meals like wraps or sandwiches, a simple zip-lock bag or a lightweight BPA-free plastic container works fine. You don't need a matching set from a fancy store. The Rubbermaid containers from Walmart do exactly what I need.
Can I freeze any of these meal prep lunches?
Some of them freeze really well — soups, cooked grain mixtures, and protein-based fillings like shredded chicken or ground turkey are all good freezer candidates. Salads, wraps, and anything with fresh vegetables or cooked pasta don't freeze well; the texture turns mushy once thawed. If you want to make a bigger batch for later, freeze the protein and grains separately, then assemble fresh when you're ready.
Which recipe on this list is the easiest for a beginner?
Honestly, any grain bowl or mason jar salad is the lowest-barrier starting point — you're mostly assembling rather than cooking. Cook a batch of rice or quinoa, roast some vegetables, add a protein, drizzle on a simple dressing, and you're done. No special technique required. Once you've done it once, it stops feeling like a project and starts feeling like something you can actually maintain week to week.
How do I keep meal prep lunches from getting boring?
Change the sauce or the grain and you basically have a different meal. I'll make the same roasted chicken three different ways in a week — once with a lemon herb dressing over quinoa, once tucked into a wrap with hummus, once tossed into a cold noodle salad. Same protein, completely different eating experience. The other thing that helps is not prepping every single lunch — leave one or two days open so you don't feel locked in.
Share This Post!
If this list helped you figure out your lunch game for the week, pin it or share it with someone who's always scrambling at noon. 📌🍱
View More Recipes here Recipe Roundups





Comments
No Comments