
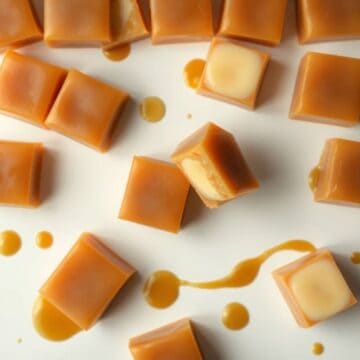
I made my first batch of homemade caramels about four years ago and they came out like little pebbles — genuinely hard enough to hurt your teeth. I had no candy thermometer, I was guessing at the temperature, and I paid for it. These vanilla cream filled caramels are what I eventually landed on after a lot of trial and error: soft, chewy, buttery caramel wrapped around a thick vanilla cream center that stays distinct even after the whole thing sets.
What makes this recipe work — and why it's different from a standard layered caramel — is that the vanilla cream gets frozen into little balls before assembly. That means the filling actually holds its shape inside the caramel instead of melting into it. You get a real contrast: the chew of the caramel on the outside, then a soft, almost fondant-like center when you bite through. The sweetened condensed milk in the caramel also gives it a depth that plain sugar-and-cream versions don't quite have.
My husband has a serious sweet tooth, and these have become one of his most requested things around the holidays. I usually make a double batch because one batch disappears faster than I expect — Zainab sneaks them from the fridge one by one, convinced I won't notice. I also wrap them in wax paper and package them in little cellophane bags for gifts, which always goes over well. If you're already planning a holiday spread, these pair nicely alongside my Strawberry Cheesecake Cookies on a dessert table.
One thing to know before you start: you do need a candy thermometer for this. I resisted buying one for years and kept guessing — which is exactly how I ended up with those first tooth-breaking caramels. A basic one costs under $10 at any grocery store or Walmart and it makes the difference between candy that sets properly and candy that's either soup or a rock. Get one. You won't regret it.

Why You'll Love This Recipe
- The filling actually stays separate: Unlike layered caramels where the filling blends in, freezing the cream balls first means you get a real center — like biting into a truffle but wrapped in caramel. The texture contrast is what makes these interesting. I didn't figure this out until my third attempt, and it changed everything about how the finished candy feels.
- Sweetened condensed milk makes the caramel easier: Traditional caramel recipes can be finicky and require more precise timing. Using sweetened condensed milk gives you more margin for error and produces a deeply flavored, slightly fudgy caramel that's consistently soft. It's not the classic method, but it works reliably in a home kitchen and the result is genuinely good.
- They're made for gifting: Wrapped individually in wax paper, these look like something you bought at a specialty candy shop. I've given them as Christmas gifts for three years running and people always ask for the recipe. They hold up well for two weeks at room temperature, so you can make them days ahead without stress.
- The ingredients are simple: Butter, brown sugar, corn syrup, sweetened condensed milk, powdered sugar, vanilla — nothing here requires a specialty store. I've made these with Walmart store-brand butter and Aldi corn syrup and they've come out perfectly fine every time. No fancy imports, no obscure extracts.
- The assembly is forgiving: Once you get the hang of flattening a scoop of caramel in your palm and wrapping it around the cream ball, the process becomes almost meditative. They don't all need to look identical — irregular shapes are part of the handmade charm. The first few I made looked lumpy and they tasted just as good.
Ingredients
- For the Vanilla Cream Filling:
- 4 tablespoons unsalted butter, softened to room temperature
- 2 tablespoons heavy cream
- 1 teaspoon vanilla extract
- 1 cup powdered sugar
- For the Caramel:
- 1 cup unsalted butter
- 1 cup brown sugar, packed
- ½ cup light corn syrup
- 1 can (14 oz) sweetened condensed milk
- 1 teaspoon vanilla extract
- Pinch of salt
Directions
- Make the Vanilla Cream Filling: Beat the softened butter, heavy cream, and vanilla extract together until smooth — I just use a fork and a bowl, no mixer needed. Gradually add the powdered sugar and mix until you have a thick, pliable dough. It should feel like soft fondant and hold its shape when you roll it. If it's too sticky, add a little more powdered sugar one tablespoon at a time.
- Freeze the Cream Balls: Roll the filling into small ½-inch balls and place them on a parchment-lined plate or small tray. Freeze for at least 30 minutes. This step is non-negotiable — if they're not fully frozen when you wrap them in caramel, the heat will melt the filling and you'll lose that distinct center.
- Cook the Caramel: In a heavy-bottomed saucepan, melt the butter over medium heat. Add the brown sugar, corn syrup, and sweetened condensed milk. Stir constantly as you bring it to a boil — don't walk away. Once boiling, continue stirring and cook until the mixture reaches 240°F on a candy thermometer (soft-ball stage). This usually takes 8 to 12 minutes. Remove from heat and stir in the vanilla and salt.
- Cool the Caramel Slightly: Let the caramel sit off the heat for about 5 to 8 minutes until it's cool enough to handle but still pliable. You want it warm and soft, not liquid-hot. If it cools too much and stiffens before you finish wrapping, you can briefly set the pan over very low heat to loosen it again.
- Wrap the Caramels: Scoop about a tablespoon of caramel and flatten it in your palm. Place a frozen cream ball in the center and fold the caramel up around it, pinching the edges closed. Roll gently between your palms to form a smooth ball or oval shape. Work quickly — the cream balls start to soften once they're out of the freezer for more than a few minutes.
- Chill and Set: Place finished caramels on a parchment-lined tray and refrigerate for at least 30 minutes until firm. Once set, wrap each caramel individually in a square of wax paper, twisting the ends closed.

Tips for Success
- Use a candy thermometer — seriously: I know I mentioned this in the intro but I can't stress it enough. The difference between 235°F and 245°F is the difference between a caramel that's soft and one that's hard enough to pull out a filling. A basic instant-read candy thermometer from Walmart costs about $8. Clip it to the side of the saucepan so you can keep both hands free for stirring.
- Keep the cream balls frozen until the last second: Take them out of the freezer in small batches — maybe 5 or 6 at a time — while you work. The caramel is warm and will start softening the filling immediately. I learned this the hard way when my filling turned into cream puddles inside the caramel on my second batch. Cold centers = clean contrast.
- Stir constantly while the caramel cooks: Sweetened condensed milk burns fast if you let it sit against the bottom of the pan. Use a silicone spatula or wooden spoon and keep it moving the whole time. A heavy-bottomed saucepan helps distribute the heat more evenly — if yours is thin, drop the heat slightly and take longer to reach temperature.
- Lightly grease your hands before wrapping: The caramel sticks to dry hands and makes the whole process frustrating. A tiny dab of butter or neutral oil on your palms lets you work the caramel without it gluing itself to your skin. I figured this out halfway through my first proper batch and it made everything smoother.
- Cut wax paper squares before you start: Once you're in the middle of wrapping caramels, you don't want to be wrestling with a roll of wax paper. Pre-cut your squares — about 4x4 inches works well — and lay them out in a row so wrapping goes quickly. This is the kind of prep that sounds fussy but saves real time when you're in the middle of assembly.
Variations
- Salted Caramel Version: Add ½ teaspoon of flaky sea salt to the caramel after you take it off the heat, and sprinkle a tiny pinch on each finished caramel before it sets. The salt cuts through the sweetness and makes the whole thing taste more complex. My husband prefers this version over the plain one — he adds it every time I let him help.
- Chocolate-Dipped: After the caramels have chilled and set, dip them in melted dark or milk chocolate and let them set on parchment. This takes them from "nice homemade gift" to "something you'd pay real money for at a chocolate shop." I've done this for Christmas gift boxes and they disappear immediately. If you want more chocolate-covered inspiration, my Monster Cookie Peanut Butter Cheesecake Pie uses a similar dipping approach for some of the garnish.
- Almond or Mint Filling: Swap the vanilla extract in the cream filling for almond extract (use just ¼ teaspoon — it's stronger than vanilla) or peppermint extract. The almond version is my personal favorite for holiday boxes because it reminds me of marzipan. The mint version is surprisingly refreshing against the sweet caramel.
- Nutty Caramel: Press a toasted pecan half or a few crushed walnuts into the outside of the caramel before it sets. In Pakistan we love nuts in our sweets — mithai almost always has pistachios or cashews — so this variation feels familiar to me even in a very Western recipe. The crunch against the soft caramel is genuinely satisfying.
- Coconut Oil and Coconut Cream Version: Substitute the butter in the caramel with refined coconut oil and replace the heavy cream in the filling with full-fat coconut cream. The result has a very slight coconut undertone which actually works well with the vanilla. This isn't something I make often, but I've made it for a friend who avoids dairy and she said it held up well.
Serving and Storage
Serving
Serve these at room temperature for the best texture — straight from the fridge they're a little firmer than ideal, so let them sit out for 10 minutes if you can. I put them out on a small plate at the end of a meal or arrange them in a little dish on the coffee table when we have guests. They also look great piled in a small bowl alongside other sweets on a holiday dessert table — they pair well with a simple Christmas Salad spread if you're doing a festive dinner.
Storage
Keep wrapped caramels in an airtight container at room temperature for up to 2 weeks. If your kitchen runs warm, refrigerate them — they'll last 3 to 4 weeks refrigerated. Let them come to room temperature before eating. Do not stack unwrapped caramels; they'll stick together and you'll lose the wax paper wrapping, which is what keeps them from fusing into one big caramel blob (I've done this — it's not the end of the world but it's annoying). They can also be frozen for up to 2 months; just thaw in the fridge overnight.

Frequently Asked Questions
Do I really need a candy thermometer, or can I guess the temperature?
You really do need one. I tried to guess on my first batch using the cold water test and ended up with caramels hard enough to cause real dental concern. A basic candy thermometer costs under $10 at Walmart or any grocery store, and it takes all the guesswork out. The target is 240°F — soft-ball stage — and hitting that number consistently is what gives you a soft, chewy caramel every time.
Can I make the caramel and cream filling ahead of time?
Yes, and I actually recommend it. Make the cream filling balls and freeze them up to a day before you plan to assemble. The caramel can be made a day ahead too — reheat it gently in the saucepan over low heat, stirring until it's pliable again, then proceed with wrapping. Full assembled caramels can also be made up to a week in advance and stored wrapped in an airtight container.
My caramel got too hard before I finished wrapping — what do I do?
This happens, especially if your kitchen is cool. Set the pan back over very low heat and stir gently until the caramel softens up again — it usually takes just a minute or two. Don't crank the heat or you risk cooking it further and pushing it past the soft-ball stage. If it's seized up completely and won't melt back down smoothly, stir in a tablespoon of heavy cream over low heat to loosen it.
Can I use a different extract in the filling instead of vanilla?
Absolutely. Almond extract works really well — use just ¼ teaspoon since it's much more potent than vanilla. Peppermint is a fun holiday option. I wouldn't use lemon here; the acidity clashes with the sweet caramel in a way that doesn't quite work. Stick to warm or cool extracts rather than bright citrus and you'll be fine.
How do I know when the caramel has cooled enough to wrap without burning my hands?
Touch the side of the saucepan — when it feels warm but not hot, the caramel is usually ready. Another test: dip a spoon into the caramel and let it cool for 10 seconds on a plate. If you can press it with your finger and it doesn't burn you and holds a soft impression, it's ready to handle. Always have a little butter on your palms before you start — it helps you work the caramel without it sticking to your skin.
A Few Final Thoughts
These caramels took me several attempts to get right, and I'm genuinely glad I kept going. The frozen cream ball method is the thing that changed everything — once I figured that out, the rest of the recipe fell into place. The caramel itself is forgiving as long as you hit that 240°F mark, and the assembly gets faster every time you do it. By the end of a batch, you're moving through them quickly.
I make these every December without fail, and I've started making them in November too because the demand is real. My husband requests the salted version, Zainab prefers plain, and I usually make both. If you're building out a holiday baking list, these pair well with my Banana Bread Brownies — both are good keepers and both wrap nicely for gifts.
If you try these, I hope they come out exactly as you're imagining them — soft, chewy, with that little hit of vanilla cream in the center. Candy-making has a bit of a learning curve, but this recipe is one of the more forgiving ones in my repertoire. Once you've made them once, you'll have the feel for it. 🍬✨
VANILLA CREAM FILLED CARAMELS
Ingredients
For the Vanilla Cream Filling:
- 4 tablespoons unsalted butter softened
- 2 tablespoons heavy cream
- 1 teaspoon vanilla extract
- 1 cup powdered sugar
For the Caramel:
- 1 cup unsalted butter
- 1 cup brown sugar packed
- ½ cup light corn syrup
- 1 can 14 oz sweetened condensed milk
- 1 teaspoon vanilla extract
- Pinch of salt
Instructions
Make the Vanilla Cream:
- Beat butter, cream, and vanilla until smooth. Gradually add powdered sugar and mix until a thick, pliable dough forms. Roll into small ½-inch balls and freeze for 30 minutes.
Cook the Caramel:
- In a heavy saucepan, melt butter over medium heat. Stir in brown sugar, corn syrup, and sweetened condensed milk. Bring to a boil, stirring constantly, until the mixture reaches 240°F (soft-ball stage) on a candy thermometer. Remove from heat and stir in vanilla and salt.
Assemble the Caramels:
- Let the caramel cool slightly until it’s still pliable but not hot. Scoop about a tablespoon of caramel, flatten it in your hand, and wrap it around a frozen cream ball. Roll gently into a smooth ball or oval.
Chill and Wrap:
- Place caramels on a parchment-lined tray and chill for at least 30 minutes. Wrap in wax paper or candy wrappers.
Notes
- Storage: Keep wrapped caramels in an airtight container for up to 2 weeks.
- Gifting Tip: Package in cellophane bags with ribbons for a festive gift.
- Flavor Variations: Add a pinch of sea salt or a swirl of melted chocolate for extra flair.
- Make Ahead: Both caramel and cream centers can be made a day in advance.





Comments
No Comments