
Saad asked me to make these three weeks in a row before I finally wrote down exactly what I was doing. They're basically a no-bake version of a peanut butter chocolate candy bar — graham cracker base, creamy peanut butter middle, and a smooth chocolate top — and they come together without turning on the oven once.
What I like about this recipe is that it's genuinely simple but the result looks like you put in real effort. Three distinct layers, each one doing something different — the base has that buttery crunch, the middle is soft and almost fudgy, and the top sets into a proper chocolate shell. I make these in a 9x9-inch dish so the bars come out thick and substantial, not thin and flimsy.
My husband takes these straight from the fridge, cold. Saad lets his sit out for ten minutes first because he says the middle gets "softer and better" that way. I've made these for school events, Eid gatherings, and honestly just for a Tuesday night when everyone needed something sweet. I usually make a double batch because a single pan disappears faster than I expect.
One thing to know going in: the hardest part of this recipe is waiting. You need the layers to chill between steps or everything smears together when you try to slice. I skipped that step the first time I made these and ended up with a beautiful mess that tasted fine but looked nothing like bars. Patience is the actual skill here. If you're into other no-bake chocolate treats, my cheesecake fudge is made the same way — no oven, no stress, just chill time.
Why You'll Love This Recipe
- No oven required: The whole thing is assembled cold and chilled in the fridge — no baking, no temperature watching, no risk of burning anything. I've made these in the middle of summer when I refuse to turn on the oven, and they work perfectly. If you can stir and press and wait, you can make these bars.
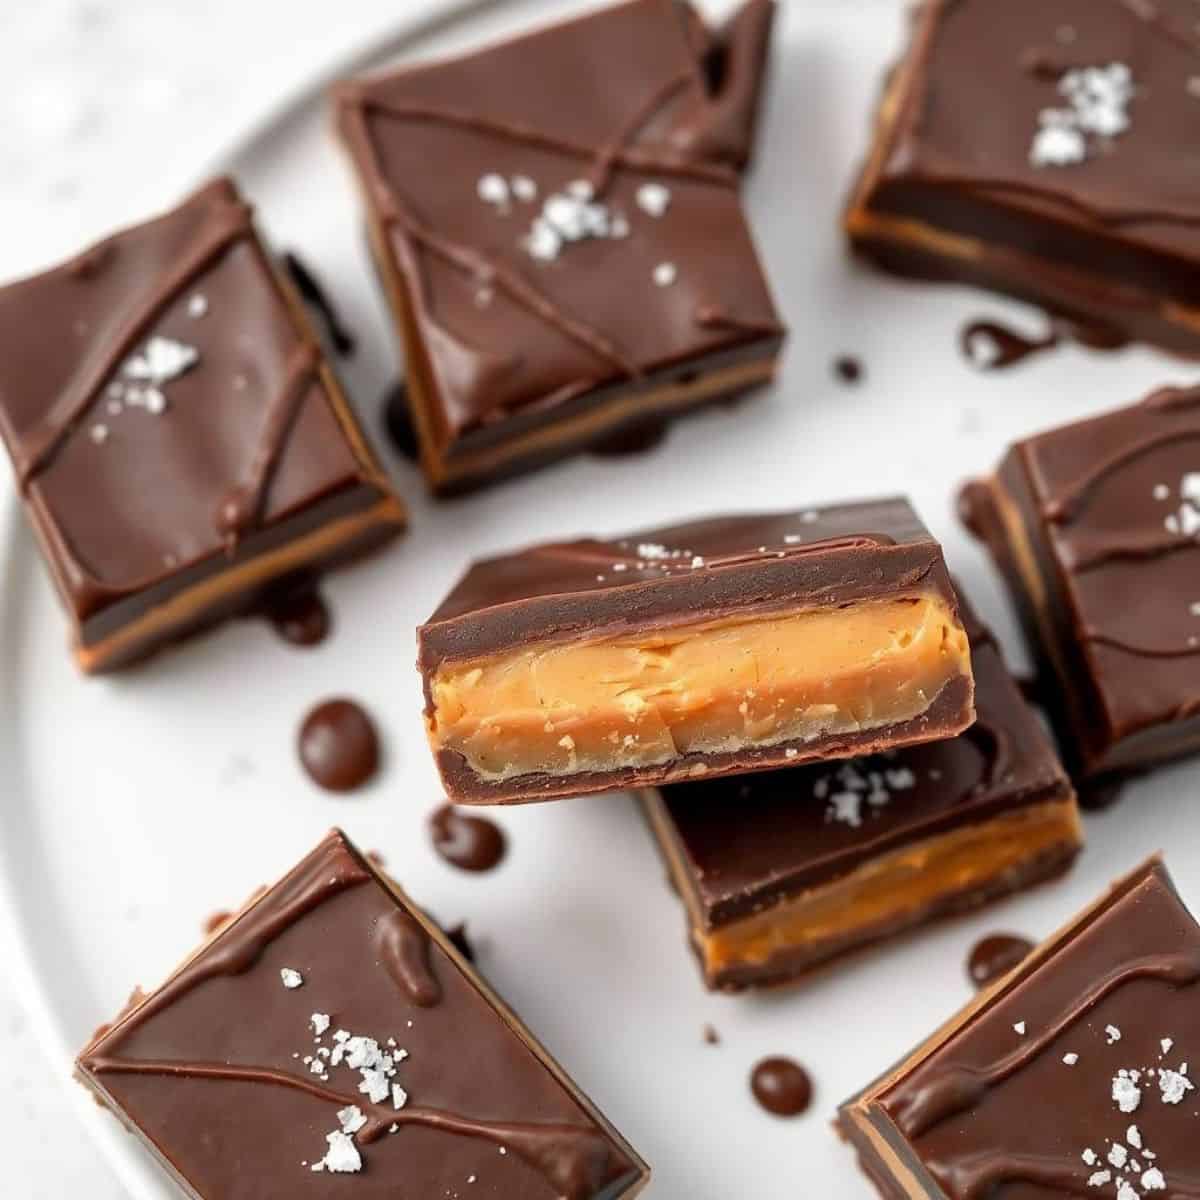
- Three real layers that actually stay separate: When you slice into these, you can see each layer clearly — the golden crumb base, the pale peanut butter middle, the dark chocolate top. I was skeptical the first time, but as long as you chill between steps, they hold their shape beautifully when cut.
- Ingredients you probably already have: Graham crackers, peanut butter, butter, powdered sugar, chocolate chips. No specialty store required. I've bought all of these at Walmart or Aldi without any trouble. The only thing you might not have on hand is enough chocolate chips — I always underestimate and end up scraping the bag.
- Make-ahead friendly: These actually get better after sitting in the fridge overnight. The layers firm up, the flavors settle, and slicing becomes much cleaner. I often make them the evening before I need them, which takes the stress out of any gathering or event.
- Easy to customize: The base recipe is forgiving. You can press in crushed pretzels with the graham crackers for a salty-sweet thing, or swirl a little peanut butter into the chocolate before it sets. My husband likes a pinch of flaky sea salt on top of the chocolate layer — he says it balances out the sweetness, and honestly he's right.
Ingredients
- For the base layer:
- 2 cups graham cracker crumbs (about 1 full sleeve of crackers, crushed)
- 1 cup powdered sugar
- 1 cup unsalted butter, melted
- 1 cup creamy peanut butter
- For the middle layer:
- 1½ cups powdered sugar
- ½ cup unsalted butter, softened (not melted — this matters)
- ¼ cup creamy peanut butter
- For the top layer:
- 2 cups semisweet chocolate chips
- 2 tablespoons unsalted butter
Directions
- Step 1: Make the base layer — In a medium bowl, mix the graham cracker crumbs, powdered sugar, melted butter, and peanut butter until everything is combined and holds together when pressed. Grease a 9x9-inch baking dish and press the mixture firmly into the bottom — I use the flat bottom of a measuring cup to get it even. Stick it in the fridge while you work on the middle layer.
- Step 2: Make the middle layer — In a separate bowl, beat together the softened butter, powdered sugar, and peanut butter until smooth. If you don't have a hand mixer, a wooden spoon and some arm strength works fine — it'll come together in a few minutes. Spread this mixture evenly over the chilled base layer, then return the dish to the fridge for at least 20-30 minutes so it firms up before you pour the chocolate.
- Step 3: Make the chocolate top — Combine the chocolate chips and butter in a microwave-safe bowl. Microwave in 30-second intervals, stirring between each, until completely melted and smooth. This usually takes about 90 seconds total. Pour over the chilled peanut butter layer and use a spatula to spread it edge to edge.
- Step 4: Chill until set — Refrigerate the whole dish for at least 2 hours, or until the chocolate is fully set and firm when you press it gently. I usually leave mine overnight if I'm making these ahead — it makes slicing much cleaner.
- Step 5: Slice and serve — Run a sharp knife under hot water, wipe it dry, then slice into squares or rectangles. The hot knife helps you get clean cuts through the chocolate without cracking it. Serve cold straight from the fridge, or let them sit out for 10 minutes if you like a softer middle.

Tips for Success
- Chill between every layer: I cannot say this enough — I skipped it once and ended up with a swirled mess instead of three clean layers. The peanut butter middle needs to be cold and firm before you pour the chocolate on top, otherwise the warm chocolate melts right into it. Twenty minutes in the fridge minimum, thirty is better.
- Use softened butter (not melted) for the middle layer: The middle layer is a peanut butter buttercream-style filling, and it only works if the butter is soft but not liquid. I learned this the hard way — melted butter makes it greasy and loose instead of creamy and spreadable. Take your butter out about an hour before you start.
- Press the base in firmly and evenly: If the base is uneven or loose, the whole bar falls apart when you try to pick it up. I use the flat bottom of a glass or measuring cup to really compact it. It should feel almost like a firm cookie crust when you press down on it.
- Hot knife for clean slices: Run your knife under very hot water, wipe it dry, then slice immediately. The warmth helps it cut through the chocolate layer without it shattering into chunks. Do this before every few cuts, especially if your bars have been in the fridge a long time and the chocolate is very cold and hard.
- Don't rush the chocolate set time: Two hours is the minimum, but if you slice too early the chocolate layer will have soft spots in the middle and won't hold its shape. If you can make these the night before, do it. A fully overnight chill gives you bars that cut beautifully and hold together when you pick them up.
Variations
- Add a pretzel crunch to the base: Replace about ½ cup of the graham cracker crumbs with crushed pretzels. It adds a salty edge that cuts through the sweetness of the peanut butter layers. My husband actually prefers this version — he says straight sweet gets a bit much after a square or two, and the salt fixes that.
- Swap in digestive biscuits: If you're in the UK or Australia, digestive biscuits work perfectly in place of graham crackers — same ratio, slightly less sweet. Readers in Pakistan can find digestives at most larger grocery stores. The flavor is a little more toasty and less sugary, which I actually enjoy.
- Sea salt chocolate top: Before the chocolate sets, sprinkle a small pinch of flaky sea salt across the top. It sounds like a small thing but it makes a real difference — the bars taste less one-note and more like something from a proper candy shop. This is my favorite version.
- White chocolate top: Sub in white chocolate chips for the semisweet on the top layer. The result is sweeter and creamier looking — Zainab loves this version. Just note that white chocolate sets differently and can be a bit softer, so make sure you give it the full overnight chill.
- Mint chocolate version: Add ¼ teaspoon of peppermint extract to the chocolate before pouring it on top. It gives the bars a cool, almost mint-patty flavor that works really well with the peanut butter. I've made these around Christmas alongside my Christmas tree cupcakes and they disappear faster than anything else on the table.
Serving and Storage
Serving
Serve these cold, straight from the fridge — that's when the layers are firmest and the chocolate has the best snap. If you let them sit at room temperature for too long, especially in a warm kitchen, the middle layer softens considerably and the bars can get messy to hold. I cut them into roughly 2-inch squares, which gives you about 16 bars from a 9x9 dish. For a party spread, I'll slice them smaller — more pieces means more people get to try one. These pair nicely alongside other chocolate treats; if you're doing a dessert table, my chocolate marshmallow swirl cookies sit well next to them.
Storage
Store leftovers in an airtight container in the refrigerator for up to 5 days. Layer them with parchment paper between rows so the bars don't stick to each other. For longer storage, freeze them in a single layer on a sheet pan until solid, then transfer to a freezer bag — they'll keep for up to 2 months. Let frozen bars thaw in the fridge overnight rather than at room temperature, which can cause the chocolate to sweat and the layers to soften unevenly.

Frequently Asked Questions
Can I make these bars ahead of time?
Yes, and honestly I'd recommend it. Making them a day ahead gives all three layers time to fully firm up, which makes cutting much cleaner and the bars hold their shape better when you pick them up. I've made them up to two days in advance — just keep them covered in the fridge until you're ready to slice and serve.
Can I use crunchy peanut butter instead of creamy?
You can, but the middle layer won't be as smooth. Crunchy peanut butter makes the filling a little more textured and slightly harder to spread evenly over the base. If you like that extra crunch, go for it — just press the layer down gently with a spatula to get it as even as you can before chilling.
Why is my chocolate cracking when I slice the bars?
The chocolate is probably too cold when you're cutting — this happens when bars have been in the fridge for many hours or overnight. The fix is simple: run your knife under hot water, wipe it completely dry, then cut. The warmth lets the knife glide through the chocolate instead of cracking it. Repeat every few cuts if needed.
Can I freeze these bars?
Yes. Freeze them in a single layer first until the chocolate is solid, then stack with parchment paper between layers in a freezer-safe container. They'll keep for up to 2 months. Thaw overnight in the fridge — don't try to rush it at room temperature or the layers can separate and the chocolate can get a white bloom on the surface.
What can I substitute for graham crackers?
Digestive biscuits are the best substitute — same weight, similar texture, slightly less sweet. You can find them at most UK and Australian grocery stores, and in the international aisle at some US stores like Walmart or Cost Plus World Market. Crushed Oreos (with the filling scraped out) also work for a darker, more chocolatey base.

These bars have become one of those recipes I come back to again and again — not because they're complicated or impressive to make, but because everyone genuinely loves them and I can put them together in under 20 minutes of actual active work. The rest is just waiting, which I can do while cooking dinner or helping with homework.
What I appreciate most is how well they keep. A batch lasts almost a full week in the fridge (if nobody finds them), which means I can make them Sunday and have something ready to grab through the week. They're the kind of thing that makes me look more organized than I actually am.
If you're on a no-bake dessert kick, my cheesecake fudge follows the same logic — mix, chill, slice, done. And if you want something that requires a little more effort but hits the same chocolate-and-peanut-butter craving, the red velvet cheesecake cupcakes are worth the extra steps. But for a night when you just need something sweet and easy, these bars are what I reach for. 🍫✨

TRIPLE LAYER CHOCOLATE CANDY BARS
Ingredients
For the base layer:
- 2 cups graham cracker crumbs
- 1 cup powdered sugar
- 1 cup unsalted butter melted
- 1 cup creamy peanut butter
For the middle layer:
- 1 ½ cups powdered sugar
- ½ cup butter softened
- ¼ cup peanut butter
For the top layer:
- 2 cups semisweet chocolate chips
- 2 tablespoon unsalted butter
Instructions
Prepare the base layer:
- In a medium bowl, combine the graham cracker crumbs, powdered sugar, melted butter, and peanut butter. Stir until everything is well mixed.
- Press this mixture into the bottom of a greased 9x9-inch baking dish, creating a firm, even base. Chill in the refrigerator while you prepare the next layer.
Prepare the middle layer:
- In a separate bowl, beat together the powdered sugar, softened butter, and peanut butter until smooth and creamy.
- Spread this mixture evenly over the graham cracker base layer. Return the dish to the refrigerator to set while preparing the top layer.
Prepare the top layer:
- In a microwave-safe bowl, melt the chocolate chips and butter together. Heat in 30-second intervals, stirring between each, until completely smooth.
- Pour the melted chocolate over the peanut butter layer and spread it evenly with a spatula.
Chill and set:
- Refrigerate the candy bars for at least 2 hours, or until the chocolate is set and the bars are firm.
Serve:
- Once set, cut the bars into squares and serve chilled or at room temperature. Enjoy these rich, decadent treats!
Notes
- You can substitute the graham cracker crumbs with digestive biscuits for a slightly different flavor.
- For a smoother top layer, you can mix a little heavy cream into the melted chocolate.
- To make these bars even richer, you can add a sprinkle of sea salt on top of the chocolate before chilling.
- These candy bars can be stored in an airtight container in the refrigerator for up to 5 days, or frozen for longer storage.
If you liked these bars, here are a few more things from my kitchen you might want to try next:
- Cheesecake Fudge — another no-bake, fridge-set treat that takes almost no time
- Chocolate Marshmallow Swirl Cookies — for when you want something chocolate but baked
- Red Velvet Cheesecake Cupcakes — showstopper for any gathering or celebration
- Thumbprint Cookies — simple, satisfying, and easy to make with kids
- Christmas Tree Cupcakes — these pair beautifully with the candy bars on a holiday dessert table





Comments
No Comments