
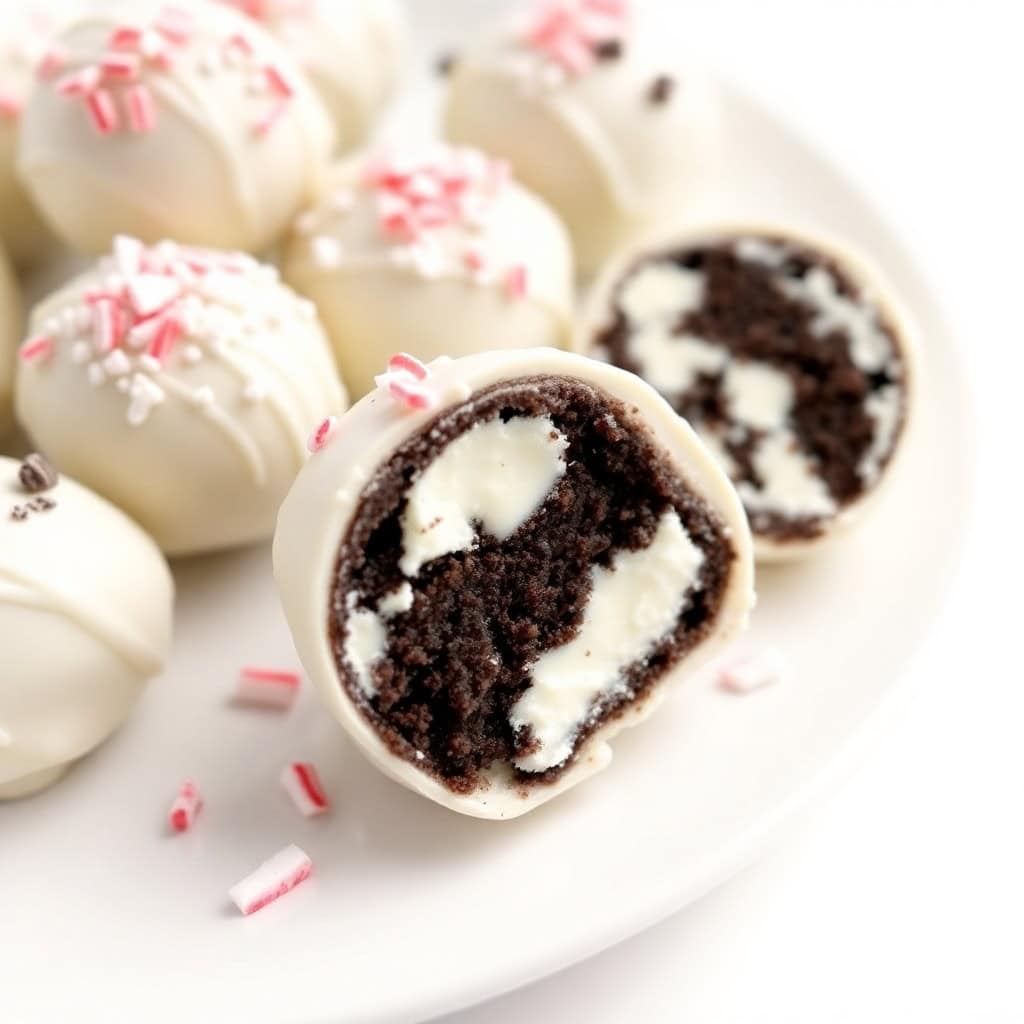
Zainab asked me to make "the minty chocolate ones" three times before December even started. That's how these peppermint Oreo balls became a permanent part of our holiday rotation. They take about 30 minutes of actual work, they require zero baking, and somehow they look impressive enough that people assume you spent way more time on them than you did.
What makes these work is the ratio — one package of Oreos to 8 ounces of cream cheese gives you a filling that's firm enough to roll but still creamy inside. I use just half a teaspoon of peppermint extract because the first time I made these I used a full teaspoon and they tasted like toothpaste. Less is genuinely more with peppermint. You want it to be a hint of cool, not a mouthful of candy cane.
I make a double batch every time because a single batch disappears before I've even finished cleaning up. Zainab takes a handful straight from the fridge, my husband eats them after dinner with tea, and I end up with maybe three left for myself. If you're making these for a party or gifting, definitely double it. They keep well in the fridge for up to a week, so you can make them ahead without any stress. If you're in the mood for more no-bake holiday baking, my snickerdoodle cheesecake bars also come together without turning on the oven.
One thing to know before you start: the cream cheese needs to be properly softened, not just slightly less cold. If it's still cool from the fridge, it won't blend smoothly with the Oreo crumbs and you'll end up with little white lumps in your mixture. I usually leave mine out on the counter for about an hour. Also, chilling the rolled balls before dipping is non-negotiable — I skipped it once and spent 10 minutes fishing crumbling Oreo balls out of melted chocolate. Do not skip the chill.

Why You'll Love This Recipe
- No baking required: Everything happens at room temperature and in the fridge. I don't have to heat up my kitchen, which matters during the holidays when I'm already roasting things and baking cookies on other days. The hardest part is waiting for the chocolate to set, and even that only takes 15 minutes.
- Ready in about 30 minutes of hands-on time: Most of that time is rolling and dipping. The chilling in between is passive — I use those breaks to clean up the kitchen or help Zainab with homework. By the time I'm done tidying, the balls are ready for the next step.
- Only five ingredients: Oreos, cream cheese, peppermint extract, white chocolate, and crushed candy cane for the top. All of these are easy to find at Walmart or Costco during December. You don't need anything specialty or hard to track down.
- Great for gifting: I've packed these in small boxes lined with parchment and given them as neighbor gifts. They look proper — shiny white chocolate, crushed candy cane on top, very festive. People always ask for the recipe and are genuinely shocked at how simple it is.
- Kids can help: Rolling the balls is something even young kids can do. Zainab has been helping me with that step for a couple of years now. The dipping is better handled by adults since the chocolate is hot, but the rolling and the sprinkling? That's her job.
Ingredients
- 1 package (14.3 oz) Oreo cookies (regular, not double-stuffed)
- 8 oz cream cheese, softened to room temperature
- ½ teaspoon peppermint extract (see tip below before adding more)
- 12 oz white chocolate chips or a white chocolate melting bar (semi-sweet works too)
- 1 tablespoon crushed peppermint candies or candy canes, for garnish (optional)
Directions
- Step 1: Crush the Oreos — Put the whole package of Oreos into a food processor and blitz until you have fine crumbs. If you don't have a food processor, put them in a zip-top bag and crush them with a rolling pin — it takes about 5 extra minutes but works just as well. You want them fully broken down with no large chunks remaining.
- Step 2: Mix with cream cheese — In a large bowl, combine the Oreo crumbs with the softened cream cheese and peppermint extract. Mix until everything is fully combined and you have a thick, uniform dough. This is easier with a wooden spoon than a fork — the mixture is stiff and a fork just bends. If you see any white streaks of cream cheese, keep mixing.
- Step 3: Roll the balls — Scoop out roughly tablespoon-sized portions and roll them between your palms into smooth balls. Place them on a parchment-lined baking sheet. Once all the mixture is rolled, put the sheet in the fridge for at least 30 minutes. This step is what keeps them from falling apart in the chocolate — do not skip it.
- Step 4: Melt the chocolate — While the balls are chilling, melt the white chocolate in a microwave-safe bowl. Do it in 30-second intervals, stirring in between, until fully melted and smooth. If the chocolate feels too thick for dipping, stir in half a teaspoon of vegetable oil — it thins it out just enough without affecting the flavor.
- Step 5: Dip the balls — Take the chilled balls out of the fridge and dip them one at a time into the melted chocolate. I use a fork to lower them in and lift them out, then tap the fork on the edge of the bowl to knock off the excess. Place each dipped ball back on the parchment sheet. Work quickly because white chocolate starts to seize as it cools.
- Step 6: Garnish and set — Sprinkle crushed peppermint candies or candy cane pieces over the top of each ball immediately after dipping, before the chocolate sets. If you wait too long, the garnish won't stick. Once all the balls are garnished, put the tray back in the fridge for another 15–30 minutes until the chocolate is fully hardened.
- Step 7: Serve or store — Once the chocolate is set and firm, they're ready. Serve them straight from the fridge — they taste best cold.

Tips for Success
- Soften the cream cheese properly: I pull mine out of the fridge at least an hour before I start. If it's even slightly cold, it won't blend evenly with the Oreo crumbs and you'll see white patches in the mixture. Properly softened cream cheese mixes in smoothly in about 2 minutes of stirring.
- Don't skip the first chill: I learned this the hard way. The balls need at least 30 minutes in the fridge before dipping. If they're not firm enough, they crack or crumble the moment they hit the warm chocolate. Once they're properly chilled, dipping is much cleaner and faster.
- Go easy on the peppermint extract: Half a teaspoon is genuinely enough. The first version I made used a full teaspoon and the mint flavor was overwhelming — it tasted more medicinal than festive. If you want a stronger mint hit, add a tiny bit more, but taste the mixture before rolling and adjust carefully.
- Thin your chocolate if it's too thick: White chocolate can be stubborn and sometimes gets thick quickly, especially if your kitchen is cool. A half teaspoon of vegetable oil stirred in makes it much more fluid and gives you a thinner, smoother coating. Don't add water — that will seize the chocolate completely.
- Sprinkle the garnish immediately: The window for getting the crushed candy cane to stick is small — once the chocolate starts to set, the garnish just slides off. I keep the crushed peppermint in a small bowl right next to my dipping station so I can sprinkle each ball within a few seconds of coating it.
Variations
- Dark chocolate coating: Swap the white chocolate for dark chocolate and the whole flavor profile shifts — it's richer, less sweet, and the mint reads differently against dark chocolate than white. My husband actually prefers this version. I sometimes do half white and half dark so everyone gets what they want.
- Mint crunch filling: Mix a tablespoon of finely crushed candy cane into the Oreo and cream cheese filling before rolling. It adds a little crunch inside the ball alongside the creaminess. Zainab thinks this version is better than the original — she likes finding the crunchy bits inside.
- Different Oreo flavors: I've tried these with mint Oreos (which intensifies the mint flavor significantly — good if you love mint), and also with golden Oreos for a vanilla-peppermint version that looks really pretty coated in white chocolate. Golden Oreo balls look almost like actual cake pops.
- Festive drizzle: Once the white chocolate coating has set, melt a small amount of dark or milk chocolate and drizzle it over the tops with a fork or spoon. It takes two minutes and makes them look much more decorated — great if you're gifting them. A red and white drizzle looks really striking on a holiday platter.
Serving and Storage
Serving
Serve these cold, straight from the fridge. The chocolate shell is firmer and the filling is creamier when they're chilled. I put them on a white plate or a small tiered stand for parties and they always look festive without any extra effort. If you're serving them as a dessert after dinner, pull them out of the fridge about 5 minutes before — just enough to take the sharp edge off the cold without letting the chocolate soften. They pair well with coffee or hot chocolate. If you're looking for something to serve alongside on a holiday dessert table, my peanut butter caramel cookies go really well next to these.
Storage
Store in an airtight container in the refrigerator for up to one week. Layer them between sheets of parchment so the chocolate doesn't stick together. For freezing, put them in a single layer on a baking sheet first until solid, then transfer to a sealed freezer bag — they'll keep for up to 6 weeks. Thaw in the fridge overnight rather than at room temperature, which can cause condensation on the chocolate coating.
Frequently Asked Questions
Can I make these peppermint Oreo balls ahead of time?
Yes, and honestly they're better when made a day ahead. The filling firms up more overnight and the flavors meld together. I make them up to a week in advance and keep them in the fridge in an airtight container. They're one of my favorite make-ahead holiday treats for exactly this reason.
Can I freeze these Oreo balls?
You can. Freeze them in a single layer first until solid, then move them to a sealed freezer bag or container. They keep well for up to 6 weeks. Thaw in the fridge rather than at room temperature — thawing at room temp causes condensation on the chocolate which makes them look spotty and dull.
My chocolate keeps clumping or going thick — what am I doing wrong?
White chocolate is more temperamental than dark or milk chocolate. If it's seizing up (going thick and grainy), it might have gotten a drop of water in it — even steam from the microwave can do this. Start fresh if that happens. If it's just thicker than you'd like for dipping, stir in half a teaspoon of vegetable oil. That usually brings it back to a smooth, dippable consistency.
Can I use a different type of chocolate for coating?
Absolutely. Dark chocolate gives a richer, less sweet coating that contrasts really nicely with the peppermint filling. Milk chocolate is a middle ground — sweeter than dark, not as cloyingly sweet as white. All three work. I'd just stick to good-quality chips or a melting bar rather than regular baking chocolate, which can be harder to melt smoothly.
What if I don't have a food processor?
A zip-top bag and a rolling pin work perfectly fine. Put the Oreos in the bag, seal it, and roll back and forth firmly until you have fine crumbs — takes about 5 minutes. I actually did it this way for the first year I made these before I got a food processor, and the results were identical. Just make sure there are no large chunks left before you mix in the cream cheese.

These peppermint Oreo balls have become one of the few holiday recipes I actually look forward to making — partly because they're fast, partly because the end result looks way more impressive than the effort involved. There's something satisfying about a recipe that takes 30 minutes of work and produces something that looks like it came from a bakery box.
I make them every December without fail now. Sometimes I do the white chocolate version for gifting and the dark chocolate version for us at home. If you want more no-fuss holiday baking ideas, my cinnamon sugar donut sweet bread is another one that looks more complicated than it is — great for the same holiday table.
If you make these, store a few in the back of your fridge behind something else. Otherwise they'll be gone before the chocolate has fully set and you'll be starting a second batch the same afternoon. I say this from experience. 🍬❄️

PEPPERMINT OREO BALLS
Ingredients
- 1 package 14.3 oz Oreo cookies
- 8 oz cream cheese softened
- ½ teaspoon peppermint extract
- 12 oz white chocolate melted
- 1 tablespoon crushed peppermint candies optional, for garnish
Instructions
- Crush the Oreo cookies in a food processor or place them in a zip-top bag and crush with a rolling pin until fine crumbs form.
- In a large bowl, mix the crushed Oreos and softened cream cheese until well combined.
- Add peppermint extract and stir to incorporate.
- Roll the mixture into 1-inch balls and place them on a parchment-lined baking sheet.
- Chill the Oreo balls in the fridge for at least 30 minutes to firm up.
- Once chilled, dip each ball into melted white chocolate, coating completely.
- Place the dipped balls back on the parchment sheet and sprinkle with crushed peppermint candies, if desired.
- Chill again for 15 minutes to allow the chocolate to set.
- Serve and enjoy!
Notes
- For extra flavor, you can add a bit more peppermint extract to the filling or chocolate coating.
- These Oreo balls can be made ahead of time and stored in the fridge for up to a week.
- You can substitute white chocolate with milk or dark chocolate for a different taste.
- If you don’t have peppermint candies, you can use crushed candy canes for a holiday touch.
- The peppermint extract is optional but enhances the flavor of the holiday treat.
- Make sure the balls are chilled enough before dipping to prevent them from falling apart.
- For a more festive look, drizzle extra melted white chocolate over the balls before chilling.
- These Oreo balls make great holiday gifts when packaged in decorative containers.
If you liked this recipe, here are a few more you might enjoy:
- Homemade Snickerdoodle Cheesecake Bars — another no-fuss dessert that works great for holidays
- Peanut Butter Caramel Cookies — chewy, rich, and always the first thing to go on a cookie plate
- Cinnamon Sugar Donut Sweet Bread — looks impressive, easier than it looks
- Easter Bread (Pane di Pasqua) — if you're baking for another holiday season, this one is worth the effort





Comments
No Comments