
Saad asked for this pie three weeks in a row before I finally stopped winging it and wrote the recipe down. He's not usually a dessert kid — he'll skip cake at birthday parties — but something about Nutter Butter cookies blitzed into a crust and piled with peanut butter cream gets him every single time. So here we are.
What I like about this pie is that it's genuinely no-bake, not "technically no-bake but requires six steps and a candy thermometer." You crush cookies, mix butter, press it into a dish, beat together a filling, and fold in whipped cream. That's it. I've made this on a Tuesday night with dinner dishes still in the sink and still had it ready to chill by 8pm. It's that kind of recipe. If you're in the mood for something a little more showstopper, my Pumpkin Caramel Cheesecake Delight lives in the same neighborhood — rich, creamy, make-ahead friendly.
My husband eats this cold straight from the fridge the next morning and calls it breakfast. I don't fight it. Zainab prefers hers with a little extra whipped cream on top, and honestly she's right — it's better with more whipped cream. I usually make this when we have people coming over because it looks like I spent hours on it and I very much did not.
One thing to set expectations: leave yourself at least 4 hours of chill time before you cut into it. I tried to rush it once — sliced it at the 2-hour mark because I was impatient — and the filling slid right off the crust. Let it set properly. Overnight is ideal. The next day it's firm, clean slices, and the flavor is noticeably better too.

Why You'll Love This Recipe
- Zero oven time: No baking means no heating up your kitchen, which matters in summer. I make this most often in July when turning the oven on feels like a punishment. Everything comes together at room temperature and then chills in the fridge — that's all the "cooking" involved.
- The crust is everything: Nutter Butter cookies make a crust that already tastes like peanut butter before you even add filling. Graham crackers are fine, Oreos are fun, but Nutter Butters give you that double hit of peanut flavor that makes this pie different from any other no-bake recipe I've tried.
- Make it the night before: I almost always make this the evening before I need it. It means dessert is already handled and I'm not scrambling while guests arrive. The overnight chill actually improves the texture — the filling gets firmer and the crust holds together better when it's had time to set.
- The filling is lighter than it looks: Because you fold in whipped cream, the filling ends up mousse-like rather than dense. It's rich, yes, but not heavy in that way where you feel awful after one slice. It's the kind of thing you actually finish your whole piece of.
- Simple ingredients, no specialty store required: Everything here — Nutter Butters, cream cheese, peanut butter, powdered sugar, heavy cream — is at Walmart or your regular grocery store. Nothing obscure, nothing that requires a special trip.
Ingredients
- 24 Nutter Butter cookies, crushed (for the crust)
- 4 tablespoons unsalted butter, melted
- 1 cup creamy peanut butter (Jif or Skippy — not natural, see tips)
- 8 oz cream cheese, softened to room temperature
- 1 cup powdered sugar
- 1 teaspoon vanilla extract
- 1½ cups heavy whipping cream, whipped to stiff peaks
- Crushed Nutter Butter cookies or a drizzle of melted chocolate for topping (optional)
Directions
- Step 1: Make the crust. Crush 24 Nutter Butter cookies until they're fine crumbs — a food processor works fastest, but a zip-lock bag and a rolling pin gets the job done in a few minutes if you don't have one. Mix the crumbs with the melted butter until everything looks like wet sand. Press the mixture firmly into the bottom and up the sides of a 9-inch pie dish, then refrigerate while you make the filling. The colder the crust, the better it holds its shape.
- Step 2: Whip the cream. Pour 1½ cups cold heavy cream into a large bowl and beat it with a hand mixer until stiff peaks form — this takes about 3 to 4 minutes on high speed. Set it aside. I do this step first so the cream is ready to fold in right when I need it.
- Step 3: Make the peanut butter filling. In a separate large bowl, beat the softened cream cheese and peanut butter together until totally smooth. Add the powdered sugar and vanilla extract and keep beating until you have a creamy, uniform mixture. If your cream cheese isn't soft enough, you'll get lumps here — so let it sit out for at least 15 to 20 minutes before you start.
- Step 4: Fold in the whipped cream. Add the whipped cream to the peanut butter mixture in two additions, folding gently with a spatula each time. Don't stir or beat — fold in slow swooping motions to keep the mixture light and airy. This is what gives the pie its mousse-like texture rather than a dense, heavy filling.
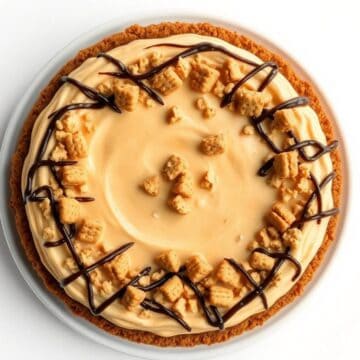
- Step 5: Assemble and chill. Spread the filling evenly over the chilled crust and smooth the top with a spatula. Add any toppings you want — crushed cookies, a drizzle of melted chocolate, a few whole Nutter Butters pressed in around the edge. Cover loosely and refrigerate for at least 4 hours, or overnight for best results.

Tips for Success
- Let the cream cheese come to room temperature: I learned this the hard way. Cold cream cheese doesn't fully blend — you end up with small white lumps throughout the filling that don't smooth out no matter how long you beat it. Pull it from the fridge 20 to 30 minutes before you start. If you forget, cut it into small cubes and let it sit for 15 minutes; that helps too.
- Don't use natural peanut butter: I know natural peanut butter is better for a lot of things, but not here. The oil in natural peanut butter can separate in the filling and make the texture greasy and unstable. Stick with classic processed creamy peanut butter — Jif, Skippy, or the store brand all work fine.
- Press the crust firmly and evenly: A loose crust crumbles when you slice it. Use the flat bottom of a measuring cup to press the crumbs into the pie dish with real pressure, especially where the bottom meets the sides. Firm, compact crust = clean slices.
- Whip the cream cold: Warm cream won't whip to stiff peaks — it'll just slosh around. Use cream straight from the fridge. If your kitchen is hot, you can even chill the bowl in the freezer for 10 minutes first. Cold bowl, cold cream, stiff peaks in 3 to 4 minutes on high.
- Give it the full chill time: This isn't the kind of dessert you rush. At 2 hours, the filling is still soft and slides around when you cut it. At 4 hours, it holds a clean slice. Overnight is genuinely best — the crust firms up, the filling sets completely, and the flavors have time to settle together.
Variations
- Chocolate layer in the middle: Melt about ½ cup of chocolate chips and spread it over the chilled crust before adding the filling. Let it harden for 10 minutes in the fridge first, then pour the filling on top. You get this thin chocolate layer in every slice that makes it feel like a peanut butter cup in pie form. My husband specifically requests this version now.
- Frozen pie: Skip the refrigerator and freeze the assembled pie instead. It sets into something closer to an ice cream pie — firmer, colder, great in summer. Let it sit on the counter for 10 minutes before slicing. This is the version I make when it's 40°C outside and nobody wants anything warm. Pair it with my Whipped Pink Lemonade for the full no-cook summer dessert spread.
- Mini individual cups: Press the crust mixture into a lined muffin tin instead of a pie dish and divide the filling among the cups. Chill and serve as individual portions — easier for parties and no slicing required. I've made a double batch this way for birthday parties, and they hold up really well.
- Chocolate drizzle topping: Melt ¼ cup of chocolate chips with a teaspoon of coconut oil and drizzle it over the set pie in whatever pattern you like. It hardens into thin chocolate ribbons on top that look like you spent time decorating when really it took 2 minutes. Crushed candied pecans scattered over the top add a nice salty crunch alongside the chocolate.
- Different cookie crust: Oreos make a great chocolate-peanut butter contrast. Graham crackers with a tablespoon of peanut butter mixed into the crumbs work well too if Nutter Butters aren't available at your store. The filling stays the same — only the crust changes.
Serving and Storage
Serving
Serve this pie cold, straight from the fridge. Slice it with a sharp knife — run the knife under hot water and dry it between cuts for cleaner slices. A dollop of extra whipped cream on top is never wrong. If I'm serving it at a gathering, I'll add a few whole Nutter Butter cookies standing upright in the filling for a simple decoration that takes 30 seconds. Pair it with something to drink — it's rich, so a cup of coffee or tea helps cut through the sweetness.
Storage
Cover the pie tightly with plastic wrap or store in an airtight container in the fridge for up to 4 to 5 days — though in my house it never lasts past day two. If you want to freeze it, wrap the whole pie (or individual slices) tightly in plastic wrap and then foil, and freeze for up to 1 month. Let it thaw in the fridge for a few hours before serving, or leave it on the counter for 10 minutes if you want it partially frozen and firm.

Frequently Asked Questions
Can I make this pie the night before?
Yes, and honestly I'd encourage it. The overnight chill gives the filling time to fully set and the crust to firm up. It slices cleaner and tastes better the next day than it does at the 4-hour mark. I almost always make it the evening before I need it.
Can I freeze Nutter Butter pie?
You can. Wrap it tightly in plastic wrap and then a layer of foil, and it keeps well in the freezer for up to a month. When you're ready to serve, let it thaw in the fridge for a couple of hours, or serve it semi-frozen for a firmer, ice-cream-pie texture. Either way works.
What if I can't find Nutter Butter cookies?
Any peanut butter sandwich cookie works as a substitute — most grocery stores carry a store-brand version. If you're completely stuck, graham crackers with a tablespoon or two of peanut butter mixed into the crumbs will give you a similar result. The peanut butter flavor won't be quite as strong in the crust, but the filling carries the pie anyway.
Can I use Cool Whip instead of whipping the cream myself?
Yes, an 8 oz container of thawed Cool Whip folds in the same way and gives you a similar texture. The filling will be slightly lighter and a little sweeter than with homemade whipped cream. Both versions work — use whichever is more convenient. If you do whip your own cream, make sure it's at stiff peaks before folding so the pie holds its structure in the fridge.
Why can't I use natural peanut butter?
Natural peanut butter separates — the oil rises and the solids sink — and in a chilled filling, that oil can make the texture greasy and unstable. Classic processed peanut butter like Jif or Skippy stays emulsified, which gives you a smooth, firm filling that holds up in the fridge. Save the natural stuff for toast.
This is not a complicated pie. It doesn't require any special equipment — I make it with a hand mixer, a regular 9-inch pie dish I've had for years, and a rubber spatula. What it does require is patience for the chill time, which is the hardest part honestly. Once it's set, it slices cleanly, holds together on the plate, and disappears faster than almost anything else I make.
I've made this for school potlucks, for Eid gatherings, for random Tuesday nights when someone in my house announced they needed something sweet. It always gets the same reaction — people ask what's in it, assuming it must be complicated, and then look slightly surprised when I explain it's basically crushed cookies, cream cheese, and peanut butter. That surprise is always satisfying. If you want another no-bake dessert in the same category, my Rice Krispie Chocolate Chip Cookies are just as easy and just as dangerous to leave sitting on the counter.
The version in the recipe card below uses heavy whipping cream that you whip yourself — I prefer that over Cool Whip for a slightly richer, more stable filling. But if you're in a hurry, the Cool Whip swap works. Either way, give it the full overnight chill if you can. You'll be glad you did. 🥜🥧✨
NUTTER BUTTER PIE
Ingredients
Crust:
- 24 Nutter Butter cookies crushed
- 4 tablespoons unsalted butter melted
Filling:
- 1 cup creamy peanut butter
- 8 oz cream cheese softened
- 1 cup powdered sugar
- 1 ½ cups heavy whipping cream whipped
- 1 teaspoon vanilla extract
Optional Topping:
- Crushed Nutter Butter cookies or chocolate drizzle
Instructions
- Prepare Crust: Mix crushed Nutter Butter cookies with melted butter. Press mixture into the bottom of a 9-inch pie pan. Chill in the fridge while preparing filling.
- Prepare Filling: In a large bowl, beat cream cheese and peanut butter until smooth. Add powdered sugar and vanilla extract, mixing well.
- Fold in Whipped Cream: Gently fold whipped cream into peanut butter mixture until smooth and fluffy.
- Assemble Pie: Pour filling over chilled crust, spreading evenly.
- Chill: Refrigerate pie for at least 4 hours or until firm.
- Serve: Garnish with crushed cookies or chocolate drizzle if desired, and serve chilled.
Notes
- Make Ahead: Pie can be prepared a day ahead for best results.
- Customizing Flavor: Add chocolate chips or swirl in chocolate ganache for extra indulgence.
- Serving Suggestions: Serve chilled with a cup of coffee or milk.
- Storage Tips: Store in the refrigerator for up to 3 days. Do not freeze as texture may change.
If you're looking for more desserts and treats to try, these are some of my favorites from the site:
- Pumpkin Caramel Cheesecake Delight — another make-ahead, no-fuss dessert that looks impressive
- Rice Krispie Chocolate Chip Cookies (Chewy with a Surprise Crunch) — Saad's current obsession
- Air Fryer Candied Pecans — great as a topping for this pie or on their own
- Whipped Pink Lemonade — the drink I'd serve alongside this pie in summer
- Fluffy Japanese Soufflé Pancakes — when you want something impressive and a little different





Comments
No Comments