
I started making these no-bake brownie bites during a stretch of summer when I absolutely refused to turn on the oven. It was one of those weeks where the heat was relentless and the kids still wanted something sweet after dinner every single night. I threw this together with stuff I already had in my pantry — dates, oats, cocoa, peanut butter — and honestly I wasn't expecting much. Then Zainab ate four of them before I'd even put the plate on the table.
What makes these work is the Medjool dates. They're doing the heavy lifting here — they bind everything together, add natural sweetness, and give the bites that dense, fudgy chew that actually reminds you of a real brownie. I tried making a version with regular pitted dates from a dollar store bag once, and the texture was noticeably drier. Soft, fresh Medjool dates make a difference, so it's worth checking the date section at Costco or Whole Foods where they stock them properly.
I make a double batch almost every time because a single batch disappears within 24 hours in my house. My husband grabs them as a post-lunch treat, Zainab takes them in her school lunchbox, and Saad eats them straight from the fridge at whatever hour he wanders into the kitchen. They also travel well, which is how they ended up at a family gathering last Eid — I brought a tin and they were gone before the samosas.
One thing to know before you start: you do need a food processor for this. A blender technically works but it's frustrating — the mixture is thick and it keeps stopping. If you're looking for something that requires zero equipment, my Rolo Pretzels with M&M Candies are even simpler. But if you have a food processor, these brownie bites come together in under 15 minutes, then just need time in the fridge.

Why You'll Love This Recipe
- No oven, no stress: The whole thing happens in a food processor and then your fridge does the rest. I've made these on 100°F days when even standing near the stove felt wrong. Active prep time is maybe 12 minutes, and then you just wait 30 minutes for them to firm up. It's genuinely one of the lowest-effort desserts I make.
- The texture is actually fudgy: Most no-bake energy balls I've tried taste healthy in a way that reminds you they're healthy. These don't. The combination of dates, cocoa, and peanut butter creates something genuinely rich and dense. The first time I described them to my sister as "like a brownie but chewier" and she didn't believe me until she tried one.
- Five real pantry ingredients: Medjool dates, oats, cocoa powder, peanut butter, and vanilla. That's basically it. I almost always have all of these already. The oats are old-fashioned rolled oats — the kind you use for oatmeal, not the quick-cook ones. I get the big Quaker container from Walmart and it lasts forever.
- You can make them ahead: These actually get better after a night in the fridge. The flavors settle and the texture firms up into something really satisfying. I make them on Sunday and they keep beautifully all week, which makes the weekday snack situation much easier in my house.
- Easy to customize: Once you have the base down, it's very forgiving. I've rolled them in cocoa powder, shredded coconut, and crushed pistachios at different times. My husband likes a pinch of espresso powder in the mix. Zainab prefers plain with mini chocolate chips pressed in on top. Everyone's happy.
Ingredients
- 1 cup pitted Medjool dates, packed (about 10-12 large dates — make sure they're soft)
- ½ cup old-fashioned rolled oats
- ¼ cup unsweetened cocoa powder
- ¼ cup natural peanut butter (or almond butter, or cashew butter)
- 1 teaspoon vanilla extract
- Pinch of sea salt
- 1–3 tablespoons water (only if needed to bring dough together)
- Optional for rolling: mini chocolate chips, shredded coconut, or extra cocoa powder
Directions
- Soak the dates if needed: Check your dates first. If they feel firm or dry, soak them in warm water for 10 minutes and then drain them well before using. Soft dates process easily; hard ones just fight the food processor and you end up with a crumbly mess instead of a paste. I ruined my first batch by skipping this check.
- Process the dates: Put the pitted dates into a food processor and run it until they form a sticky paste, scraping down the sides as needed. This takes about a minute of processing. You want it smooth and cohesive — no whole chunks remaining — before you add anything else.
- Add the dry ingredients: Add the oats, cocoa powder, and sea salt to the food processor. Pulse about 10 times until everything is combined and the mixture looks like coarse, dark crumbs. Don't over-process here or the oats lose all their texture.
- Add the wet ingredients: Add the peanut butter and vanilla extract. Process again until a thick dough comes together. Stop and press a small amount between your fingers — it should hold together cleanly. If it's crumbling, add water one tablespoon at a time and pulse again until it holds.
- Roll into bites: Scoop out roughly 1 tablespoon of dough at a time and roll between your palms into a ball. Slightly damp hands help here — the dough is sticky and dry hands make it cling. I get about 15-18 bites from one batch.
- Coat if desired: Roll the finished bites in mini chocolate chips, shredded coconut, or extra cocoa powder if you'd like. This step is completely optional but it looks nice and adds a little extra something to each bite.
- Chill and serve: Arrange the bites on a parchment-lined plate or tray and refrigerate for at least 30 minutes before eating. They firm up nicely in the cold and the flavor deepens. Straight from the fridge is honestly the best way to eat them.

Tips for Success
- Your dates must be soft: This is the single most important thing. I've made this recipe with fresh, plump Medjool dates from a grocery store date bin and with the kind that come in a cardboard box and have been sitting on the shelf for months — the difference is real. If yours feel at all firm, the soak step is non-negotiable. Ten minutes in warm water, drain completely, then proceed.
- Process the dates fully before adding anything else: I know it feels like an extra step but it matters. If you dump everything in at once, the dates don't break down properly and you get uneven chunks throughout the dough. Get the dates to a smooth paste first — then add the oats and everything else. This one adjustment made my bites significantly more consistent.
- Add water very cautiously: A tablespoon at a time and no more. I added two tablespoons all at once once and the dough went from slightly dry to impossibly sticky in one go — I couldn't roll it at all. The dough should feel like thick, dense clay. If it's sticking aggressively to your hands even when damp, it's too wet and you'd need to add a spoonful more oats to correct it.
- Wet your hands before rolling: Run your palms under cold water, shake off the excess, and then roll. I re-wet my hands every 4-5 bites. It sounds fussy but it genuinely keeps the dough from sticking to you, which means cleaner balls and less frustration. I use a small cookie scoop to portion — any $8 one from Walmart works fine — and then roll between my palms to smooth.
- Don't skip the chill time: Thirty minutes minimum, an hour is better. Right out of the food processor the bites are quite soft and will dent easily. After time in the fridge they firm up into something that actually holds together properly when you pick them up. If you're making these for a party or to pack in a lunchbox, I'd make them the night before.
Variations
- Espresso-chocolate: Add 1 teaspoon of instant espresso powder along with the cocoa. You won't taste coffee exactly, but it makes the chocolate flavor much deeper and more intense. My husband started requesting this version specifically. It's a small addition that makes a noticeable difference.
- Orange zest: Stir in 1 teaspoon of fresh orange zest before rolling. Chocolate and orange is a combination I grew up eating in those Terry's Chocolate Orange balls my aunt used to bring back from the UK, and this version gives me that same feeling. It's a subtle change but the citrus cuts through the richness nicely.
- Nutty crunch: Add ¼ cup of finely chopped almonds, walnuts, or pecans to the processor with the oats. They add texture and make the bites feel more substantial. This is the version I made for a school bake sale and several parents asked me for the recipe — people seem to really like having something to chew through.
- Nut-free version: Swap the peanut butter for sunflower seed butter (SunButter is the brand I see most often at Target and Walmart). The flavor is slightly different — earthier, a little less sweet — but it works well in this recipe. The texture is the same. Good option if you're making these for a school event where nuts aren't allowed.
- Coconut-chocolate: Add 3 tablespoons of shredded unsweetened coconut into the dough itself, and then roll the finished bites in more coconut before chilling. This gives a slightly tropical edge to the flavor and a pretty white coating that looks nice on a dessert plate. If you enjoy Bounty bars or Mounds, this variation will appeal to you.
Serving and Storage
Serving
Serve these cold, straight from the fridge. Room temperature bites are fine for a few minutes on a plate, but they soften quickly in warm weather and lose that satisfying firmness. I put them on a small plate with a little bowl of extra cocoa powder or crushed pistachios on the side so people can roll their own coating. They work well as a dessert after a heavier meal, a lunchbox treat, or an afternoon snack alongside tea. If you're putting together a party spread alongside something like my Chocolate Chip Cheesecake Cookies, these make a nice contrast — dense and fudgy next to soft and chewy.
Storage
Store in an airtight container in the fridge for up to one week. I line the container with a piece of parchment so the bites don't stick to the bottom. They also freeze well — lay them flat on a parchment-lined tray until solid, then transfer to a zip-lock freezer bag. They keep for up to 2 months in the freezer. To eat from frozen, just move them to the fridge the night before or leave them at room temperature for about 15 minutes.

Frequently Asked Questions
Can I use a different type of date instead of Medjool?
Medjool dates are really the best option here because they're naturally soft and very sticky, which is what holds the bites together. If you can only find regular deglet noor dates (the smaller, drier variety), soak them in warm water for at least 20 minutes and drain well before using. The texture won't be quite as fudgy but it'll still work. I've done it in a pinch and the result was slightly less rich but still good.
I don't have a food processor. Can I make these without one?
Technically yes, but it takes real effort. You'd need to chop the dates very finely by hand until they form a rough paste — this takes about 10 minutes of chopping and some patience. Then mix everything else in by hand in a bowl. The texture will be chunkier and less uniform, but the flavor is the same. A high-powered blender works too, just in short pulses with a spatula scrape between each one to keep things moving.
How long do these keep in the fridge?
Up to one week in an airtight container in the refrigerator. After about day five they're still fine to eat but the texture gets a little softer. For the best texture, I'd say days one through four are peak. If you made a big batch and know you won't eat them all in a week, freeze half right away — they come back to life perfectly after thawing.
Can I freeze these brownie bites?
Yes, and they freeze really well. Freeze them in a single layer first so they don't clump together, then move to a sealed container or freezer bag. They'll keep for up to 2 months. When you want one, either pull it out and eat it semi-frozen (honestly great in summer) or let it thaw in the fridge overnight. I keep a batch in the freezer at all times now as an emergency chocolate situation solution.
Are these vegan and gluten-free?
The base recipe is naturally vegan as long as you use maple syrup instead of honey — honey is technically not vegan. For gluten-free, you'll want to make sure you're using certified gluten-free oats, since regular oats can be processed in facilities that also handle wheat. Bob's Red Mill makes gluten-free rolled oats that are easy to find at most grocery stores. Everything else in the recipe is naturally gluten-free.
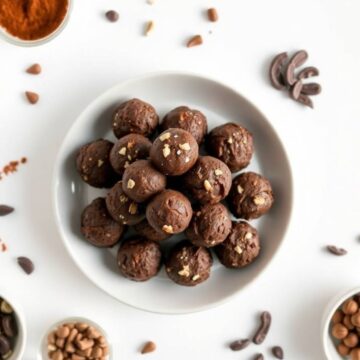
NO BAKE BROWNIE BITES
Ingredients
- 1 cup old-fashioned rolled oats
- ½ cup natural peanut butter
- ¼ cup honey or maple syrup
- ¼ cup unsweetened cocoa powder
- 1 teaspoon vanilla extract
- Pinch of salt
- Optional: ¼ cup mini chocolate chips or chopped nuts
Instructions
Mix Ingredients:
- In a large bowl, combine oats, peanut butter, honey, cocoa powder, vanilla, and salt. Stir until fully combined.
Add Mix-Ins:
- Fold in mini chocolate chips or nuts if desired.
Form Bites:
- Using your hands or a small scoop, roll the mixture into 1-inch balls.
Chill:
- Place the bites on a parchment-lined tray and refrigerate for at least 1 hour to set.
Notes
- Make Ahead: Store bites in the fridge up to 1 week or freeze for 2 months.
- Variations: Swap peanut butter for almond or cashew butter; add a pinch of cinnamon or espresso powder for extra flavour.
- Serving Suggestions: Perfect for lunchboxes, afternoon snacks, or dessert on-the-go.
- Allergy-Friendly: Use seed butter for a nut-free version and dairy-free chocolate chips.
This recipe has quietly become one of my most-made things over the past year. It's not flashy — there's no frosting, no layers, nothing to decorate — but it satisfies a chocolate craving faster than I can preheat an oven for something else, which is the point. I started making it in the summer and then kept making it through the fall and winter because it turns out a cold, fudgy chocolate bite is good in any weather.
I've brought these to enough gatherings now that people have started asking me to specifically bring "those chocolate date things." At a recent get-together I also had my Grinch Cookies on the table and the brownie bites still went first, which tells you something about how well they hold their own against more decorated competition.
If you're new to date-based no-bake recipes, this is the one to start with. It's forgiving, the ingredient list is short, and the result is consistent once you know to soak dry dates and wet your hands before rolling. Make a batch on a Sunday and see how long they last in your house. In mine, the answer is never more than three days. 🍫✨
If you liked these, you might also enjoy these other easy treats from my kitchen:
- Chocolate Chip Cheesecake Cookies — soft, cream cheese-based cookies that disappear fast
- Rolo Pretzels with M&M Candies — the easiest party treat with zero real cooking involved
- Grinch Cookies Recipe — a crowd favorite whenever I bring them anywhere
- Mini Cranberry Pecan Goat Cheese Balls — if you need something savory to balance out all this chocolate





Comments
No Comments