
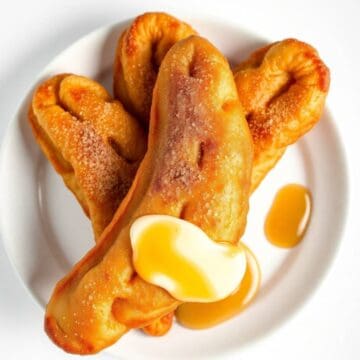
Fried dough never goes out of style, and maple beaver tails are proof. Inspired by a beloved Canadian treat, these flat, golden pastries are deep-fried to crispy perfection and then glazed with a warm maple topping that melts in your mouth.
They’re the ultimate fusion of crispy, chewy, and sweet—delivering satisfaction with every bite. Whether served at a fair, carnival, or from your home kitchen, they bring comfort and nostalgia to the table in a big way.
You don’t need special equipment or skills to recreate this iconic dessert. The ingredients are simple, and the process is easier than it looks. It’s a great recipe for beginners and experienced bakers alike.
These beaver tails are customizable too—maple is the star, but you can play with toppings like cinnamon sugar, lemon, or chocolate. Perfect for breakfast, dessert, or a cozy weekend treat. If you’ve never tried a beaver tail, now is the time.
This recipe brings authentic Canadian street food vibes straight to your kitchen—with a sweet maple twist that makes them even more irresistible. The maple flavour gives it a truly Canadian twist that’s impossible to resist.

WHY YOU WILL LOVE THIS RECIPE
- Irresistible Flavor: Maple glaze adds a warm, buttery sweetness that perfectly complements the crispy fried dough of these pastries.
- Fun to Make: Frying and topping the beaver tails is a fun kitchen activity the whole family can enjoy together.
- Canadian Classic: Brings a taste of Canada’s famous street food right to your home with simple, easy-to-find ingredients.
- Perfect Texture: Crispy outside, chewy inside—this recipe delivers on all fronts for texture lovers and pastry fans.
- Great for Sharing: These large, flat pastries are ideal for splitting with friends and family at any casual get-together.
- Customizable Toppings: Maple is just the beginning—you can easily change toppings to suit your mood or seasonal flavors.
- Crowd Pleaser: everyone loves fried dough, and this maple version elevates a classic into something extra special.
INGREDIENTS
- 2 ¼ teaspoons (1 packet) active dry yeast
- 1 cup warm milk (about 110°F)
- 2 tablespoons granulated sugar
- 3 cups all-purpose flour
- ½ teaspoon salt
- 1 teaspoon vanilla extract
- 2 tablespoons melted butter
- 1 egg
- Vegetable oil, for frying
- ½ cup pure maple syrup
- ¼ cup powdered sugar
- 1 tablespoon unsalted butter
- Optional toppings: cinnamon sugar, chocolate sauce, lemon juice, or chopped nuts
DIRECTIONS
- Step No.1: Activate the yeast
In a large bowl, combine warm milk, sugar, and yeast. Let it sit for about 10 minutes, until foamy and activated.
- Step No.2: Mix the dough
Add flour, salt, vanilla, melted butter, and the egg to the yeast mixture. Stir until a shaggy dough forms, then knead until smooth.
- Step No.3: Let the dough rise
Place the dough in a greased bowl, cover with a towel, and let it rise in a warm place for 1 hour or until doubled.
- Step No.4: Shape the beaver tails
Punch down the dough and divide into 6-8 portions. Roll each portion into a flat oval shape, about ½-inch thick.
- Step No.5: Fry until golden
Heat 2 inches of oil in a deep pan to 350°F. Fry each dough oval for 1-2 minutes per side, until golden and puffed.
- Step No.6: Make the maple glaze
In a small saucepan, combine maple syrup, powdered sugar, and butter. Heat gently until melted and smooth. Stir constantly to avoid burning.
- Step No.7: Glaze and serve
While the beaver tails are still warm, brush or drizzle the maple glaze generously over each. Add additional toppings if desired, and serve.

TIPS FOR SUCCESS
- Use Fresh Yeast: Always check the expiration date—fresh yeast ensures a strong rise and fluffy texture for the dough.
- Control Oil Temperature: Keep oil at a steady 350°F to ensure even frying and prevent greasy or undercooked beaver tails.
- Don’t Overcrowd Pan: Fry one or two at a time to maintain oil temperature and avoid sticking or uneven cooking.
- Roll Evenly: Make sure each dough oval is rolled evenly for consistent frying and appearance.
- Use Real Maple Syrup: The flavor of genuine maple syrup makes a big difference in the glaze—avoid artificial substitutes.
- Glaze While Warm: Applying the glaze while the pastries are warm helps it soak in and creates a glossy finish.
- Paper Towels Help: Drain fried beaver tails on paper towels to absorb excess oil and keep them crisp.
VARIATIONS
- Cinnamon Sugar Delight: Skip the glaze and toss the warm beaver tails in cinnamon sugar for a simpler but still satisfying version.
- Nutty Crunch: Add crushed pecans or walnuts on top of the glaze for texture and a richer, nutty flavor.
- Chocolate Drizzle: Drizzle with melted chocolate or Nutella for a dessert that feels more indulgent and kid-friendly.
- Lemon Zest Twist: Add lemon zest to the glaze or top with lemon sugar for a fresh, citrusy contrast to the maple.
- Apple Pie Style: Add sautéed cinnamon apples on top of the glaze for a cozy, fall-inspired version.
- Savory Option: Skip sweet toppings and try health benefits of garlic butter and herbs for a creative savory take on this classic pastry.
- Holiday Edition: Add crushed candy canes or festive sprinkles during the holidays for a seasonal, crowd-pleasing treat.
SERVING AND STORAGE
Serving
Serve warm with extra maple glaze or toppings of choice; best enjoyed fresh for the perfect crispy-chewy balance.
Storage
Store leftovers in an airtight container at room temperature for 1 day, or refrigerate for up to 3 days.

FAQ
Yes, you can prepare the dough and refrigerate it overnight. Let it come to room temperature before shaping and frying.
Yes, substitute an equal amount of instant yeast and skip the activation step—just mix it directly with the flour.
Technically yes, but baking won’t achieve the same crispy, fried texture. Frying is recommended for authentic results.
Beaver tails originated in Canada and are a popular street food known for their flat, oval shape and sweet toppings.
Use a kitchen thermometer. The ideal temperature is 350°F. If you don’t have one, test with a small piece of dough—it should sizzle.
Golden, crispy, and dripping with maple glaze—this maple beaver tails recipe delivers the ultimate sweet treat experience.
They’re a delightful twist on funnel cakes or doughnuts, with Canadian flair and a fun presentation.
The maple glaze soaks into every crevice, making each pastry deeply satisfying and rich in flavor.
Whether you're craving comfort food or impressing guests, maple beaver tails always deliver.

MAPLE BEAVER TAILS
Ingredients
- 2 ½ cups all-purpose flour
- 2 teaspoons instant yeast
- ¼ cup granulated sugar
- ½ teaspoon salt
- ¾ cup warm milk
- 2 tablespoons melted butter
- 1 large egg
- Oil for frying
- ½ cup granulated sugar for coating
- 1 teaspoon cinnamon
- Maple syrup for drizzling
Instructions
Make the Dough:
- In a bowl, mix flour, yeast, sugar, and salt. Add warm milk, butter, and egg. Mix until smooth and elastic. Let rise for 1 hour.
Shape:
- Divide the dough into 8 balls. Roll each into an oval, about ¼ inch thick, to resemble a beaver’s tail.
Fry:
- Heat oil in a deep pan. Fry each tail for 1–2 minutes per side until golden brown. Drain on paper towels.
Coat and Drizzle:
- Mix sugar and cinnamon in a shallow dish. Coat warm tails in cinnamon sugar, then drizzle with maple syrup.
Notes
- Tip: Serve warm for the best texture and flavour.
- Variation: Add chocolate drizzle, crushed nuts, or whipped cream for a decadent twist on this classic treat.





Comments
No Comments