
Growing up in Pakistan, arvi was one of those vegetables that showed up on the table without much fanfare — my mother would peel it, slice it, and have it ready in under 30 minutes on a weeknight when she didn't have the energy for anything elaborate. I didn't appreciate it enough back then. Now that I'm the one cooking for my own family, I completely understand why she kept coming back to it.
Arvi ki bhujia is a dry taro root curry made with just a handful of spices — kalonji (nigella seeds), methi dana (fenugreek seeds), chili flakes, and red chili powder. That's really it. The magic is in the technique: you bloom those seeds in hot oil first, and the fragrance that comes out of that pan is something else entirely. It makes a simple vegetable taste like it had a lot more work put into it than it actually did.
My husband asks for this at least twice a month, always with roti and a pile of sliced onions on the side with lemon squeezed over everything. My kids are less enthusiastic — taro is still a hard sell with them — but I make it anyway because I genuinely love it, and some recipes you cook for yourself. If you're looking for something vegetarian that actually fills you up and doesn't take all evening, this one is worth knowing. It also pairs nicely alongside a simple hummus party dip platter if you're doing a lighter spread.
One thing I want to set expectations on: arvi can be slippery to peel and it does require a bit of prep (salted cold water soak while you get everything else ready). It's not difficult, just different from peeling a potato. I'll walk you through it below so you don't run into the same confusion I had the first time I tried to cook it without my mother standing next to me.
Why You'll Love This Recipe
- Ready in about 20 minutes: Once the arvi is peeled and soaking, the actual cooking is genuinely fast. The whole thing goes from raw to done in roughly 20 minutes on the stove. On nights when I haven't planned dinner and I need something real on the table quickly, this is what I reach for.
- Completely vegetarian and vegan diet: There's no meat, no dairy, nothing animal-based at all. The oil, spices, and taro root are the whole dish. If you're cooking for someone who doesn't eat meat, this is a genuinely satisfying option — not a side dish masquerading as a main.
- The flavor comes from technique, not a long ingredient list: Most of the flavor in this dish comes from blooming the kalonji and methi dana seeds in hot oil before anything else goes in. That step takes maybe 90 seconds but it changes the whole dish. I skipped it once when I was in a rush and the bhujia tasted flat. Don't skip it.
- Pantry-friendly spices: If you cook Pakistani or Indian food even occasionally, you likely already have everything you need. Kalonji and methi dana are the only slightly unusual ones — both are available at Indian/Pakistani grocery stores, and increasingly at larger international sections in stores like Walmart or online. A small bag of each lasts for months.
- Naturally mildly sweet: Taro root has a flavor that's somewhere between a potato and a sweet potato — starchy but with a gentle sweetness underneath. It picks up the spices beautifully without being overpowered by them. If you've never eaten arvi before, this is a good first recipe because it lets the vegetable actually taste like itself.
Ingredients
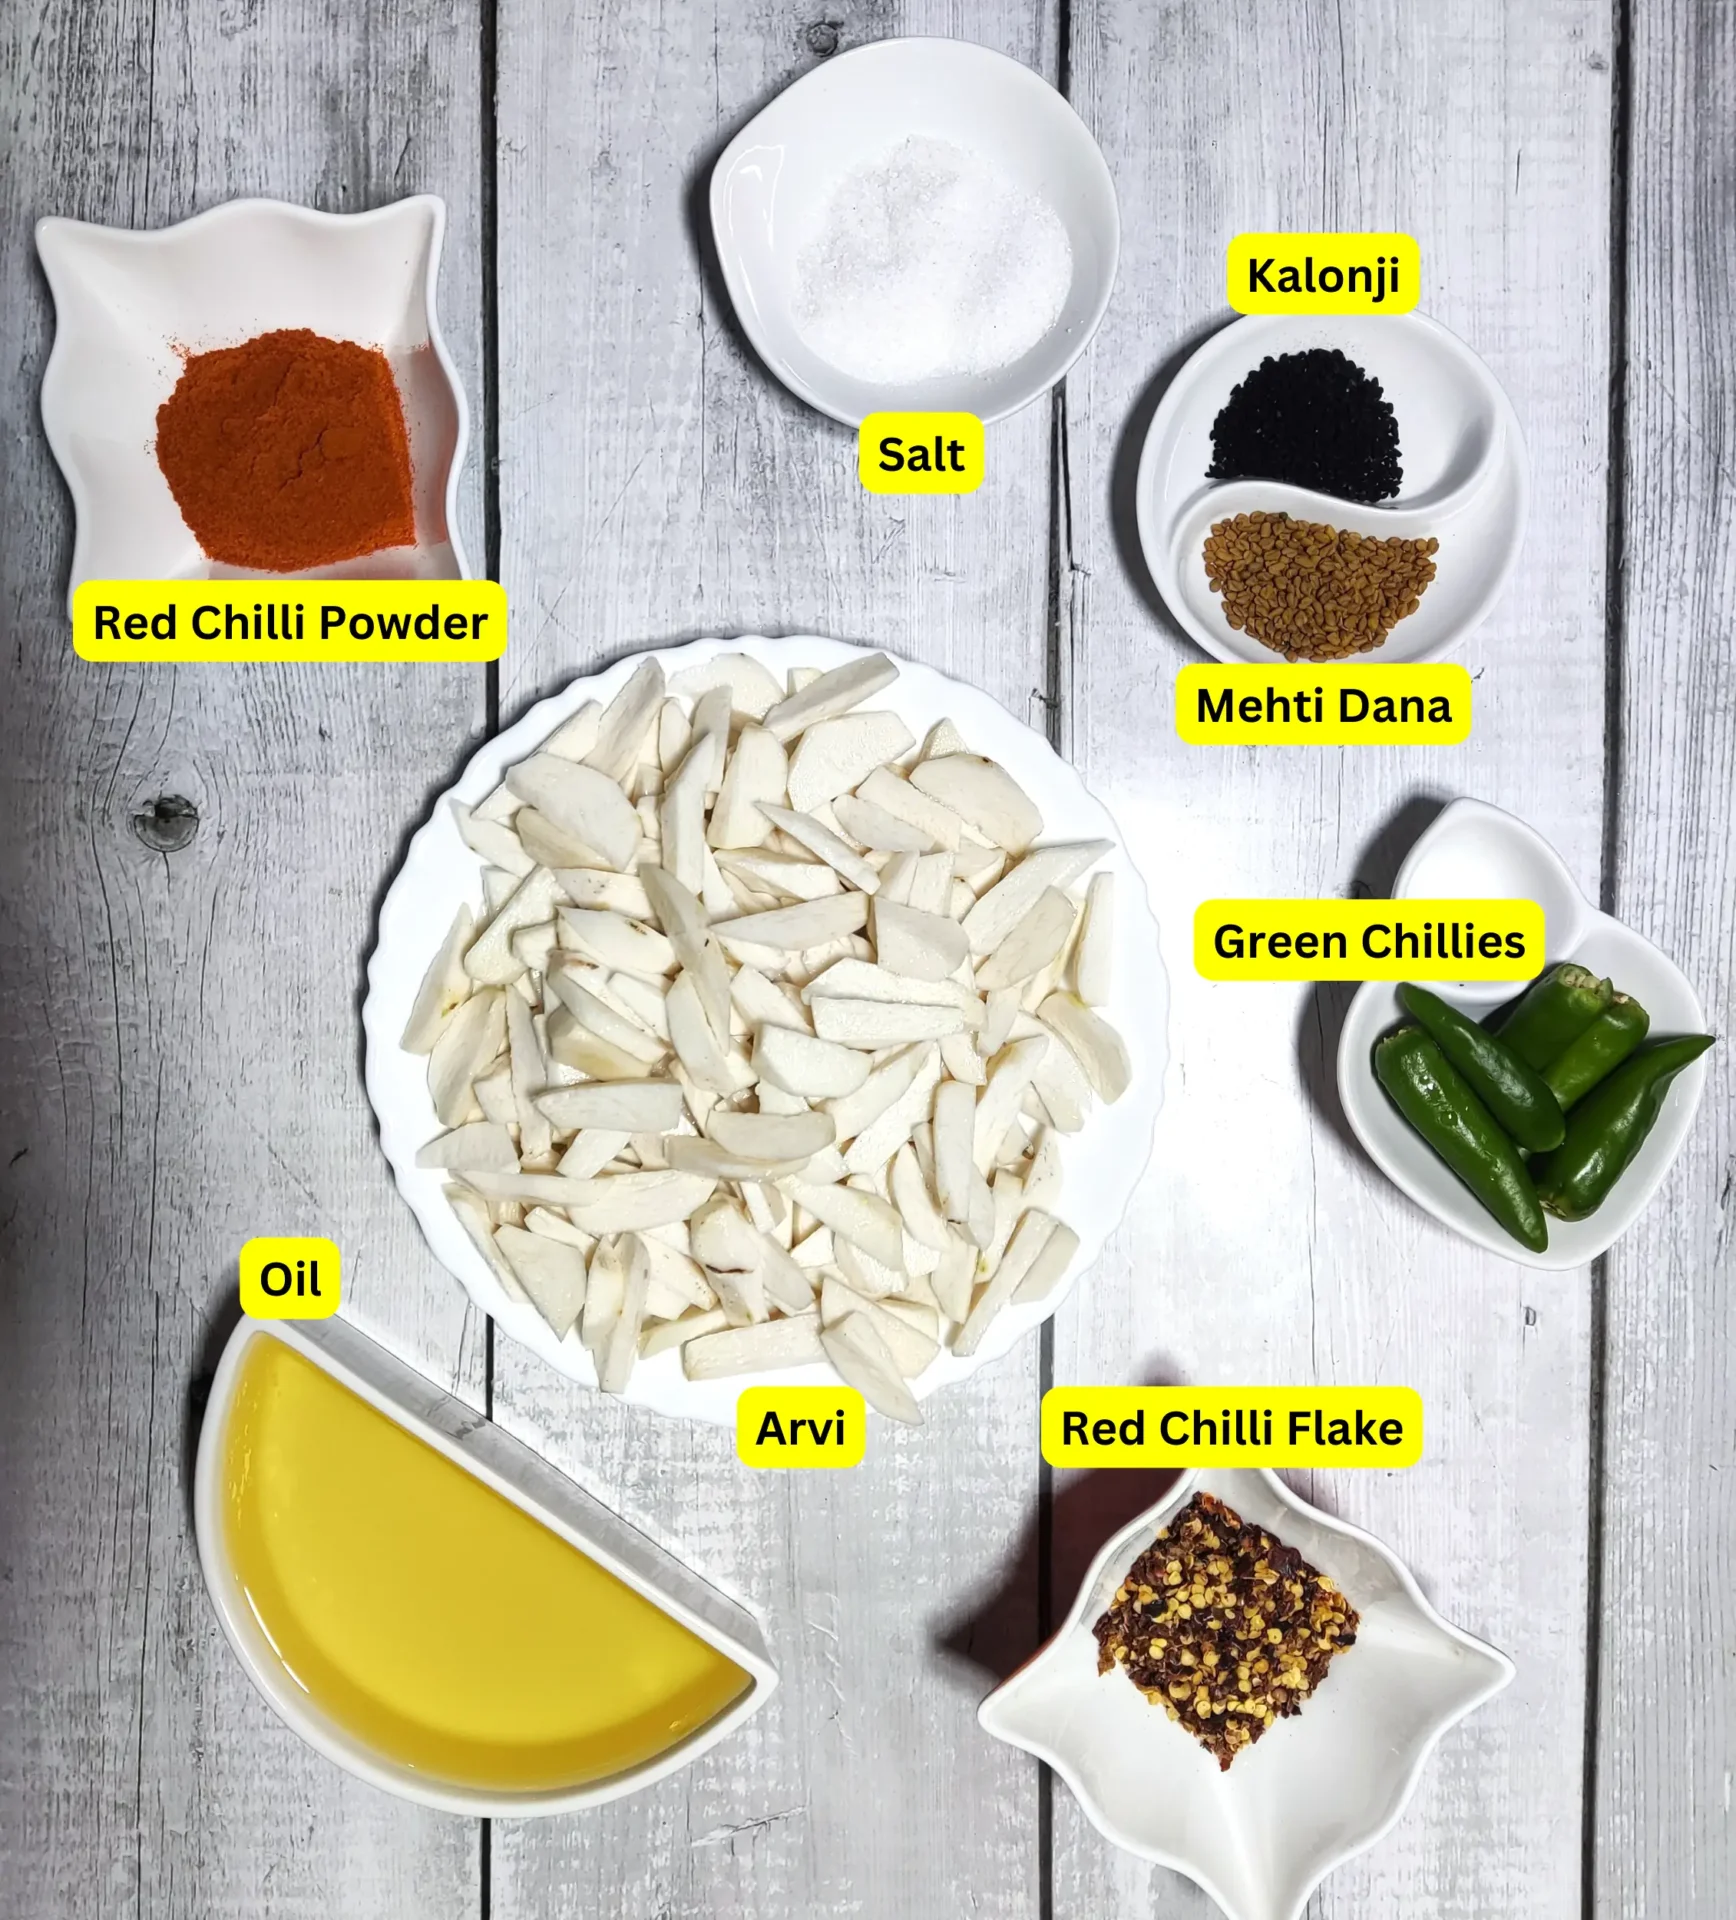
- ½ cup neutral oil (vegetable, canola, sunflower, or corn oil — anything without a strong flavor)
- 1 pinch kalonji (nigella seeds)
- 1 pinch methi dana (fenugreek seeds)
- ¼ teaspoon chili flakes
- 9 oz (250g) arvi / taro root, peeled and sliced into thin fingers
- Salt, to taste
- ¼ teaspoon red chili powder (add more or less to your heat preference)
- 2 green chilies, whole
Directions
- Peel and soak the arvi: Peel the taro root using a knife or peeler — don't worry about getting every last bit of skin, a few missed spots won't hurt. Slice it into thin finger-sized pieces. Place in a bowl of cold salted water and leave it there until you're ready to cook. This prevents it from going slimy and keeps it fresh. A note: arvi can cause itching on bare skin for some people — rub a little cooking oil on your hands before you start peeling.
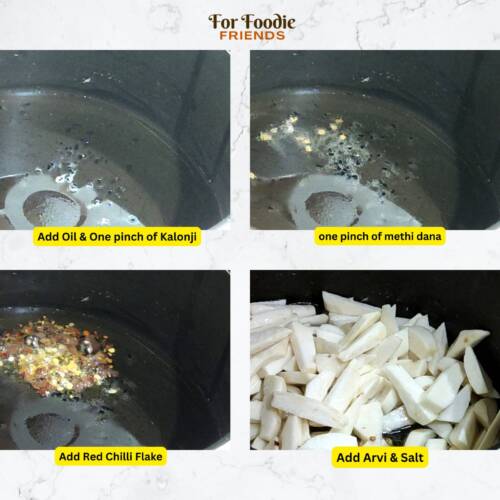
- Heat the oil and bloom the seeds: Pour the oil into a large, heavy skillet or pan over medium-high heat. Once the oil is hot and shimmering, add the kalonji (nigella seeds). Let them sizzle for about 30 seconds until you can smell their fragrance — it's a slightly peppery, onion-y smell. This step releases the flavor of the seeds into the oil, which is what carries through the whole dish.
- Add the fenugreek seeds: Once the kalonji is fragrant, add the pinch of methi dana (fenugreek seeds) and let those sizzle too for about 30 seconds. They'll darken slightly — that's fine. What you don't want is for them to burn and go black, so keep the heat steady and don't walk away.
- Add the chili flakes: Stir in the chili flakes and mix quickly. They'll go in the hot oil for just a few seconds before the arvi goes in — this is enough to toast them slightly without burning.
- Add the arvi and salt: Drain the arvi and add it to the pan. Sauté it with the spiced oil for about a minute, turning it to coat everything. Add salt to taste at this stage.
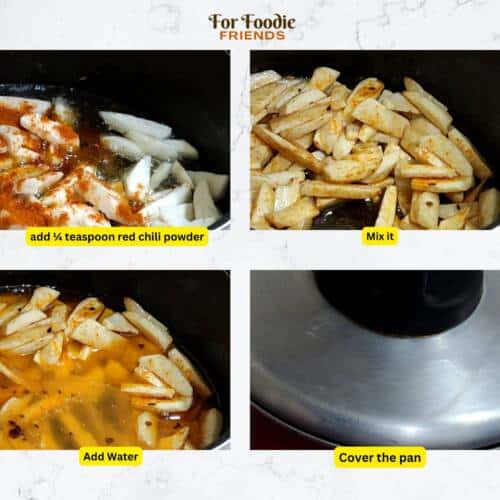
- Add the red chili powder: Sprinkle in the red chili powder and mix well so every piece of arvi is coated with the spices.
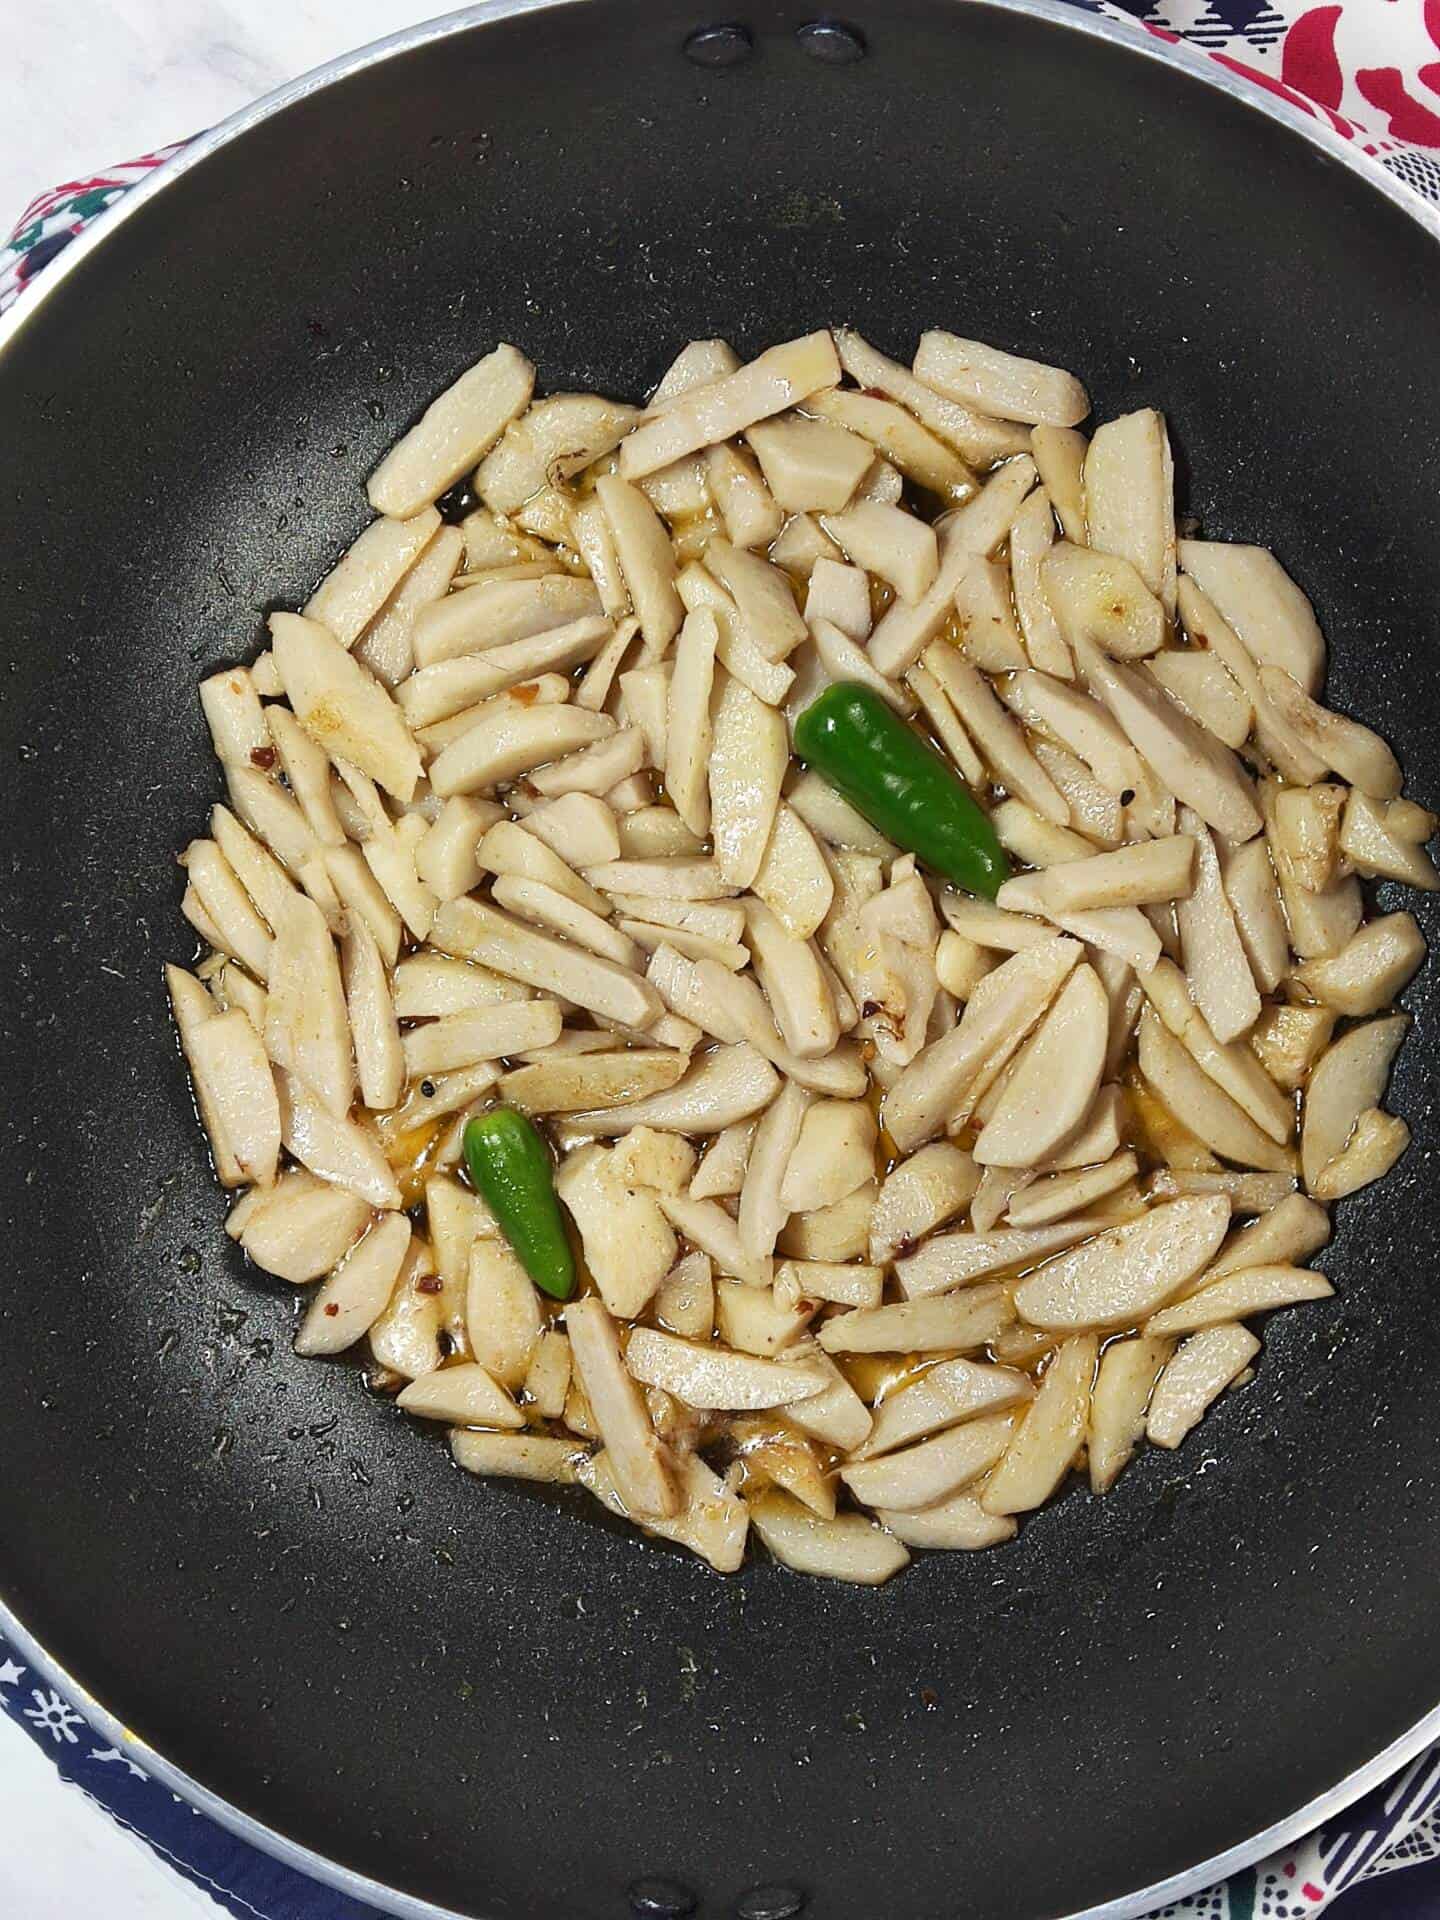
- Add water and cover: Pour in approximately ¾ cup (180ml) of water — enough to just cover the arvi. Put the lid on and cook on medium-low for 15–20 minutes. Check it once or twice to make sure it's not drying out too fast; if it is, add a splash more water.
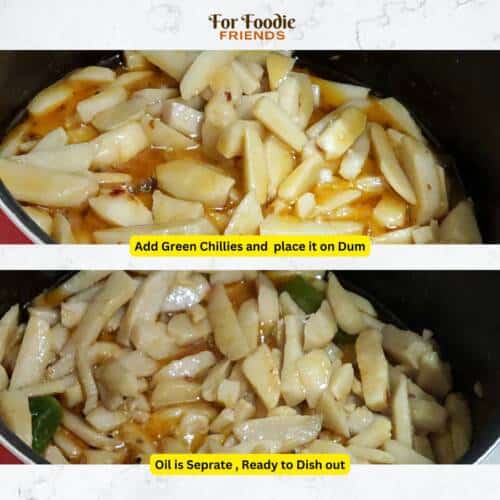
- Add the green chilies and reduce: After 15–20 minutes, lift the lid and add the whole green chilies on top. Cover again and let everything cook until the water is nearly gone. When the water level is very low, turn the heat down to its lowest setting and let it sit on dum (covered, minimal heat) for another 5–7 minutes.
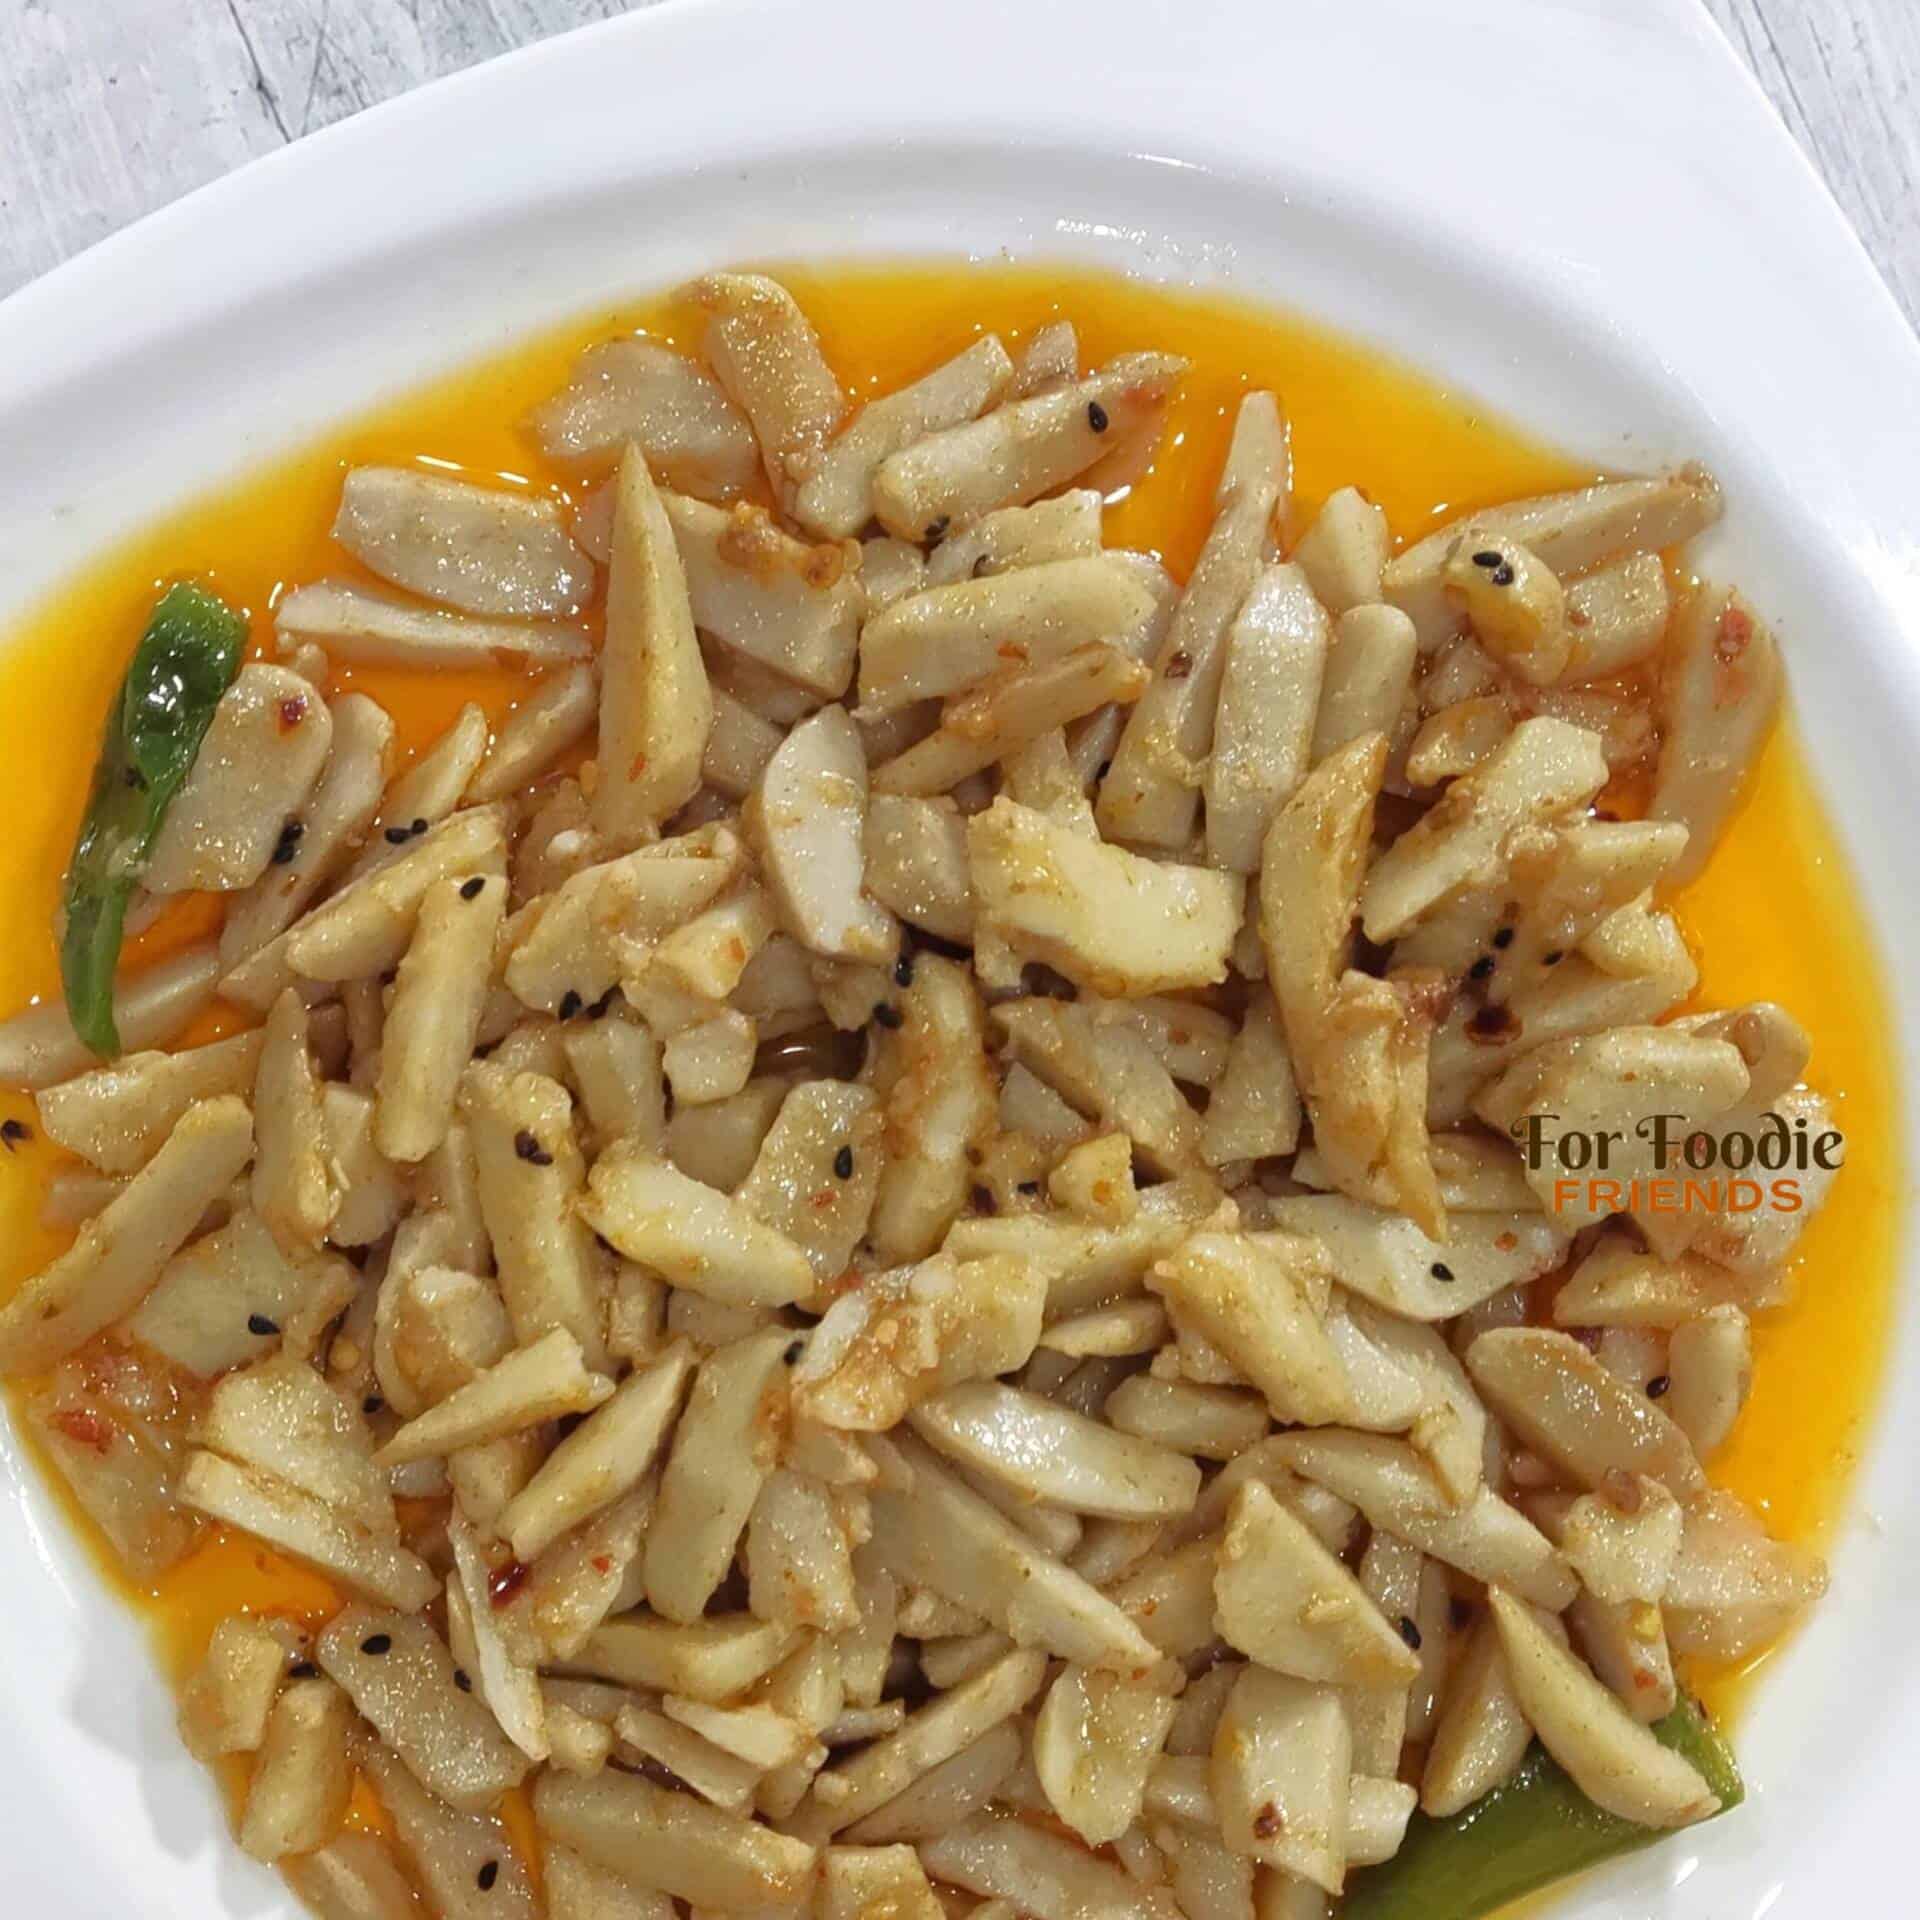
- Check for doneness: You'll know it's ready when the oil separates and becomes visible around the edges of the pan, and the arvi is completely soft when you press it with a spoon. If it still feels firm in the center, add a few tablespoons of water and give it another 5 minutes covered.
Tips for Success
- Oil your hands before peeling: The first time I peeled arvi without oiling my hands, my palms itched for hours afterward. Taro root has a natural compound in its skin that irritates some people's skin. A thin coat of cooking oil on your hands before you start is all it takes to prevent it — I use whatever's already sitting next to the stove.
- Soak in salted cold water immediately after peeling: Arvi turns dark and can go slimy fast once peeled. Dropping the pieces straight into a bowl of cold salted water while you prep everything else prevents both problems. I usually have the bowl ready before I start peeling so there's no gap between peeling and soaking.
- Don't rush the seed-blooming step: Those 60–90 seconds you spend letting the kalonji and methi dana sizzle in the hot oil are doing most of the flavor work in this dish. I learned this the hard way when I once added everything at once in a hurry and got a flat, dull-tasting bhujia. Bloom the seeds in sequence — kalonji first, then fenugreek — and take your time.
- Choose smaller arvi when possible: Smaller taro roots have a better, more concentrated flavor than the large ones. They're a little harder to peel because of the irregular shape, but the taste difference is noticeable. If you're at an Asian or South Asian grocery store, look for the ones with brown, hair-like texture on the skin — that's a sign they haven't been over-processed.
- Finish with lemon juice: This isn't in the recipe itself but it's something my mother always did — a squeeze of fresh lemon right before serving lifts the whole dish. The acidity cuts through the oil and brightens all the spices. My husband insists on this and I've stopped arguing with him about it because he's right.
Variations
- Add tomatoes for a saucier version: Some households in Pakistan make arvi ki bhujia with chopped tomatoes added after the spices, which creates more of a gravy. I prefer the dry version my mother made, but if you like something saucier to eat with rice, dice one medium tomato and add it after the chili powder. Let it cook down for a few minutes before adding the water.
- Add amchur (dried mango powder) for a tangy note: A pinch of amchur stirred in near the end adds a sour, fruity depth that works really well with taro. If you don't have amchur, a small squeeze of tamarind paste diluted in a tablespoon of water does the same job. Either way, that little bit of acidity makes the dish taste more complex without any extra work.
- Make it with meat: If you want arvi in a meatier context, the combination of taro root with goat or lamb in a slow-cooked gravy is something else entirely. That's a different recipe with a longer cook time, but if you love this bhujia, it's worth exploring.
- Extra heat: My husband always asks me to double the chili flakes and add an extra green chili. If you want real heat, add ½ teaspoon chili flakes instead of ¼ and slice the green chilies lengthwise rather than leaving them whole — sliced chilies release a lot more heat into the curry. I keep them whole so the kids can see them and move them aside.
- No kalonji or methi dana? These seeds are worth finding if you can — check the international aisle at a larger Walmart, any South Asian grocery, or order online. But if you genuinely can't get them, you can still make this dish with just chili flakes and red chili powder. It won't have the same depth, but it'll still taste good. This is my less-authentic workaround version and I won't pretend otherwise.
Serving and Storage
Serving
In Pakistan this is almost always served with fresh roti or chapati, and that's still my first choice. The dry curry clings to the bread in a way that works really well. My husband also loves it with plain boiled basmati rice when he wants something more filling. If you want to serve it the way my mother used to, set out a simple salad of chopped onion, cucumber, and tomato with lemon juice and salt on the side — that fresh crunch alongside the warm spiced taro is genuinely one of my favorite combinations. Thin sliced raw onion with a heavy squeeze of lemon is the other classic accompaniment.
Storage
Leftovers keep in an airtight container in the fridge for up to 3 days. The texture of the arvi changes slightly as it sits — it gets a little softer — but the flavor actually deepens, which I don't mind. Reheat in a small pan on low with the lid on, or microwave covered for 1–2 minutes. I wouldn't try to freeze this one; taro root doesn't hold up well after freezing food safely and thawing, the texture goes mushy.
Frequently Asked Questions
Where can I find taro root (arvi) if I don't have a South Asian grocery store nearby?
Taro root shows up in a lot of places depending on where you live. In the US and UK, check the produce section of larger grocery stores — it's also common in Caribbean, African, and Asian grocery stores since it's a staple across all those cuisines. Walmart and some Kroger locations carry it, and if you're in a city with a large Caribbean or West African community, their grocers almost certainly stock it year-round. If you truly can't find it, this recipe unfortunately doesn't have a great substitute — arvi's texture is quite specific. Worth hunting for though.
Why does taro root make my hands itch when I peel it?
Raw taro root contains calcium oxalate crystals in the skin that cause irritation on contact with bare skin for a lot of people. It's completely normal and nothing to worry about — it just means you need to take precautions. Rub cooking oil on your hands before peeling (the oil creates a barrier), or wear disposable gloves. Cooking destroys the crystals entirely, so once the arvi is cooked it's completely fine to eat.
Can I make arvi ki bhujia ahead of time?
Yes, and honestly it's one of those dishes that tastes even better the next day. I'll sometimes make it in the afternoon and let it sit until dinner — the spices settle and the flavors come together more. If making it ahead, slightly undercook the arvi so it doesn't go too soft when you reheat it. Store covered in the fridge and reheat on low heat with the lid on.
What can I substitute for kalonji (nigella seeds) and methi dana (fenugreek seeds)?
There's no perfect substitute for either, but if you can't find kalonji, a tiny pinch of cumin seeds will give you a different but still aromatic base. For methi dana, you can skip it entirely rather than substitute — its bitterness is a background note and the dish will still work without it. I'd really encourage looking for both online or at any South Asian or Middle Eastern grocery; a small bag of each costs very little and lasts a long time.
Is arvi ki bhujia very spicy?
At the quantities listed, it has a gentle warmth — noticeable but not overwhelming. The green chilies left whole add fragrance more than heat (as long as you don't bite into them). If you want it milder, reduce the chili flakes to a small pinch and use Kashmiri chili powder instead of regular red chili powder — Kashmiri chili gives you color and mild warmth without much bite. If you want it hotter, double the flakes and slice the green chilies open.
Arvi ki Bhujia Recipe
Equipment
- Large Pot or Pan: You’ll need a large, heavy-bottomed pot or pan to cook the Arvi.
- Lid: A lid to cover the pot while cooking.
- Knife and Cutting Board: To cut the Arvi. Here’s our pick for the best knives on the market!
- Measuring Cups and Spoons: For accurately measuring all ingredients.
- Sturdy Spoon or Spatula: To stir and mix the Arvi while cooking.
- A Large Container or dish: To soak the Arvi before cooking, you need a large container or dish.
Ingredients
- Oil half cup: You can use any neutral oil such as, vegetable, corn, sunflower, or canola. The neutral oil doesn’t mask the flavor of the Arvi.
- One pinch of kalonji or Nigella seeds: Kalonji holds many health benefits. it contains many antioxidants, which help fight cancer, it is also anti-inflammatory, so it can help fight joint pains. It is a powerhouse of amino acids, iron, calcium, and many other minerals and salts. it can become a very healthy addition to your diet. It is used as a spice in many parts of Asia and adds a unique nutty flavor to any dish.
- One pinch of methi dana or Fenugreek seeds: Methi dana is another very healthy ingredient used in this dish. It is packed full of Vitamins A, C, and D. It also has a good amount of iron. Methi dana can also aid in weight loss.
- ¼ teaspoon chili flakes: This recipe uses both chili flakes and red chili powder to add extra heat.
- Arvi 250 gram: You can’t make arvi ki bhujia without arvi! Arvi takes center stage in this recipe so make sure you choose fresh Arvi, which is not too big. The smaller-sized Arvi is a little harder to peel, but it gives the best taste to this curry. Peel and slice the Arvi thinly, into fingers.
- Salt to taste.
- ¼ teaspoon red chili powder: The main spice in this dish is red chili powder. it is a staple in all Asian recipes.
- 2 pieces green chili: To top the Arvi with. Green chili adds a wonderful aroma to any dish.
Instructions
- In a large pan add oil, and let it heat up. once the oil is hot and add one pinch of kalonji, or Nigella seeds. Let these sizzle and pop.
- Once you can smell the kalonji’s fragrance, add one pinch of methi dana, or fenugreek seeds. Allow these to sizzle too.
- Next, add ¼ teaspoon chili flakes and mix well.
- Now, add the Arvi 250, and saute it with the spices for a minute. Add salt as per your taste.

- Next, add ¼ teaspoon red chili powder. You can add more or less, according to your taste.
- Mix all the ingredients well.
- Now add enough water to cover the Arvi, approximately ¾ cup.
- Cover the pan and let it cook on medium-low flame, for approximately 15-20 minutes.
- After about 15- 20 minutes remove the lid and add the green chili. Cover again and let it cook. Keep checking the level of the water that remains. When it is almost reduced down, place it on dum, by placing the lid on and turning the flame down to a minimum.
- After about 5-7 minutes almost all the water should have, and oil should be visible around the sides of the pan.
- Check the Arvi to ensure it is fully cooked. Arvi ki bhujia is ready to be served!
Video




Comments
No Comments