
Saad asked for nachos four Fridays in a row, and by the third one I finally stopped winging it and wrote down exactly what I was doing. That's how this recipe was born — not from some grand plan, but from a kid who knew what he wanted and a mom who got tired of guessing.
What makes these work is pretty simple: warm chili goes on before baking, fresh toppings go on after. I know that sounds obvious, but the first time I made nachos I piled everything on at once — jalapeños, sour cream, green onions, the works — and then baked it all into a sad, soggy mess. The chips went soft, the sour cream curdled, and nobody was happy. Now I keep the two phases separate and they come out right every time.
These are a Friday night staple at our house. My husband likes extra jalapeños, Saad wants the cheesiest corner pieces, and my daughter Zainab usually picks the chips out and leaves the toppings — kids are something else. I make a big sheet pan and it disappears before anyone sits down properly. If you're making these for more than four people, I'd do two pans rather than trying to pile more onto one.
One thing to know going in: nachos don't wait for you. Once they come out of the oven, you have maybe five minutes before the chips start going soft under the heat of the chili. So have your toppings prepped and your people ready. This isn't a dish you assemble and then walk away from. If you're looking for something you can set out earlier, this blue cheese dip is a great make-ahead option to put out while the nachos bake.

Why You'll Love This Recipe
- It comes together in 30 minutes: From cold ingredients to a hot pan on the table, this takes about half an hour — and most of that is just waiting for the oven. I do the chili warming and topping prep while the oven preheats, so nothing feels rushed. On chaotic evenings this is the recipe I reach for first.
- One pan, minimal cleanup: Everything bakes on a single sheet pan lined with foil if I'm being smart about it. I'm not washing five dishes after Friday night nachos — that defeats the whole point. Line your pan and cleanup is genuinely five minutes.
- You can customize every tray: My husband's tray gets chipotle hot sauce stirred into the chili. Saad's gets extra cheese and nothing spicy. I make one big pan and just section off the toppings. It's the kind of recipe that works for a table with completely different preferences — which is every dinner in my house.
- Canned chili works perfectly here: I'm not making homemade chili on a Friday night. A good canned chili — I usually grab Hormel or whatever's at Walmart — does exactly what you need it to do. Warm it, season it a little if you want, spoon it on. Done.
- Kids and adults both go for it: I've made these for a table of adults watching a game and for a table of eight-year-olds at a birthday. Both times the pan was empty in under ten minutes. It's the kind of food that doesn't need explaining — people just grab.
Ingredients
- 4 cups tortilla chips (sturdy restaurant-style chips hold up best — I like Mission or Tostitos Cantina)
- 1 cup cooked chili, beef or vegetarian (canned works great — warm it before using)
- 1½ cups shredded cheddar cheese (block cheese you shred yourself melts better than pre-shredded)
- ½ cup shredded Monterey Jack cheese (optional but adds a creamier melt)
- ¼ cup sliced jalapeños (fresh or pickled, your call)
- ¼ cup sliced black olives (optional)
- ¼ cup sour cream
- 2 tablespoons salsa
- 2 tablespoons chopped green onions
Directions
- Step 1: Preheat and prep — Set your oven to 375°F (190°C) and line a large baking sheet with foil. While the oven heats up, chop your green onions, slice your jalapeños if using fresh, and get your sour cream and salsa into small bowls. Having everything ready before the nachos come out is what keeps them from going soggy while you're scrambling around.
- Step 2: Warm the chili — Pour your chili into a small saucepan over medium heat, stirring every minute or two until it's fully hot. Warm chili is important here — cold chili dropped on chips takes longer to heat in the oven, which means the chips overcook trying to catch up. If the chili looks greasy, tip the pan slightly and spoon off the excess fat before using it.
- Step 3: Layer the chips — Spread your tortilla chips across the baking sheet in an even single-ish layer. Don't pile them too deep — you want most chips to actually touch a topping, not just act as padding. If you're making this for a crowd, use two sheet pans instead of cramming one.
- Step 4: Add chili and cheese — Spoon the warm chili over the chips as evenly as you can. Then scatter both cheeses on top, making sure the coverage is generous. Don't just dump it all in one spot — take an extra thirty seconds to spread it out so every section of the pan gets some cheese.
- Step 5: Bake — Slide the pan into your preheated oven and bake for 10 to 12 minutes, until the cheese is fully melted and you can see bubbling around the edges. Don't walk away and forget about it — at 12 minutes the cheese is golden and perfect, but at 15 it starts to get greasy and the chips around the edges burn.
- Step 6: Add fresh toppings and serve immediately — Pull the pan out and right away add your jalapeños, olives, and green onions. Dollop sour cream and salsa around the pan. Serve directly from the sheet pan — no plating needed. Eat them while they're hot.

Tips for Success
- Shred the cheese yourself: Pre-shredded cheese has a coating on it that stops it from clumping in the bag — but that same coating also makes it melt less smoothly. I learned this after making a batch where the cheese just sat on top in dry little clumps instead of getting gooey and melted. A block of cheddar and five minutes of shredding makes a noticeable difference.
- Don't overload the chips: More toppings sounds better until your chips collapse under the weight and you end up with a pile of mush. I use one cup of chili for four cups of chips and that ratio keeps things balanced. If you add more chili, the chips at the bottom get soggy fast.
- Drain excess fat from the chili: Depending on your brand or your homemade recipe, beef chili can be pretty fatty. If you tip the pan and see a puddle of orange grease, skim it off before spooning onto the chips. Greasy chips lose their crunch instantly in the oven and the whole tray ends up slick and heavy.
- Fresh toppings go on after baking, always: Sour cream melts and separates in the oven. Green onions go limp and slightly bitter. Jalapeños lose their brightness. I always bake plain — just chips, chili, and cheese — then add everything fresh the moment the pan comes out. It takes thirty extra seconds and makes a big difference in how the finished nachos look and taste.
- Use restaurant-style chips, not thin ones: Thin chips — the delicate kind you'd eat with guacamole — dissolve in the oven under the weight of the chili. You want thick, sturdy tortilla chips. Mission Rounds or Tostitos Cantina-style are what I reach for. They hold their shape through baking and can actually support a scoop of toppings without snapping.
Variations
- Vegetarian version: Swap the beef chili for a black bean or lentil chili and these are fully vegetarian. I've made this version when we have guests who don't eat meat and nobody notices the difference — the cheese and toppings do most of the heavy lifting flavor-wise. Amy's Black Bean Chili from Trader Joe's or Whole Foods works great straight from the can.
- Chicken nachos: Use shredded rotisserie chicken tossed with a few spoonfuls of enchilada sauce in place of the chili. It's lighter than beef chili but still has enough moisture and flavor to hold the nachos together. My husband prefers this version actually — he thinks it's cleaner-tasting, which is fair. Pairs really well alongside something like these barbecue chicken street corn tacos if you're doing a full spread.
- Spicy chipotle version: Stir one or two chipotle peppers in adobo sauce into your chili while it warms. It adds a deep smoky heat that's different from just adding fresh jalapeños. This is the version I make for adults-only nacho nights — not appropriate for the kids' section of the pan.
- Loaded Tex-Mex: Add a handful of drained black beans and a handful of frozen corn (thawed) scattered over the chips before baking. After baking, top with pico de gallo and diced avocado instead of salsa. It's a more substantial tray and honestly closer to what you'd get at a Tex-Mex restaurant. This isn't an authentic Mexican dish — it's an American take on Tex-Mex, and I'm not claiming otherwise.
- Three-cheese blend: Mix cheddar, Monterey Jack, and a small amount of mozzarella for an especially gooey melt. The mozzarella adds stretch that cheddar alone doesn't have. I sometimes do this when I'm making nachos for Saad specifically — the cheese pull factor is very important to him.
Serving and Storage
Serving
Serve these straight from the sheet pan the moment they come out of the oven — hot, cheesy, and with all the fresh toppings just added. Set out small bowls of extra sour cream and salsa on the side so people can add more as they go. I usually put the pan in the center of the table and let everyone grab from wherever they want. For a bigger spread, these go well next to a simple green salad or alongside a bowl of guacamole and extra chips. If you're hosting and want something to snack on while the nachos bake, this blue cheese dip is a good sidekick.
Storage
Honestly, nachos don't store well — the chips go soft within an hour and there's no recovering them. If you have leftover chili and cheese but haven't baked them yet, store those separately in the fridge and assemble fresh the next day. Leftover baked nachos can technically go in the fridge in an airtight container, but I'd only use them as a topping on scrambled eggs the next morning — don't expect them to taste like nachos again. The chili alone keeps in the fridge for up to 3 days or freezes well for up to a month.

Frequently Asked Questions
Can I make chili cheese nachos ahead of time?
The chili can be made or warmed up to a day ahead and kept in the fridge. But assemble and bake the nachos right before you're ready to eat — once the chips go on the pan they need to go straight into the oven. If you layer them and let them sit, the chips at the bottom start absorbing moisture from the chili and go soft before they even hit the heat.
What cheese melts best on nachos?
Cheddar and Monterey Jack are my go-to combination. Cheddar gives you that sharp, classic nacho flavor and Monterey Jack melts incredibly smoothly and adds creaminess. Shred both from a block rather than using pre-shredded bags — the anti-caking coating on packaged shredded cheese really does affect how it melts.
How do I stop nachos from going soggy?
Three things: use sturdy chips, warm your chili before spooning it on (so the bake time stays short), and don't overload the tray. Also drain any excess fat from beef chili before using it — fatty chili is a big soggy-chip culprit. And keep wet toppings like sour cream and salsa off the pan until after baking.
Can I make these nachos in the microwave?
You can, and I've done it when I just needed something fast for one person. Spread chips on a microwave-safe plate, add chili and cheese, and microwave in 30-second bursts until the cheese melts. The result is fine, but the chips go soft almost immediately and the cheese doesn't get that slightly golden, bubbly texture from the oven. For a full pan serving multiple people, the oven is worth it.
Can I use homemade chili instead of canned?
Absolutely — homemade chili works even better here because you control the seasoning and fat content. Just make sure it's not too watery; a thicker chili sits on the chips without soaking through. If your chili is on the thinner side, simmer it uncovered for a few extra minutes before using it so it reduces a bit.
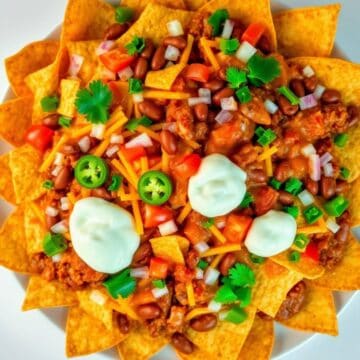
CHILI CHEESE NACHOS
Ingredients
Nacho Ingredients
- 4 cups tortilla chips store-bought or homemade
- 1 cup chili cooked, beef or vegetarian
- 1 ½ cups shredded cheddar cheese
- ¼ cup sour cream optional
- ¼ cup jalapeños sliced, optional
- 2 tablespoons chopped green onions optional
- 2 tablespoons salsa optional
Instructions
Assemble Nachos
- Preheat oven to 375°F (190°C). Spread tortilla chips evenly on a baking sheet or oven-safe dish.
- Spoon cooked chili evenly over chips. Sprinkle shredded cheddar cheese on top.
Bake and Serve
- Bake for 10–12 minutes until cheese is melted and bubbly.
- Remove from oven. Top with sour cream, jalapeños, green onions, and salsa as desired. Serve immediately.
Notes
- Make Ahead: Chili can be prepared a day in advance. Assemble just before baking.
- Variations: Add beans, corn, or different cheeses for extra flavor.
- Serving Suggestions: Serve with guacamole or extra salsa on the side.
Friday nights at our house have a pattern now, and nachos are a big part of it. I like that this recipe requires almost no thought once you know the basic steps — warm the chili, spread the chips, add the cheese, bake, then finish with the fresh stuff. It's not complicated and it doesn't need to be. Some of the best food is like that.
If you're making these for a group, my honest advice is to do two smaller pans instead of one massive overloaded one. Every chip gets better coverage, the bake is more even, and nothing goes soggy in the middle where the chili piles up. I made the mistake of cramming too much onto one pan the first time I made these for a big group and the center was mush while the edges were fine. Two pans fixed that completely.
If you're planning a full spread around these, the barbecue chicken street corn tacos make a great pairing — same casual vibe, different textures, and the whole meal comes together in under an hour. And if you need a sweet finish after all that cheese and chili, I've been making these soft and chewy sugar cookies lately that are genuinely hard to stop eating.
Make these once on a Friday night and see how fast they disappear. That's really all I can tell you. 🧀🔥
If you liked this recipe, you might want to check these out too:
- Barbecue Chicken Street Corn Tacos (Ready in 30 Minutes)
- Blue Cheese Dip
- Soft Chewy Sugar Cookies with Crispy Edges
- Chocolate Peppermint Cookie Cups
- Chicken Piccata



Comments
No Comments