
I made BBQ baby back ribs for the first time about four years ago and I genuinely did not know what I was walking into. I thought ribs were just ribs — season them, throw them in the oven, pull them out. Then I dragged out a slab of chewy, dry, tough meat and had to explain to my family why dinner looked so defeated. That failure was the best thing that could have happened, because it made me actually figure out what I was doing wrong.
The thing that changed everything was the foil. Covering the ribs tightly and baking them low and slow at 300°F for a full 2 to 2½ hours is what gets you that tender, pull-apart texture without a smoker. I don't have a smoker. I have a regular oven, a sheet pan, and foil from Walmart — and these ribs come out right every single time. The broil at the end is where you get the sticky, caramelized glaze, and it only takes about 4 minutes so you cannot walk away from the oven.
My husband loses his mind over these. He'll eat whatever I make without complaint, but ribs are one of the rare things where he'll actually say something out loud about how good they are. Saad, who has been in a phase for approximately forever where he claims to only like chicken, ate an entire rack last time without a word. I served these alongside a big Caesar salad and some cornbread and nobody left the table hungry.
One thing to set expectations on: this is not a fast dinner. The active work is maybe 15 minutes, but the ribs need their time in the oven — 2 hours minimum. If I know I'm making these on a Friday night, I season them Thursday evening and let the dry rub sit overnight. The difference in flavor is real and noticeable, and it means almost nothing to prep the night before.

Why You'll Love This Recipe
- No smoker required: A lot of rib recipes assume you have a grill or a smoker sitting in the backyard, and most of us just don't. This whole recipe works start to finish in your regular oven. The foil does the heavy lifting on tenderness and the broiler handles the caramelized finish. I've made these in the middle of a Pakistani winter with no outdoor access whatsoever and they come out the same way every time.
- The dry rub uses pantry staples: Brown sugar, paprika, garlic powder, onion powder, chili powder, salt, and pepper. That's it. Nothing you have to hunt down at a specialty store. Most of this is already sitting in your cabinet. The brown sugar caramelizes during the long bake and again under the broiler, which is what gives the outside that deep color and crunch.
- Make-ahead friendly: Season the ribs the night before and you've cut almost all the hands-on work out of the next day. The ribs go in the fridge covered, and when I'm ready to cook them I pull them out, let them sit at room temperature for 20 minutes, and slide them straight into the oven. The flavor is noticeably better when they've had overnight time with the rub.
- Any BBQ sauce works: I am not precious about the sauce here. I've used the cheap store-brand bottle, Sweet Baby Ray's, a spicy Kansas City style, and a honey version I stirred together myself. They all work. The dry rub underneath is where most of the flavor lives — the sauce on top is finishing work, not the foundation.
- The leftovers reheat well: My husband reheats them in a low oven with extra BBQ sauce brushed on top and they come back to life properly. Zainab eats them cold straight from the fridge, which I used to find odd but honestly I've tried it and she's not wrong. Either way, they keep well for 3 days and they don't dry out if you reheat them with foil on.
Ingredients
- 2 racks baby back ribs
- 2 tablespoons olive oil
- 2 tablespoons brown sugar
- 1 tablespoon paprika (smoked paprika if you have it)
- 1 teaspoon garlic powder
- 1 teaspoon onion powder
- 1 teaspoon chili powder
- 1 teaspoon salt
- ½ teaspoon black pepper
- 1½ cups BBQ sauce (any kind — Sweet Baby Ray's works well, so does store brand)
Directions
- Preheat the oven: Set your oven to 300°F (150°C) and line a large baking sheet with foil. The foil lining isn't just for easy cleanup — it helps hold heat around the bottom of the ribs and makes the tight wrap easier to seal later.
- Remove the membrane: Flip the ribs bone-side up and find the thin silvery membrane stretched across the back. Slide a butter knife under one edge to get it started, then grab it with a dry paper towel for grip and pull it off in one piece if you can. This step genuinely matters — leaving the membrane on keeps your rub from penetrating the meat and turns that layer rubbery after cooking.
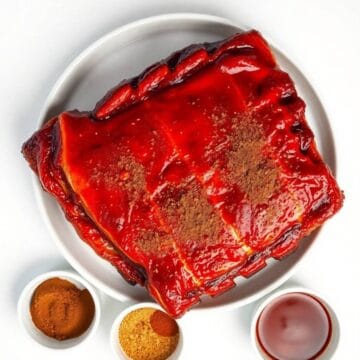
- Season the ribs: Pat the ribs dry with paper towels, then brush lightly with olive oil on both sides. Mix the brown sugar, paprika, garlic powder, onion powder, chili powder, salt, and pepper together in a small bowl, then rub it all over both sides. Press it in firmly — don't just dust the surface.
- Wrap and bake: Lay the seasoned ribs on your foil-lined sheet, then cover them completely and tightly with another sheet of foil. Seal the edges well — any gaps let steam escape and that steam is what keeps the meat moist. Bake for 2 to 2½ hours. You want to see the meat pulling away from the bones slightly at the ends before you move on. If it's not there yet, give it another 20 minutes.
- Add the BBQ sauce: Pull off the top foil and brush a generous layer of BBQ sauce over the top and sides of the ribs. Get the edges too — the sauce on the sides is what gives you those caramelized bits around the rim.
- Broil to finish: Switch your oven to broil on high and slide the ribs back in, uncovered, for 3 to 5 minutes. Stay at the oven. The sugars in the sauce go from beautifully caramelized to burnt in under a minute if your broiler runs hot. Check at 3 minutes. You want bubbling, sticky, slightly darkened — not black.
- Rest and slice: Let the ribs sit for 5 minutes before you cut them. Slice between the bones and serve with extra BBQ sauce on the side.

Tips for Success
- Don't skip removing the membrane: My first few batches of ribs were disappointing and I couldn't figure out why until I actually looked it up. I was leaving the membrane on every time. It acts as a barrier that keeps your rub from flavoring the meat underneath, and it turns into a tough, plasticky layer after cooking that's unpleasant to eat through. Spend the 90 seconds to take it off — it makes a bigger difference than any spice you add.
- Seal the foil completely: When you cover the ribs for baking, make the seal tight around all four edges of the pan. Any gaps let steam escape, and that steam is doing most of the tenderizing work during those two hours. I sometimes use two overlapping sheets of foil to make sure there are no holes. It makes a real difference in how much moisture stays in the meat.
- Season ahead if you have time: Even 4 hours of the dry rub sitting on the meat before it goes in the oven gives you noticeably more flavor than seasoning right before. Overnight is best. If neither is possible, at least let the seasoned ribs sit at room temperature for 20 to 30 minutes while the oven preheats — it's not nothing.
- Watch the broiler the entire time: I burned a rack of ribs under the broiler exactly once and once was enough. The caramelization happens fast — especially with a sweet sauce — and the line between perfect and ruined is narrow. I stand at the oven with the light on for the full broil step. Check at 3 minutes and decide from there. Don't walk to another room.
- Let them rest before slicing: I know this sounds like filler advice that every recipe includes, but with ribs it actually matters. Cut them immediately and the juices run straight out onto your cutting board. Wait 5 minutes and those juices redistribute back into the meat. It's a small thing that affects how juicy each piece is when you eat it.
Variations
- Spicy version: Add ½ teaspoon cayenne to the dry rub and use a spicy BBQ sauce for the glaze. My husband makes this version whenever he takes over the kitchen and ends up with something that clears the sinuses in the best possible way. If you have kids eating too, season one rack spicy and leave the other plain — that's how we handle it when he wants heat and Saad doesn't.
- Honey BBQ glaze: Stir 2 tablespoons of honey into your BBQ sauce before brushing it on. The honey makes the glaze stickier and gives it a deeper caramelization under the broiler. This is probably my favorite version for when I want the ribs to look genuinely impressive on the plate — the color is beautiful and it tastes like more effort than it is.
- Dry rub only: Skip the BBQ sauce entirely and let the rub do all the work. Double the dry rub quantities and press them in firmly. The outside develops a beautiful crust from the oven heat and the broiler, and you taste the spices directly without sauce softening everything. Honestly this is my favorite way to eat them — it's less sticky, more savory, and you can actually taste the individual spices.
- Asian-inspired glaze: Instead of BBQ sauce, whisk together ¼ cup soy sauce, 2 tablespoons hoisin, 1 tablespoon honey, and ½ teaspoon grated ginger. Use this as your broiling glaze in the final step. It goes in a completely different direction from classic BBQ — more savory, less sweet, with a lacquered finish. I'd serve these with steamed rice and something like a simple cucumber salad on the side.
- Maple BBQ: Replace the brown sugar in the dry rub with 1 tablespoon of maple syrup brushed directly onto the ribs before the spice rub goes on, and stir another tablespoon into your BBQ sauce. The maple adds a warmth to the sweetness that reads differently from just sugar — it's subtle but you notice it, especially in the caramelized edges.
Serving and Storage
Serving
Serve the ribs hot off the pan with extra BBQ sauce on the side for dipping. We almost always pair these with something that can roast in the oven around the same time — a tray of vegetables or potatoes that go in during the last 45 minutes works perfectly. Coleslaw is a classic pairing for a reason — the cool crunch genuinely balances the richness of the ribs. If you want to start the meal with something light before these come out, my bruschetta is a good option and it comes together in minutes. Cornbread alongside is never a bad idea either.
Storage
Leftover ribs keep well in an airtight container in the refrigerator for up to 3 days. To reheat, place them on a foil-lined baking sheet, brush with a little extra BBQ sauce, cover loosely with foil, and warm in a 300°F oven for about 20 minutes. This keeps them from drying out. I'd skip the microwave — it makes the texture rubbery and uneven. If you're reheating a full rack, go low and slow just like you cooked them the first time. They freeze reasonably well too, wrapped tightly in foil and then in a zip bag, for up to 2 months — thaw overnight in the fridge before reheating.

Frequently Asked Questions
Can I make these ribs ahead of time?
Yes, and I actually recommend it. Season the ribs with the dry rub up to 24 hours ahead and keep them covered in the fridge. The rub has more time to work into the meat and the flavor is noticeably deeper. When you're ready to cook, pull them out and let them sit at room temperature for about 20 minutes before they go in the oven.
What if my ribs aren't tender after 2 hours?
Cover them back up with foil and give them another 20 to 30 minutes. The exact timing varies depending on the size of the rack and how your oven runs. You're looking for the meat to pull back visibly from the ends of the bones — that's your signal they're ready. Don't rush past this step or the texture won't be right.
Can I use spare ribs instead of baby back ribs?
You can, but spare ribs are larger and meatier so they'll need more time — closer to 3 to 3½ hours at 300°F. Everything else in the recipe stays the same. Baby back ribs are a bit more forgiving for a first attempt because they're smaller and cook more evenly, which is why I use them.
How do I know when to stop broiling?
Check at the 3-minute mark. You want the sauce to be bubbling, sticky, and darkened in spots — but not black all over. The sugar in the sauce burns fast under a hot broiler. I stand at the oven with the light on the entire time and don't do anything else. Once you've done it once you'll know what the right look is.
Can I freeze leftover ribs?
Yes. Wrap the cooled ribs tightly in foil, then place in a zip-top freezer bag and freeze for up to 2 months. Thaw overnight in the refrigerator before reheating. Reheat covered with foil at 300°F with a brush of extra BBQ sauce — they come back well as long as you don't rush the reheating.
BBQ BABY BACK RIBS
Ingredients
- 2 racks baby back ribs
- 2 tablespoons olive oil
- 2 tablespoons brown sugar
- 1 tablespoon paprika
- 1 teaspoon garlic powder
- 1 teaspoon onion powder
- 1 teaspoon chili powder
- 1 teaspoon salt
- ½ teaspoon black pepper
- 1 ½ cups BBQ sauce any kind
Instructions
- Preheat Oven: Preheat oven to 300°F (150°C). Line a baking sheet with foil.
- Prepare Ribs: Remove the thin membrane from the back of the ribs for tenderness. Pat dry and brush lightly with olive oil.
- Season: Mix brown sugar, paprika, garlic powder, onion powder, chili powder, salt, and pepper. Rub evenly over both sides of the ribs.
- Wrap & Bake: Place ribs on the baking sheet, cover tightly with foil, and bake for 2–2½ hours until tender.
- Add Sauce: Remove foil and brush ribs generously with BBQ sauce.
- Caramelize: Broil for 3–5 minutes or grill 5–7 minutes until the sauce becomes sticky and caramelized.
- Serve: Slice between the bones and serve warm with extra BBQ sauce.
Notes
- Make Ahead: Season ribs up to 24 hours ahead for deeper flavor.
- Customizing the Flavor: Use spicy BBQ sauce, honey BBQ, or add cayenne for extra heat.
- Serving Suggestions: Serve with cornbread, coleslaw, mac and cheese, or grilled corn.
- Allergy-Friendly Options: Choose gluten-free BBQ sauce if needed.
- Storage Tips: Store leftovers in an airtight container for 3 days; reheat low and slow for best texture.
These ribs have become one of the recipes I return to whenever I want something that feels genuinely satisfying without requiring any equipment I don't own. The process makes sense once you understand what each step is doing — the low oven builds the tenderness, the sealed foil holds the moisture, and the broiler at the end does the glamour work. I've made these for regular weeknight dinners, for guests, and once just for me and my husband on a Saturday afternoon when the kids were at my mother-in-law's. Every single time they come out the way they're supposed to.
If you're making these for the first time, don't overthink it. The three things that actually matter are removing the membrane, keeping the foil sealed tight, and not rushing the oven time. Everything else is adjustable. The BBQ sauce brand doesn't matter much. The spice ratios can shift based on what your family likes. This is a recipe with a solid structure — use it as a base and adjust it over time the way I have.
If you're building a bigger meal around these, I'd suggest pairing them with something warming and filling. My Tuscan white bean soup is a surprisingly good starter before a heavy main like ribs — it's light enough that it doesn't steal the show. And if you want a proper dessert to end the evening, something with a bit of richness works well after the savory depth of the ribs. We usually keep it simple — fruit, or whatever the kids request. Zainab's dessert requests after rib nights have included everything from cupcakes to ice cream, and I've learned to just ask her in advance. 🍖



Comments
No Comments