
I made these Oreo cake balls for the first time on a whim — it was a Thursday night, I had a packet of Oreos sitting in the pantry, and Zainab had been asking for something sweet all week. Three ingredients, no oven, done in under an hour. I honestly couldn't believe how good they turned out.
What makes these work is the ratio — 36 Oreos to 8 oz of cream cheese hits a texture that's firm enough to roll but still creamy inside. I tried a version once with less cream cheese because I was running low, and the balls crumbled when I went to dip them. Stick to the full amount. Let the cream cheese come to room temperature first too — cold cream cheese lumps and you'll end up with an uneven mix.
My kids both helped me make these the second time around. Saad handled the crushing (he used a zip-top bag and a rolling pin, which he thought was extremely fun), and Zainab rolled the balls. It turned into a whole afternoon thing. Now whenever I make something no-bake like this or my Strawberry Cheesecake Lush, they appear in the kitchen immediately.
One thing to set expectations on: these need chill time. Don't try to skip the freezer step — I did that once and the balls went soft the second I put them near the warm chocolate. Give them at least 30 minutes in the freezer, or an hour in the fridge. It's worth the wait.

Why You'll Love This Recipe
- Three ingredients, no oven: I keep saying this because it still surprises me. You need Oreos, cream cheese, and chocolate — that's it. No baking, no mixer, no complicated steps. On days when I don't want to heat up my kitchen, this is what I reach for.
- Kids can actually help: Most dessert recipes say "kid-friendly" and then immediately involve hot pans or sharp tools. This one genuinely works — the crushing, mixing, rolling, and decorating are all things small hands can handle. Zainab takes the sprinkle part very seriously.
- Make-ahead friendly: I usually make a double batch because one batch disappears in a single sitting. They keep well in the fridge for up to a week, and you can freeze them for up to a month. I've pulled them out of the freezer for last-minute guests more than once.
- Easy to customize: Mint Oreos, peanut butter Oreos, birthday cake Oreos — they all work. You can dip in dark chocolate, white chocolate, or coloured candy melts. Add sprinkles, crushed Oreos on top, or a drizzle. The base is simple enough that you have a lot of room to play.
- They look like they took effort: I've brought these to parties twice and people always ask where I got them. There's something about the chocolate shell and the little decorations that looks polished. No one needs to know it took you 20 minutes of active work.
Ingredients
- 36 Oreo cookies (one standard 14.3 oz package)
- 8 oz cream cheese, softened to room temperature (full-fat works best)
- 12 oz semi-sweet chocolate chips or candy melts, for coating
- Optional: white chocolate chips or candy melts for drizzling
- Optional: sprinkles or extra crushed Oreos for decorating
Directions
- Step 1: Crush the Oreos — Place all 36 Oreos in a food processor and pulse until you have fine, even crumbs. If you don't have a food processor, put them in a zip-top bag and go at them with a rolling pin — it takes about 5 extra minutes but works just as well. You want the crumbs as fine as possible so the mixture holds together cleanly.
- Step 2: Mix with cream cheese — Transfer the Oreo crumbs to a large bowl and add the softened cream cheese. Mix until everything is fully combined into a thick, dark dough. If your cream cheese wasn't at room temperature, this step will be harder — lumps don't incorporate well and you'll end up with an uneven texture.
- Step 3: Roll into balls — Scoop out about 1 tablespoon of dough at a time and roll into balls between your palms. Place them on a parchment-lined baking sheet as you go. You should get around 30 balls from one batch. Wash your hands between rolls if they start getting sticky — it helps keep the shape neat.
- Step 4: Chill — Put the tray in the freezer for at least 30 minutes, or in the fridge for at least 2 hours. This step is non-negotiable — cold balls hold their shape when you dip them. I skipped this once and they started falling apart in the warm chocolate.
- Step 5: Melt the chocolate — Place your chocolate chips or candy melts in a microwave-safe bowl. Microwave in 30-second intervals, stirring well between each round, until completely smooth. Don't rush this — overheating chocolate makes it seize up and go grainy. Three or four intervals is usually enough.
- Step 6: Dip and coat — Use a fork or a toothpick to lower each chilled ball into the melted chocolate. Let it sit for a second, lift it out, and tap the fork gently on the edge of the bowl to shake off the excess. Place back on the parchment-lined tray. Work quickly — the balls warm up faster than you'd think.
- Step 7: Decorate and set — While the chocolate is still wet, add your sprinkles, crushed Oreos, or white chocolate drizzle. Then leave the tray out at room temperature for 10 minutes or pop it back in the fridge until the coating is fully set. Once set, they're ready to eat — or store.

Tips for Success
- Let the cream cheese sit out first: I pulled cold cream cheese straight from the fridge the first time I made these and the mixing was a nightmare — it clumped and refused to combine smoothly with the crumbs. Give it at least 15 to 20 minutes on the counter. Room temperature cream cheese blends in about two minutes flat.
- Crush the Oreos as finely as you can: Coarse crumbs mean the balls don't hold together as well and the surface looks lumpy after dipping. A food processor gives you the finest result. If you're using the bag-and-rolling-pin method, keep going longer than you think you need to — another minute of crushing makes a real difference.
- Don't rush the freezer step: Thirty minutes minimum. An hour is better. The colder the balls, the cleaner the chocolate coat goes on, and the faster the coating sets after dipping. If you're working in a warm kitchen, pop the whole tray back in the freezer halfway through your dipping session — the last few balls will coat just as nicely as the first.
- Use a fork, not tongs: I tried tongs once. Don't. A fork lets you control the ball much better — you can lower it in gently, turn it to coat all sides, and lift it out cleanly. A toothpick also works for smaller balls. The goal is minimal handling so the ball stays intact.
- Melt chocolate low and slow: Chocolate is more delicate than people expect. If you blast it in the microwave, it goes from melted to burnt very fast, and burnt chocolate has a grainy, seized texture you can't fix. Thirty-second bursts, stir after each one. If it's mostly melted with a few lumps, keep stirring — residual heat finishes the job without another microwave blast.
Variations
- Mint chocolate: Use mint Oreos instead of classic and dip in dark chocolate. The combination tastes like a fancy after-dinner mint. I made these for Eid one year and my whole family asked for the recipe — they didn't realize it was just a swapped Oreo flavor.
- Peanut butter Oreos: Peanut butter Oreos plus a semi-sweet chocolate coating is a combination my husband cannot resist. You can also stir a tablespoon of peanut butter into the cream cheese mixture for extra depth. These disappear faster than any other version I've made.
- White chocolate coating: Swap the semi-sweet chocolate for white chocolate melts and top with pink or red sprinkles — they look beautiful for Valentine's Day or baby showers. White chocolate is sweeter, so the slight bitterness of the Oreos inside balances it nicely. You can find white candy melts at Walmart or Michaels.
- Truffle pops: Before the freezer step, push a lollipop stick into each ball. After freezing and dipping, you've got Oreo truffle pops — which are way easier to serve at parties than trying to pick up a slippery chocolate ball. My kids think these are more fun. These would sit nicely on a dessert table next to something like Snickerdoodle Cheesecake Bars for variety.
- Roll instead of dip: If you don't want to mess with melted chocolate at all, skip the dipping step and just roll the chilled balls in cocoa powder, crushed Oreos, or powdered sugar. They won't have that snappy shell, but they're still really good — and it saves you about 15 minutes.
Serving and Storage
Serving
Serve these cold or at room temperature — I find they taste best straight from the fridge because the chocolate shell has a satisfying snap. Arrange them on a small tray or plate and add a few extra sprinkles on top if you're serving guests. They work really well alongside other bite-sized desserts, like the Blueberry Pastry Rings with Vanilla Cream, if you're putting together a dessert spread.
Storage
Store in an airtight container in the fridge for up to 7 days. Layer them with parchment paper between layers so the chocolate shells don't stick to each other. To freeze, place them on a tray first until solid, then transfer to a sealed freezer bag or container — they keep for up to 2 months. Thaw in the fridge overnight before serving; don't rush it at room temperature or the chocolate can get sweaty and soft.

Frequently Asked Questions
Can I make Oreo cake balls ahead of time?
Yes, and honestly I'd recommend it. You can make the balls up to 3 days in advance and keep them in the fridge — dipped or undipped. If you're planning ahead for a party, I usually dip them the day before so the chocolate has plenty of time to set fully and everything looks neat on the tray.
Can I freeze Oreo cake balls?
Yes. Freeze them in a single layer first until solid, then move to a sealed container with parchment between layers. They keep for up to 2 months. Thaw in the fridge overnight before serving — don't leave them out on the counter to speed it up, or the chocolate shell can get soft and condensation builds up on the outside.
Why is my mixture too soft to roll?
This usually happens if the cream cheese was too warm, or if the Oreos weren't crushed finely enough. Pop the whole bowl in the fridge for 20 to 30 minutes and try again — cold mixture is much easier to roll into clean balls. Don't add more Oreos to compensate; that throws off the texture once it's set.
Can I use low-fat cream cheese?
You can, but the balls won't hold their shape as firmly. Low-fat cream cheese has more water in it, which makes the mixture softer and harder to work with. I've done it in a pinch and the taste is still fine — just chill them longer before dipping, and work fast once they come out of the freezer.
What kind of chocolate works best for coating?
Candy melts are the easiest to work with because they melt smoothly and set with a firm snap at room temperature. Semi-sweet chocolate chips work great too — just make sure you melt them slowly. I'd avoid milk chocolate chips from the baking aisle if you can, because they can seize up more easily; go for a bar of good milk chocolate instead if that's the flavor you want.
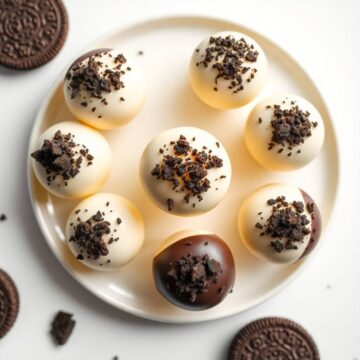
OREO CAKE BALLS
Ingredients
- 36 Oreo cookies
- 8 oz cream cheese softened
- 12 oz semi-sweet or white chocolate chips for coating
- Sprinkles or crushed Oreos for decoration optional
Instructions
Crush the Oreos:
- Place Oreos in a food processor and pulse until finely crushed. Alternatively, place in a zip-top bag and crush with a rolling pin.
Make the Dough:
- In a bowl, mix crushed Oreos with softened cream cheese until smooth and well combined.
Shape the Balls:
- Roll mixture into 1-inch balls and place on a lined baking sheet. Freeze for 1 hour or refrigerate for 2 hours until firm.
Coat with Chocolate:
- Melt chocolate in the microwave in 30-second intervals, stirring in between. Dip each ball into the melted chocolate and place back on the baking sheet.
Decorate and Set:
- Top with sprinkles or crushed Oreos if desired. Let the coating set at room temperature or chill until firm.
Notes
These Oreo cake balls have become one of those recipes I come back to every few months without even planning to. They take so little effort that it almost feels unfair how well they turn out. I've made them for Eid, I've made them for school bake sales, I've made them on a random Tuesday because Zainab asked nicely. They always work.
The thing I like most is that the recipe is forgiving — you can swap the Oreo flavor, change the chocolate coating, skip the decorations entirely, and it still comes together. It's one of the few recipes I give to people who say they can't bake, because there's genuinely nothing that can go wrong as long as you chill the mixture before dipping. If you want something a bit more involved for your next dessert spread, my Snickerdoodle Cheesecake Bars are another no-fuss crowd favorite that sits right alongside these on a tray.
I always make a double batch now. One batch is gone by the end of the first evening, and the second batch goes in the freezer for when we need something sweet later in the week. This is one of those recipes I genuinely wish I'd found years earlier. 🍫✨
If you liked this, here are a few more recipes from my kitchen you might want to try next:
- Strawberry Cheesecake Lush — layered, creamy, no-bake, and just as easy to pull together
- Homemade Snickerdoodle Cheesecake Bars — a cinnamon-sugar cheesecake bar that works for any occasion
- Blueberry Pastry Rings with Vanilla Cream — impressive looking, surprisingly simple to make
- Bacon-Wrapped Dates — sweet and salty in the best way, great for a party table alongside desserts
- Chorizo Queso Dip — if you want something savory to balance out all the sweetness





Comments
No Comments