
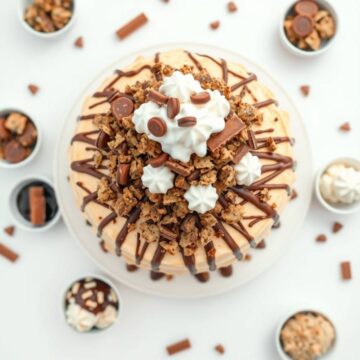
I made this for Saad's birthday last summer because he specifically requested "something with Reese's and ice cream and a lot of it." I had made ice cream cakes before, but never one like this — a proper frozen slab with a cookie crust, two full layers of ice cream, hot fudge, and enough Reese's on top to make any chocolate-peanut butter fan genuinely emotional. It was the most requested dessert I've made in years, and I've been making it on repeat since.
What I like about this recipe is that it's entirely no-bake, which means I'm not heating up my kitchen or watching the oven while also trying to manage everything else. The process is just layering and freezing — anyone can do it. I use a 9x13 dish instead of a springform pan because that's what I have, and it works perfectly. If you need a peanut butter fix in frosting form rather than frozen cake form, my homemade peanut butter frosting is the same kind of obsessive energy, just in a different direction.
The first time I made this, I skipped the freeze time between the ice cream layers because I was in a rush. By the time I added the hot fudge, the chocolate layer had gone completely soft underneath and everything started sliding. I had to throw it back in the freezer and start the waiting over. Now I don't rush the freezing steps — each layer needs to be genuinely firm before you build on top of it.
This feeds a crowd easily from one 9x13 dish — I usually get about 15 slices out of it, and people always come back for seconds. Make it the night before your event and it will be perfectly set and ready to slice. The only work you're doing the day of is taking it out of the freezer ten minutes before serving.

Why You'll Love This Recipe
- Completely no-bake: There's no oven involved at all, which means I can make this in July without sweating through the whole process. All you need is a freezer and a little patience between layers. On the day of a party, that patience is genuinely worth it.
- Make-ahead friendly: I make this the night before and just pull it out when I need it. There's no last-minute stress, no reheating, nothing to check on. That's exactly the kind of dessert I want when I'm already juggling a whole party menu.
- Two full layers of ice cream: This isn't a thin scoop on top of a crust — you're getting a full 1.5-quart container of chocolate ice cream and a full 1.5-quart of peanut butter ice cream. It's genuinely substantial, which is what makes it feel like a real celebration dessert rather than a small treat.
- The Reese's situation on top is serious: Two cups of chopped Reese's cups plus half a cup of Reese's Pieces — it's not decorative, it's a full layer of candy. Every single slice gets a proper amount. If you're buying Reese's cups at Costco or Walmart, one of those big bags will cover you.
- Minimal equipment needed: A 9x13 baking dish, a spatula, and a knife. That's genuinely all you need. No stand mixer, no springform pan, no special tools. I've made this with what's already sitting in my normal kitchen drawers.
Ingredients
- 1 box (about 14 oz) chocolate sandwich cookies, crushed (Oreos work great)
- ½ cup unsalted butter, melted
- 1 container (1.5 qt) chocolate ice cream, softened slightly
- 1 container (1.5 qt) peanut butter ice cream, softened slightly
- 1 jar hot fudge topping
- 1 jar peanut butter topping (or ¼ cup natural peanut butter, melted and thinned with a splash of oil)
- 2 cups whipped topping, thawed (like Cool Whip — find it at any Walmart or Kroger)
- 2 cups Reese's peanut butter cups, roughly chopped
- ½ cup Reese's Pieces candies
Directions
- Make the crust: Mix the crushed cookies with the melted butter until it looks like wet sand and holds together when pressed. Press this mixture firmly and evenly into the bottom of a 9x13-inch dish — use the flat bottom of a measuring cup to compact it properly. Freeze for 10 minutes to set.
- Add the chocolate ice cream layer: Let your chocolate ice cream sit on the counter for about 10 minutes until it's spreadable but not melted. Spoon it over the crust and use a spatula to spread it into an even layer right to the edges. Freeze for at least 30 minutes until firm before moving on — don't rush this step.
- Add the peanut butter ice cream layer: Once the chocolate layer is genuinely firm (press it gently to check), soften your peanut butter ice cream the same way and spread it evenly on top. Smooth it out and freeze for 1 full hour — this layer needs more time because it's going to carry everything above it.
- Add the hot fudge and first round of Reese's: Warm the hot fudge in the microwave for about 30 seconds until it's pourable but not boiling hot — you don't want it melting the ice cream. Drizzle it over the frozen peanut butter layer along with the peanut butter topping, then scatter half your chopped Reese's cups over the top. Freeze for another 30 minutes.
- Add the whipped topping and finish: Spread the thawed whipped topping evenly across the surface. Scatter the remaining chopped Reese's cups and all of the Reese's Pieces over the top. Drizzle extra hot fudge if you want — I always do.
- Final freeze: Cover the dish tightly with plastic wrap and freeze for at least 4 hours, or overnight for best results. The whole thing needs to be completely solid before you slice it.
- Serve: Pull the dish from the freezer and let it sit on the counter for 5–10 minutes. Dip a sharp knife in hot water, wipe it dry, and slice cleanly. The hot knife trick makes a real difference through those frozen layers.

Tips for Success
- Don't skip the freeze time between layers: I learned this one the messy way. If you spread peanut butter ice cream on top of chocolate ice cream that hasn't fully firmed up, they blend together into one muddy layer and you lose the whole visual effect. Set a timer and actually wait — at least 30 minutes for the chocolate layer, a full hour for the peanut butter layer.
- Let the ice cream soften on the counter, not in the microwave: Microwaving ice cream melts it unevenly — you'll get soft patches and icy edges. Pull it out and let it sit for about 10 minutes at room temperature. It should be spreadable and soft but still hold its shape. If it's pouring off the spoon, it's gone too far.
- Line the dish with plastic wrap if you want cleaner removal: If you'd like to lift the whole cake out of the dish before slicing, press plastic wrap into the 9x13 dish before you start, leaving enough overhang on all sides. Once it's fully frozen, you can lift it straight out onto a cutting board. I don't always bother, but it does look nicer for parties.
- Chop the Reese's before you start assembling: Once the layers are going, you want to work quickly, especially with the hot fudge. If you're stopping mid-assembly to unwrap and chop candy, the fudge cools and stiffens up before you can drizzle it properly. I chop everything and set it out in bowls before I take the dish out of the freezer.
- Use a hot knife to slice: Fill a glass with hot water, dip your knife in for a few seconds, wipe it dry with a tea towel, and then slice. Repeat between cuts. Cold knife through frozen ice cream cake means dragging and crumbling — the hot knife goes through clean. This is the one tip that makes the difference between a beautiful slice and a crumbled mess.
Variations
- Swap the candy: Reese's is the obvious choice here, but this exact same recipe works with Snickers, chopped Butterfingers, or M&M's. Saad has asked me to try it with Oreo pieces and caramel sauce next, which honestly sounds great. The structure of the cake stays the same — just change out what you pile on top.
- Add a caramel layer: Replace the hot fudge with a good jarred caramel sauce — or use both. Drizzle caramel between the layers and fudge on top. It adds a buttery sweetness that cuts through the richness of the peanut butter ice cream nicely. If you enjoy caramel and chocolate together, my salted caramel muddy buddies hit the same flavor notes in a completely different form.
- Switch up the crust: A graham cracker crust gives you something a little lighter and less intense than the chocolate cookie base. You can also use crushed pretzels mixed with butter for a salty-sweet crust that works really well against all that sweet ice cream. I haven't tried a brownie base yet but I have every intention of doing so.
- Make it nut-free: Use chocolate and vanilla ice cream instead of peanut butter flavors, skip the peanut butter drizzle, and top with M&M's or Smarties instead of Reese's. The hot fudge layer and cookie crust carry the whole thing even without peanut butter involved — it's still a genuinely impressive frozen dessert.
- Make individual portions: Press the crust mixture into a muffin tin lined with cupcake liners, layer the ice cream in smaller amounts, and top each one individually. They freeze and serve exactly the same way. For a party where people are serving themselves, individual portions are easier to hand out than slicing a full tray.
Serving and Storage
Serving
Pull the dish from the freezer about 5–10 minutes before you're ready to cut — this gives the layers just enough time to loosen up so a knife goes through cleanly. Dip your knife in hot water and wipe it dry between each slice. Serve immediately after cutting; this isn't a dessert that sits out well once it starts to thaw. I usually cut the whole tray at once and plate the slices quickly.
Storage
Wrap any leftover portions tightly in plastic wrap, then press a layer of foil over the top as well — two layers keeps the ice cream from picking up freezer smells. It keeps well for up to 2 weeks in the freezer. If you're storing individual slices, wrap each one separately so you can pull just one out without disturbing the rest. The crust does soften slightly over time but it still tastes good after a week.

Frequently Asked Questions
Can I use different ice cream flavors?
Yes, absolutely. Vanilla and chocolate work well together, or try cookie dough and peanut butter if you want to keep the peanut butter element but change one layer. The recipe structure stays exactly the same regardless of which flavors you pick — just make sure both containers are the same size so your layers are even.
How far in advance can I make this?
I've made it up to 3 days ahead with no problems. Just keep it tightly wrapped in the freezer the whole time. The night before is my personal sweet spot — the layers are perfectly set and nothing has had time to get icy or pick up any freezer smell.
What if I don't have a springform pan?
I actually use a regular 9x13 baking dish and it works great. You can also line any deep pan with plastic wrap, leaving overhang on all sides, so you can lift the whole thing out once it's frozen. A springform pan gives you cleaner edges but it's not required — the dessert tastes the same either way.
Can I use homemade whipped cream instead of Cool Whip?
You can, but it needs to be stabilized or it will deflate and get icy once frozen. Add about 1 tablespoon of powdered sugar and 1 teaspoon of cornstarch per cup of heavy cream while whipping — this helps it hold its structure in the freezer. Cool Whip is honestly just easier here because it's already formulated to freeze well.
Can I freeze leftovers after the cake has been partially sliced?
Yes. Press plastic wrap directly against the cut surface to prevent ice crystals from forming, then cover the whole dish with foil. The exposed cut edges will dry out a little faster than the rest, but if you wrap it well it stays good for up to 2 weeks. I usually wrap individual slices separately if I know I'll be pulling out one piece at a time.
REESE’S OVERLOAD ICE CREAM SUNDAE CAKE
Ingredients
- 1 box chocolate sandwich cookies crushed
- ½ cup unsalted butter melted
- 1 container 1.5 qt chocolate ice cream, softened
- 1 container 1.5 qt peanut butter ice cream, softened
- 1 jar hot fudge topping
- 1 jar peanut butter topping or melted peanut butter
- 2 cups whipped topping like Cool Whip
- 2 cups chopped Reese’s peanut butter cups
- ½ cup Reese’s Pieces candies
Instructions
- Make the Crust: Mix crushed cookies with melted butter. Press firmly into the bottom of a 9x13-inch dish. Freeze 10 minutes.
- Layer Ice Cream: Spread softened chocolate ice cream evenly over crust. Freeze 30 minutes. Spread peanut butter ice cream on top. Freeze 1 hour.
- Add Toppings: Warm fudge and peanut butter topping slightly. Drizzle over the frozen layers. Sprinkle half the Reese’s cups. Freeze 30 minutes.
- Finish: Spread whipped topping evenly. Sprinkle with remaining Reese’s cups and Reese’s Pieces. Drizzle extra fudge if desired.
- Freeze: Cover and freeze at least 4 hours or overnight before slicing.
Notes
- Make Ahead: Perfect for preparing a day before a party.
- Flavour Boost: Add crushed pretzels or caramel drizzle for extra crunch.
- Serving Tip: Remove from freezer 10 minutes before slicing.
- Storage: Keep tightly covered in the freezer for up to 2 weeks.
This is one of those recipes I keep coming back to because it genuinely delivers every single time. The layers look impressive when you cut into it, the Reese's on top makes it obvious what you're in for, and the whole thing takes maybe 20 minutes of active work spread across an afternoon. It's just a very honest dessert — no tricks, no complicated techniques, and it feeds a table full of people without any stress.
If you're making this for a birthday or a summer gathering, I'd strongly recommend doing it the night before. The overnight freeze makes every layer solid and clean, and you'll thank yourself when the day of your event arrives and this is already done. I've brought it to enough parties now that people specifically ask if I'm bringing "that ice cream cake thing" — which is the best kind of reputation to have.
For something on the other end of the dessert spectrum — light, tangy, and completely different in texture — my glazed lemon cookies are what I make when I need something that travels easily and doesn't require a freezer. But for sheer frozen indulgence, this Reese's cake is what gets requested in my house. 🍫🥜✨
If you liked this recipe, here are a few more from the site worth trying:
- Homemade Peanut Butter Frosting — deeply rich and peanut-buttery, great on cupcakes or brownies
- Salted Caramel Muddy Buddies — sweet, crunchy, impossible to stop eating, and another total crowd-snacker
- Glazed Lemon Cookies — tangy, soft, and completely different from anything chocolate-peanut butter
- Ham and Cheese Croissant Breakfast Casserole — for when you need a make-ahead savory dish with the same no-stress logic
- Crackers Party Sandwiches — a simple, crowd-feeding savory snack that belongs at the same table as this cake





Comments
No Comments