
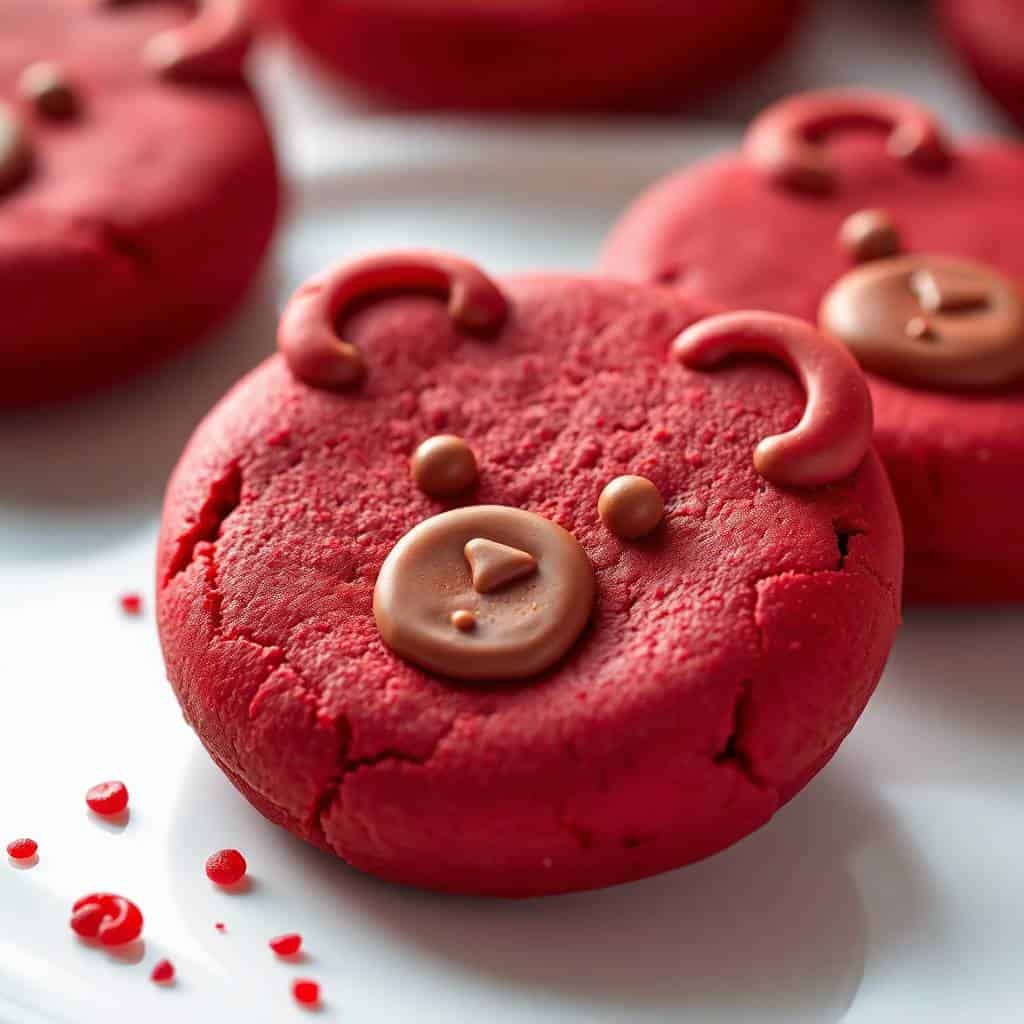
There are cookies that taste extraordinary, and there are cookies that look genuinely extraordinary — but these Red Velvet Bear Cookies achieve both simultaneously in the most delightfully charming way possible. With their rich cocoa and vanilla flavour, vibrant deep red colour, soft yet beautifully firm texture that holds every detail of the bear shape, and the most adorable little chocolate chip eyes and candy nose decorations — these cookies are the kind of bake that makes absolutely everyone smile the moment they see them on the plate.
The dough is a genuinely straightforward, genuinely practical red velvet cookie dough — butter and sugars creamed until fluffy, egg and vanilla mixed in, cocoa and red food colouring added for that signature colour and flavour, then flour and leavening stirred in to produce a soft, workable dough that chills beautifully, handles easily, and holds its bear shape with remarkable fidelity during baking. The bears come out of the oven soft in the center, slightly crisp at the edges, and genuinely extraordinary in both appearance and flavour.
These Red Velvet Bear Cookies are the perfect baking activity to enjoy with children — they will have tremendous fun shaping the bears from dough balls, pressing in the chocolate chip eyes, adding the candy noses, and then decorating with icing bows and heart-shaped candies after baking. Find more cookie baking inspiration in our easy cookie recipes and our easy homemade cake recipes.
Once you bake these Red Velvet Bear Cookies, you will return to this recipe again and again for every festive occasion, every cookie gift box, every holiday party tray, and every baking day with children that calls for something genuinely playful and genuinely delicious. Let's bake the most adorable, most genuinely delicious bear cookies available!

WHY YOU WILL LOVE THIS RECIPE
- Charming Design: Shaped like little bears, these cookies are visually adorable and completely irresistible — perfect for gifting, holiday-themed dessert platters, school treat boxes, party favours, and any occasion where the presentation should be as genuinely delightful as the flavour.
- Red Velvet Flavour: These cookies offer the most classic red velvet combination of subtle cocoa and vanilla with a hint of tang and sweetness — genuinely distinctive and genuinely extraordinary in a way that plain chocolate cookies simply cannot achieve.
- Soft Yet Firm Texture: The cookies are delightfully soft when bitten but firm enough to hold the most detailed bear shapes with precision — making them ideal for both creative cookie cutting and hand-shaping techniques.
- Kid-Friendly Baking Activity: Children genuinely love shaping, decorating, and naming their individual bear cookies — it is one of the most genuinely engaging, most rewarding hands-on baking activities available for any age and ends with the most delicious results.
- Perfect for Gifting: Wrap these bear cookies individually in cellophane bags tied with ribbon, or layer them in a decorated tin or box, for the most thoughtful, most genuinely personal homemade gift available for any occasion or holiday.
- Customisable Decorations: Add chocolate chips for eyes, icing bows, mini heart candies for noses, or melted chocolate for additional face details — every bear can be uniquely personalised and no two need to look exactly the same.
- Crowd-Pleasing Treat: Both visually and flavour-wise, these cookies appeal genuinely to all ages and are always the very first things to disappear from any cookie tray, party platter, or dessert table they appear on.
INGREDIENTS
For the Cookies:
- 1½ cups all-purpose flour
- 2 tablespoons unsweetened cocoa powder
- ½ teaspoon baking soda
- ¼ teaspoon salt
- ½ cup unsalted butter, softened
- ½ cup granulated sugar
- ¼ cup brown sugar
- 1 large egg
- 1 tablespoon milk
- 1 teaspoon vanilla extract
- 1 teaspoon red food colouring — gel preferred for the most vibrant, most consistent colour
Optional Decorations:
- Mini chocolate chips or candy eyes for eyes
- Pink or white candy hearts for noses
- Melted chocolate or white icing for facial details, bows, and finishing touches
DIRECTIONS
- Step No.1: Cream butter and sugars
In a large mixing bowl, beat the softened butter, granulated sugar, and brown sugar together using a hand mixer or stand mixer on medium speed for 2–3 minutes until the mixture is light, fluffy, and noticeably paler in colour. Properly creamed butter and sugar produces the most tender, most evenly textured cookie dough.
- Step No.2: Add wet ingredients
Mix in the egg, milk, vanilla extract, and red food colouring until the mixture is completely smooth and evenly coloured throughout. Gel food colouring produces a more vibrant, more deeply saturated red than liquid colouring without watering down the dough — strongly recommended for the most striking visual result.
- Step No.3: Sift in dry ingredients
In a separate bowl, whisk together the flour, cocoa powder, baking soda, and salt. Gradually add the dry ingredients to the wet mixture, stirring on low speed until a soft, cohesive dough forms. Do not overmix — stop as soon as no dry flour is visible.
- Step No.4: Chill the dough
Wrap the dough in plastic wrap and refrigerate for 30–45 minutes — chilling firms the dough significantly, making it dramatically easier to roll into balls and shape into bears without sticking to hands or losing definition. Do not skip this step.
- Step No.5: Shape into bears
Preheat oven to 350°F (175°C) and line baking sheets with parchment paper. For each bear, roll one larger ball of dough for the head and two smaller balls for the ears. Place the head ball on the prepared baking sheet, then press the two smaller ear balls firmly against the top of the head, slightly overlapping, to create the bear face shape. Press gently with a fingertip to smooth and connect the pieces. Use a small spoon to smooth any cracks in the ear joints so they do not separate during baking.
- Step No.6: Decorate before baking
Press mini chocolate chips or candy eyes into the dough for the eyes. Press a small candy heart into the lower center of the head for the nose. Press all decorations in gently but firmly so they stay in place during baking. Additional details like mouth lines or paw prints can be added with melted chocolate after baking once the cookies are completely cooled.
- Step No.7: Bake and cool
Bake for 10–12 minutes until the edges are just set and the cookies appear done around the perimeter but still slightly soft in the center — they will firm up considerably as they cool on the pan. Allow to cool on the baking sheet for 5 minutes before transferring to a wire rack to cool completely. Add any additional icing or melted chocolate decorations only once the cookies are completely cooled.

TIPS FOR SUCCESS
- Always Chill Before Shaping: The 30–45 minute refrigeration step is genuinely essential — chilled dough holds its bear shape with dramatically more precision during baking than unchilled dough, which spreads too much and loses definition around the ears and face.
- Use Parchment Paper: Line all baking trays with parchment paper — it prevents the cookies from sticking, keeps the bottoms from over-browning, and makes transferring the delicate bear shapes from tray to rack significantly easier without breakage.
- Do Not Overbake: Remove from the oven when the edges are just set — the centers should still look slightly underdone. The cookies will firm up to the most perfect soft, chewy texture as they cool on the pan. Overbaking produces a hard, dry cookie rather than the desired soft result.
- Use Gel Food Colouring: Gel food colouring produces the most vibrant, most deeply saturated red colour without adding excess liquid to the dough — liquid food colouring in the same volume produces a significantly less intense colour and can make the dough slightly too wet to handle cleanly.
- Avoid Too Much Flour: Adding excess flour to prevent sticking makes the dough dry and prone to cracking during shaping. If the dough is sticky after chilling, lightly flour your hands rather than adding flour directly to the dough.
- Decorate Before Baking: Press all chocolate chip eyes and candy noses into the dough before baking so they are set in place and fully embedded — decorations added to baked cookies do not adhere as securely and may fall off when the cookies are handled.
- Cool Fully Before Icing: Wait until the cookies are completely cool before applying any icing, melted chocolate, or icing bows — decorating warm cookies causes all icing to melt and spread rather than setting into clean, defined lines and shapes.
VARIATIONS
- Heart-Shaped Bears: Use a small heart cookie cutter to make Valentine-themed red velvet hearts — the same vibrant colour and rich flavour in a sweet, compact shape that is genuinely perfect for Valentine's Day gift boxes.
- Red Velvet Sandwich Bears: Bake two bears and sandwich them together with a generous layer of cream cheese frosting between for a fun, genuinely decadent twist that delivers the full red velvet cake experience in cookie form.
- Add Mini Chocolate Chips: Fold mini chocolate chips into the dough before chilling for extra bursts of chocolate flavour in every bite that complement the cocoa-rich red velvet base beautifully.
- Cream Cheese Frosting Bears: Pipe a small rosette of cream cheese frosting onto each cooled bear for the most classic, most genuinely indulgent red velvet flavour pairing — cream cheese and red velvet are genuinely one of the most extraordinary combinations in all of baking.
- Gluten-Free Version: Use a 1:1 gluten-free flour blend as a direct substitute for the all-purpose flour — the texture may be very slightly different but the cookies hold their bear shape well and the flavour is genuinely excellent.
- Stuffed Bears: Create a small pocket in each dough ball before shaping and tuck a small piece of Nutella or a dot of jam inside before sealing for a surprise filling that makes every bite of the bear genuinely extraordinary.
- Holiday Colours: Substitute the red food colouring with green for Christmas bears, pink for Easter or birthday bears, or purple for Halloween — the same delicious cookie dough base works beautifully in any colour for any themed occasion.
SERVING AND STORAGE
Serving
Serve these Red Velvet Bear Cookies on a decorated platter or board for the most visually striking, most crowd-pleasing presentation available — their bold red colour and adorable bear shapes make them genuinely impossible to resist. For gifting, wrap 3–4 bears together in a clear cellophane bag tied with a ribbon for the most charming, most personal homemade gift. They are a genuinely perfect addition to holiday cookie trays, party dessert tables, classroom treat boxes, and gift baskets of any kind.
Storage
Store in an airtight container at room temperature for up to 5 days — the cookies remain soft and genuinely delicious throughout this time. Undecorated baked cookies can be frozen in a single layer in a freezer-safe container for up to 1 month — thaw at room temperature for 30 minutes before decorating or serving. Raw cookie dough can be refrigerated for up to 2 days or frozen for up to 1 month — thaw in the refrigerator overnight before shaping and baking.
FAQ
Yes — these bears are shaped by hand from dough balls rather than cut with a cutter, so no special equipment is needed beyond your hands. Simply roll one larger ball for the head and two smaller balls for the ears and press them together firmly on the baking sheet. You can also use a round cutter and then decorate the flat round with icing to create a bear face design.
A sticky dough after mixing is normal and expected — this is why the chilling step is essential. If the dough is still too sticky to handle after 45 minutes of refrigeration, return it to the refrigerator for a further 15–20 minutes. You can also lightly dust your hands with flour while shaping, but avoid adding flour directly to the dough as this can dry it out and cause cracking.
Yes — the dough can be made and refrigerated for up to 2 days before shaping and baking, or frozen for up to 1 month. Baked, undecorated cookies can be frozen for up to 1 month and thawed at room temperature before decorating closer to the serving time.
Gel food colouring is strongly preferred for this recipe — it produces the most vibrant, most deeply saturated red colour without adding excess liquid to the dough that could affect the texture. Liquid food colouring in the same quantity produces a significantly less intense colour. Wilton or AmeriColor gel food colours are widely available and produce excellent results.
Use a toothpick to draw small paw print indentations or facial expression lines in the dough before baking. After baking and cooling completely, use melted chocolate in a piping bag or a small zip-lock bag with a tiny corner snipped off to pipe a mouth line, eyebrows, or tiny paw details. White icing can be used for bow ties or ribbons on top of the head for an extra adorable finishing touch.
Their bold red colour, charming bear shape, and soft, cocoa-rich texture make these Red Velvet Bear Cookies the most genuinely perfect combination of flavour and fun available from any cookie recipe. Kids will love participating in the process — from rolling the dough balls to adding the faces and decorations — and the adults at the table will love eating them just as much.
Try them once and you will find yourself making these irresistible bear cookies for every special occasion — or simply because they are that good. Find more cookie inspiration in our easy cookie recipes and our maraschino cherry chocolate chip cookies. 🐻❤️✨

RED VELVET BEAR COOKIES
Ingredients
For the Cookies:
- 1 ½ cups all-purpose flour
- 2 tablespoons unsweetened cocoa powder
- ½ teaspoon baking soda
- ¼ teaspoon salt
- ½ cup unsalted butter softened
- ½ cup granulated sugar
- ¼ cup brown sugar
- 1 large egg
- 1 tablespoon milk
- 1 teaspoon vanilla extract
- 1 teaspoon red food coloring gel preferred
Optional Decorations:
- Mini chocolate chips or candy eyes for eyes
- Pink or white candy hearts for noses
- Melted chocolate for facial details
Instructions
Preheat the Oven:
- Preheat oven to 350°F (175°C). Line baking sheets with parchment paper.
Mix Dry Ingredients:
- In a bowl, whisk together flour, cocoa powder, baking soda, and salt.
Cream Butter and Sugars:
- In a large bowl, beat butter, granulated sugar, and brown sugar until fluffy. Add egg, milk, vanilla, and red food coloring. Mix until combined.
Add Dry Ingredients:
- Gradually stir in the dry ingredients to form a soft dough.
Shape the Bears:
- Roll dough into small balls—1 large (for the head) and 2 smaller ones (for ears). Arrange them on the baking sheet to form a bear face. Gently press together.
Decorate:
- Press in mini chocolate chips for eyes and candy hearts for noses. You can also add features after baking using melted chocolate.
Bake:
- Bake for 10–12 minutes. Let cool on the sheet for 5 minutes, then transfer to a wire rack to cool completely.
Notes
- Make Ahead: Cookie dough can be chilled for up to 2 days or frozen for up to 1 month.
- Shaping Tip: Use a small spoon to smooth and press ear pieces together firmly so they don't separate during baking.
- Festive Variations: Try pink or white dough for different themes like Easter or birthdays. You can also dip half the bear face in melted chocolate.
- Serving Ideas: Great for classroom treats, party favours, or gift boxes tied with ribbon.
- Storage Tips: Store cookies in an airtight container at room temperature for up to 5 days.





Comments
No Comments