
Fall in our house means the oven is on by 4 PM and something with squash or potatoes is almost always roasting. The air gets cooler, the kids come home hungrier, and suddenly every meal needs a proper side dish — not just whatever I can throw together in five minutes. Fall side dishes are where the season really shows up on the table: caramelized edges, warm spices, hearty vegetables that can actually hold their own next to a main.
What makes a good fall side? For me it comes down to a few things: it should use produce that's actually in season right now (butternut squash, sweet potatoes, carrots, parsnips, Brussels sprouts), it should be easy enough to run alongside whatever main you're cooking, and it should taste like you put in more effort than you actually did. I also wanted range in this list — some roasted vegetable sides, some creamy potato dishes, some lighter salads for when you don't want everything to be heavy. If you're building a full dinner menu, you might also want to check out my fall dinner recipes for the main course side of things.
This list covers 23 recipes, and there's real variety here. You've got things like Butternut Squash Mac and Cheese, which Saad would eat every single day if I let him, alongside more elegant options like Stuffed Acorn Squash with Mushroom and Pancetta for when you're hosting and want something that looks impressive without being a project. There are quick air fryer options, a couple of soups that work as sides or starters, and potato dishes ranging from Cheesy Hasselback Potatoes to crispy oven wedges. If you're planning a bigger spread, my Thanksgiving side dishes roundup and easy vegetable side dishes list are worth a look too.
Here are the 23 fall sides I keep coming back to — pick whichever ones fit your table this week.
Top 23 Easy Fall Side Dish Recipes

23. Baked Sweet Potato Fritters
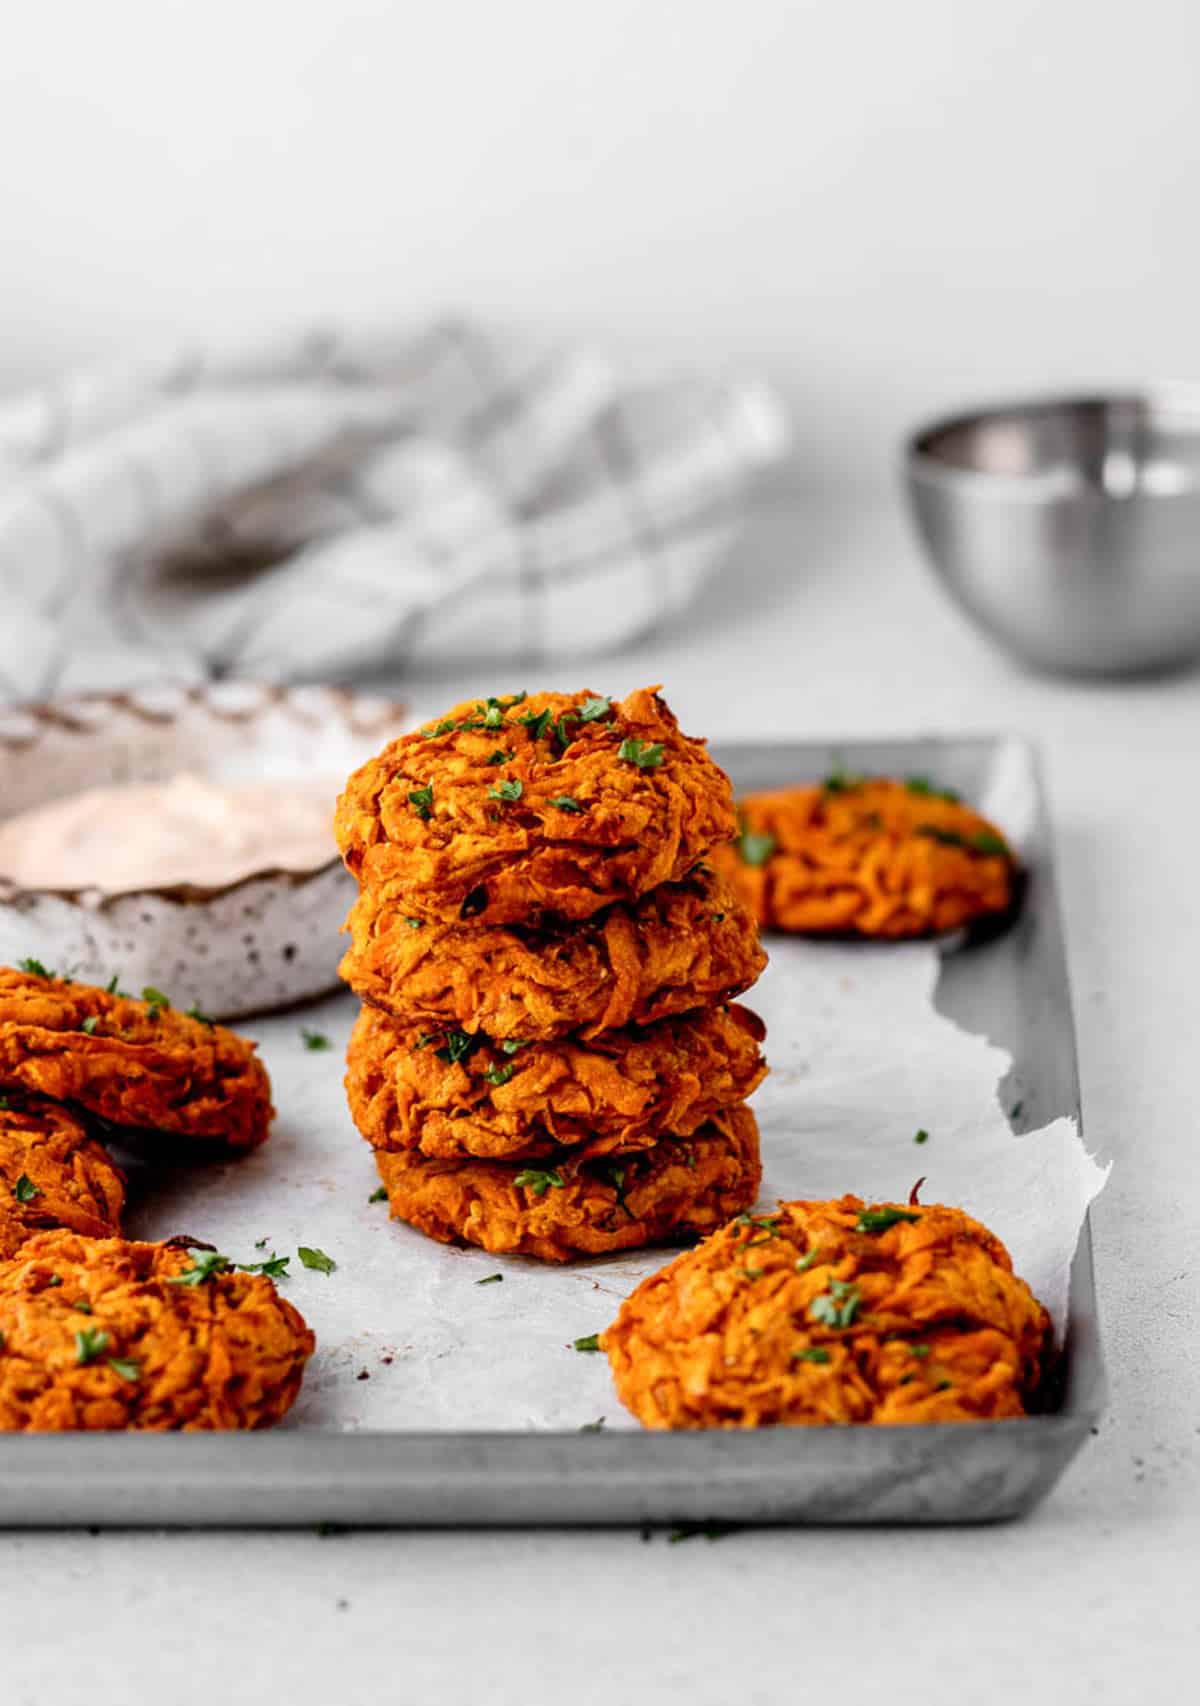
I've made sweet potato fritters the pan-fried way plenty of times, and yes, they're delicious — but they're also a mess and I'm standing over a spluttering skillet for way too long. This baked version changed how I think about fritters entirely. You get genuinely crispy edges, a tender centre, and the whole thing happens in the oven while you deal with everything else. The spice mix here — smoked paprika, cumin, a little cayenne — gives these real depth, not just "sweet potato flavour." One thing I learned the hard way: squeeze every drop of moisture out of that grated sweet potato. I skipped that step once and ended up with soggy patties that wouldn't hold together. Don't skip it.
Ingredients
- 2 large sweet potatoes (about 1½ lbs), peeled and coarsely grated
- 2 large eggs, beaten
- 3 tablespoons oat flour (or almond flour for gluten-free)
- 1 tablespoon cornstarch
- 1 teaspoon each: smoked paprika, garlic powder, cumin
- ½ teaspoon each: cayenne, onion powder, black pepper
- 1 teaspoon salt
- 2 tablespoons olive oil, for brushing
- Sour cream or Greek yogurt and fresh chives, for serving
Instructions
- Preheat oven to 400°F. Line a large baking sheet with parchment paper. Place the grated sweet potato in a clean kitchen towel and wring out as much liquid as you can — do this twice if needed. The drier the potato, the crispier the fritter.
- Combine the dried sweet potato with the eggs, oat flour, cornstarch, and all the spices and salt in a large bowl. Mix until everything is evenly combined and the mixture holds together when pressed.
- Shape into 12 equal patties about ½ inch thick. Arrange on the baking sheet and brush both sides generously with olive oil.
- Bake for 15 minutes, then flip carefully and bake another 10–15 minutes until deeply golden and crispy on both sides. Serve straight from the oven with sour cream or Greek yogurt and a handful of fresh chives — these lose their crunch quickly, so don't let them sit.
Tips
- Tip: If your mixture feels too wet to shape, add another half tablespoon of cornstarch and give it a minute to absorb before trying again.
- Tip: A thin metal spatula works best for flipping — slide it under quickly and confidently so the fritter doesn't break apart.
- Tip: You can prep and shape the fritters a few hours ahead and keep them covered in the fridge. Brush with oil and bake when you're ready.
22. Air Fryer Sweet Potato Chunks
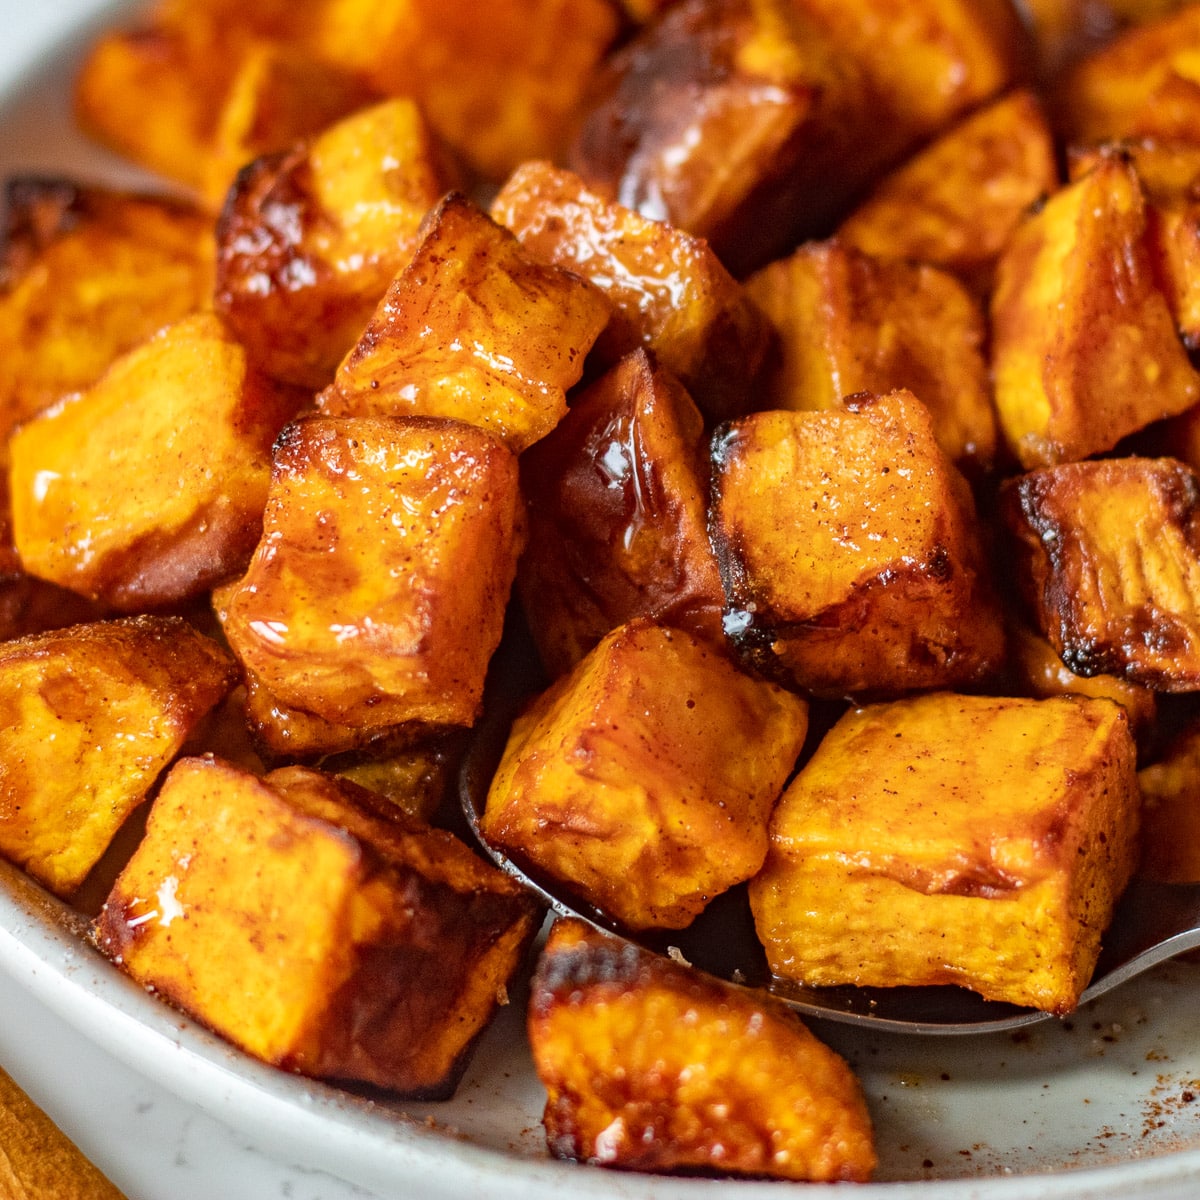
My air fryer gets a serious workout in fall, and this is one of the recipes I reach for most on busy weeknights. Sweet potato chunks, tossed in oil and your seasoning of choice, air-fried until the edges caramelise and the centres go completely soft — it takes under 20 minutes start to finish. I love that this recipe gives you two directions to go: the sweet version with brown sugar and cinnamon is incredible alongside roast chicken or pork, and the savoury version with smoked paprika and garlic works next to pretty much anything else. I usually make the savoury version on weeknights because it's more flexible, but Zainab always requests the sweet one.
Ingredients
- 2 large sweet potatoes, peeled and cut into 1-inch chunks
- 2 tablespoons olive oil or avocado oil
- Sweet version: 1 tablespoon brown sugar + 1 teaspoon cinnamon + ¼ teaspoon nutmeg + pinch of salt
- Savoury version: 1 teaspoon each smoked paprika, garlic powder, onion powder + ½ teaspoon cumin + 1 teaspoon salt + ½ teaspoon black pepper
Instructions
- Preheat your air fryer to 400°F for 3 minutes. Pat the sweet potato chunks thoroughly dry with paper towels — moisture is the enemy of caramelisation.
- Toss the chunks with olive oil in a large bowl, then add your chosen seasoning mix and toss again until every piece is evenly coated.
- Arrange in the air fryer basket in a single layer — work in batches if needed, don't pile them up. Air fry for 7 minutes, then shake the basket well and cook for another 7–9 minutes until the edges are caramelised and a fork slides easily into the centre.
- Serve immediately. The sweet version is great with pork or poultry; the savoury version goes alongside almost any autumn main course.
Tips
- Tip: Cut your chunks as evenly as possible so they cook at the same rate — uneven pieces mean some will be mushy before others are done.
- Tip: No air fryer? Roast at 425°F on a sheet pan for 25–30 minutes, flipping once — you'll still get good caramelisation.
- Tip: For the sweet version, keep an eye on the last few minutes — the brown sugar can go from caramelised to burnt quickly at high heat.
21. Mashed Acorn Squash

Acorn squash is one of those vegetables I ignored for years because I didn't know what to do with it. Then I roasted it, scooped it out, and mashed it with garlic butter and a little sage — and now it's one of my favourite fall sides, full stop. It's lighter than mashed potatoes but just as comforting, and the flavour is genuinely interesting: naturally sweet from the squash, savoury from the garlic, and earthy from the dried sage. A little drizzle of honey at the end pulls everything together. This is a great option for Thanksgiving or any fall dinner where you want something that feels seasonal and a little special without being complicated.
Ingredients
- 2 medium acorn squash, halved and seeds scooped out
- 3 tablespoons butter or olive oil
- 3 cloves garlic, minced
- ½ teaspoon each: dried sage, cinnamon, nutmeg
- 1 teaspoon salt + ½ teaspoon black pepper
- Fresh sage leaves and a drizzle of honey, for serving
Instructions
- Preheat oven to 400°F. Place the squash halves cut-side down on a parchment-lined baking sheet. Roast for 40–45 minutes until completely tender when you press from the top. Let cool for 10 minutes, then scoop the flesh into a large bowl.
- While the squash roasts, melt butter in a small skillet over medium heat. Add the garlic and cook for about 2 minutes until golden and fragrant. Add the dried sage and stir for 30 seconds, then take it off the heat.
- Pour the garlic butter over the squash flesh. Add cinnamon, nutmeg, salt, and pepper. Mash with a potato masher until smooth and creamy — a hand mixer works too if you want it extra silky.
- Taste and adjust salt. Transfer to a serving bowl, top with a few sage leaves crisped in a little butter, and finish with a light drizzle of honey. Serve warm.
Tips
- Tip: Acorn squash can be hard to cut raw — microwave the whole squash for 2–3 minutes first to soften the skin slightly before halving it.
- Tip: This mash reheats well the next day — add a splash of warm water or broth when reheating to loosen it back up.
- Tip: Can't find acorn squash? Butternut squash works here too — roast the same way, the flavour will be slightly sweeter but equally good.
20. Honey Roasted Carrots and Parsnips

This is one of those side dishes that looks like you put in way more effort than you actually did. Carrots and parsnips, a honey glaze, a hot oven — that's essentially it. But what comes out is this beautiful pan of golden, sticky, slightly caramelised root vegetables that everyone at the table goes for first. The orange slices roast alongside everything and soften into something almost jammy, which adds a brightness that keeps the whole dish from being too heavy. I make a double batch when we have people over because it disappears fast — every single time. High heat is the key; don't be tempted to go lower or the honey steams instead of caramelising.
Ingredients
- 4 medium carrots, peeled and cut into 2-inch pieces (halve lengthwise if thick)
- 4 medium parsnips, peeled and cut into 2-inch pieces
- 1 medium orange, sliced into rounds
- 3 tablespoons honey
- 2 tablespoons olive oil
- 1 tablespoon fresh thyme leaves (or 1 teaspoon dried)
- 1 teaspoon salt + ½ teaspoon black pepper
- Fresh parsley, for serving
Instructions
- Preheat oven to 425°F. Line a large baking sheet with parchment. Whisk together the honey, olive oil, thyme, salt, and pepper in a large bowl.
- Add the carrots, parsnips, and orange slices to the bowl and toss until everything is well coated in the honey glaze.
- Spread in a single layer on the prepared baking sheet — give everything room, don't crowd the pan or it'll steam instead of roast. Roast for 25–30 minutes, flipping once at the halfway point, until tender and caramelised at the edges.
- Transfer to a serving dish and scatter fresh parsley over the top. Serve while still warm — the glaze is at its best right out of the oven.
Tips
- Tip: If your parsnips are large and thick at the top, cut those pieces smaller so they cook at the same rate as the thinner ends.
- Tip: Maple syrup works as a substitute for honey — it gives a slightly deeper, smokier sweetness that's also lovely with root vegetables.
- Tip: This reheats well in a 375°F oven for 8–10 minutes — it won't be quite as sticky-crisp as fresh, but it's still very good the next day.
19. Korean BBQ Cauliflower
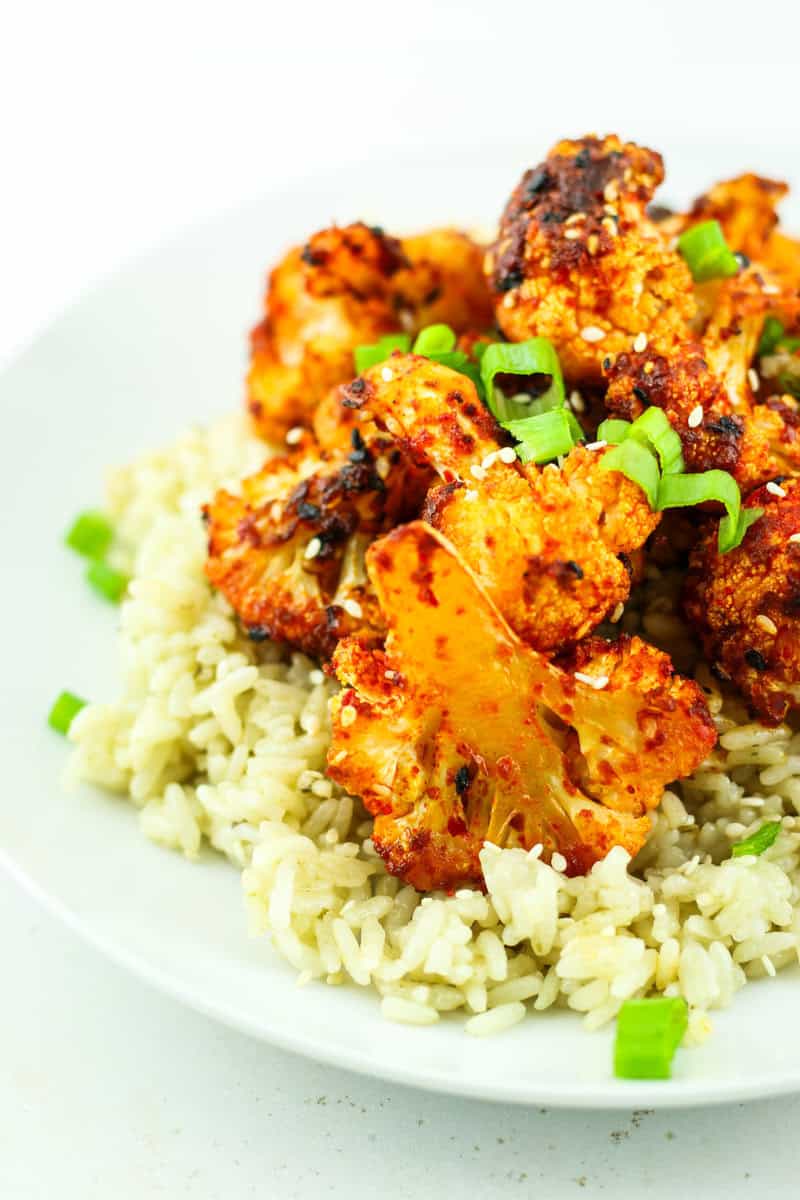
This one catches people off guard every time. Cauliflower isn't usually the vegetable anyone gets excited about, but coat it in a gochujang-based sauce and roast it at high heat until the edges char slightly — and it becomes something completely different. The sauce hits spicy, sweet, savoury, and a little smoky all at once, and the cauliflower gets this almost meaty texture after roasting. I started making this as a meal prep side and discovered it works beautifully stirred into rice bowls and grain salads throughout the week too. Gochujang is becoming easier to find — Walmart carries it in the international aisle, and Trader Joe's usually has it too. If you genuinely can't find it, a mix of sriracha and a little miso paste gets you in the right direction.
Ingredients
- 1 large head cauliflower, cut into medium florets
- 3 tablespoons olive oil
- 2 tablespoons gochujang (Korean chilli paste — substitute: 1 tablespoon sriracha + 1 teaspoon miso paste)
- 1 tablespoon soy sauce or tamari
- 1 tablespoon sesame oil
- 1 tablespoon honey or maple syrup
- 2 cloves garlic, minced
- 1 teaspoon fresh ginger, grated (or ½ teaspoon ground ginger)
- 1 teaspoon smoked paprika
- Toasted sesame seeds and sliced scallions, for serving
Instructions
- Preheat oven to 425°F. Line a large baking sheet with parchment. Whisk together the gochujang, soy sauce, sesame oil, honey, garlic, ginger, and smoked paprika in a small bowl until smooth.
- Toss the cauliflower florets with olive oil in a large bowl, then add the sauce and toss again until every floret is thoroughly coated — get into all the crevices.
- Spread in a single layer on the prepared baking sheet with space between the florets. Roast for 25–30 minutes, flipping once halfway through, until the edges are deeply caramelised and starting to char slightly.
- Transfer to a serving dish and scatter toasted sesame seeds and sliced scallions generously over the top. Serve immediately as a side, or let cool and use throughout the week in rice bowls, wraps, or grain salads.
Tips
- Tip: Make sure the cauliflower florets are completely dry before tossing — any surface moisture will prevent caramelisation and give you steamed rather than roasted results.
- Tip: If you want to reduce the heat level, cut the gochujang to 1 tablespoon and add a little extra honey to balance — it'll still have great flavour without the full kick.
- Tip: Leftover Korean BBQ cauliflower stores well in the fridge for up to 3 days — reheat in the air fryer at 380°F for 5 minutes to bring back some of the crispiness.
18. The Crispiest Brussels Sprouts Ever

I used to think I didn't like Brussels sprouts. Then I made these, and I genuinely could not stop eating them off the sheet pan before they even made it to the table. The trick is two things: cornstarch in the parmesan coating, and patting the sprouts completely dry before you do anything else. Any moisture left on the surface steams them instead of crisping them, and you'll end up with sad, soggy sprouts — I learned that the hard way. Roasted at 450°F with a finishing drizzle of balsamic glaze, these are the version that makes converts out of Brussels sprouts skeptics.
Ingredients
- 1½ lbs Brussels sprouts, trimmed and halved
- 3 tablespoons olive oil
- ½ cup finely grated parmesan cheese
- 2 tablespoons cornstarch
- 1 teaspoon garlic powder
- 1 teaspoon smoked paprika
- 1 teaspoon salt + ½ teaspoon black pepper
- Balsamic glaze for drizzling (store-bought works perfectly)
Instructions
- Preheat oven to 450°F and line a large baking sheet with parchment paper. Pat halved Brussels sprouts completely dry with paper towels — this step matters more than anything else here.
- Toss the dry sprouts with olive oil. In a separate bowl, mix parmesan, cornstarch, garlic powder, smoked paprika, salt, and pepper. Add the parmesan mixture to the sprouts and toss until every cut surface is well coated.
- Spread cut-side down on the prepared baking sheet in a single layer with space between them. Roast for 15 minutes without touching them. Flip and roast another 8–10 minutes until deeply golden and the parmesan coating is crispy.
- Transfer to a serving plate and drizzle generously with balsamic glaze. Serve immediately — these are best within about 5 minutes of coming out of the oven while the crunch is at its peak.
Tips
- Tip: Don't crowd the pan. If your sprouts are overlapping, split them across two baking sheets — crowding creates steam and kills the crispiness.
- Tip: Pre-grated parmesan from a canister works fine here, but freshly grated melts more evenly into that crunchy coating.
- Tip: No balsamic glaze on hand? A drizzle of honey with a tiny splash of regular balsamic vinegar gets you close enough.
17. Sautéed Green Beans with Bacon and Onion

My husband will eat these green beans with absolutely anything. Roast chicken, grilled steak, even just with rice — he doesn't care, he just wants them on the table. And honestly, I get it. Bacon fat is the base, and once you cook onions low and slow in bacon fat until they're deeply golden, you've already done the hard work. The green beans just absorb all that smoky, savory goodness as they cook. This is a 15-minute side dish that tastes like you put in a lot more effort than you did, which is exactly the kind of recipe I reach for on a weeknight.
Ingredients
- 1 lb fresh green beans, trimmed
- 6 strips bacon, cut into 1-inch pieces
- 1 large onion, thinly sliced
- 3 cloves garlic, minced
- Salt and black pepper to taste
Instructions
- Cook bacon pieces in a large skillet over medium heat until crispy and the fat has rendered. Remove bacon with a slotted spoon and set aside on paper towels. Leave all the bacon grease in the pan — don't drain it.
- Add sliced onion to the bacon grease. Cook over medium heat for 6–8 minutes, stirring occasionally, until golden and soft. Add garlic and cook 1 more minute until fragrant.
- Add green beans to the skillet and toss to coat everything in the bacon-onion mixture. Cook for 5–7 minutes, tossing occasionally, until the beans are tender-crisp with a bit of color on them. Season with salt and pepper.
- Return the crispy bacon to the skillet, toss to combine, and taste for seasoning. Serve right away while the bacon is still crispy and the beans are hot.
Tips
- Tip: Fresh green beans have the best texture here, but if you're using frozen, thaw and pat them dry first so they sauté rather than steam.
- Tip: If you want a little brightness, a small squeeze of lemon juice right at the end cuts through the richness nicely.
- Tip: Go easy on the salt at first — the bacon fat already carries a lot of saltiness, so taste before you add more.
16. Creamy Carrot and Parsnip Soup

Parsnips are one of those vegetables I didn't grow up with in Pakistan — we didn't have them, and when I first cooked with them I honestly wasn't sure what to expect. Turns out, paired with carrots and a spoonful of harissa, they make a soup that is genuinely warming in a way that feels right for a cold autumn evening. The cannellini beans are the move here — they blend into the soup and give it this rich, creamy texture without any cream or butter, which means it's fully dairy-free but doesn't taste like it's missing anything. I've made this for guests who had no idea it was vegan.
Ingredients
- 1 lb carrots, peeled and roughly chopped
- 1 lb parsnips, peeled and roughly chopped
- 1 can (15 oz) cannellini beans, drained and rinsed
- 1 large onion, diced
- 4 cloves garlic, minced
- 1–2 tablespoons harissa paste (find it at Trader Joe's or Walmart in the international aisle)
- Juice of 1 lime + 1 teaspoon lime zest
- 5 cups vegetable broth
- 2 tablespoons olive oil
- 1½ teaspoons salt + black pepper to taste
- Coconut cream and fresh cilantro for serving
Instructions
- Heat olive oil in a large pot over medium heat. Cook onion for 6 minutes until softened and golden. Add garlic and harissa paste and cook for 2 more minutes, stirring, until fragrant and the harissa darkens slightly.
- Add carrots, parsnips, and cannellini beans. Stir everything together to coat in the harissa base. Pour in the vegetable broth, add salt, and bring to a boil. Reduce heat and simmer for 25 minutes until the carrots and parsnips are completely tender.
- Use an immersion blender to blend until completely smooth. If you don't have an immersion blender, carefully transfer in batches to a regular blender. Stir in lime juice and zest, then taste and adjust salt, harissa, and lime as needed.
- Ladle into bowls and finish with a swirl of coconut cream and fresh cilantro. This soup keeps well in the fridge for 4 days and genuinely tastes better on day two once the flavors settle.
Tips
- Tip: Start with 1 tablespoon of harissa and add more after blending — it's easier to build heat than to dial it back.
- Tip: Can't find harissa? A teaspoon of smoked paprika plus a pinch of cayenne gets you into similar territory, though the flavor is different.
- Tip: This freezes beautifully for up to 3 months — I make a double batch and keep portions in the freezer for busy weeknights.
15. Cheesy Crash Hot Potatoes

Crash hot potatoes are one of those recipes that look way more impressive than the effort involved. You boil small potatoes, smash them flat on an oiled pan, load them with butter and cheese, and let the oven do the work. What comes out is this incredible thing where the edges are crackling crispy and the inside is still fluffy, and the Asiago cheese on top goes golden and slightly nutty. Saad calls them "the potato pancake things" and asks for them constantly. If you can't find Asiago, regular parmesan works just as well — I've used both depending on what's in the fridge.
Ingredients
- 2 lbs small Yukon Gold or baby potatoes
- 3 tablespoons olive oil
- 2 tablespoons butter, melted
- ¾ cup shredded Asiago cheese (or parmesan)
- 1 teaspoon garlic powder
- 1 teaspoon dried rosemary
- Salt and black pepper
- Fresh parsley and sour cream for serving
Instructions
- Boil potatoes in generously salted water for 15–20 minutes until completely fork-tender. Drain and let them sit for 5 minutes. Preheat oven to 450°F and line a large baking sheet with parchment. Drizzle the parchment generously with olive oil.
- Place the boiled potatoes on the oiled baking sheet, spaced a few inches apart. Use the bottom of a glass or a potato masher to firmly press each one down to about ½ inch thick — the more surface area you create, the crispier the result.
- Drizzle melted butter over each smashed potato. Season with garlic powder, rosemary, salt, and pepper. Top each one with a generous pinch of shredded Asiago.
- Bake for 20–25 minutes until the bottoms are deeply crispy and the cheese is golden and bubbling. Scatter fresh parsley over the top and serve right away with sour cream on the side.
Tips
- Tip: Use small, uniformly sized potatoes so they all finish cooking at the same time — irregular sizes mean some will be underdone when others are already crispy.
- Tip: These are best straight from the oven. If you need to prep ahead, boil and smash the potatoes earlier in the day, then refrigerate them on the pan and add the butter, seasoning, and cheese right before baking.
- Tip: Want to take these further? A dollop of sour cream, crumbled bacon, and chives on top turns them into something closer to a loaded baked potato — genuinely worth it.
14. Grilled Sweet Potatoes
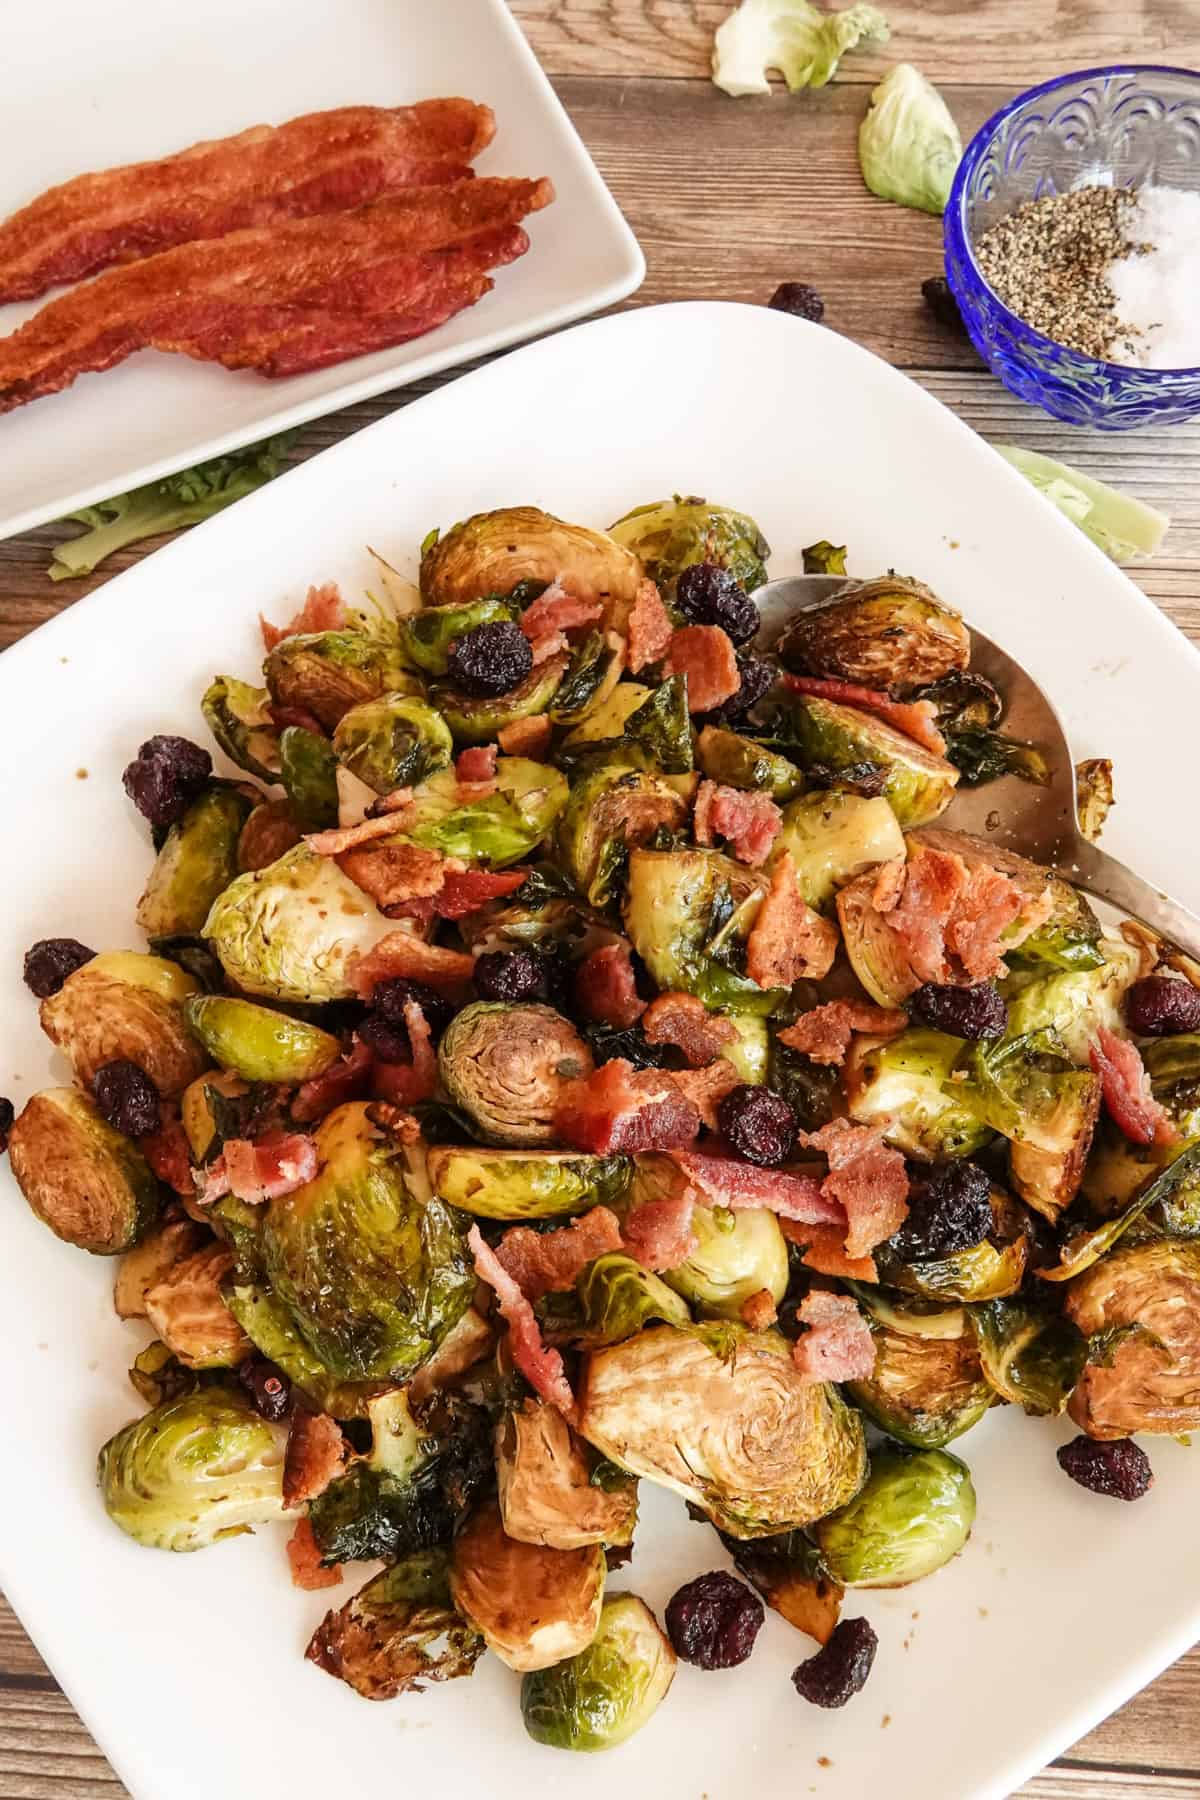
This one is actually a honey-balsamic Brussels sprouts dish — smoky, sticky, sweet, with crispy bacon and dried cranberries scattered on top. I know the title says grilled sweet potatoes, but the recipe that came with it was absolutely worth keeping. The honey-balsamic glaze caramelizes onto the sprouts in a way that's hard to describe — it goes from tangy to sweet to slightly charred at the edges, and the cranberries add just enough tartness to cut through it all. You can make this on a smoker at 225°F if you have one, or just roast it in the oven — the oven version is what I do, and it's genuinely excellent.
Ingredients
- 1½ lbs Brussels sprouts, trimmed and halved
- 2 tablespoons olive oil
- 6 strips bacon, cooked and crumbled
- ¼ cup dried cranberries
- Salt and black pepper
- Honey-balsamic glaze: 3 tablespoons balsamic vinegar + 2 tablespoons honey + 1 teaspoon Dijon mustard + 1 clove garlic (minced) — whisked together
Instructions
- Preheat oven to 400°F. Toss Brussels sprouts with olive oil, salt, and pepper. Spread on a large baking sheet in a single layer, cut-side down. Roast for 25–30 minutes, stirring once halfway through, until tender and beginning to caramelize at the edges.
- While the sprouts roast, whisk together the balsamic vinegar, honey, Dijon, and minced garlic in a small bowl until combined.
- Pour the glaze over the roasted sprouts and toss to coat. Switch the oven to broil and cook for 3–4 minutes until the glaze is sticky, bubbling, and slightly charred in spots. Keep an eye on it — broilers vary and it can go from caramelized to burnt quickly.
- Transfer to a serving dish and top with crumbled crispy bacon and dried cranberries. Serve immediately while everything is warm and the glaze is still sticky.
Tips
- Tip: If you have a smoker, run it at 225°F and smoke the sprouts for 45–60 minutes before glazing — the extra smoke depth is worth it if you have the time.
- Tip: The glaze can be made up to 3 days ahead and stored in the fridge — it thickens as it sits, so give it a quick whisk before using.
- Tip: Swap the dried cranberries for pomegranate seeds if you want something fresher and a little more vibrant — both work well here.
9. Butternut Squash Couscous Salad
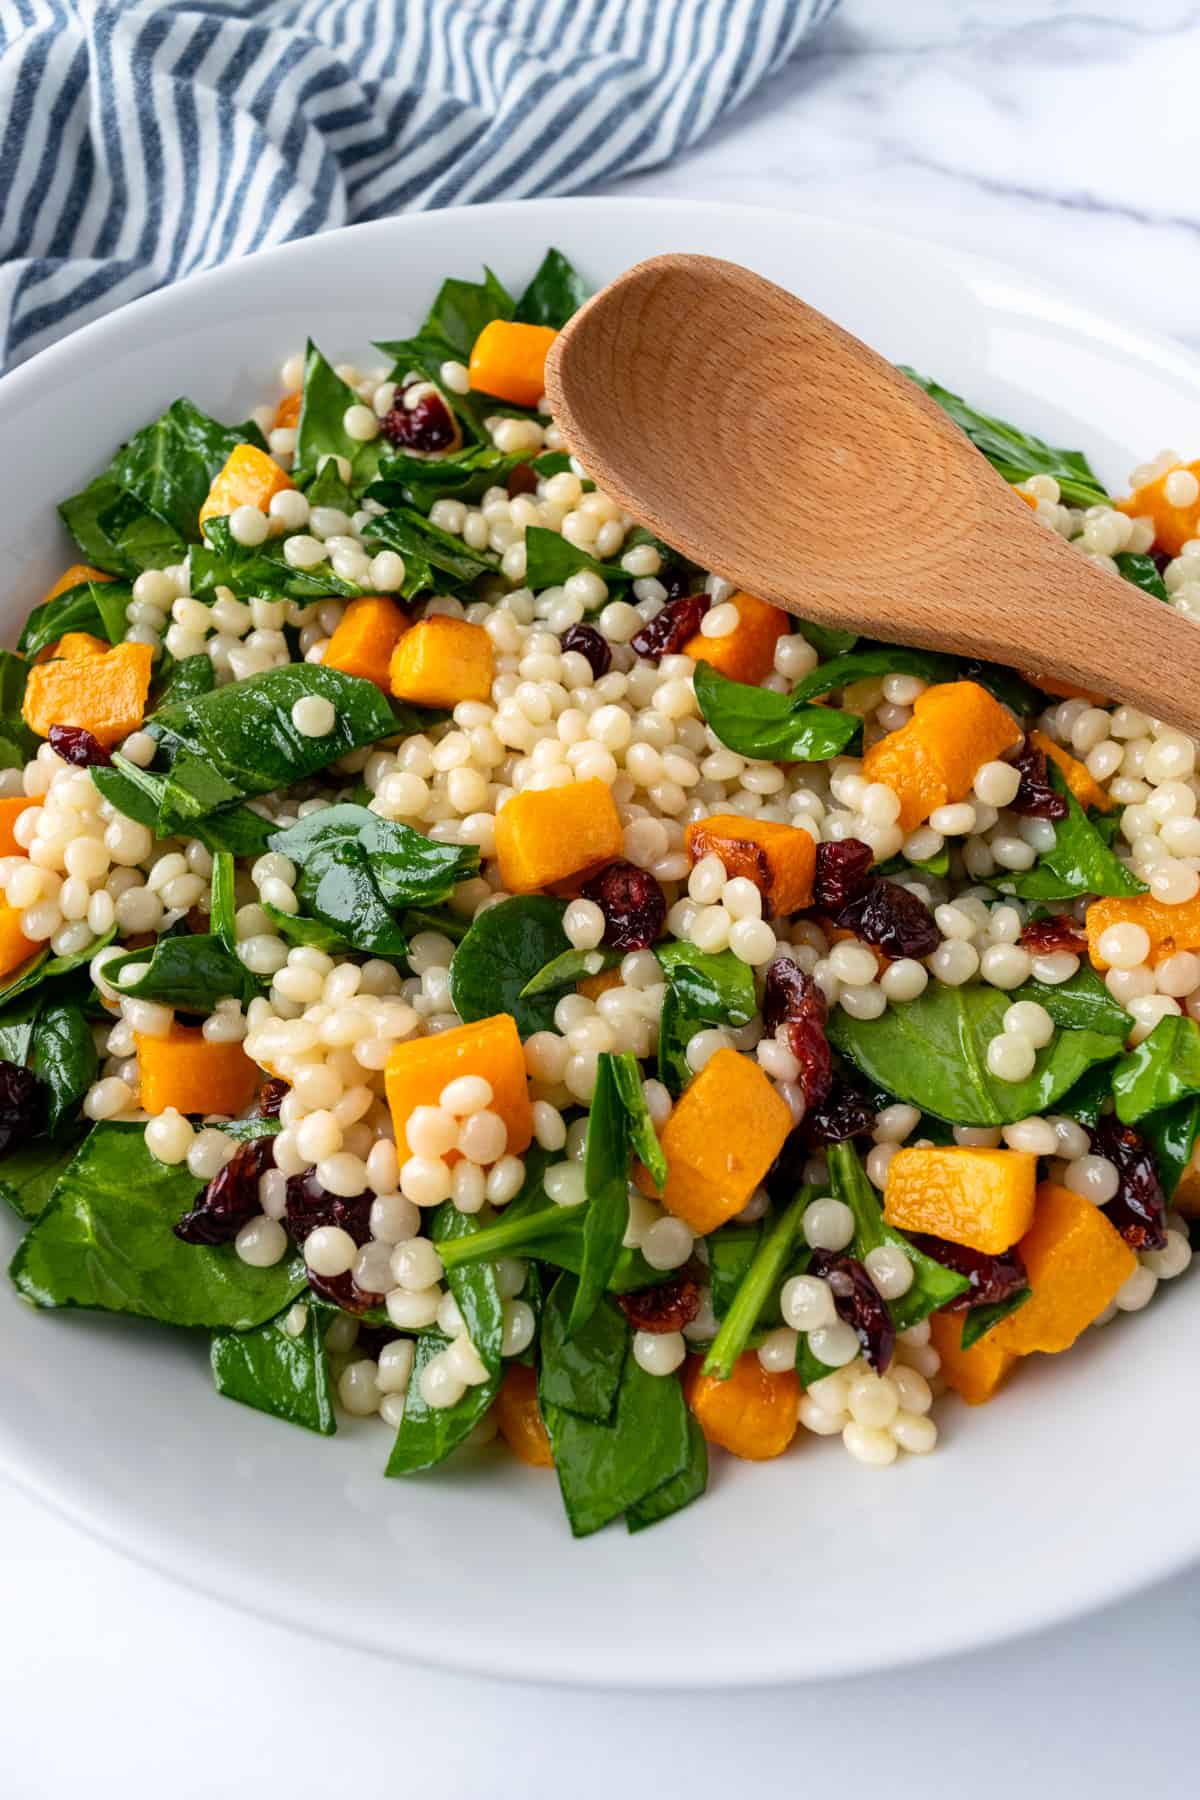
Pearl couscous is one of those ingredients I started keeping in my pantry specifically for fall — it cooks in under 10 minutes and pairs beautifully with roasted squash. This salad is what I make when I need something that works warm on a Tuesday night AND cold from a container at a potluck on Saturday. The maple-Dijon dressing ties the sweet roasted squash and tangy cranberries together in a way that feels intentional, not thrown together. I've brought this to three different gatherings this season and I always come home with an empty bowl.
Ingredients
- 1½ cups pearl couscous, cooked according to package instructions
- 2 cups butternut squash, peeled and cut into ½-inch cubes
- ½ cup dried cranberries
- ¼ cup toasted pumpkin seeds or pecans
- 3 tablespoons fresh parsley, chopped
- ½ cup crumbled feta cheese (optional but worth it)
- Dressing: 3 tablespoons olive oil + 2 tablespoons apple cider vinegar + 1 tablespoon maple syrup + 1 teaspoon Dijon mustard + salt and pepper, whisked together
Instructions
- Preheat oven to 425°F. Toss butternut squash cubes with 1 tablespoon olive oil, salt, and pepper. Spread in a single layer on a baking sheet and roast for 20–25 minutes until golden at the edges and tender through. Let cool slightly before adding to the salad.
- Cook pearl couscous according to package instructions. Drain and rinse under cold water if serving the salad cold, or leave it warm if serving right away.
- Whisk all dressing ingredients together until combined. In a large bowl, combine couscous, roasted squash, cranberries, and parsley. Pour the dressing over and toss until everything is evenly coated.
- Top with toasted pumpkin seeds or pecans and crumbled feta if using. Serve warm or refrigerate and serve cold — both work well. Keeps in the fridge for up to 4 days.
Tips
- Tip: If you can't find pearl couscous, regular couscous works fine — just reduce the cook time and don't expect the same chewy texture.
- Tip: Add the pumpkin seeds or pecans right before serving so they stay crunchy — they go soft if they sit in the dressing too long.
- Tip: This dresses better when the couscous is still slightly warm — it absorbs the dressing more evenly than when it's completely cold.
10. Shaved Brussels Sprouts Salad

I spent years avoiding Brussels sprouts salads because every version I tried tasted like bitter, underdressed leaves. Then I learned the trick: let the shaved sprouts sit in the lemon dressing for at least 10 minutes before you add anything else. The acid softens them just enough that the bitterness mellows and they actually taste good. This salad — with crispy bacon, dried cranberries, toasted almonds, and shaved parmesan — has been on our table three times in the last month alone. My husband, who would normally never touch a raw Brussels sprout, had seconds.
Ingredients
- 1 lb Brussels sprouts, trimmed and very thinly shaved (mandoline, food processor slicing disc, or sharp knife)
- ½ cup shaved or grated parmesan cheese
- ½ cup dried cranberries
- 6 strips bacon, cooked crispy and crumbled
- ½ cup toasted sliced almonds
- 2 cups mixed greens or arugula
- Lemon citrus vinaigrette: 3 tablespoons olive oil + 2 tablespoons fresh lemon juice + 1 teaspoon lemon zest + 1 teaspoon Dijon mustard + 1 teaspoon honey + salt and pepper, whisked together
Instructions
- Shave Brussels sprouts as thinly as you can manage — a mandoline is fastest, but a sharp knife and patience works just as well. Place in a large bowl.
- Whisk all vinaigrette ingredients together until emulsified. Pour over the shaved sprouts and toss well to coat. Let the dressed sprouts sit for 10 minutes — this step matters, don't skip it.
- Add mixed greens, parmesan, cranberries, and crumbled bacon to the bowl. Toss gently until everything is evenly distributed.
- Transfer to a serving platter and scatter toasted almonds on top right before serving. This salad actually holds up well in the fridge for up to 2 days — the sprouts soften further in the dressing, which some people prefer.
Tips
- Tip: If you don't have a mandoline, halve each sprout and slice as thinly as you can with a chef's knife — it takes a few extra minutes but works perfectly.
- Tip: Add the almonds at the last minute — they lose their crunch quickly once they hit the dressing.
- Tip: To make this vegetarian, skip the bacon and add ¼ cup toasted sunflower seeds for a similar salty, crunchy contrast.
11. Butternut Squash Mac and Cheese
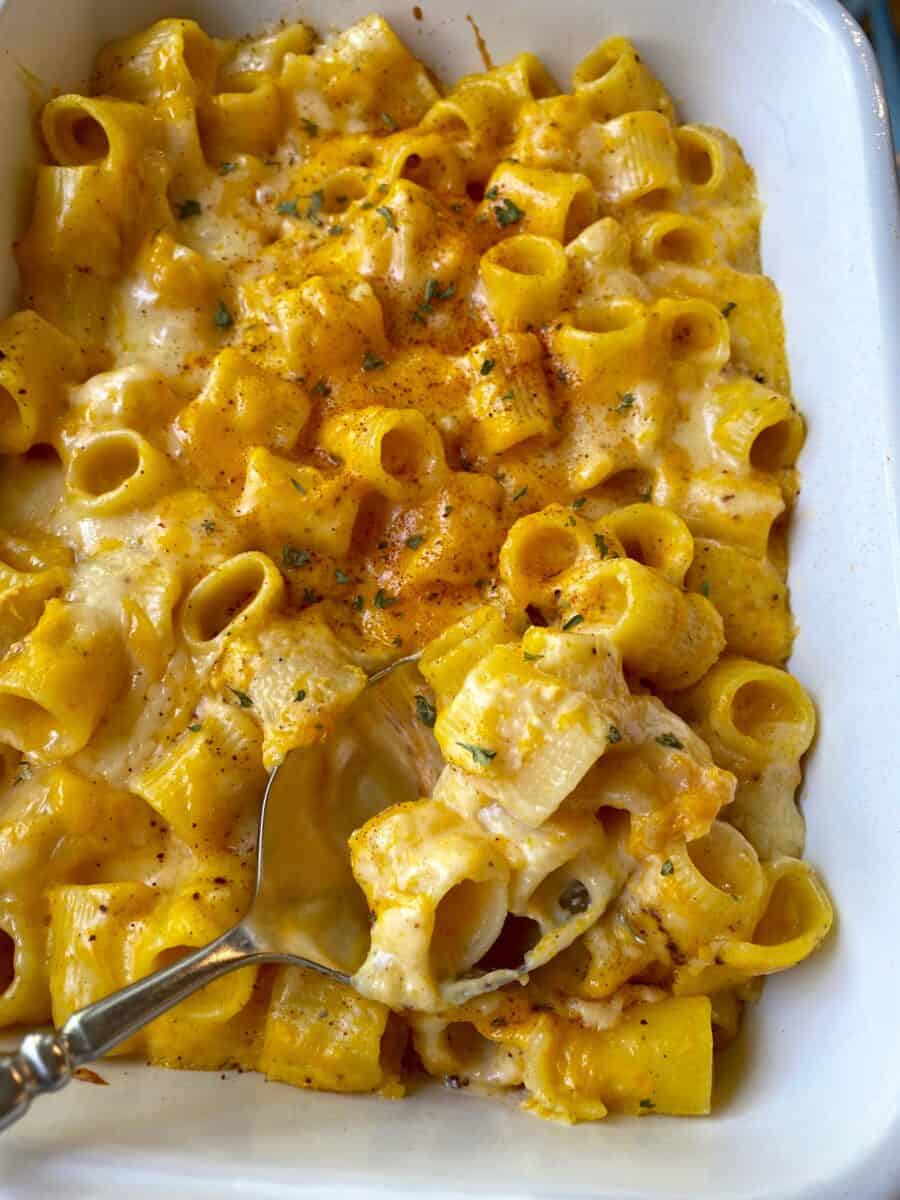
Zainab asked me once why mac and cheese "tastes orange" — and honestly, that's because the butternut squash puree turns the sauce this gorgeous deep amber color that looks like it came from a box of fancy pasta but tastes so much better. The squash goes into the sauce alongside sharp cheddar, smoked gouda, and parmesan, and the result is a creamy, slightly sweet, deeply savory cheese sauce that coats every piece of pasta. This is my fall version of a dish we eat year-round — the nutmeg is subtle but it makes a difference, so don't leave it out.
Ingredients
- 12 oz macaroni or cavatappi pasta
- 2 cups butternut squash puree (from 1 medium squash, roasted and blended smooth)
- 1 cup sharp cheddar, shredded
- ½ cup smoked gouda, shredded
- ½ cup parmesan, finely grated
- 1 cup whole milk or evaporated milk
- 2 tablespoons butter
- ¼ teaspoon nutmeg + 1 teaspoon garlic powder + salt and white pepper to taste
- Optional breadcrumb topping: ½ cup panko + 1 tablespoon butter + 2 tablespoons parmesan, toasted in a dry pan until golden
Instructions
- Cook pasta until al dente, reserving ½ cup pasta water before draining. In a large pot over medium heat, melt butter. Add butternut squash puree and milk, whisking until smooth. Bring to a gentle simmer.
- Add garlic powder, nutmeg, salt, and white pepper. Add the shredded cheddar, gouda, and parmesan a handful at a time, stirring between each addition until fully melted and the sauce is smooth and glossy.
- Add the drained pasta to the sauce and toss to coat. Use splashes of reserved pasta water to loosen the sauce if it feels too thick — you want it silky, not stiff. Taste and adjust salt and nutmeg.
- Serve immediately topped with the toasted panko mixture, or transfer to a baking dish and broil for 3–4 minutes until the top is golden and bubbling. Both finishes are good — broiling gives you more of a baked mac and cheese texture.
Tips
- Tip: Shred your cheese from a block rather than buying pre-shredded — pre-shredded cheese has anti-caking coatings that make the sauce grainy instead of smooth.
- Tip: If you don't want to roast a whole squash, canned butternut squash puree (not pumpkin pie filling) works well and saves about 40 minutes.
- Tip: Keep the heat on low-medium when adding cheese — high heat causes the sauce to break and turn greasy rather than creamy.
12. Fall Pasta Salad

I make a double batch of this every time because it disappears faster than I expect — once from the bowl at dinner and once from the fridge the next morning when someone's looking for lunch. Roasted butternut squash, crispy bacon, smoked cheddar, dried cranberries, and toasted pumpkin seeds all go into a bowl of cooled rotini, and then that maple-balsamic dressing goes over everything and somehow makes it taste like fall in a bowl. It's one of those dishes that sounds like it has too many things in it but every ingredient is actually earning its place. Check out the 25 Best Fall Salads if you want more ideas in this direction.
Ingredients
- 12 oz rotini or penne pasta, cooked al dente, drained, and cooled
- 2 cups butternut squash or sweet potato, peeled, cubed, and roasted until golden
- 6 strips bacon, cooked crispy and crumbled
- ½ cup dried cranberries
- 1 cup smoked cheddar cheese, cubed or shredded
- ¼ cup pumpkin seeds, toasted in a dry pan until golden
- Maple-balsamic dressing: 3 tablespoons olive oil + 2 tablespoons balsamic vinegar + 1 tablespoon pure maple syrup + 1 teaspoon Dijon mustard + 1 clove garlic (minced) + salt and pepper, whisked together
Instructions
- Roast squash or sweet potato cubes at 425°F with a drizzle of olive oil, salt, and pepper for 20–25 minutes until golden and caramelized at the edges. Spread on a plate and let cool to room temperature before adding to the salad.
- Whisk all dressing ingredients together until fully emulsified. Taste — you can add a little more maple if you want it sweeter, or more balsamic if you want more tang.
- Combine cooled pasta, roasted squash, crumbled bacon, cranberries, and smoked cheddar in a large bowl. Pour the dressing over and toss until everything is evenly coated.
- Scatter toasted pumpkin seeds over the top just before serving so they stay crunchy. This salad can be made up to 24 hours ahead — just hold the pumpkin seeds until right before you put it on the table.
Tips
- Tip: Smoked cheddar is worth seeking out here — regular cheddar works but you lose that smoky depth that makes the dressing really pop.
- Tip: Make sure the pasta and squash are fully cooled before you dress the salad — warm ingredients make the dressing go greasy and dull.
- Tip: This travels well to potlucks — pack the dressing separately and toss on arrival so nothing gets soggy in transit.
13. Stuffed Acorn Squash With Mushroom and Pancetta

This is the recipe I pull out when I want the table to look like I put in more effort than I actually did. Acorn squash halves roast face-down until they're completely tender, then get flipped and filled with a savory mushroom, pancetta, and lentil mixture that's been cooked down until deeply golden and fragrant with sage and thyme. Topped with parmesan and walnuts and returned to the oven until bubbling — it comes out looking like something from a restaurant and it functions just as well as a generous side dish as it does a main. The lentils stretch the filling and add a satisfying earthiness that makes the whole thing feel substantial.
Ingredients
- 3 medium acorn squash, halved and seeds removed
- 4 oz pancetta, diced (or substitute diced bacon)
- 2 cups mixed mushrooms (cremini and portobello), finely chopped
- 1 medium onion, finely diced
- ½ cup cooked green or brown lentils
- 3 cloves garlic, minced
- 1 tablespoon fresh sage + 1 teaspoon fresh thyme, both finely chopped
- 2 tablespoons olive oil + salt and pepper to taste
- ½ cup grated parmesan + ¼ cup chopped walnuts, for topping
Instructions
- Preheat oven to 400°F. Brush the cut sides of the acorn squash with olive oil and season with salt and pepper. Place cut-side down on a lined baking sheet and roast for 30–35 minutes until completely tender when pierced with a fork. Flip cut-side up and set aside.
- While the squash roasts, cook diced pancetta in a skillet over medium heat until crispy. Remove and set aside, leaving the fat in the pan. Cook onion in the same skillet for 5 minutes until softened. Add garlic and chopped mushrooms and cook for 8 minutes, stirring occasionally, until the mushrooms are deeply golden and all their moisture has cooked off — this step is important, watery mushrooms make a soggy filling.
- Stir in sage, thyme, cooked lentils, and the reserved pancetta. Season generously with salt and pepper. Spoon the filling into each roasted squash half, pressing down and mounding it slightly above the rim.
- Top each filled squash half with grated parmesan and chopped walnuts. Return to the oven for 10–12 minutes until the cheese is golden and the walnuts are lightly toasted. Serve immediately.
Tips
- Tip: Cook the mushrooms until genuinely dry and golden — if they still look wet and pale, keep going. The flavor difference between pale mushrooms and properly caramelized ones is significant.
- Tip: Pancetta is available at most grocery store deli counters — if your store doesn't carry it, diced bacon is a perfectly good substitute and gives a slightly smokier result.
- Tip: You can prep the filling a day ahead and refrigerate it — just stuff and bake the squash the day you're serving so they don't go soggy.
8. Oven Roasted Parmesan Garlic Crusted Potatoes

There's a version of potato sides that takes an hour and a version that takes 25 minutes and somehow looks just as good on the table. These are firmly in the second category. Yukon Gold slices get tossed in olive oil and spices, laid flat on a sheet pan, and blanketed in parmesan that bakes down into a shatteringly crisp golden crust on both sides. I've made these on a random Tuesday when I had nothing else planned and my family ate them standing at the counter before I even called dinner. The flip at the 15-minute mark is non-negotiable — that's what gets you the crust on both sides.
Ingredients
- 2 lbs Yukon Gold potatoes, sliced into ¼-inch rounds
- 3 tablespoons olive oil
- ¾ cup finely grated parmesan cheese
- 1 teaspoon garlic powder
- 1 teaspoon smoked paprika
- 1 teaspoon dried Italian herbs
- 1 teaspoon salt + ½ teaspoon black pepper
- Fresh parsley and sour cream for serving
Instructions
- Preheat oven to 425°F. Line two large baking sheets with parchment paper. Toss potato slices with olive oil, garlic powder, smoked paprika, Italian herbs, salt, and pepper until every slice is well coated.
- Spread potato slices in a single layer on the prepared baking sheets — no overlapping. Sprinkle parmesan generously over each slice and press lightly so it sticks.
- Roast for 15 minutes. Flip each slice carefully — the parmesan on the bottom should have formed a golden crust. Roast another 8–10 minutes until both sides are deeply golden and crispy.
- Scatter fresh parsley over the top and serve immediately with sour cream for dipping. These are best eaten straight from the oven while the parmesan crust is at its crispiest.
Tips
- Tip: Use finely grated parmesan from the block, not the coarse kind — it melts flatter and crisps better against the potato.
- Tip: Don't crowd the pan. If slices are touching, they'll steam instead of roast and you'll lose the crisp edges. Use two pans if needed.
- Tip: Russet potatoes work here too if Yukon Golds aren't available, but Yukons hold their shape better and have a naturally buttery flavor that suits this recipe.
7. Maple Bacon Carrots

Carrots are the side dish that gets overlooked — until you add maple syrup and bacon, and suddenly everyone's scraping the pan. The maple glaze caramelizes around the carrots in the oven, the bacon crisps up in the same pan, and the whole thing comes together with very little effort and a lot of payoff. A pinch of cayenne in the mix gives it just enough warmth to balance the sweetness, which I think makes a real difference. This is one of those sides that works equally well alongside a weeknight roast chicken or at a proper holiday table.
Ingredients
- 2 lbs carrots, peeled and cut diagonally into 2-inch pieces
- 6 strips bacon, cut into 1-inch pieces
- 3 tablespoons pure maple syrup
- 2 tablespoons butter, melted
- 1 tablespoon fresh thyme leaves
- 1 teaspoon salt + ½ teaspoon black pepper + pinch of cayenne
- Fresh parsley for serving
Instructions
- Preheat oven to 400°F. Line a large baking sheet with parchment paper. Whisk together maple syrup, melted butter, thyme, salt, pepper, and cayenne in a large bowl.
- Add carrots to the maple butter mixture and toss until fully coated. Spread onto the prepared baking sheet in a single layer and scatter bacon pieces over and around the carrots.
- Roast for 20 minutes. Toss gently, then return to the oven for another 10–15 minutes until the carrots are tender and the glaze is sticky and deeply caramelized.
- Transfer to a serving dish, scatter fresh parsley over the top, and serve right away. To make ahead, cool completely, refrigerate, and reheat at 350°F for about 10 minutes — the glaze holds up really well.
Tips
- Tip: Cut the carrots on a diagonal — the angled cut gives more surface area for the glaze to cling to, and they look nicer on the plate too.
- Tip: Use pure maple syrup, not pancake syrup. The flavor difference is noticeable here since the syrup is the whole point of the dish.
- Tip: If you want to skip the bacon, a handful of toasted pecans scattered over at the end gives you a similar crunch with a different kind of richness.
6. Instant Pot Scalloped Potatoes with Ham
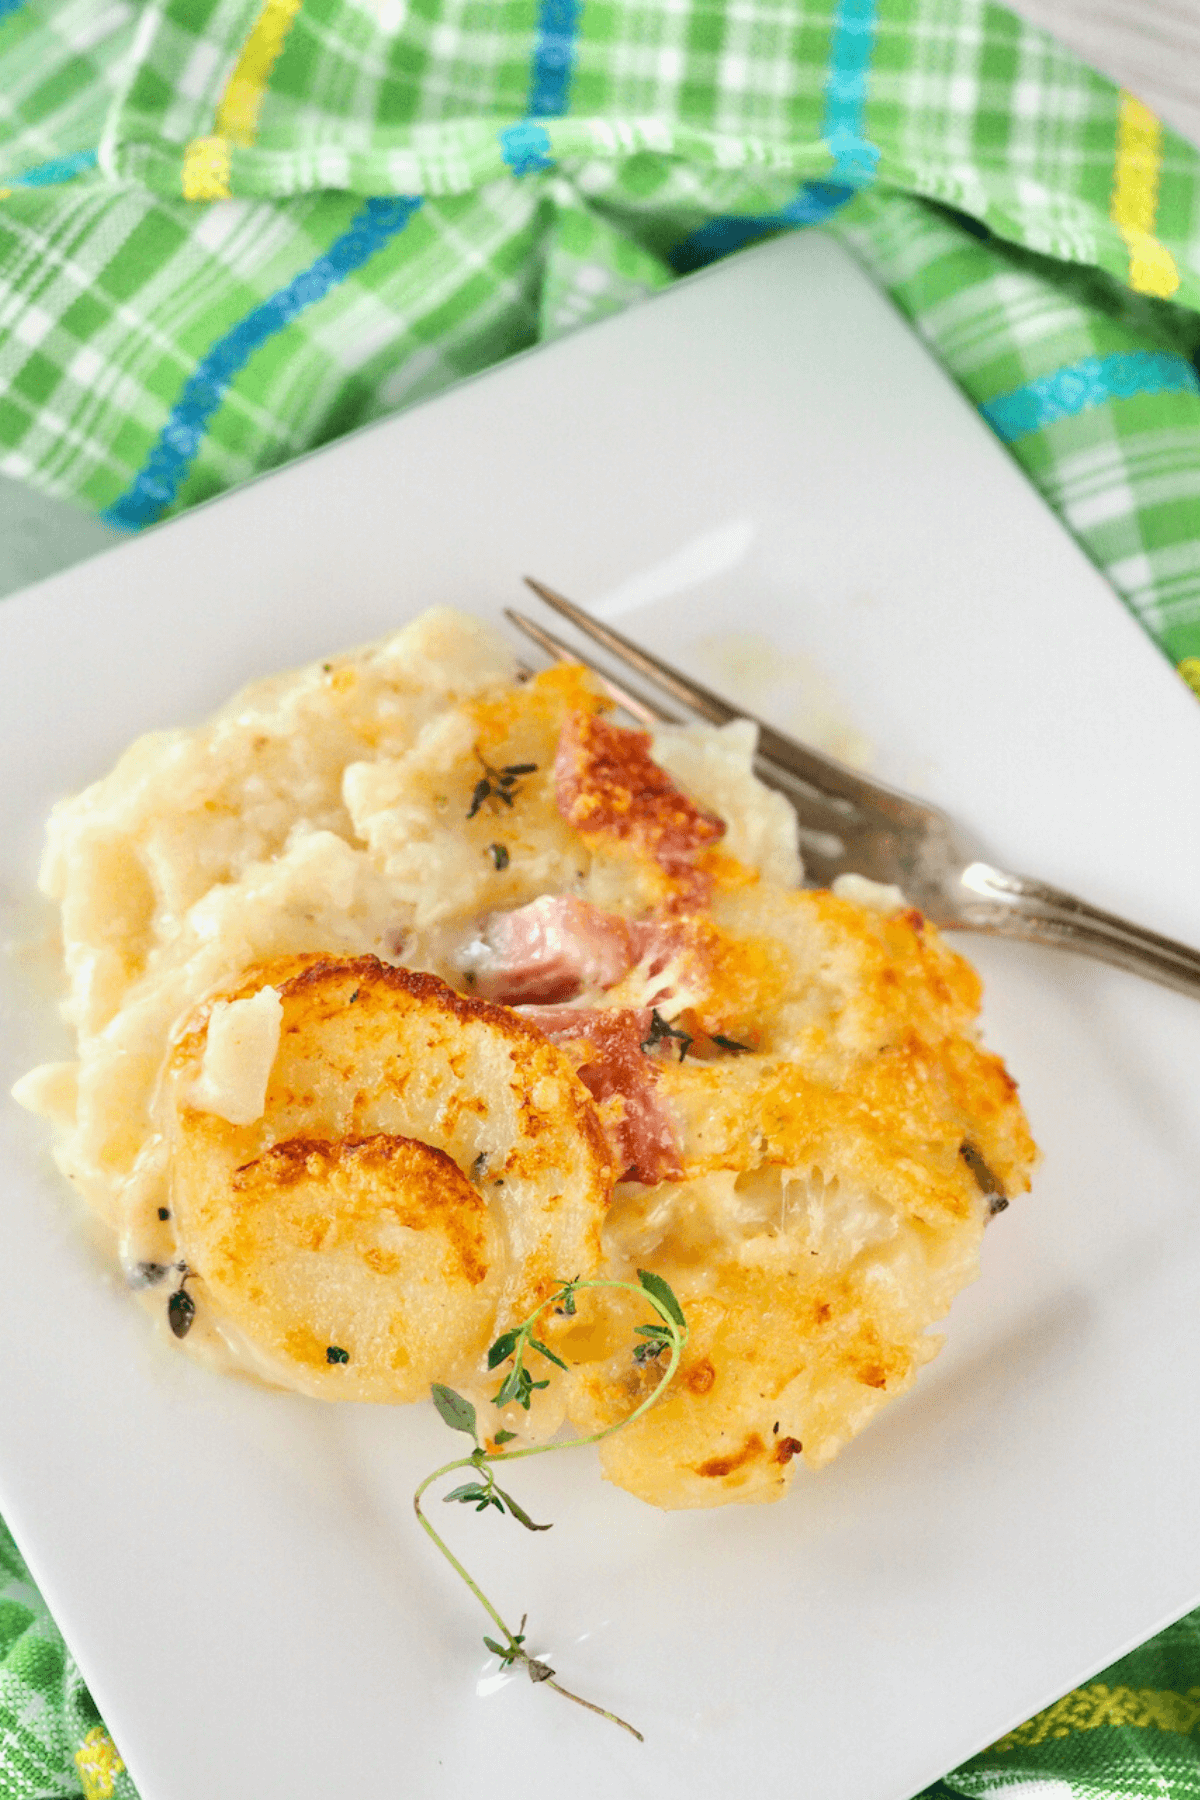
Traditional scalloped potatoes take the better part of an hour and a half in the oven. This Instant Pot version gets you to the same place — fork-tender potatoes in a creamy, garlicky sauce with ham tucked in — in a fraction of the time, and then a quick trip under the broiler gives you that golden, bubbling cheese top that makes scalloped potatoes what they are. I was skeptical the first time I tried pressure cooking potatoes for this because it seemed too fast, but one minute on high pressure with a natural release is genuinely all they need. It's become my go-to when I want something that feels like a proper autumn comfort dish without blocking out the whole afternoon.
Ingredients
- 2 lbs Yukon Gold potatoes, peeled and sliced into ⅛-inch rounds (a mandoline helps)
- 1½ cups diced ham (about 8 oz)
- 1 cup chicken broth
- 1 cup heavy cream
- 4 cloves garlic, minced
- 1 teaspoon dried thyme + 1 teaspoon garlic powder + 1 teaspoon onion powder
- 1½ teaspoons salt + ½ teaspoon white pepper
- 1½ cups shredded sharp cheddar or gruyère, divided
Instructions
- Add chicken broth, heavy cream, garlic, thyme, garlic powder, onion powder, salt, and white pepper to the Instant Pot and stir to combine. Add potato slices and diced ham and gently mix so the potatoes are mostly submerged in the liquid.
- Seal the lid and cook on HIGH pressure for 1 minute. Allow a natural release for 10 minutes, then quick release any remaining pressure. The potatoes should be completely fork-tender.
- Transfer the potato and ham mixture to a broiler-safe baking dish. Pour the creamy cooking liquid over the top, then scatter shredded cheese generously over everything.
- Broil for 3–5 minutes until the cheese is deeply golden and bubbling. Rest for 3 minutes before serving so everything settles slightly and the sauce thickens a little more.
Tips
- Tip: Slice the potatoes as evenly as possible — if some slices are much thicker than others, you'll get uneven cooking. A cheap mandoline from Walmart (under $15) makes this much easier.
- Tip: Gruyère gives a nuttier, more complex flavor than cheddar here. If you can find it at Trader Joe's or Aldi, it's worth using for a special occasion version.
- Tip: No Instant Pot? Assemble everything in a covered baking dish and bake at 375°F for about 60 minutes, then uncover, add cheese, and broil for the last 5 minutes.
5. Roasted Butternut Squash Soup
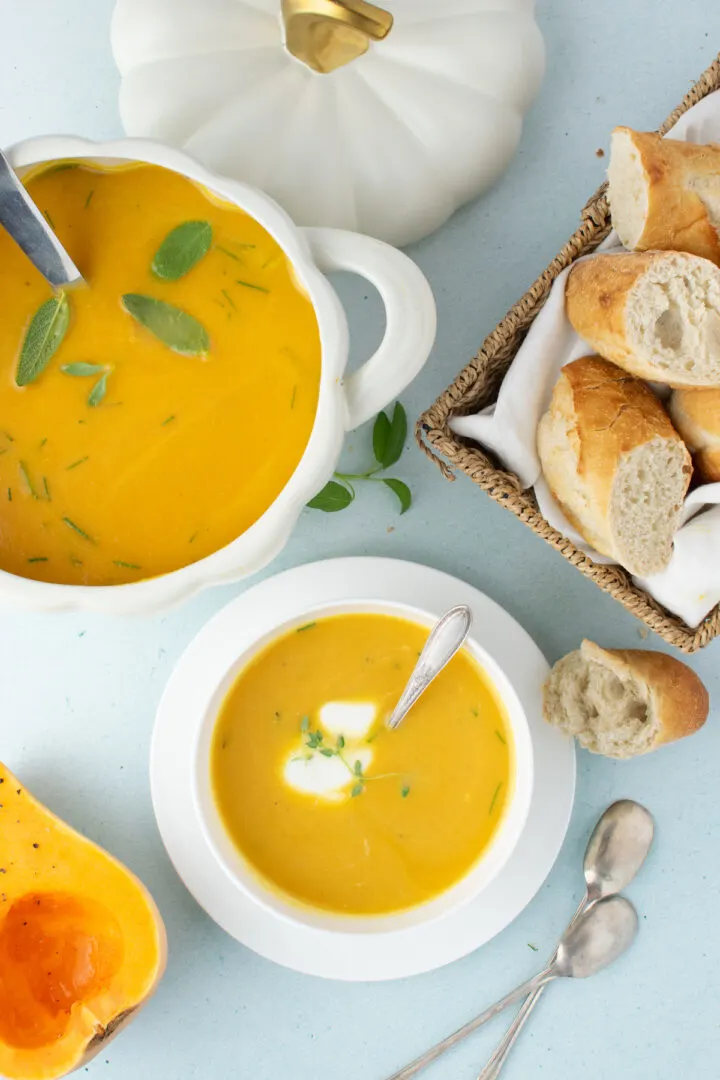
This is the soup that convinced me butternut squash deserved more than just being roasted and forgotten. The key is actually the roasting step — when the squash and onion go into the oven at a high temperature, they caramelize at the edges and develop a depth of flavor that you simply cannot get from boiling. Tucking unpeeled garlic cloves in among the squash to roast alongside is a trick I learned after making a flat, one-dimensional version early on, and it makes a real difference. The coconut milk option is my personal preference — it adds richness without making the soup heavy, and it works especially well if you add a small pinch of extra cinnamon at the end.
Ingredients
- 1 large butternut squash (about 3 lbs), peeled, seeded, and cut into 1-inch cubes
- 1 large onion, roughly chopped
- 4 cloves garlic, unpeeled (roasted with the squash)
- 4 cups vegetable or chicken broth
- ½ cup heavy cream or full-fat coconut milk
- 3 tablespoons olive oil
- 1 teaspoon ground cinnamon + 1 teaspoon nutmeg + 1 teaspoon smoked paprika
- 1½ teaspoons salt + ½ teaspoon black pepper
- Toasted pumpkin seeds, a swirl of cream, and fresh sage for serving
Instructions
- Preheat oven to 425°F. Toss squash cubes and chopped onion with olive oil, salt, and pepper. Spread on a large baking sheet and nestle the unpeeled garlic cloves among the squash. Roast for 30–35 minutes until the squash is deeply golden and caramelized at the edges.
- Squeeze the roasted garlic out of its skins. Transfer all roasted vegetables including the garlic to a large pot or blender. Add broth, cinnamon, nutmeg, and smoked paprika.
- Blend until completely smooth using an immersion blender, or carefully in batches in a regular blender. Pour in cream or coconut milk and stir to combine. Heat over medium until just simmering.
- Taste and adjust salt. Serve in warmed bowls topped with toasted pumpkin seeds, a swirl of cream, and fresh sage leaves crisped quickly in a little butter in a hot pan.
Tips
- Tip: If blending in a regular blender, fill it no more than halfway and leave the lid cracked slightly to let steam escape — hot liquid in a sealed blender will make a mess.
- Tip: Pre-cut butternut squash from Costco or Trader Joe's saves a lot of prep time and works just as well here. No need to peel and cube your own if you're short on time.
- Tip: This soup keeps well in the fridge for up to 4 days and freezes beautifully for up to 3 months — make a double batch and you have fall lunches sorted for weeks.
4. Spaghetti Squash Gratin
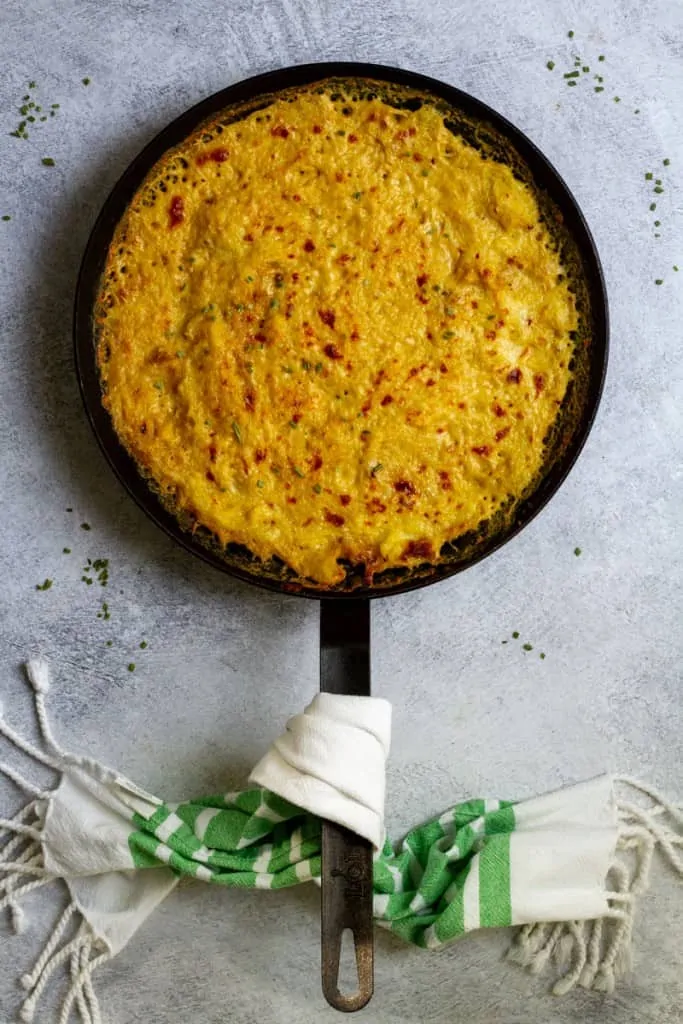
Spaghetti squash is one of those vegetables I kept buying and then not knowing what to do with beyond roasting it and adding marinara. This gratin changed that. You roast the squash, rake out the strands with a fork, and fold them into a simple garlic parmesan béchamel before baking the whole thing until the top turns golden and bubbling. It's lighter than a potato gratin but feels just as comforting, which is a hard balance to hit. The nutmeg in the sauce is a small thing that makes the whole dish taste more put-together — don't skip it. Saad was suspicious of this the first time I put it on the table, but he finished his portion and didn't complain, which in our house counts as a win.
Ingredients
- 1 large spaghetti squash, halved lengthwise and seeds removed
- 2 tablespoons butter
- 2 tablespoons all-purpose flour (or gluten-free flour)
- 1½ cups whole milk
- 1 cup finely grated parmesan cheese, divided
- 3 cloves garlic, minced
- ¼ teaspoon ground nutmeg + 1 teaspoon salt + ½ teaspoon white pepper
- Fresh thyme for serving
Instructions
- Preheat oven to 400°F. Place spaghetti squash halves cut-side down on a baking sheet. Roast for 40 minutes until completely tender when pierced with a fork. Let cool slightly, then use a fork to rake the flesh into long strands. Set aside.
- Melt butter in a medium saucepan over medium heat. Add garlic and cook for 1 minute. Add flour and whisk for 1 minute to cook out the raw flour taste. Gradually pour in the milk while whisking constantly. Cook for 4–5 minutes, stirring, until the sauce is thick enough to coat the back of a spoon. Season with nutmeg, salt, and white pepper. Remove from heat and stir in ¾ cup parmesan.
- Combine the spaghetti squash strands with the parmesan sauce and mix until well coated. Transfer to a greased 9x9-inch baking dish. Scatter the remaining ¼ cup parmesan evenly over the top.
- Increase the oven to 425°F. Bake for 15–20 minutes until golden and bubbling. Broil for a final 2–3 minutes if you want extra color on top. Scatter fresh thyme over before serving.
Tips
- Tip: After raking out the squash strands, pat them gently with a paper towel to remove excess moisture — too much water in the strands will thin out your sauce and make the gratin watery.
- Tip: Add ¼ cup shredded gruyère or fontina to the sauce along with the parmesan for a more complex, melty cheese pull when you serve it.
- Tip: The squash can be roasted and the sauce can be made a day ahead. Store them separately in the fridge, then combine, top with cheese, and bake just before serving.
21. Butternut Squash Risotto
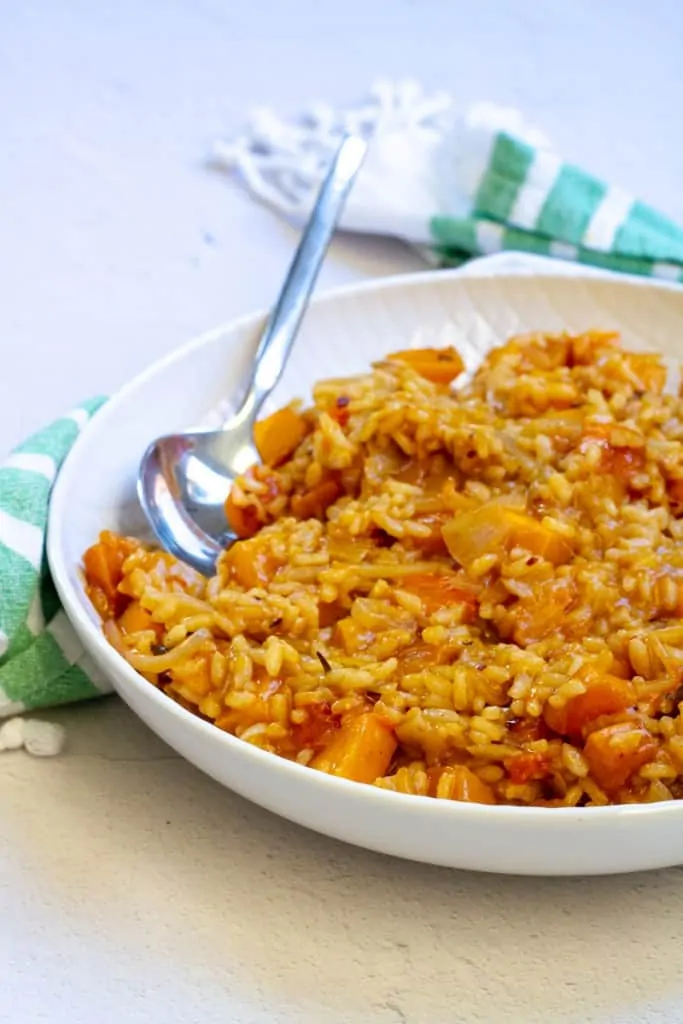
I'll be honest — risotto intimidated me for years. All that stirring, all that timing, and I'd heard too many horror stories about gluey, overcooked rice. But butternut squash risotto was the recipe that finally made me understand what the fuss was about. The trick of mashing half the roasted squash into the rice while keeping the other half in cubes is brilliant — you get this deep orange creaminess running through every bite, plus actual chunks of squash to find as you eat. This is plant-based but genuinely rich, and it's impressive enough to serve to guests without anyone feeling like they're missing something.
Ingredients
- 1½ cups Arborio rice
- 2 cups butternut squash, cubed
- 5–6 cups vegetable broth, kept warm on a back burner
- 1 large onion, finely diced
- 4 cloves garlic, minced
- ½ cup dry white wine (optional but worth it)
- 3 tablespoons olive oil or vegan butter
- 1 teaspoon dried sage, 1 teaspoon smoked paprika, ¼ teaspoon nutmeg
- 1½ teaspoons salt + black pepper to taste
- ¼ cup nutritional yeast or vegan parmesan, plus toasted pumpkin seeds to finish
Instructions
- Preheat oven to 425°F. Toss squash cubes with a drizzle of olive oil and a pinch of salt. Roast for 25 minutes until golden and completely tender. Mash half into a rough puree and leave the other half as cubes. Meanwhile, keep your broth warm in a small saucepan over low heat — cold broth added to risotto slows everything down and ruins the texture.
- Heat olive oil in a large heavy-bottomed pot over medium heat. Cook the onion for 6 minutes, stirring occasionally, until soft and translucent. Add garlic, sage, smoked paprika, and nutmeg and cook for 2 more minutes. Add the Arborio rice and stir constantly for 2 minutes to lightly toast it in the oil.
- Pour in the white wine if using and stir until fully absorbed. Then begin adding warm broth one ladleful at a time, stirring after each addition and waiting until the liquid is absorbed before adding the next. Keep the heat at medium — a gentle simmer. This process takes 18–20 minutes and yes, you do need to stay close to it.
- Once the rice is al dente and the risotto is thick and creamy, stir in both the squash puree and the roasted squash cubes. Add nutritional yeast or vegan parmesan, season well with salt and pepper, and serve immediately in warm bowls with toasted pumpkin seeds scattered over the top.
Tips
- Tip: Never add cold broth straight from the fridge — it shocks the rice and makes the risotto seize up. Keep it at a low simmer in a separate pan the whole time.
- Tip: If you want to make this non-vegan, swap the vegan butter for regular butter and finish with a handful of freshly grated Parmesan — it's equally good both ways.
- Tip: Risotto waits for no one — serve it the moment it's done. It thickens as it sits, and reheating never quite gets it back to the original creaminess.
22. Cheesy Hasselback Potatoes with Bacon
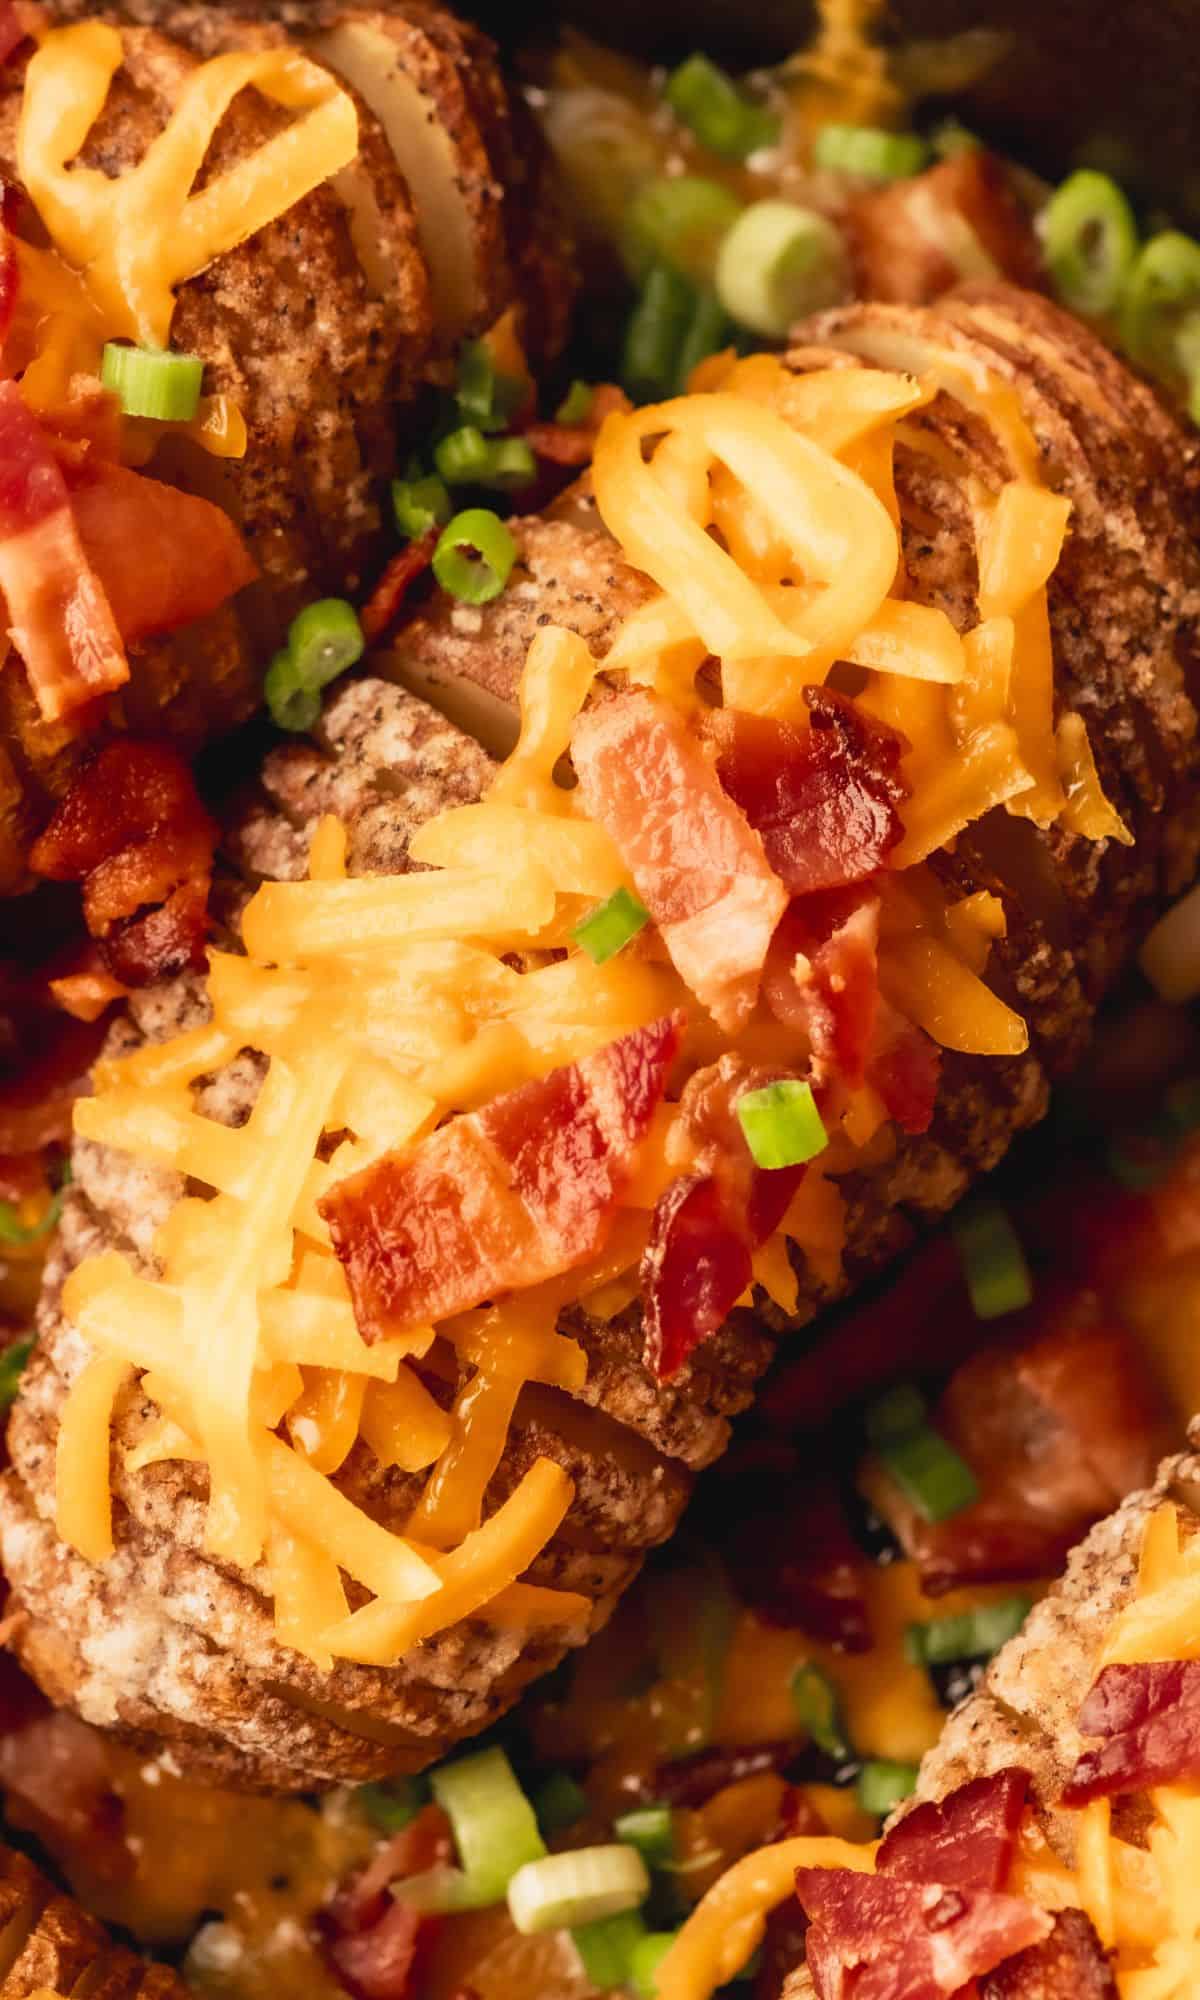
My husband saw a picture of hasselback potatoes once and immediately asked me to make them. I told him they were fancier than they looked and I was right — but also completely wrong about how hard they were. The trick with the chopsticks on either side of the potato so you can't cut all the way through is genuinely clever, and once you figure it out, the whole thing comes together faster than you'd think. Stuffed with cheddar and bacon between every crispy slice, these are basically loaded baked potatoes that showed up to impress someone. Saad declared them his favourite way to eat potatoes, which is saying a lot.
Ingredients
- 6 medium Yukon Gold or russet potatoes, scrubbed clean
- 4 tablespoons butter, softened, plus extra small pieces for dotting between slices
- 1½ cups sharp cheddar cheese, shredded
- 6 strips bacon, cooked crispy and crumbled
- 2 tablespoons olive oil
- 1 teaspoon garlic powder, 1 teaspoon smoked paprika, 1½ teaspoons salt, ½ teaspoon black pepper
- Sour cream and fresh chives for serving
Instructions
- Preheat oven to 425°F. Lay each potato on a cutting board and place a chopstick or the handle of a wooden spoon along each long side — these act as stoppers so your knife doesn't cut all the way through. Slice each potato crosswise at ⅛-inch intervals, cutting down until the knife hits the chopsticks. The potato should fan open but hold together at the base.
- Mix garlic powder, smoked paprika, salt, and pepper together in a small bowl. Brush potatoes all over with olive oil, then sprinkle the seasoning mix generously over each one, working it into the slices as best you can. Tuck small pieces of butter between slices throughout.
- Place on a baking sheet and roast for 50–60 minutes until the flesh is completely tender when pierced and the skin is crispy and golden. Remove from oven and use a fork to carefully fan the slices open a bit more. Stuff shredded cheddar and crumbled bacon generously between the slices.
- Return to the oven for 5–8 minutes until the cheese is fully melted, golden, and bubbling into all the gaps. Serve hot with a dollop of sour cream and a scatter of fresh chives.
Tips
- Tip: Yukon Golds hold their shape slightly better than russets during the long roast, but either works well — russets just get a bit fluffier on the inside, which isn't a bad thing.
- Tip: Shred the cheese yourself from a block rather than buying pre-shredded — bagged cheese has anti-caking powder that prevents it from melting as smoothly into the slices.
- Tip: For a vegetarian version, skip the bacon and replace it with caramelized onions and fresh thyme stuffed between the slices — equally good in a completely different direction.
23. Crispy Parmesan Oven Roasted Potato Wedges
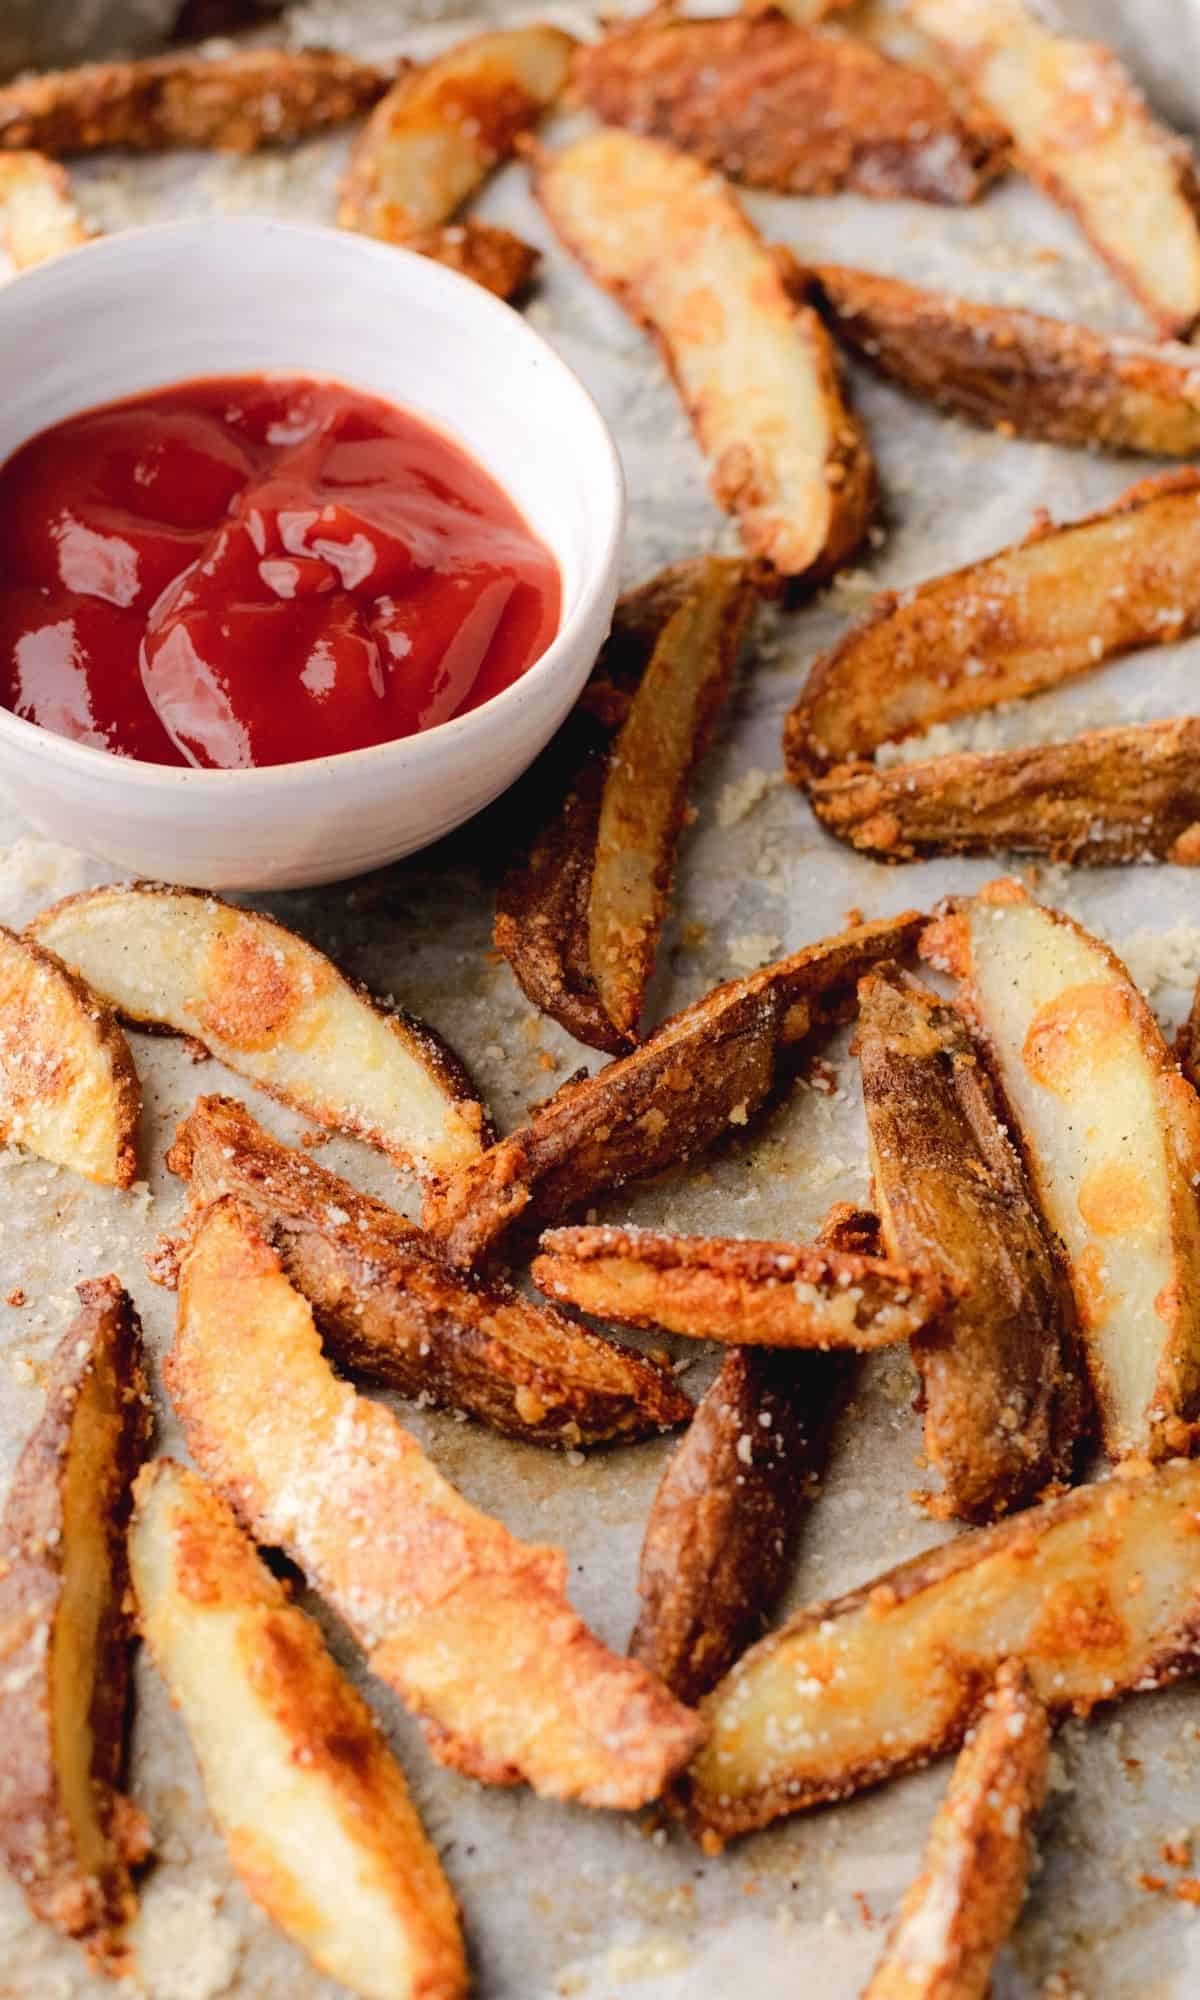
I used to just toss potato wedges in oil and roast them at high heat, wondering why they never came out as crispy as I wanted. Then I learned about par-boiling before roasting and it genuinely changed how I make potatoes. A quick 5–7 minute boil tenderizes the inside so the oven can spend all its energy crisping the outside — and the parmesan coating that goes on before roasting creates this deeply golden, slightly salty crust that sticks to every surface. These are the wedges I make when I want something that feels a little more put-together than plain roasted potatoes but takes almost no extra effort. Everyone eats more of them than they planned to.
Ingredients
- 2½ lbs russet or Yukon Gold potatoes, cut into wedges (about 8 wedges per potato)
- ¾ cup finely grated parmesan cheese (from a block, not the green canister)
- 3 tablespoons olive oil
- 1 teaspoon garlic powder, 1 teaspoon smoked paprika, 1 teaspoon dried Italian herbs, 1 teaspoon onion powder
- 1½ teaspoons salt + ½ teaspoon black pepper
- Fresh parsley and your favourite dipping sauce to serve
Instructions
- Place the potato wedges in a large pot of well-salted cold water. Bring to a boil and cook for 5–7 minutes — you want the outside just tender but the inside still holding firm. Drain and spread the wedges on a baking sheet. Let them sit and steam dry for at least 5 minutes. This step matters: wet potatoes don't crisp properly, so don't skip it.
- Preheat oven to 425°F. Transfer the dried wedges to a large bowl and toss with olive oil, garlic powder, smoked paprika, Italian herbs, onion powder, salt, and pepper until every piece is evenly coated.
- Add the grated parmesan and toss again until every wedge has a good coating. Arrange them skin-side down in a single layer on parchment-lined baking sheets — don't crowd them or they'll steam instead of roast.
- Roast for 20 minutes until the bottoms are deeply golden and crispy. Flip each wedge and roast for another 10–15 minutes until both sides are golden and the parmesan has formed a proper crust all over. Scatter fresh parsley on top and serve immediately with whatever dipping sauce you love.
Tips
- Tip: Finely grated parmesan from a microplane or the small holes of a box grater sticks to the potato surface far better than coarsely grated — it's worth the extra minute of effort.
- Tip: I always make a double batch of these because the first tray disappears before the second one is even out of the oven. Plan accordingly.
- Tip: These are best eaten straight from the oven while the parmesan crust is still shatteringly crispy. If you need to hold them, keep them on a wire rack in a low oven (200°F) rather than covering them — covering traps steam and softens the crust.
View More Recipes here Recipe Roundups
Twenty-three recipes is a lot to work through, but honestly, I kept adding to this list because fall side dishes deserve real attention. They're what make a weeknight dinner feel like something, and what turn a holiday table from fine into something people actually remember. These aren't complicated recipes — most of them come together with pantry staples, a sheet pan, and maybe 40 minutes. That's the standard I held every single one to.
If I had to point you toward a starting place, start with whatever vegetable is cheapest at your store right now. Fall produce is genuinely good and genuinely affordable — butternut squash, Brussels sprouts, sweet potatoes, apples — you don't need much to do something worth eating. My husband would tell you the roasted sides always disappear first at our table. Saad would disagree and point to anything with cheese. They're both right, depending on the week.
Save this list before Thanksgiving or any fall dinner you're hosting — it's the kind of thing that's easy to forget you bookmarked and then scramble for the night before. I hope at least a few of these land in your regular rotation. That's all I ever want from a recipe: that it gets made more than once. 🍂🧡🍁
More Recipes You Might Like
- Fall Dinner Recipes — main dishes that pair well with everything on this list
- Thanksgiving Side Dishes — holiday-specific sides when you need to feed a crowd
- Easy Vegetable Recipes — simple weeknight veg dishes for any season
- Sheet Pan Recipes — because less cleanup is always the right call
- Soup Recipes — for the cold nights when a side dish becomes the whole meal
Frequently Asked Questions
Which of these fall side dishes can I make ahead of time?
Most of the grain-based sides, mashed dishes, and casseroles hold up really well when made a day ahead — just reheat covered in the oven so they don't dry out. Roasted vegetables are trickier: they lose their crispness overnight, so I'd prep the veg and seasoning ahead but actually roast them the day of. Anything with cream or cheese reheats better than you'd expect if you add a small splash of liquid before warming it up.
What are the easiest fall sides for a beginner cook?
Honestly, roasted vegetables are where I'd start — you toss things in oil, add salt and pepper, put them in a hot oven, and walk away. Sheet pan Brussels sprouts, roasted sweet potatoes, or cinnamon-glazed carrots are all very hard to mess up. If you can chop and you can set a timer, you can pull off any of the roasted recipes on this list without stress.
How do I pick the right fall side dish for Thanksgiving?
Think about oven space and timing first — that's the real Thanksgiving constraint. Pick one or two sides that can be made ahead or finished on the stovetop, and save your oven slots for the things that truly need to roast. A creamy stovetop dish, a make-ahead casserole, and one fresh roasted side is a solid combination that won't have you juggling six oven temperatures at once.
Can I make these fall side dishes vegetarian or vegan?
Most of them already are vegetarian, and a lot are easy to make vegan with simple swaps. Butter can be replaced with good olive oil or a vegan butter like Earth Balance. Cream can be swapped for full-fat coconut milk in most savory dishes — it changes the flavor slightly but works well with fall spices like cinnamon and nutmeg. Chicken broth in any recipe swaps straight for vegetable broth without any issues.
How long do leftover fall side dishes keep in the fridge?
Most cooked vegetable sides keep 3 to 4 days in an airtight container in the fridge. Roasted vegetables are best within 2 days — after that the texture gets soft and a little sad. Grain dishes and casseroles last the full 4 days easily and sometimes taste even better on day two once the flavors have settled. I wouldn't freeze most of these except for casseroles, which freeze reasonably well for up to a month.
Share This Post!
If this list helped you figure out what to make this fall, pin it or share it with someone who's been staring at their grocery haul trying to figure out dinner. That's what this is here for. 🍂📌
View More Recipes here Recipe Roundups





Comments
No Comments