
Fall in our house means one thing above everything else: pumpkin, in every form I can manage. I'm not exaggerating when I say that from the first week of October through Thanksgiving, there is almost always some kind of pumpkin dessert sitting on my kitchen counter. It started years ago when I found a single can of Libby's pumpkin puree at Walmart and made a very mediocre pie — and I've been chasing better versions ever since. My kids grew up on these recipes, and by now Saad can spot pumpkin spice in a baked good before he's even seen it.
What makes a pumpkin dessert worth making? For me it comes down to three things: real pumpkin flavor that isn't buried under too much sugar, the right spice balance (cinnamon and nutmeg are not interchangeable with "pumpkin spice blend" — they behave differently), and a texture that actually delivers on what the recipe promises. A pumpkin bar should be fudgy and dense, not cakey. A pumpkin cheesecake mousse should be airy, not gluey. These distinctions matter, and I've made enough bad versions of all of these to know. If you're looking for more fall baking inspiration beyond pumpkin, my fall dessert recipes roundup has plenty to explore.
This list covers twenty recipes across every category I could think of — from no-bake options like Pumpkin Cheesecake Mousse and Pumpkin Pie Pudding Cups, to baked classics like Pumpkin Roll and Pumpkin Bars with Cream Cheese Frosting, all the way to more unexpected things like Pumpkin Pie Ice Cream and Chai-Spiced Pumpkin Snickerdoodle Cookies. There are gluten-free options, dairy-free options, and a couple that come together in under 30 minutes on nights when I don't have the energy for anything complicated. I've also included a pumpkin bread roundup on the site if you want to go deeper on the bread and loaf side of things, and my easy fall cookies post pairs well with several of these.
Here are the twenty pumpkin desserts I keep coming back to — pick whatever fits your week, your oven schedule, and how much cream cheese frosting your household can reasonably handle.
Top 20 Fall Pumpkin Dessert Recipes
19. Mini Pumpkin Cheesecakes

Mini cheesecakes are one of those things I resisted making for a long time because they seemed fiddly — and then I tried them and realized they're actually easier than a full cheesecake. No water bath, no cracking drama, no uneven slices. These individual pumpkin cheesecakes sit in little graham cracker crusts and come out perfectly portioned every single time. The **cornstarch in the filling** is the move that makes the texture set cleanly — I learned that the hard way after my first batch came out a little too soft to hold their shape. Top them with whipped cream right before serving and they look like you spent way more effort than you did.
Ingredients
- 1½ cups graham cracker crumbs
- 5 tablespoons unsalted butter, melted
- 16 oz cream cheese, fully at room temperature
- ½ cup pumpkin puree
- ½ cup granulated sugar
- 2 large eggs
- 1 teaspoon vanilla extract
- 1½ teaspoons pumpkin pie spice
- ½ teaspoon ground cinnamon
- 1 tablespoon cornstarch
- Whipped cream, for topping
Instructions
- Preheat oven to 325°F. Line a 12-cup muffin tin with cupcake liners. Mix graham cracker crumbs and melted butter together, then press about 2 tablespoons firmly into the bottom of each liner to form a solid crust base.
- Beat cream cheese until completely smooth with no lumps — this is important, so don't rush it. Add pumpkin puree, sugar, vanilla, pumpkin pie spice, cinnamon, and cornstarch and beat until fully combined. Add eggs one at a time, beating just until incorporated after each — overmixing at this stage adds too much air and can cause cracking.
- Divide the filling evenly among the prepared muffin cups. Bake for 18–22 minutes until the centers are just set and no longer jiggly when you gently shake the pan. Let cool completely at room temperature before moving to the fridge.
- Refrigerate for at least 4 hours or overnight for the firmest set. Add whipped cream right before serving so it stays fresh and doesn't deflate.
Tips
- Tip: Let the cream cheese sit out for at least 30 minutes before starting — cold cream cheese will leave lumps in the batter no matter how long you beat it.
- Tip: These keep well in the fridge for up to 3 days, so they're a great make-ahead dessert for holiday gatherings or Halloween parties.
- Tip: If you can't find pumpkin pie spice at your local store, mix ¾ teaspoon cinnamon + ¼ teaspoon ginger + ⅛ teaspoon each of nutmeg and allspice — works perfectly.
18. Pumpkin Mousse Pie with Maple Cookie Crust
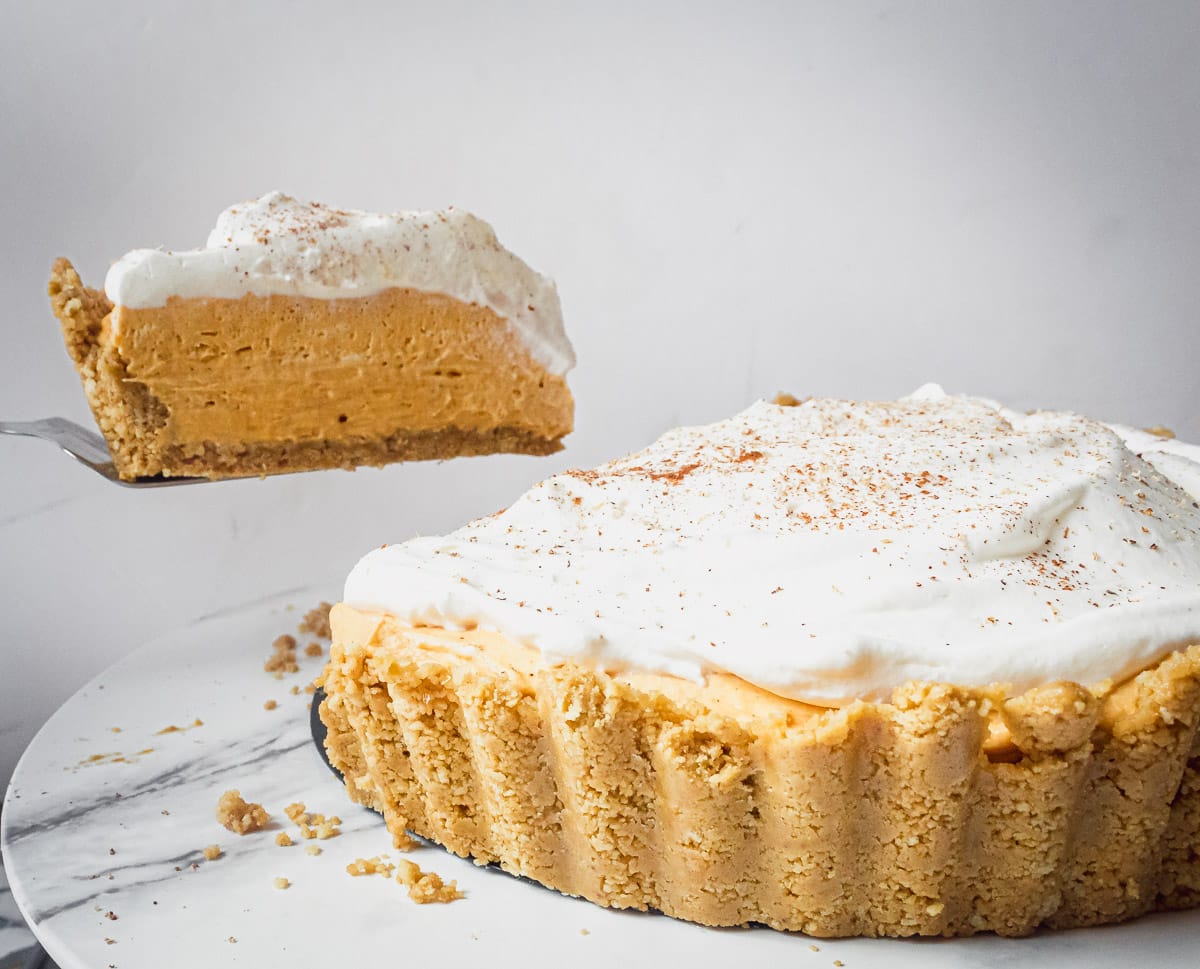
This is not your standard pumpkin pie — and that's exactly why it's on this list. The filling is a **no-bake pumpkin mousse**: light, airy, and smooth in a way that a baked custard filling simply can't be. The maple cookie crust underneath adds this warm, slightly caramel-y sweetness that plays beautifully against the spiced mousse. I make this one a day ahead and let it chill overnight — the mousse firms up into something that slices cleanly and tastes even better the next day. If you're tired of the same dense pumpkin pie every fall, this is the one to try instead.
Ingredients
- 2 cups maple cream cookies or maple-flavored cookies, finely crushed (find these at Trader Joe's or Walmart in the fall season)
- 4 tablespoons unsalted butter, melted
- 8 oz cream cheese, softened
- 1 cup pumpkin puree
- ¾ cup powdered sugar
- 1½ teaspoons pumpkin pie spice
- ¼ teaspoon freshly grated nutmeg
- 1 teaspoon vanilla extract
- 1½ cups heavy whipping cream, whipped to stiff peaks (divided — half folds into the filling, half goes on top)
Instructions
- Mix crushed maple cookies with melted butter until it resembles wet sand. Press firmly and evenly into a 9-inch pie dish — up the sides too if you can. Refrigerate for 30 minutes to set the crust before filling.
- Beat cream cheese until completely smooth. Add pumpkin puree, powdered sugar, pumpkin pie spice, nutmeg, and vanilla. Beat until the mixture is silky and uniform — no streaks.
- Gently fold half of the whipped cream into the pumpkin mixture in two additions, using a spatula and a light hand — you want to keep as much air in there as possible. This is what gives the mousse its texture.
- Spoon the mousse filling into the chilled crust and spread evenly. Top with the remaining whipped cream. Refrigerate for at least 4 hours, or overnight for the best set. Finish with a fresh grating of nutmeg right before serving.
Tips
- Tip: If you can't find maple cookies, use gingersnaps or Biscoff — both make an excellent crust with a slightly different but equally good flavor profile.
- Tip: Whip the cream in a cold bowl — if your kitchen is warm, stick the bowl in the freezer for 10 minutes first. Cold cream whips faster and holds its peaks better.
- Tip: This pie is best made the day before you need it — overnight refrigeration gives the mousse time to fully set and the flavors time to come together properly.
17. Pumpkin Custard Pie
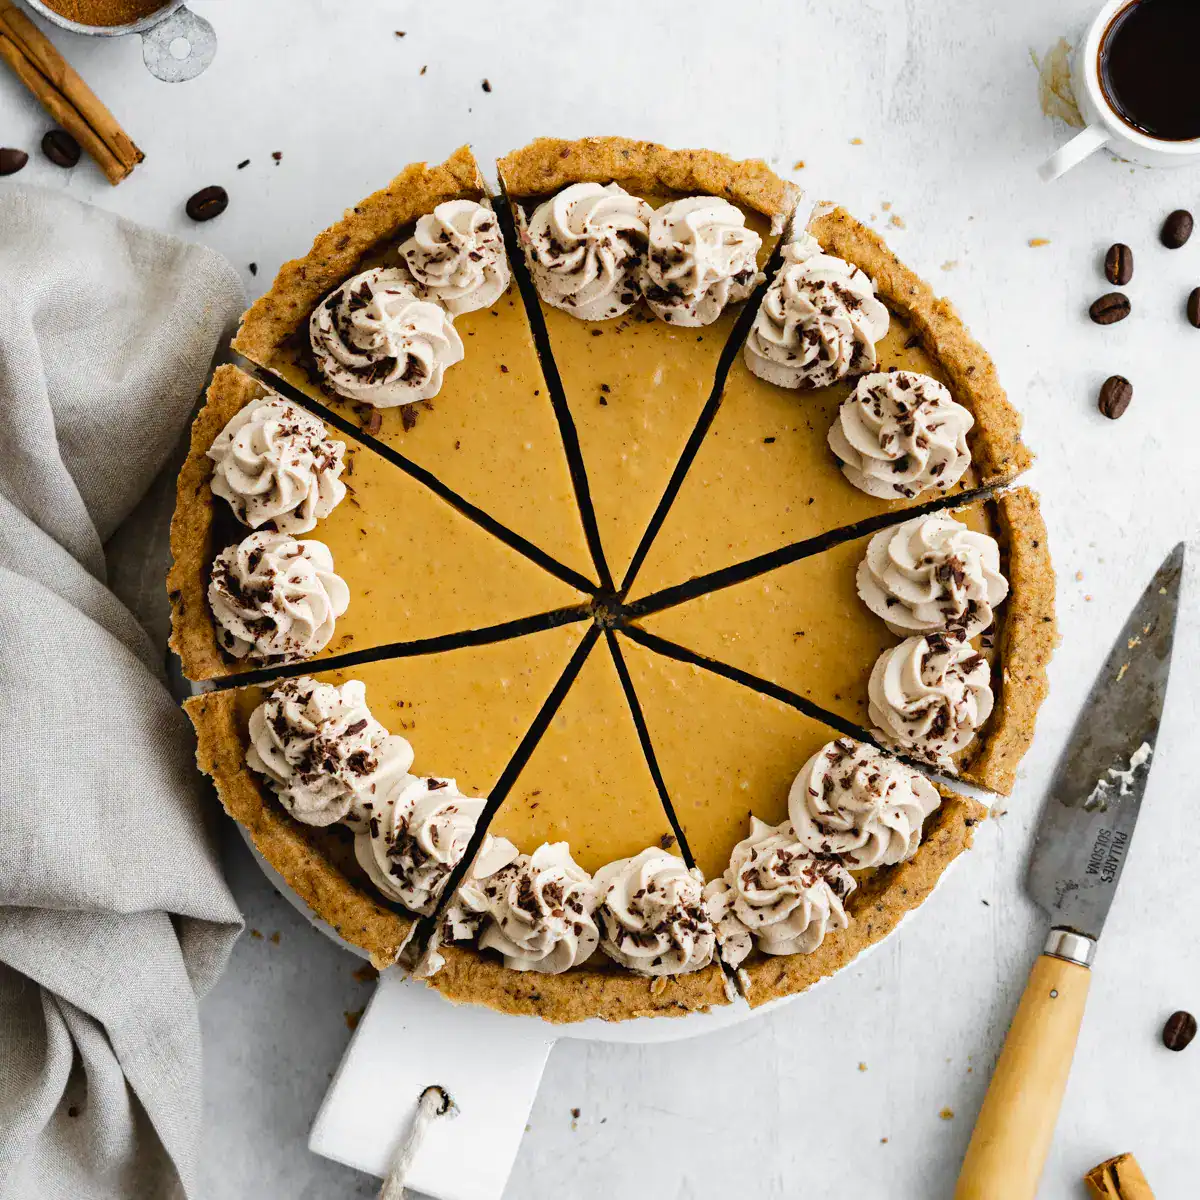
I'll be honest — I was skeptical about a vegan pumpkin pie holding up next to the classics. Then I made this one. The filling, set with **coconut cream and cornstarch** instead of eggs, comes out smoother and more uniform than almost any egg-based custard I've made — it slices like a dream. But the real star is the **coffee shortbread crust**: that slight bitterness from the instant espresso cuts through the sweet pumpkin filling in a way that makes every bite more interesting. This is the one I'd serve at a dinner party where I want people to ask for the recipe without me having to tell them it's vegan.
Ingredients
- 1½ cups all-purpose flour
- ½ cup powdered sugar
- 1 teaspoon instant espresso powder
- ½ cup cold vegan butter (such as Earth Balance), cut into small pieces
- 2 tablespoons ice water
- 1 can (15 oz) pumpkin puree
- 1 can (13.5 oz) full-fat coconut cream
- ¼ cup pure maple syrup
- 2 tablespoons cornstarch
- 1½ teaspoons pumpkin pie spice
- Pinch of salt
- Espresso whipped cream and crumble topping, for serving (see tip below)
Instructions
- Make the crust: whisk together flour, powdered sugar, and espresso powder. Work in the cold vegan butter with your fingertips until the mixture is crumbly and resembles coarse sand. Add ice water one tablespoon at a time until the dough just comes together. Press evenly into a 9-inch pie dish. Bake at 375°F for 15 minutes until lightly golden. Set aside to cool.
- Blend pumpkin puree, coconut cream, maple syrup, cornstarch, pumpkin pie spice, and salt until completely smooth. Transfer to a medium saucepan and cook over medium heat, stirring constantly, for 5–7 minutes until the mixture noticeably thickens.
- Pour the hot custard into the pre-baked crust and smooth the top with a spatula. Let it cool to room temperature, then refrigerate for at least 4 hours — overnight is better for a fully firm set.
- Serve each slice topped with espresso whipped cream (refrigerated full-fat coconut cream whipped with a small amount of instant espresso) and a sprinkle of crumble for texture contrast.
Tips
- Tip: For the espresso whipped cream, refrigerate your can of coconut cream overnight so the fat separates and rises — scoop only the solid cream off the top, add a half teaspoon of espresso powder, and whip until fluffy.
- Tip: Don't skip the stovetop cooking step — heating the filling before it goes into the crust is what activates the cornstarch and ensures the custard sets properly in the fridge.
- Tip: This pie is completely vegan but you'd never know it — if you're serving guests with dietary restrictions, this is a genuinely elegant option that doesn't feel like a compromise.
16. Pumpkin Bars with Cream Cheese Frosting
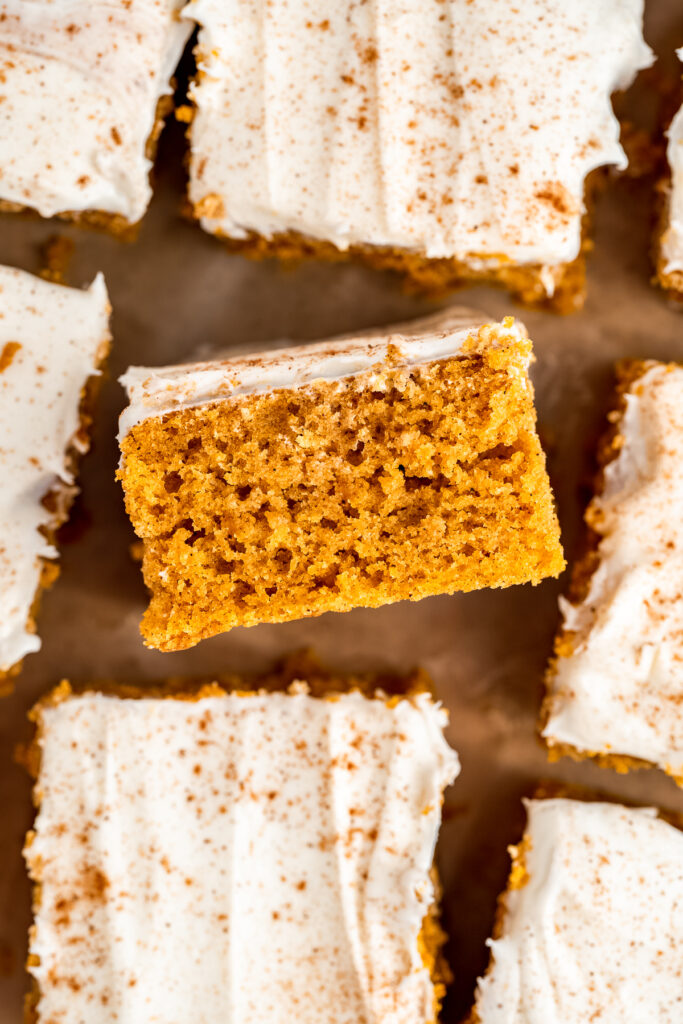
When I need to bring a dessert somewhere and I know there will be twenty or more people, this is almost always what I make. One 10×15-inch pan gives you 24 to 30 bars depending on how you cut them, and the whole thing comes together in under an hour. The bars themselves are **soft and warmly spiced** — pumpkin puree, cinnamon, nutmeg, ginger — and the cream cheese frosting on top makes them look finished and generous rather than like a plain baked slab. I always chill mine before cutting and I'll tell you right now: that step makes all the difference. Slightly frozen bars slice cleanly and look like you bought them from a bakery.
Ingredients
- 1 can (15 oz) pumpkin puree
- 1 cup granulated sugar
- ½ cup brown sugar, packed
- 4 large eggs
- ¾ cup neutral oil (vegetable or canola)
- 2 cups all-purpose flour
- 2 teaspoons baking powder
- 1 teaspoon baking soda
- 2 teaspoons ground cinnamon
- ½ teaspoon each ground nutmeg and ground ginger
- ½ teaspoon salt
- Cream cheese frosting: 8 oz cream cheese (softened) + ¼ cup butter (softened) + 2 cups powdered sugar + 1 teaspoon vanilla extract — beaten until smooth
Instructions
- Preheat oven to 350°F. In a large bowl, whisk together pumpkin puree, both sugars, eggs, and oil until smooth and well combined. Add flour, baking powder, baking soda, cinnamon, nutmeg, ginger, and salt. Fold until just combined — don't overmix or the bars can turn tough.
- Line a 10×15-inch jelly roll pan with parchment and spread the batter in an even layer. Bake for 22–25 minutes until a toothpick inserted in the center comes out with just a few moist crumbs attached. Cool completely before frosting.
- Beat the cream cheese and butter together until smooth, then add powdered sugar and vanilla and beat until completely fluffy. Spread generously over the cooled bars in an even layer.
- Refrigerate for at least 1 hour, then transfer to the freezer for 30 minutes before cutting — this gives you the cleanest, sharpest slices. Store covered in the refrigerator for up to 5 days.
Tips
- Tip: Use a hot, dry knife to cut the bars — run it under hot water, wipe it dry, then slice. Repeat between cuts for clean edges every time.
- Tip: These bars actually taste better on day two — the spices deepen overnight and the frosting sets into the top of the bar in the best way. Make them the day before if you can.
- Tip: If you don't have a 10×15-inch pan, a 9×13-inch pan works fine — the bars will be thicker and will need an extra 5 minutes in the oven. Check with a toothpick.
15. Pumpkin Banana Bread
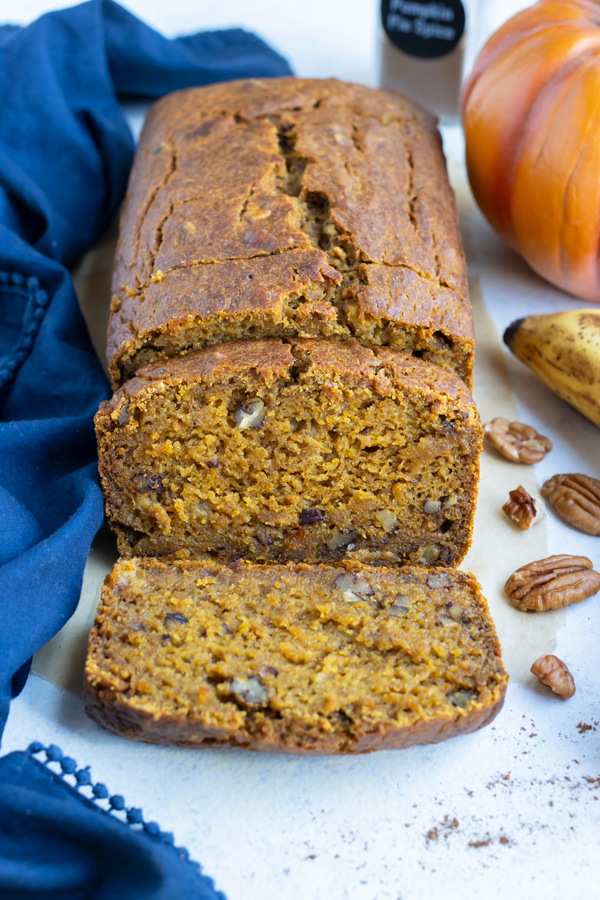
I make banana bread pretty regularly just to use up overripe bananas, but the first time I added pumpkin puree to the batter I honestly wasn't sure it would work. It works better than either bread does on its own. The banana adds natural sweetness and keeps things incredibly moist, while the pumpkin puree gives the loaf a depth and warmth that plain banana bread never quite reaches. The more speckled and brown the bananas, the better — fully brown ones give you the sweetest, most intensely flavoured result. This one genuinely earns its place as a breakfast, a snack, and a dessert all in the same day.
Ingredients
- 2 large overripe bananas, mashed
- ½ cup pumpkin puree
- ⅓ cup neutral oil or melted butter
- ½ cup granulated sugar
- ¼ cup brown sugar
- 2 large eggs
- 1 teaspoon vanilla extract
- 1½ cups all-purpose flour
- 1 teaspoon baking soda
- ½ teaspoon salt
- 1½ teaspoons pumpkin pie spice
- 1 teaspoon cinnamon
Instructions
- Preheat oven to 350°F. Grease a 9×5-inch loaf pan. Mash the bananas thoroughly until completely smooth — no large chunks should remain.
- Whisk together the mashed bananas, pumpkin puree, oil, both sugars, eggs, and vanilla until well combined and smooth.
- Add the flour, baking soda, salt, pumpkin pie spice, and cinnamon. Fold until just combined — a few streaks of flour are fine. Do not overmix or the loaf will be dense.
- Pour into the prepared loaf pan. Bake for 55–65 minutes until a toothpick inserted into the centre comes out clean. Cool in the pan for 15 minutes before turning out. Slice the following day for the cleanest cuts and best flavour.
Tips
- Tip: Wrap the cooled loaf tightly in plastic wrap and leave it overnight — the flavour deepens and the texture becomes even more moist by the next day.
- Tip: If you only have canned pumpkin pie filling rather than plain puree, reduce the added sugar by 2 tablespoons and skip the pumpkin pie spice — the filling already has both.
- Tip: A handful of chopped walnuts or pecans folded into the batter adds a nice crunch against the soft crumb — Saad picks them out, so I fold nuts into only half the batter before pouring.
14. Easy Pumpkin Cheesecake Mousse with Cool Whip

This is my emergency fall dessert. I have made it more times than I can count when I realized too late that I had nothing planned for after dinner and people were already at the table. Ten minutes, one bowl, no oven — and it genuinely tastes like a cheesecake someone put actual effort into. The key detail that nobody talks about enough is letting the cream cheese come fully to room temperature first. Cold cream cheese will leave lumps in the mousse and those lumps do not disappear after mixing. Leave it out for at least 20 minutes and the whole thing comes together smooth and cloud-like without any effort.
Ingredients
- 8 oz cream cheese, fully at room temperature
- 1 cup pumpkin puree
- ¾ cup powdered sugar
- 1½ teaspoons pumpkin pie spice
- ½ teaspoon cinnamon
- 1 teaspoon vanilla extract
- 1 container (8 oz) Cool Whip, thawed (or 1 cup heavy cream whipped to stiff peaks)
- Extra whipped cream, ground cinnamon, and gingersnap crumbles for topping
Instructions
- Beat the room-temperature cream cheese with a hand mixer or wooden spoon until completely smooth — any lumps at this stage will stay in the finished mousse, so take the extra minute here.
- Add the pumpkin puree, powdered sugar, pumpkin pie spice, cinnamon, and vanilla. Beat until fully combined and smooth with no streaks.
- Fold in the Cool Whip or whipped cream in two additions using a gentle folding motion — you want to keep the air in the mixture so the mousse stays light rather than dense.
- Spoon or pipe into individual serving glasses. Refrigerate for at least 30 minutes. Right before serving, top with a swirl of whipped cream, a dusting of cinnamon, and a crushed gingersnap or two.
Tips
- Tip: If you're skipping Cool Whip and using homemade whipped cream instead, whip 1 cup of cold heavy cream to stiff peaks before starting — it gives a fresher, slightly less sweet result that I actually prefer.
- Tip: These hold in the refrigerator for up to 3 days covered — make them the night before a gathering and just add the toppings right before serving.
- Tip: A layer of crushed graham crackers at the bottom of the glass turns this into a proper no-bake cheesecake cup with almost zero extra effort.
13. Pumpkin Apple Spice Cake with Maple Cream Cheese Frosting
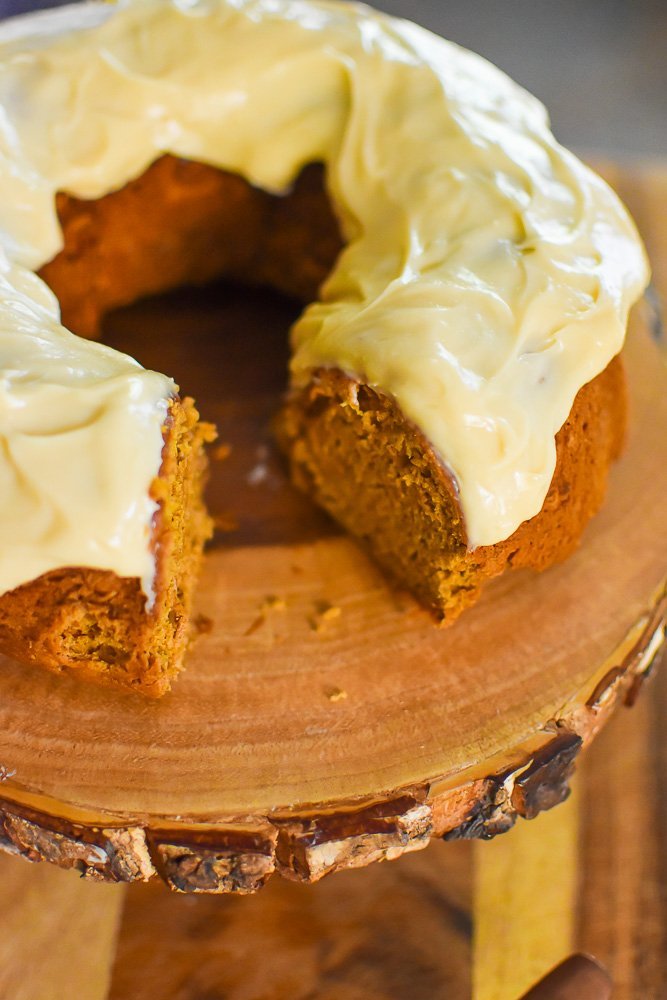
This is the one to bring to a fall gathering when you want people to actually ask you for the recipe. A thick, deeply moist cake made with both pumpkin puree and finely grated apple — and here's the thing nobody guesses: you can't taste the apple at all. What you get instead is an inexplicably moist, tender crumb that pumpkin alone never quite achieves. The apple is doing invisible structural work. And the maple cream cheese frosting is not a variation or a swap — it's the reason this cake is what it is. The maple adds a warm, almost caramel-adjacent note that standard cream cheese frosting simply cannot replicate.
Ingredients
- 1 cup pumpkin puree
- 1 cup apple, finely grated (about 1 medium apple, peeled)
- 1 cup granulated sugar
- ½ cup brown sugar
- ½ cup neutral oil
- 3 large eggs
- 1 teaspoon vanilla extract
- 2 cups all-purpose flour
- 2 teaspoons baking powder, 1 teaspoon baking soda
- 2 teaspoons cinnamon, ½ teaspoon nutmeg, ¼ teaspoon cloves, ½ teaspoon salt
- Maple cream cheese frosting: 8 oz cream cheese + 3 tablespoons softened butter + 2 cups powdered sugar + 2 tablespoons pure maple syrup + 1 teaspoon vanilla
Instructions
- Preheat oven to 350°F. Grease a 9×13-inch baking pan. Whisk together the pumpkin puree, grated apple, both sugars, oil, eggs, and vanilla until smooth and fully combined.
- Add the flour, baking powder, baking soda, cinnamon, nutmeg, cloves, and salt. Fold until just combined — don't overwork it.
- Pour into the prepared pan and bake for 30–35 minutes until a toothpick inserted in the centre comes out clean. Cool completely in the pan before frosting.
- Beat all frosting ingredients together until completely smooth and fluffy. Taste and adjust maple syrup if you want a stronger maple flavour. Spread generously over the cooled cake.
- Refrigerate for at least 1 hour before slicing. Bring to room temperature before serving so the frosting is soft and creamy rather than cold and firm.
Tips
- Tip: Squeeze the grated apple lightly in a paper towel before adding it to the batter — too much liquid from the apple can make the cake take longer to set in the centre.
- Tip: Pure maple syrup is non-negotiable here — pancake syrup (which is mostly corn syrup and artificial flavouring) will not give you the same warm, complex result in the frosting.
- Tip: This cake keeps covered in the refrigerator for 4 days and actually tastes better on day two, when the spices have had time to settle into the crumb.
12. Easy Pumpkin Pie Pudding Cups with Whipped Cream

Everything pumpkin pie should taste like, served in a small glass with a spoon and none of the stress of pastry. I make these when I want the full pumpkin pie experience for a weeknight dinner — no rolling dough, no blind baking, no hoping the filling sets properly. The pinch of kosher salt in the pudding is the detail that makes the biggest difference — it amplifies the sweetness and makes the pumpkin flavour sharper and more vivid without tasting salty at all. The maple whipped cream on top isn't decoration; it genuinely completes the flavour the same way a good whipped cream completes a slice of pie.
Ingredients
- 1 can (15 oz) pumpkin puree
- 2 cups whole milk
- ¼ cup granulated sugar
- 2 tablespoons cornstarch
- 1½ teaspoons pumpkin pie spice
- 1 teaspoon ground cinnamon
- 1 teaspoon vanilla extract
- ¼ teaspoon kosher salt
- Maple whipped cream: 1 cup heavy cream + 2 tablespoons pure maple syrup + ½ teaspoon vanilla — whipped to stiff peaks
Instructions
- Whisk together the pumpkin puree, whole milk, sugar, cornstarch, pumpkin pie spice, cinnamon, and kosher salt in a medium saucepan until completely smooth with no lumps.
- Cook over medium heat, stirring constantly, for 8–10 minutes until the pudding has thickened noticeably and coats the back of a spoon. Don't walk away — it can scorch on the bottom if left unstirred.
- Remove from heat and stir in the vanilla extract. Press a sheet of plastic wrap directly onto the surface of the pudding to prevent a skin from forming. Cool for 20 minutes at room temperature, then refrigerate for at least 2 hours until fully set and cold.
- Whip the heavy cream with maple syrup and vanilla to stiff peaks. Spoon the chilled pudding into individual glasses or cups, top with a generous swirl of maple whipped cream, and dust with a little cinnamon. Serve cold.
Tips
- Tip: These hold beautifully in the refrigerator for up to 3 days — make them a day ahead and just add the whipped cream right before serving so it stays fresh and tall.
- Tip: If you don't have whole milk, 2% will work, but the pudding will be slightly less rich and may take an extra minute or two to thicken properly on the stove.
- Tip: Serving these in clear glasses makes a real visual difference — the warm orange colour of the pudding against the white whipped cream looks genuinely appealing without any extra effort on your part.
11. Chocolate Chip Pumpkin Bars
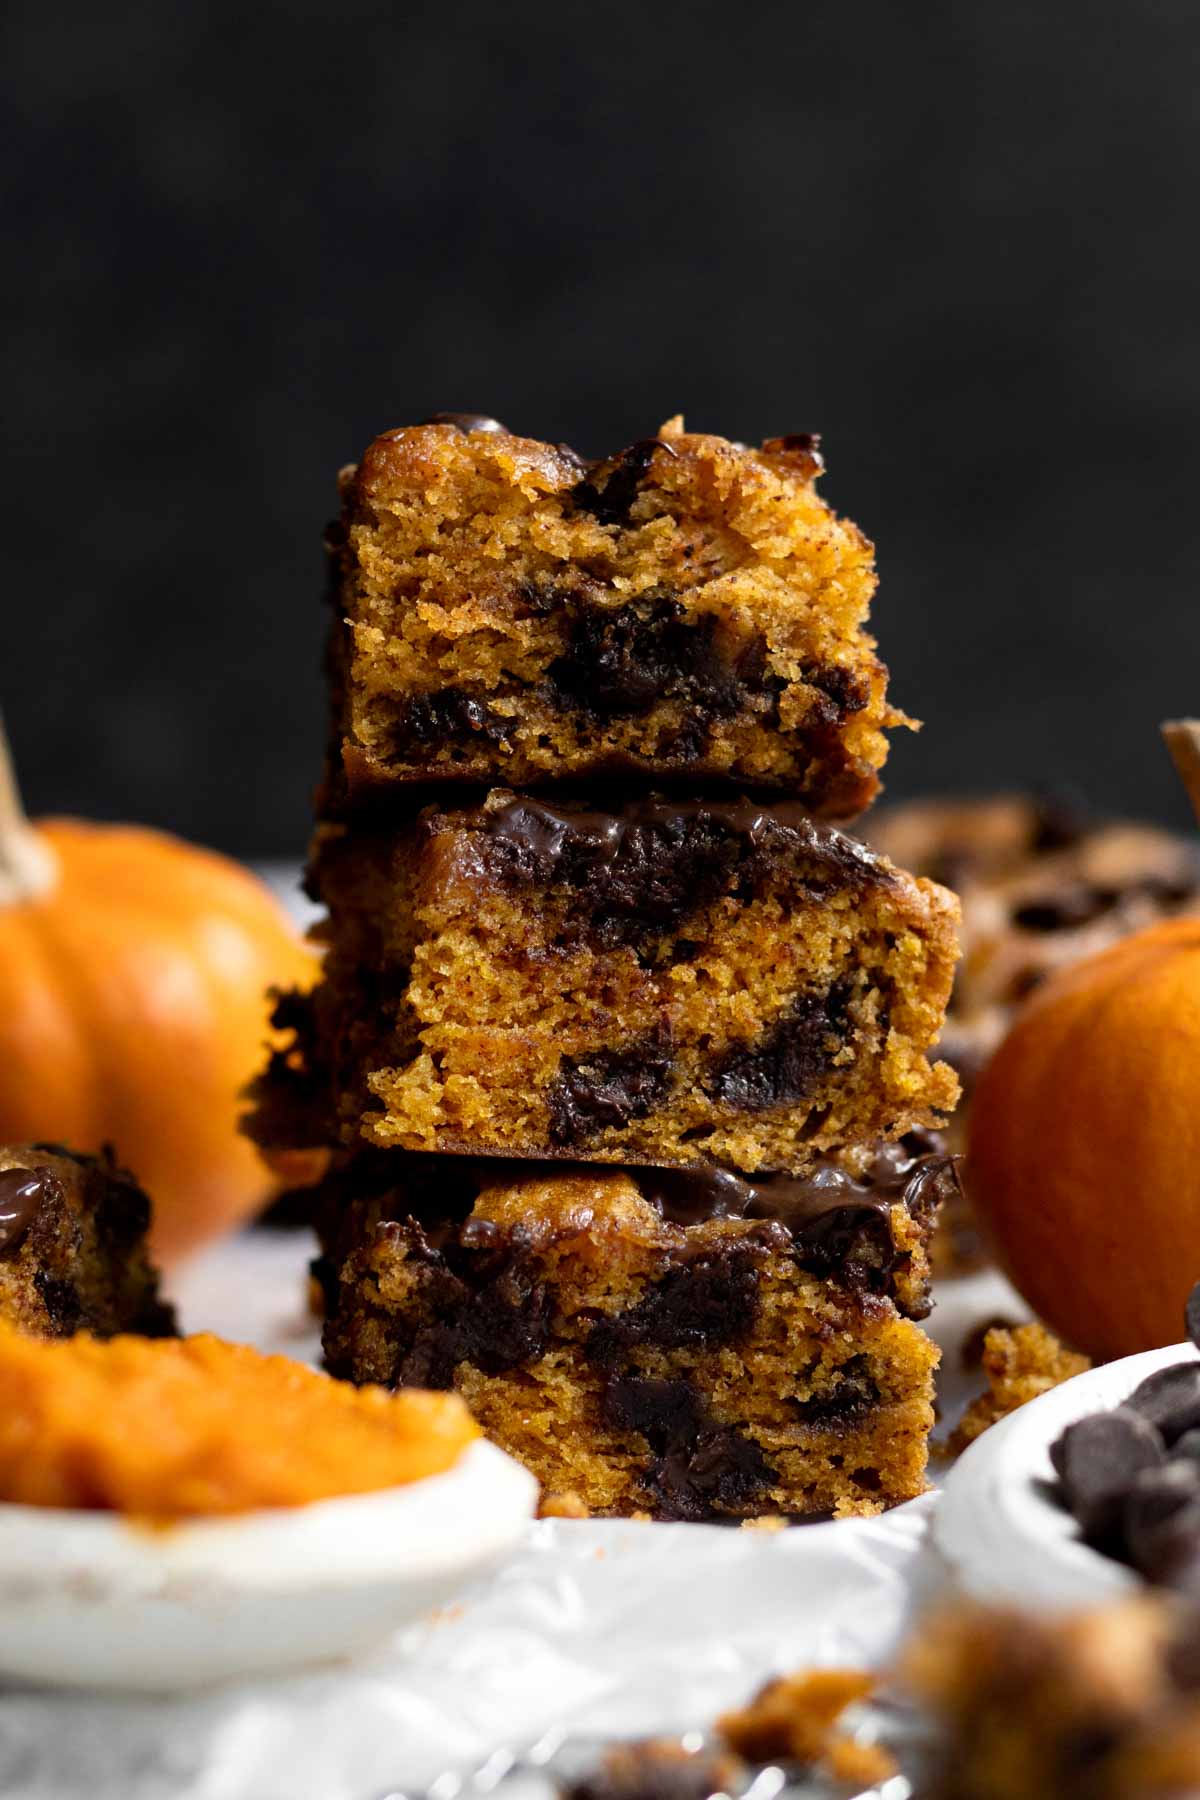
Pumpkin and chocolate is a combination I was genuinely skeptical about the first time I encountered it, and I was completely wrong to be. These bars are moist, warmly spiced, and loaded with semi-sweet chocolate chips that melt into the pumpkin base in a way that makes the whole thing taste more interesting than either ingredient does alone. They're made with a gluten-free flour blend, which means they work for guests with intolerances without anyone at the table being able to tell the difference. The most important instruction in this whole recipe is the one about not overbaking — pull them when the toothpick still has a few moist crumbs clinging to it and the bars will be fudgy and soft. Wait until it comes out completely clean and you've gone too far.
Ingredients
- 1 cup pumpkin puree
- ½ cup neutral oil or melted butter
- ¾ cup granulated sugar
- ¼ cup brown sugar
- 2 large eggs
- 1 teaspoon vanilla extract
- 1½ cups gluten-free 1:1 flour blend (Bob's Red Mill or King Arthur both work)
- 1 teaspoon baking powder
- ½ teaspoon baking soda
- 1½ teaspoons cinnamon, ½ teaspoon pumpkin pie spice, ¼ teaspoon salt
- 1½ cups semi-sweet chocolate chips
Instructions
- Preheat oven to 350°F. Line a 9×13-inch baking pan with parchment paper, leaving some overhang on the sides so you can lift the bars out cleanly after baking.
- Whisk together the pumpkin puree, oil, both sugars, eggs, and vanilla until smooth and fully combined.
- Add the gluten-free flour, baking powder, baking soda, cinnamon, pumpkin pie spice, and salt. Fold until just combined, then fold in the chocolate chips.
- Spread the batter evenly into the prepared pan. Bake for 25–30 minutes, checking at 25 minutes — a toothpick should come out with just a few moist crumbs, not wet batter and not completely dry. Cool completely in the pan before lifting out and cutting into squares.
Tips
- Tip: Regular all-purpose flour works as a direct substitute if gluten-free isn't needed — same quantity, same method, same result.
- Tip: Scatter a handful of extra chocolate chips over the top of the batter before baking — they melt into a slightly crisp, glossy top layer that looks considerably more impressive than the effort requires.
- Tip: Store cut bars in an airtight container at room temperature for up to 5 days — they stay moist throughout, which is one of the things pumpkin as an ingredient genuinely does better than almost anything else.
10. Pumpkin Roll

The pumpkin roll is the dessert that gets the most dramatic reaction when you set it on the table. That swirl of golden sponge and cream cheese filling looks like it required serious skill — it didn't, but I'm not going to tell anyone that if you don't. The one thing I had to learn the hard way: you absolutely must roll the cake in a powdered-sugar-dusted kitchen towel the moment it comes out of the oven, while it's still hot and pliable. I waited once, thinking it would be fine to let it cool flat first. It cracked in three places. Roll it hot, let it cool completely in the towel, then unroll, fill, and re-roll — that's the whole trick. This keeps beautifully in the fridge for 2–3 days, which makes it one of the best make-ahead options on this list.
Ingredients
- 3 large eggs
- 1 cup granulated sugar
- ⅔ cup pumpkin puree
- ¾ cup all-purpose flour
- 1 teaspoon baking powder
- 2 teaspoons cinnamon, ½ teaspoon ground cloves, ½ teaspoon nutmeg, ¼ teaspoon salt
- Powdered sugar for the rolling towel
- Filling: 8 oz cream cheese (softened), ¼ cup butter (softened), 1 cup powdered sugar, 1 teaspoon vanilla extract, ¼ cup finely chopped pecans
Instructions
- Preheat oven to 375°F. Line a 10×15-inch jelly roll pan with parchment and grease lightly. Beat eggs and sugar until light and pale. Mix in pumpkin puree, then fold in flour, baking powder, cinnamon, cloves, nutmeg, and salt until just combined. Spread evenly in the prepared pan and bake 13–15 minutes.
- The moment the cake comes out of the oven, immediately invert it onto a clean kitchen towel generously dusted with powdered sugar. Peel off the parchment paper and roll the cake up in the towel from the short end. Set aside and cool completely, about 1 hour.
- Beat cream cheese, butter, powdered sugar, and vanilla together until smooth. Carefully unroll the cooled cake. Spread the filling evenly across the surface, leaving a small border at the edges. Scatter chopped pecans over the filling. Re-roll the cake without the towel.
- Wrap tightly in plastic wrap and refrigerate for at least 4 hours, or up to 3 days. Dust with powdered sugar and slice with a sharp, clean knife right before serving.
Tips
- Tip: Let your cream cheese and butter sit out at room temperature for at least 30 minutes before making the filling — cold cream cheese will leave lumps no matter how long you beat it.
- Tip: The longer this sits in the fridge, the more cleanly it slices. Two days ahead is actually better than one hour ahead.
- Tip: If you don't have a jelly roll pan, a standard rimmed half sheet pan works — just note the cake will be thinner and may bake a minute or two faster, so watch it closely.
9. Pumpkin Pie Ice Cream
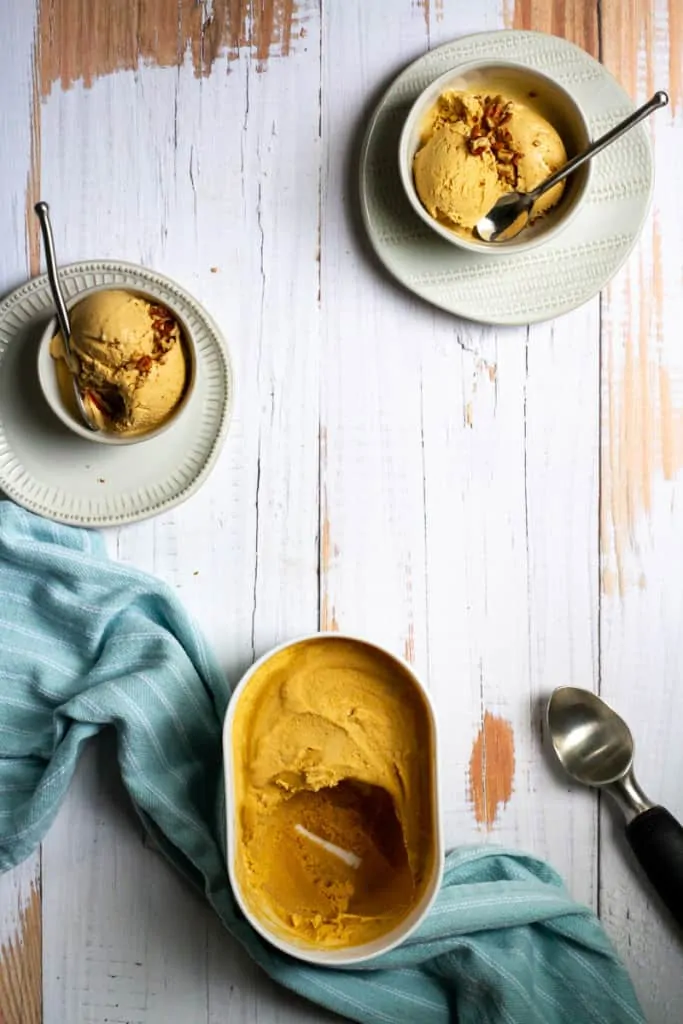
No ice cream machine, no problem. This no-churn pumpkin pie ice cream uses whipped cream and sweetened condensed milk as the base, and the result is genuinely creamy — not the icy, grainy texture you might expect from a no-churn method. The condensed milk does the heavy lifting here: it sweetens everything and keeps the ice cream scoopable straight from the freezer rather than freezing into a solid block. Real pumpkin puree and warm spices make this taste like actual pumpkin pie in frozen form. I make a double batch every October because one container disappears in a single evening at my house — Saad and Zainab treat it like a competition to see who gets the last scoop.
Ingredients
- 1 cup pumpkin puree
- 1 can (14 oz) sweetened condensed milk
- 2 cups heavy whipping cream
- 1½ teaspoons pumpkin pie spice
- 1 teaspoon ground cinnamon
- 1 teaspoon vanilla extract
- Pinch of salt
Instructions
- In a large bowl, whisk together the pumpkin puree, sweetened condensed milk, pumpkin pie spice, cinnamon, vanilla, and salt until completely smooth with no streaks.
- In a separate cold bowl, whip the heavy cream to stiff peaks — stop as soon as the peaks hold their shape and don't fold over. Over-whipping will cause the cream to look grainy and start separating.
- Add the pumpkin mixture to the whipped cream in two additions, folding gently with a rubber spatula each time. Keep the folding motion slow and wide to preserve as much air as possible — this is what keeps the ice cream creamy rather than dense.
- Pour into a freezer-safe container and press a sheet of plastic wrap directly against the surface. Freeze for at least 6 hours or overnight. Let sit on the counter for 5 minutes before scooping.
Tips
- Tip: Chill your mixing bowl in the freezer for 10 minutes before whipping the cream — cold equipment helps the cream whip faster and hold its peaks better, especially if your kitchen runs warm.
- Tip: Serve in waffle cones with an extra dusting of cinnamon on top — it takes about 30 seconds and makes this feel far more special than a bowl.
- Tip: This keeps in the freezer for up to 2 weeks. After that, ice crystals start forming on the surface even with the plastic wrap pressed down.
8. Pumpkin Snickerdoodle Bars with Cream Cheese Glaze
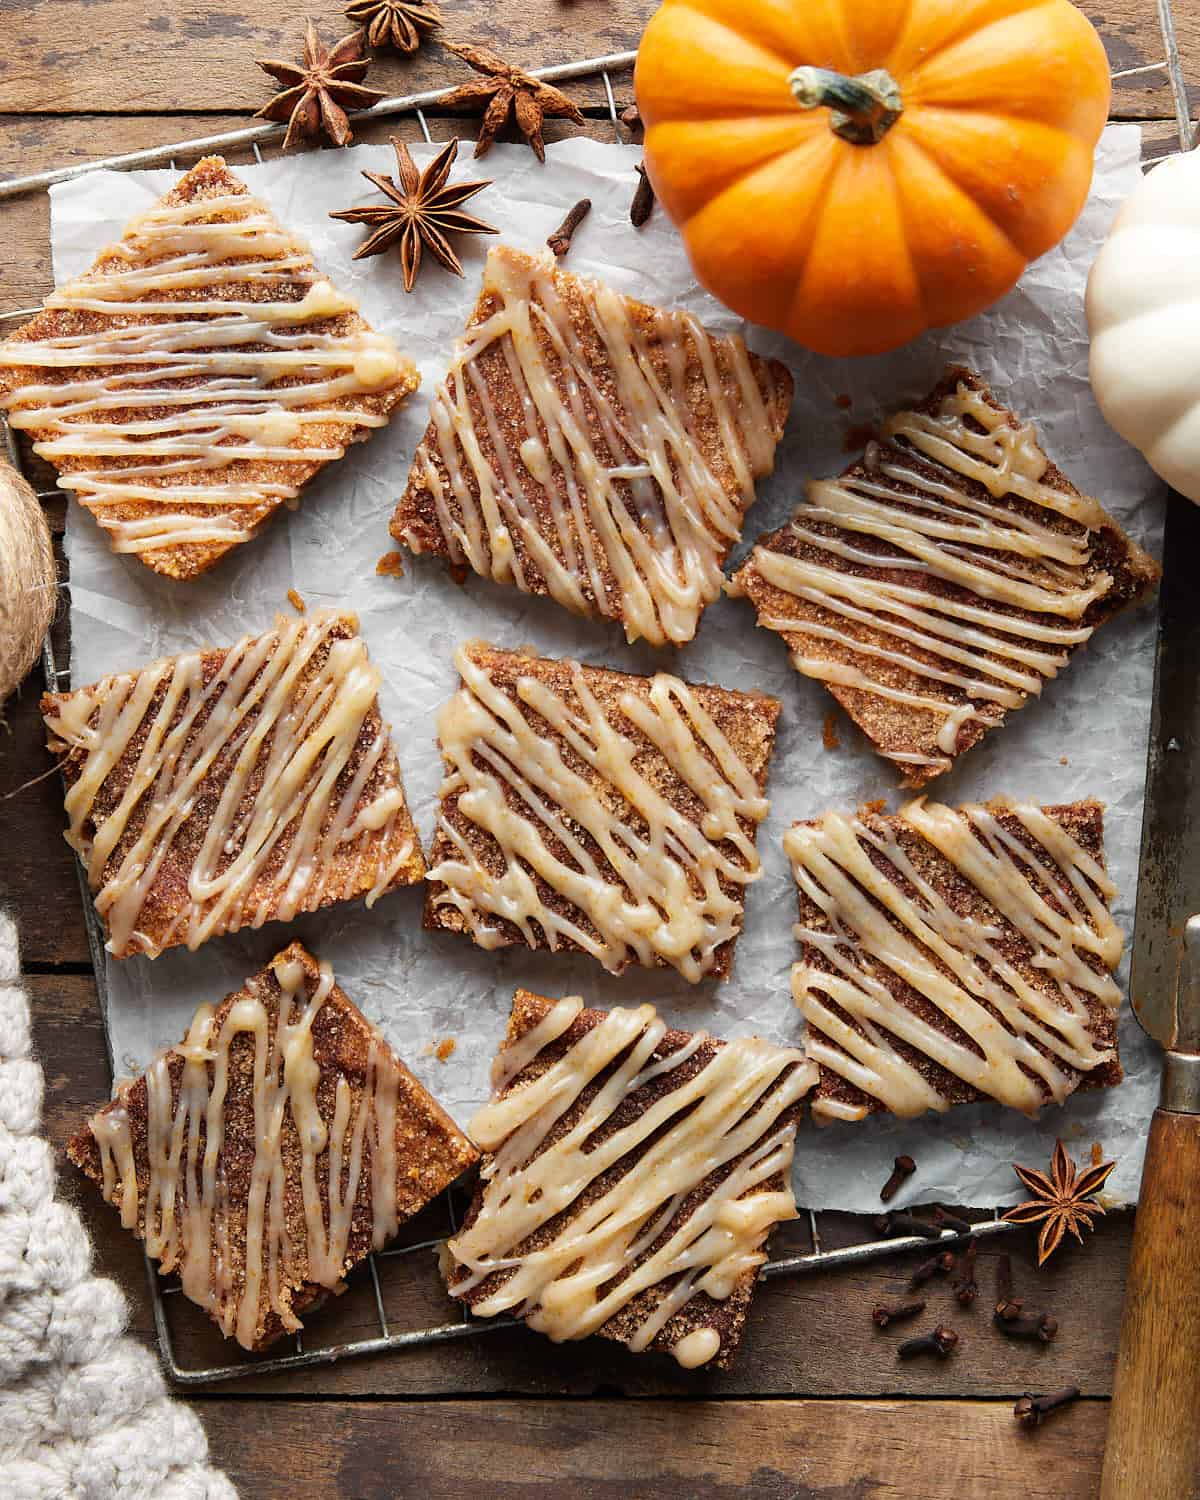
Two classics in one pan. The snickerdoodle DNA is all there — cream of tartar for that signature tangy bite, cinnamon sugar pressed into the top before baking — but the pumpkin puree adds moisture and a warm, earthy depth that plain snickerdoodles just don't have. The cream cheese glaze drizzled over the top (not spread, drizzled) gives you those uneven, slightly rustic lines that somehow look more appealing than a perfectly iced bar. Do not skip the cream of tartar thinking it's optional. I know it's a slightly annoying ingredient to track down, but it's the thing that makes these taste like snickerdoodles rather than just soft pumpkin bars. You can find it in the baking aisle at Walmart or any grocery store, usually right next to the baking powder.
Ingredients
- 1 cup butter, softened
- 1½ cups granulated sugar
- ½ cup pumpkin puree
- 2 large eggs
- 1 teaspoon vanilla extract
- 2½ cups all-purpose flour
- 1½ teaspoons cream of tartar
- 1 teaspoon baking soda
- 1½ teaspoons cinnamon, ½ teaspoon salt
- 2 tablespoons cinnamon sugar (for topping)
- Cream cheese glaze: 4 oz cream cheese (softened), 1 cup powdered sugar, 2–3 tablespoons milk, ½ teaspoon vanilla extract
Instructions
- Beat softened butter and granulated sugar together until light and fluffy, about 3 minutes. Add pumpkin puree, eggs, and vanilla and mix until combined. Add flour, cream of tartar, baking soda, cinnamon, and salt and mix until a soft dough forms — it will be thicker than a typical bar batter.
- Press the dough evenly into a greased 9×13-inch baking pan. Sprinkle the cinnamon sugar evenly across the entire surface.
- Bake at 350°F for 22–26 minutes. The edges should be set and just starting to pull away from the pan, but the center should still look very slightly underdone — it will firm as it cools. Don't overbake; these dry out quickly if left in too long. Cool completely in the pan.
- Whisk the cream cheese, powdered sugar, milk, and vanilla together until smooth and pourable, adding milk one tablespoon at a time until you reach a drizzleable consistency. Drizzle over the completely cooled bars in back-and-forth lines. Let the glaze set for 20 minutes before cutting into squares.
Tips
- Tip: To make your own cinnamon sugar for the topping, just mix 1½ tablespoons granulated sugar with 1½ teaspoons cinnamon — takes ten seconds and you probably have both in your pantry already.
- Tip: These cut most cleanly when fully chilled. Pop the pan in the fridge for 30 minutes after the glaze sets, then slice with a sharp knife wiped clean between cuts.
- Tip: Store covered at room temperature for up to 3 days, or refrigerate for up to 5 days. The bars actually get softer and more fudgy on day two.
7. Pumpkin Whoopie Pies (Paleo, Gluten-Free)
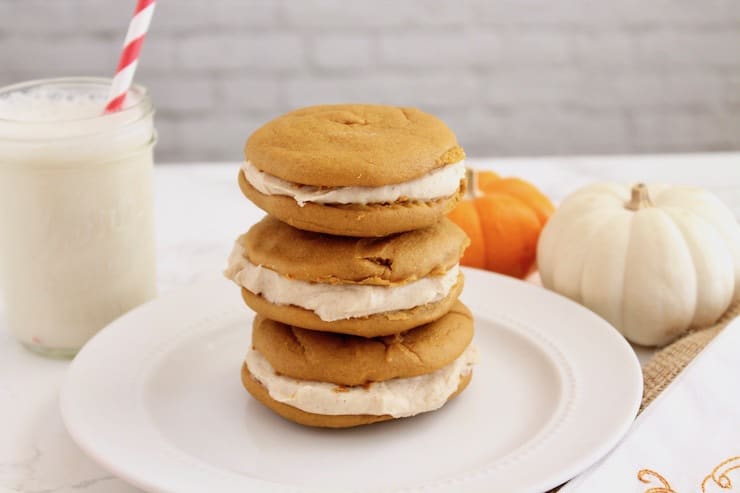
I was skeptical about gluten-free whoopie pies the first time I made them — I figured the texture would be off, gummy or dense in that way grain-free baked goods sometimes go wrong. These don't do that. The almond flour and coconut flour combination gives the cookies a genuinely cakey, tender crumb, and the maple syrup sweetens them without making them taste health-food-y. The cream cheese filling sweetened with honey is rich enough that nobody is going to feel like they're eating a compromise dessert. If you're baking for a mixed group and you know some guests are gluten-free, these are the ones to make — nobody will notice the difference until you tell them.
Ingredients
- 1 cup pumpkin puree
- ⅓ cup coconut oil or butter, melted
- ½ cup pure maple syrup
- 2 large eggs
- 1 teaspoon vanilla extract
- 1½ cups almond flour
- ¼ cup coconut flour
- 1 teaspoon baking soda
- 2 teaspoons cinnamon, ½ teaspoon nutmeg, ¼ teaspoon ground cloves
- Filling: 8 oz cream cheese (softened), 3 tablespoons honey, 1 teaspoon vanilla extract
Instructions
- Whisk together pumpkin puree, melted coconut oil, maple syrup, eggs, and vanilla in a large bowl until smooth. Add almond flour, coconut flour, baking soda, cinnamon, nutmeg, and cloves. Stir until a thick, scoopable batter forms — it will be stickier than a regular cookie dough.
- Drop heaping tablespoon-sized rounds onto a parchment-lined baking sheet, leaving about 2 inches between each. Smooth the tops slightly with the back of a wet spoon — this helps them bake into even, flat-bottomed rounds that sandwich well.
- Bake at 350°F for 12–14 minutes until the tops are set and the bottoms are lightly golden. Cool completely on a wire rack before filling — warm cookies will melt the filling.
- Beat cream cheese, honey, and vanilla together until completely smooth. Match cookies by size. Spread or pipe filling generously onto the flat side of one cookie and press a matching cookie on top. Refrigerate assembled whoopie pies for at least 1 hour before serving so the filling firms up.
Tips
- Tip: Coconut flour absorbs a lot of liquid — don't be tempted to add more if the batter looks thick. It's supposed to be thick, and it loosens slightly as it sits.
- Tip: For non-paleo guests, a cinnamon buttercream or marshmallow fluff filling works just as well with these cookies if you want to offer a variation.
- Tip: Store assembled whoopie pies in an airtight container in the fridge for up to 4 days. The cookies stay soft and the filling holds its shape well when kept cold.
6. Pumpkin Ice Cream (KitchenAid)

If you have the KitchenAid ice cream bowl attachment sitting in your freezer, fall is the season to actually use it. This churned version is noticeably different from the no-churn recipe above — airier, lighter, with that smooth, gelato-like scoopability that comes from churning air into the mixture as it freezes. The cream cheese is what makes this recipe stand out; it adds a subtle tang and a richness that stops the ice cream from tasting flat or one-dimensional. One non-negotiable: freeze the bowl for a full 15 hours before you start. I made the mistake of only giving it 10 hours once and the mixture never properly thickened. Also, chill your base in the fridge before churning — the colder everything goes in, the better the result comes out.
Ingredients
- 8 oz cream cheese, softened
- ¾ cup granulated sugar
- 1 cup pumpkin puree
- 2 cups heavy whipping cream
- 1 teaspoon vanilla extract
- 1½ teaspoons ground cinnamon
- ½ teaspoon pumpkin pie spice
- Pinch of salt
Instructions
- Place the KitchenAid ice cream bowl attachment in the freezer for a minimum of 15 hours before you plan to churn. The bowl needs to be completely and thoroughly frozen — shake it before you start and if you hear any liquid movement, it needs more time.
- Beat the softened cream cheese with sugar until completely smooth with no lumps. Add pumpkin puree, vanilla, cinnamon, pumpkin pie spice, and salt and beat until silky. Stir in the heavy whipping cream until fully combined.
- Cover and refrigerate the base mixture for at least 1 hour — this step makes a real difference to the final texture. A cold base churns faster and produces a creamier result.
- Attach the frozen bowl to your KitchenAid with the dasher attachment. Turn to medium speed and slowly pour in the chilled base. Churn for 20–25 minutes until thick and creamy. Transfer to a freezer-safe container, press plastic wrap directly against the surface, and freeze for at least 4 hours. Remove 5 minutes before scooping.
Tips
- Tip: No KitchenAid bowl attachment? Use the no-churn pumpkin pie ice cream recipe above — same flavors, different method, equally good result.
- Tip: Pressing plastic wrap directly onto the surface of the ice cream before freezing is the single most effective thing you can do to prevent ice crystals from forming on top.
- Tip: This stores well in the freezer for up to 3 weeks. After that the texture starts to deteriorate — but honestly, it never lasts that long.
5. Chai-Spiced Pumpkin Snickerdoodle Cookies

Snickerdoodles were always a favorite in my house — my husband loves anything with cinnamon sugar — but when I first made these chai-spiced pumpkin snickerdoodles, even Saad stopped what he was doing and asked for another one. The chai sugar coating is what sets these apart from every other pumpkin cookie on this list: **cardamom, ginger, and black pepper** alongside cinnamon creates that familiar snickerdoodle crunch on the outside, but with a warmth and depth that a regular snickerdoodle just doesn't have. The pumpkin in the dough keeps these soft and moist for almost a full week, which makes them perfect for gifting or baking ahead for a gathering. One thing I learned: don't be shy with the coating — roll those balls generously, because a thin coating disappears into the cookie and you lose all that gorgeous contrast.
Ingredients
- ½ cup butter, softened
- 1 cup granulated sugar
- ½ cup pumpkin puree
- 1 large egg, 1 teaspoon vanilla extract
- 2 cups all-purpose flour, 1 teaspoon cream of tartar, ½ teaspoon baking soda
- 1 teaspoon pumpkin pie spice, ¼ teaspoon salt
- ½ cup walnuts, finely chopped (optional)
- Chai sugar coating: 3 tablespoons sugar + ½ teaspoon cinnamon + ¼ teaspoon cardamom + ¼ teaspoon ginger + pinch of black pepper
Instructions
- Beat butter and sugar together until light and fluffy. Add pumpkin puree, egg, and vanilla and beat until fully combined.
- Mix in flour, cream of tartar, baking soda, pumpkin pie spice, and salt until a dough forms. Fold in the walnuts if using. Chill the dough for 30 minutes — this makes rolling much easier.
- Combine all chai sugar coating ingredients in a shallow bowl. Roll tablespoon-sized balls of dough generously in the chai sugar, pressing lightly so it adheres on all sides.
- Place on a parchment-lined baking sheet spaced 2 inches apart. Bake at 375°F for 10–12 minutes until the edges are just set — they'll look slightly underdone in the centre and that's fine. Cool on the tray; they firm up as they cool. Store in an airtight container for up to 7 days.
Tips
- Tip: Don't skip the chill time — pumpkin dough is sticky and 30 minutes in the fridge makes the difference between a messy roll and a clean one.
- Tip: If you don't have cream of tartar, substitute 1 teaspoon baking powder total (omit the baking soda and cream of tartar together) — the texture will be slightly different but still good.
- Tip: These actually taste better on day two once the spices have had time to settle into the cookie — so making them the night before you need them is a genuinely good idea.
4. Olive Oil Pumpkin Loaf

I was skeptical the first time I made a pumpkin loaf with olive oil instead of butter — I kept thinking it would taste like salad dressing baked into a cake. I was completely wrong. Using a mild olive oil (the kind you'd find at Costco or Walmart, not a strong peppery finishing oil) gives the loaf a **richer, more tender crumb** than butter does, and the reason is simple: olive oil stays liquid at room temperature, so the loaf never gets that dry, slightly stiff texture that butter-based quick breads sometimes have by day two. The light cream cheese icing on top keeps it from feeling like health food — it's pourable and delicate, not thick and sweet, which is exactly right for a loaf that works as breakfast or an afternoon snack just as comfortably as it works as dessert.
Ingredients
- 1 cup pumpkin puree
- ½ cup mild olive oil (not a strong extra-virgin — you want one that's light in flavor)
- ¾ cup granulated sugar, ¼ cup brown sugar
- 2 large eggs, 1 teaspoon vanilla extract
- 1¾ cups all-purpose flour, 1 teaspoon baking powder, ½ teaspoon baking soda
- 1½ teaspoons pumpkin pie spice, ½ teaspoon salt
- Cream cheese icing: 4 oz cream cheese (softened) + ¾ cup powdered sugar + 1–2 tablespoons milk + ½ teaspoon vanilla — whisked until smooth and pourable
Instructions
- Preheat oven to 350°F. Grease a 9×5-inch loaf pan well. In a large bowl, whisk together the pumpkin puree, olive oil, both sugars, eggs, and vanilla until smooth.
- Add flour, baking powder, baking soda, pumpkin pie spice, and salt. Fold until just combined — as soon as no streaks of dry flour remain, stop mixing.
- Pour into the prepared pan and bake for 55–65 minutes until a toothpick inserted into the centre comes out clean. Cool in the pan for 15 minutes, then turn out onto a wire rack to cool completely before icing.
- Whisk together the cream cheese icing ingredients until smooth and pourable — add milk one tablespoon at a time to get the right drizzling consistency. Pour generously over the completely cooled loaf and let it set for 20 minutes before slicing. Keeps at room temperature for 3 days or refrigerated for up to 5 days.
Tips
- Tip: Let the cream cheese sit out for at least 15 minutes before making the icing — cold cream cheese clumps and won't whisk smooth no matter how hard you try.
- Tip: If you want to skip the icing entirely, this loaf is completely good on its own — it's moist and flavorful enough to stand alone, and skipping the icing makes it even more breakfast-appropriate.
- Tip: Test for doneness at 55 minutes — oven temperatures vary, and overbaking is the main reason pumpkin loaves turn dry on the edges even when the center seemed fine.
3. Baked Pumpkin Spice Doughnuts with Pumpkin Spice Syrup
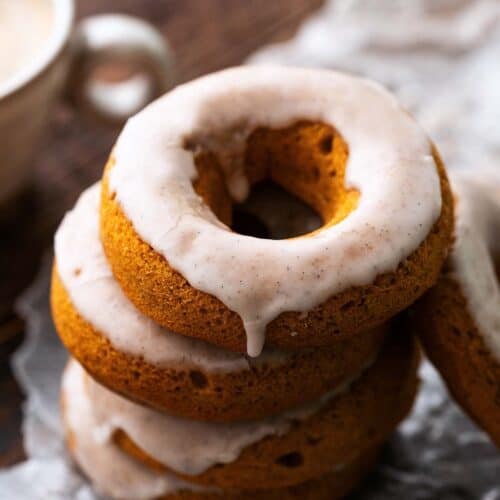
Baked doughnuts are one of those things that seem like they shouldn't work — a doughnut is fried, and we all know it — but a **baked cake doughnut** made with pumpkin puree, brown sugar, and a vanilla bean glaze is genuinely its own thing, not a sad imitation of the real deal. These come together in 30 minutes start to finish, which is the kind of fall baking that actually fits into a weekend morning rather than taking it over. The vanilla bean glaze is what makes them look bakery-worthy — those little black specks against the white glaze are simple and beautiful. And the bonus pumpkin spice syrup for coffee that comes with this recipe is genuinely one of the most practical things in this entire roundup — five minutes, keeps in the fridge for two weeks, and every morning coffee becomes something you look forward to.
Ingredients
- ¾ cup pumpkin puree
- ½ cup light brown sugar, packed
- 2 large eggs, ⅓ cup vegetable oil
- 1 teaspoon vanilla bean paste (or 1 teaspoon vanilla extract if that's what you have)
- 1½ cups all-purpose flour, 1 teaspoon baking powder, ½ teaspoon baking soda
- 1½ teaspoons pumpkin pie spice, ¼ teaspoon salt
- Vanilla bean glaze: 1½ cups powdered sugar + 2–3 tablespoons milk + ½ teaspoon vanilla bean paste — whisked until smooth
Instructions
- Preheat oven to 350°F. Grease a donut pan generously — these will stick if you're not thorough. Whisk together pumpkin puree, brown sugar, eggs, oil, and vanilla bean paste until smooth.
- Add flour, baking powder, baking soda, pumpkin pie spice, and salt. Fold until just combined. Transfer the batter to a piping bag or a zip-lock bag with one corner snipped off. Pipe into the donut cavities, filling each about ¾ full.
- Bake for 11–13 minutes until a toothpick comes out clean. Let them cool in the pan for 5 minutes, then turn out gently onto a wire rack.
- Whisk the vanilla bean glaze until smooth and slightly thick. Dip the top of each doughnut into the glaze, let the excess drip off, and return to the rack. The glaze sets in about 15 minutes. Serve alongside strong coffee.
Tips
- Tip: A donut pan is worth owning — you can find one at Walmart or on Amazon for under $15, and it pays for itself the first morning you pull a tray of these out of the oven.
- Tip: Don't dip the doughnuts while they're still hot — the glaze will slide right off. Give them a full 5 minutes on the rack before glazing.
- Tip: For the bonus pumpkin spice coffee syrup, simmer ½ cup water + ½ cup sugar + 2 tablespoons pumpkin puree + 1 teaspoon pumpkin pie spice for 5 minutes, strain, and refrigerate. It keeps for two weeks.
2. Pumpkin Cream Cheese Bread
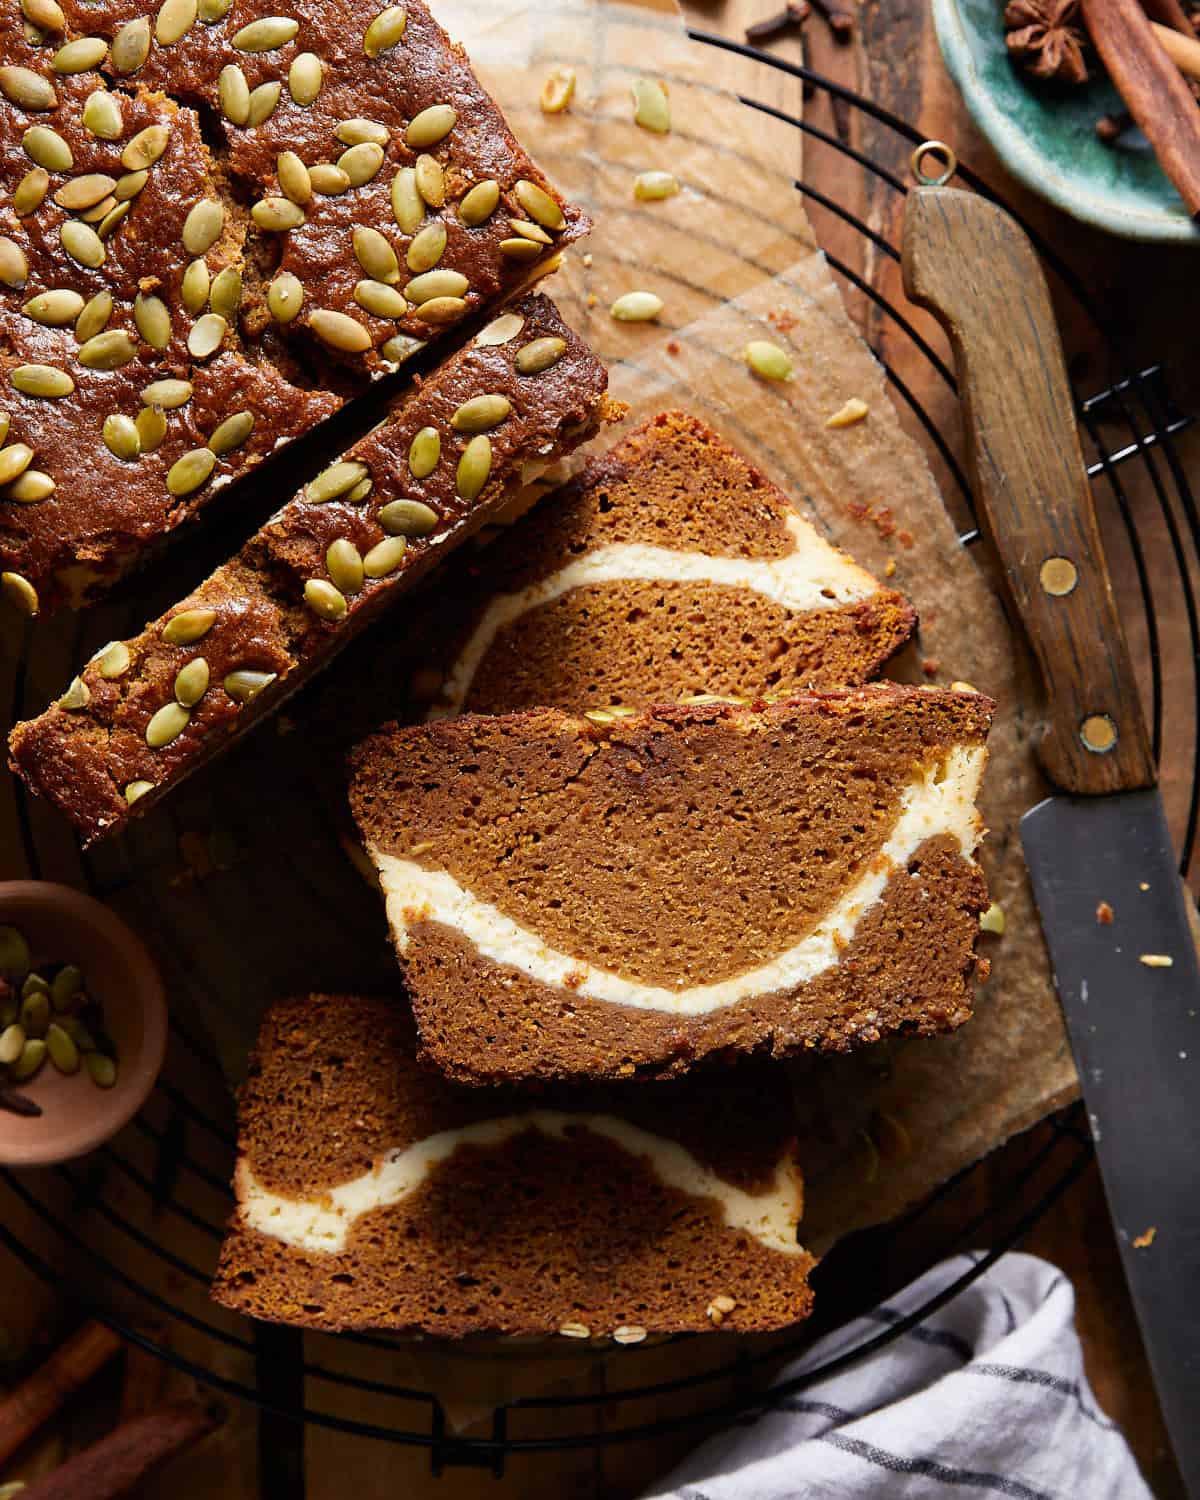
If there's one recipe on this entire list that makes people stop and ask "wait, you made that?" when you set it down, it's this one. The moment you slice into a loaf with a **cream cheese swirl** running through the centre and pumpkin seeds scattered across the top, it looks like something from a proper bakery — and the flavor backs it up completely. The cream cheese layer bakes to a smooth, slightly tangy ribbon that contrasts with the sweet, warmly spiced pumpkin crumb in every single slice. The key to getting that clean swirl is restraint: three or four passes with a knife through the layers is enough. I made the mistake of over-swirling the first time and ended up with a muddled orange loaf — still tasted great, but the visual wasn't there. Take your time with the layering and trust the process.
Ingredients
- 1 cup pumpkin puree, ½ cup neutral oil
- 1 cup granulated sugar, 2 large eggs, 1 teaspoon vanilla extract
- 1¾ cups all-purpose flour, 1 teaspoon baking soda, ½ teaspoon salt
- 1½ teaspoons cinnamon, ½ teaspoon pumpkin pie spice, ¼ teaspoon nutmeg
- Cream cheese swirl: 8 oz cream cheese (softened) + ¼ cup granulated sugar + 1 large egg + 1 teaspoon vanilla — beaten until completely smooth
- Pumpkin seeds for topping (optional, but they add a nice crunch)
Instructions
- Preheat oven to 350°F. Grease a 9×5-inch loaf pan. Whisk together pumpkin puree, oil, sugar, eggs, and vanilla in a large bowl. Add flour, baking soda, salt, cinnamon, pumpkin pie spice, and nutmeg and fold until just combined.
- In a separate bowl, beat the cream cheese, sugar, egg, and vanilla until completely smooth with no lumps — room-temperature cream cheese is non-negotiable here.
- Pour two-thirds of the pumpkin batter into the prepared pan. Spread the cream cheese mixture evenly over the top. Pour the remaining pumpkin batter over the cream cheese layer. Run a knife through the layers with 3–4 slow, deliberate passes — don't overdo it. Scatter pumpkin seeds over the top if using.
- Bake for 60–70 minutes until a toothpick inserted into the pumpkin bread portion (not the cream cheese layer) comes out clean. The cream cheese centre will remain slightly moist — that's correct. Cool completely before slicing. Store refrigerated for up to 5 days.
Tips
- Tip: Pull the cream cheese out of the fridge at least 30 minutes before you start — cold cream cheese won't beat smooth and you'll end up with lumps in your swirl layer.
- Tip: This loaf slices best when completely cold, straight from the fridge — warm slices tend to crumble slightly where the cream cheese layer meets the bread.
- Tip: If you don't have pumpkin seeds, a sprinkle of brown sugar and cinnamon across the top before baking creates a lovely caramelized crust that works just as well.
1. Soft Gluten-Free Pumpkin Cookies with Chocolate Chips
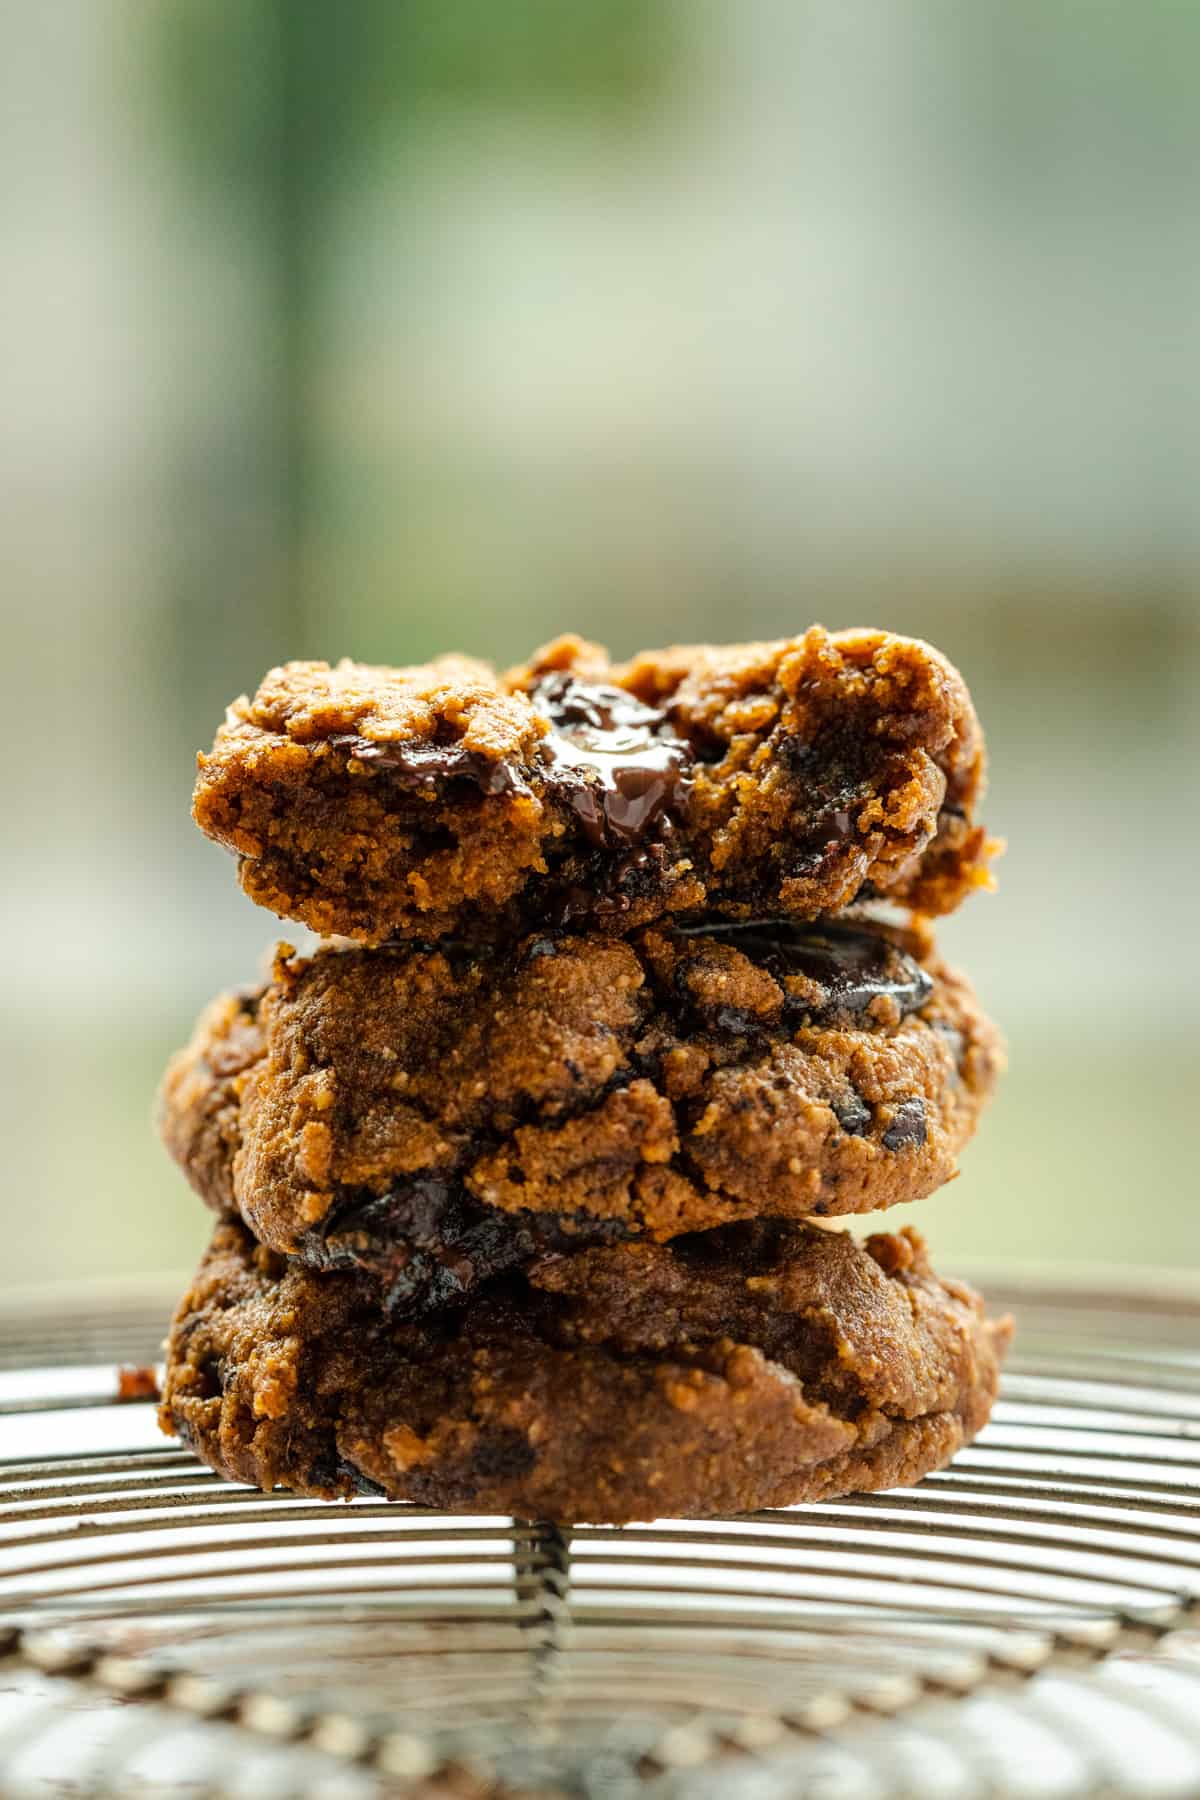
I make a double batch of these every October without fail — they disappear faster than almost anything else I bake, and half the people eating them have no idea they're gluten-free. The **chickpea flour** base sounds unusual, I know, but it produces a cookie that's naturally dense and moist in a way that most gluten-free baking never achieves. There's no dry, crumbly texture here, no strange aftertaste — just a soft, cakey pumpkin cookie loaded with semi-sweet chocolate chips that tastes like fall in the best possible way. The one thing to know: these don't spread in the oven, so flatten them slightly before baking, and then wait the full 20 minutes of cooling time before you eat one — they firm up completely as they cool and the spices genuinely develop more flavor on day two. I've started making these on Fridays so they're at their best by Saturday morning.
Ingredients
- 1 cup pumpkin puree
- ½ cup nut butter (almond or cashew butter both work well)
- ½ cup pure maple syrup or honey
- 1 large egg, 1 teaspoon vanilla extract
- 1 cup chickpea flour (available at Trader Joe's, Whole Foods, or the health food aisle at most large supermarkets)
- 1 teaspoon baking soda, 1½ teaspoons ground cinnamon
- ½ teaspoon pumpkin pie spice, ¼ teaspoon salt
- 1 cup semi-sweet chocolate chips
Instructions
- Preheat oven to 350°F. In a large bowl, whisk together the pumpkin puree, nut butter, maple syrup, egg, and vanilla until smooth and well combined.
- Add chickpea flour, baking soda, cinnamon, pumpkin pie spice, and salt. Stir until a thick, slightly sticky batter forms. Fold in the chocolate chips.
- Drop heaping tablespoon-sized mounds onto a parchment-lined baking sheet, leaving 2 inches between each. Flatten each mound slightly with the back of a wet spoon — these will not spread on their own in the oven.
- Bake for 12–14 minutes until the tops look just dry and set around the edges. Cool completely on the tray for at least 20 minutes before eating — they firm up significantly as they cool. Store in an airtight container for up to 6 days; they taste even better on day two.
Tips
- Tip: If you can't find chickpea flour, oat flour (blended from rolled oats) works as a substitute — the cookies will be slightly lighter in texture but still gluten-free if you use certified gluten-free oats.
- Tip: Use a runny nut butter for this recipe — if your almond butter is very stiff and thick straight from the jar, warm it for 20 seconds in the microwave before measuring so it incorporates properly.
- Tip: Press a few extra chocolate chips onto the tops of each cookie right before baking — it makes them look more finished and you get better chocolate coverage in every bite.
Curious for more? Our recipe collection awaits you here!
Twenty recipes later and I still can't pick a favorite — which honestly says a lot about how good pumpkin desserts can be when you let them do their thing. Whether you made it through one recipe this fall or you've been working through the list since September, I hope something on here made its way into your kitchen. These are the ones I keep returning to when the weather gets cold and I want something that actually feels like the season.
A few things I've learned from making pumpkin desserts over the years: don't skip the spices, don't overbake your bars, and canned pumpkin puree from Libby's is genuinely just as good as fresh — so don't let anyone convince you otherwise. The recipes that have earned permanent spots in my rotation are the pumpkin cheesecake bars, the pumpkin bundt cake, and the pumpkin snickerdoodles. Saad requests the cookies every single year the moment October starts. I've stopped acting surprised about it.
If you try anything from this list, I hope it fills your kitchen with that warm spiced smell that makes fall actually feel like fall. Save the ones you want to come back to, share with someone who needs a baking project, and don't stress if your first attempt isn't perfect — pumpkin desserts are forgiving that way. 🎃🍂✨
More Recipes You Might Like
- Fall Cookie Recipes — if the pumpkin snickerdoodles had you sold on fall baking, this list keeps that energy going with more cozy cookie ideas for the season.
- Easy Fall Desserts — broader than just pumpkin, this is where I go when I want something fast and seasonal without committing to a full bake.
- Thanksgiving Dessert Recipes — if you're planning ahead for the holidays, this roundup covers everything from pies to no-bake options that hold up on a full dessert table.
- Pumpkin Bread Recipes — not all pumpkin cravings need to be a full dessert. These loaves are what I make when I want something I can also justify eating for breakfast.
- Fall Dinner Recipes — because you can't just eat dessert (even if you want to). These are the savory fall meals I make before I justify a second slice of pumpkin cake.
Frequently Asked Questions
Can I use fresh pumpkin instead of canned pumpkin puree?
You can, but I honestly never do — and I say that as someone who enjoys extra kitchen work. Canned pumpkin puree (Libby's specifically) has a consistent moisture content that fresh pumpkin doesn't always match. If you roast and puree fresh pumpkin, make sure to strain it through a cheesecloth or a fine mesh sieve to remove excess water, otherwise your bars and cakes can come out soggy. For most recipes in this list, canned works better and saves you an hour.
How far ahead can I make these pumpkin desserts?
Most of them are great 1-2 days ahead, which is actually when they taste best — the spices settle and deepen overnight. Bars and loaves especially benefit from sitting. Anything with cream cheese frosting should be stored in the fridge and brought to room temperature before serving. Cookies can be baked, cooled, and stored in an airtight container at room temperature for up to 4 days without losing much.
What spices go into most pumpkin dessert recipes?
The classic pumpkin spice blend is cinnamon, nutmeg, ginger, and cloves — with cinnamon doing the heaviest lifting. You can buy pre-mixed pumpkin pie spice at Walmart, Trader Joe's, or any grocery store and it works perfectly. If you only have cinnamon on hand, that alone will still get you 80% of the way there. I keep a small jar of the pre-mixed blend in my pantry from September through December every year.
Can I freeze pumpkin desserts?
Most of them freeze well — bars, cookies, unfrosted loaves, and muffins all do great wrapped tightly and frozen for up to 2 months. Cheesecake-based desserts can freeze too, but the texture shifts slightly after thawing, so I usually eat those fresh. The trick is to let everything cool completely before wrapping, and to thaw in the fridge overnight rather than on the counter. I almost always make a double batch of pumpkin bars specifically to freeze half for later in the season.
Which recipe from this list is the easiest for a beginner baker?
Pumpkin bars or pumpkin muffins — hands down. Both are one-bowl recipes that don't require any special technique, just mixing and baking. You don't need to cream butter, you don't need to worry about overworking a dough, and they're hard to mess up badly enough that they're inedible. If you're new to baking and want to start somewhere with pumpkin, those two are the lowest-pressure entries on the whole list.
Share This Post!
If any of these pumpkin





Comments
No Comments