
I made these heart Oreo balls for the first time two Februaries ago, mostly because I didn't want to deal with an oven. Valentine's Day falls on a school day, the kids have activities, and I'm not about to babysit a cake in the oven at 9pm. Three ingredients, one silicone mold, and no baking whatsoever — this was exactly what I needed.
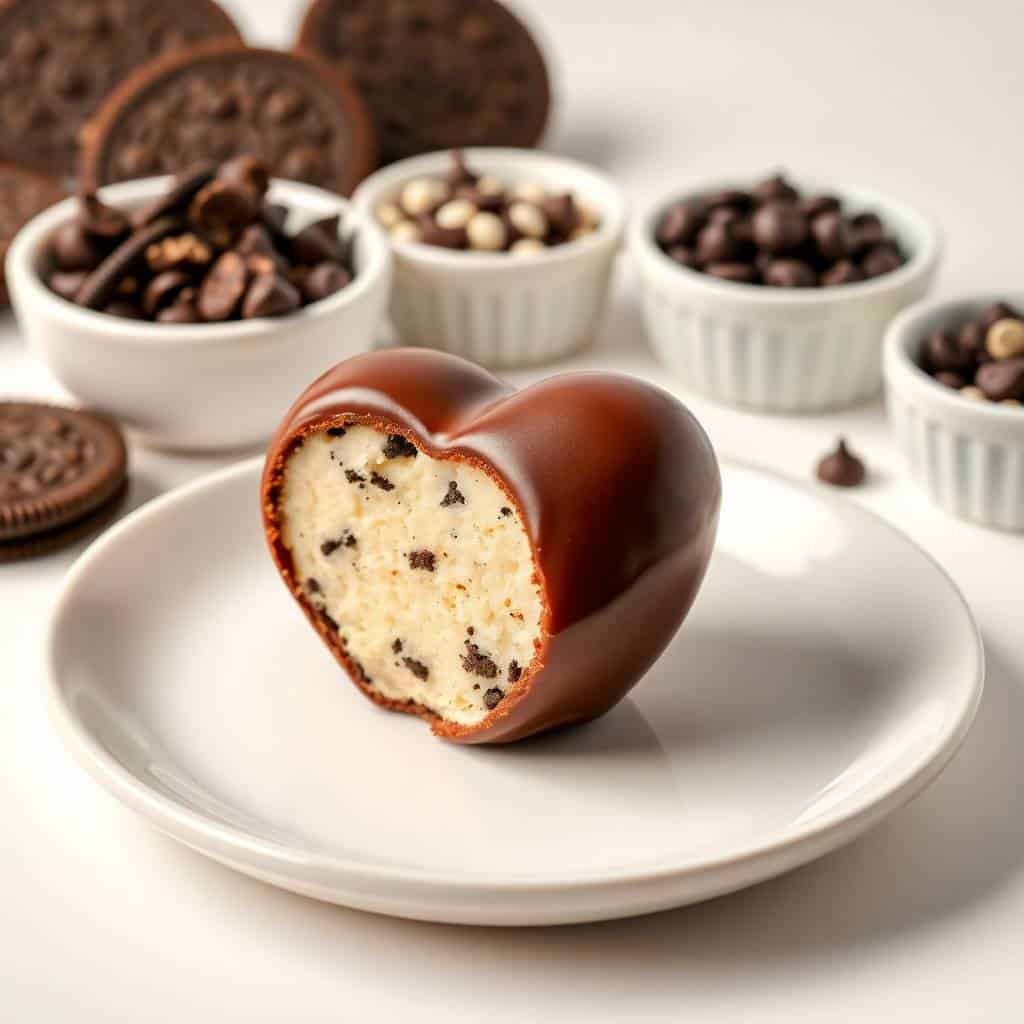
What I didn't expect was how good they actually taste. The filling is this thick, dark, fudgy mixture — crushed Oreos and cream cheese — and once it's coated in chocolate and chilled, it eats like a cross between a truffle and a no-bake cheesecake. The heart shape is just a bonus. It's the kind of treat that looks like you put in way more effort than you actually did, which is honestly my favorite kind of recipe. If you like no-bake desserts, my no bake coconut cream balls follow the same easy method and are just as good.
Zainab absolutely loves making these with me — she's the one who insists on the pink sprinkles, every single time. We set up a little dipping station at the kitchen counter and she decorates while I dip. It takes maybe 45 minutes total and we usually make a double batch because one tray disappears before they even finish setting. My husband eats them straight from the fridge.
One thing to know before you start: the cream cheese needs to be genuinely room temperature — not just "out of the fridge for 10 minutes" temperature, but actually soft and pliable. I learned the hard way that cold cream cheese doesn't blend evenly with Oreo crumbs. You get lumps, the texture is gritty, and pressing it into the mold is a nightmare. Pull it out at least an hour ahead and you'll have a smooth, easy-to-work dough.
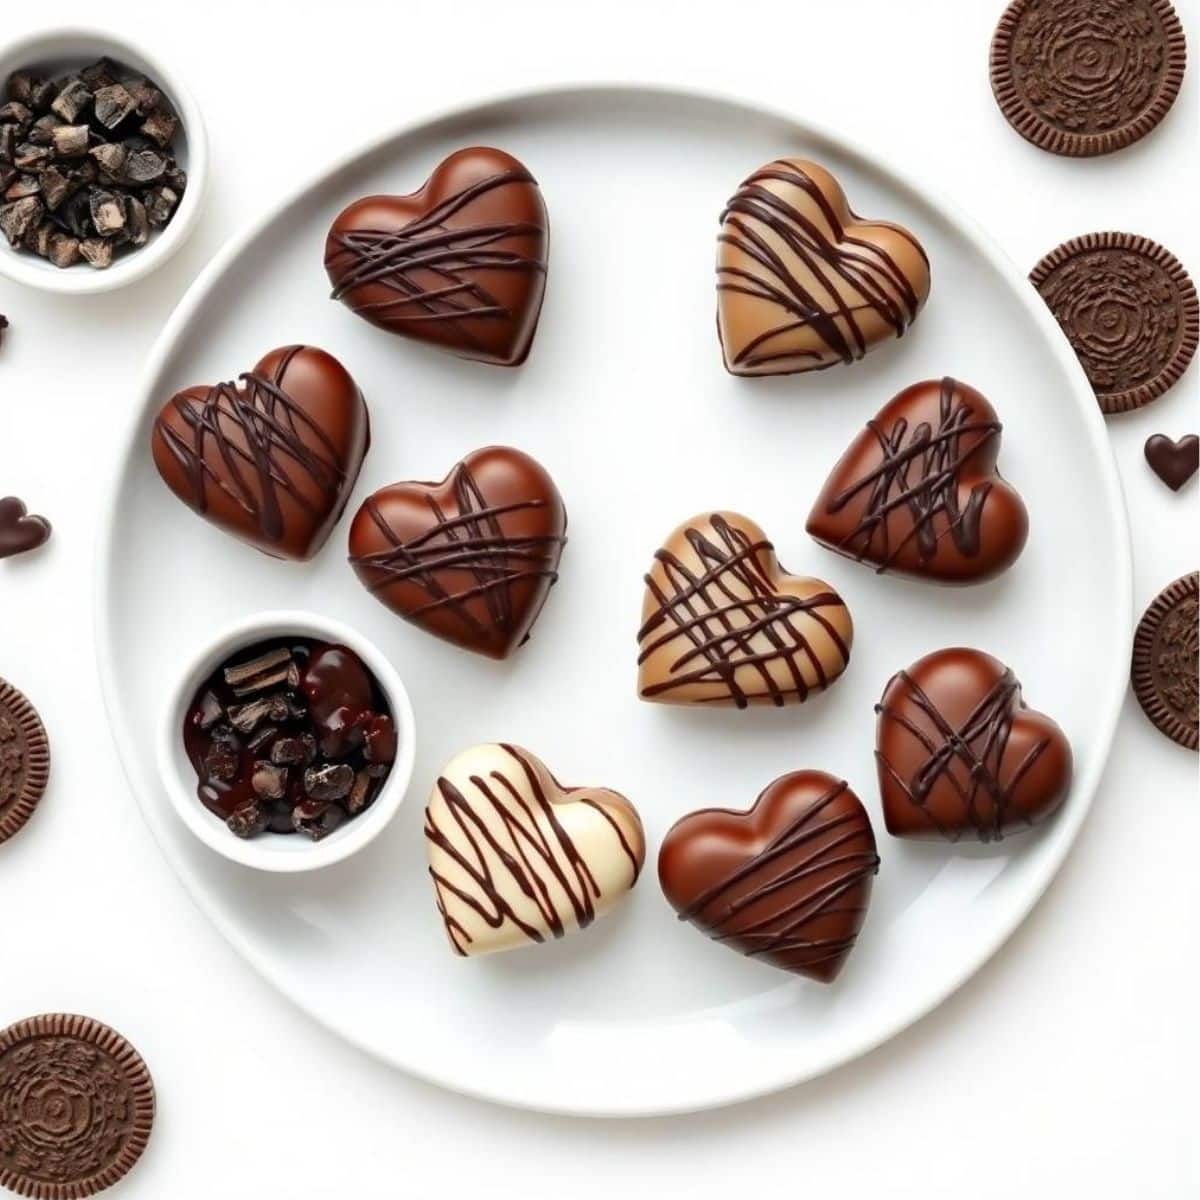
Why You'll Love This Recipe
- No oven required: The whole recipe happens at room temperature and in the freezer — no preheating, no baking, no timing anything. I've made these while simultaneously cooking dinner on the stove because they require so little active attention. On days when the kitchen is already chaotic, that matters a lot.
- Three ingredients, real results: Oreos, cream cheese, chocolate — that's it. I'm always a little skeptical of three-ingredient recipes because they often taste like three ingredients, but this one genuinely doesn't. The filling is rich and creamy and the chocolate shell snaps when you bite into it. It tastes like something from a confectionery counter.
- Make-ahead friendly: I make these the day before Valentine's Day and just pull them out when needed. They keep beautifully in the fridge for up to five days, which means zero morning-of stress. You can even freeze them a month ahead if you're really organized — I've done this once and it worked perfectly.
- A genuinely fun activity with kids: Zainab takes the decorating part very seriously. She has opinions about sprinkle placement. Making these together is one of those kitchen activities that's actually enjoyable rather than stressful — there's no hot oven, no sharp tools, and the mess is mostly contained to one bowl and a dipping fork.
- Easy to customize: The base recipe stays the same regardless of what Oreo flavor you use or what chocolate you coat them in. Golden Oreos with white chocolate, mint Oreos with dark chocolate, pink candy melts for a full Valentine's look — each version feels different but requires exactly the same work.
Ingredients
- 36 Oreo cookies, original flavor (filling included)
- 8 oz cream cheese, full-fat block, softened to room temperature
- 12 oz semi-sweet chocolate chips or candy melting wafers
- 1 teaspoon coconut oil (optional — helps thin the chocolate for easier dipping)
- Sprinkles, heart-shaped decorations, or edible glitter (optional)
- Red or pink gel food coloring (optional, for tinting white chocolate)
- Heart-shaped silicone mold (see notes below if you don't have one)
On the cream cheese: Use the block kind, not the spreadable tub. The tub version is too loose and the filling won't hold its shape. It must be fully softened — genuinely at room temperature, not just slightly cool. Take it out a full hour before you start.
On the chocolate: Wilton candy melts (available at Walmart or any craft store) are the easiest option — they melt smoothly without needing coconut oil and set quickly. If you're using regular chocolate chips, add the coconut oil to thin them out a little. It makes a real difference in how the coating looks and how easily it drips off.
On the mold: A silicone heart mold is what gives these their clean shape. They're inexpensive — a few dollars at any kitchen store, craft store, or online. If you don't have one, see the workaround in the tips section below.
Directions
- Crush the Oreos: Place all 36 Oreos — filling and all — in a food processor and pulse until you have fine, even crumbs with no large chunks. The finer the crumb, the smoother the filling and the cleaner the hearts will look when they come out of the mold. No food processor? Put the Oreos in a zip-lock bag and crush with a rolling pin. It takes about 5 extra minutes but works just as well.
- Mix with cream cheese: Add the fully softened cream cheese to the Oreo crumbs and mix until completely combined into a thick, smooth, dark dough. It should hold together when pressed between your fingers without crumbling. If the mixture feels sticky or too soft, refrigerate it for 15 to 20 minutes to firm up slightly before molding.
- Shape into hearts: Press the Oreo dough firmly into each cavity of the silicone mold, filling to the top and smoothing the surface flat with the back of a spoon or your fingertip. Press firmly — you want no air pockets. Place the filled mold in the freezer for 30 to 45 minutes until the hearts are completely solid and firm. Don't rush this step; soft hearts fall apart during dipping.
- Melt the chocolate: Place the chocolate chips and coconut oil (if using) in a microwave-safe bowl. Microwave in 30-second intervals, stirring well after each interval, until fully melted and smooth. Stop as soon as it's melted — overheated chocolate seizes up and goes grainy. You want it fluid and warm, not steaming hot.
- Dip the hearts: Flex the silicone mold gently to pop out the frozen hearts. Let them sit at room temperature for 2 to 3 minutes — this prevents cracking from thermal shock when they hit the warm chocolate. Working with 3 to 4 at a time (keep the rest in the freezer), drop each heart into the chocolate and use a fork to flip and coat it completely. Lift out on the fork and tap the fork gently on the edge of the bowl to let the excess drip off, then set flat-side down on a parchment-lined tray.
- Decorate and set: While the coating is still wet, add your sprinkles or decorations immediately — the chocolate sets fast, especially on cold hearts. Let them set at room temperature for 20 to 30 minutes, or speed things up in the fridge for 10 to 15 minutes.
Tips for Success
- Cream cheese at room temperature is non-negotiable: I know I keep saying this, but the first batch I made had cold cream cheese and the filling was lumpy and rough — impossible to press smoothly into the mold. Once it's fully soft, it blends into the Oreo crumbs in under a minute and the texture is completely different. One hour out of the fridge minimum.
- Don't skip the freezing step: Refrigerating the hearts isn't enough — they need to be genuinely frozen solid before dipping. Firm, cold hearts hold their shape during the dipping process and the contrast in temperature actually helps the chocolate coating set almost instantly in a smooth, even layer. I tried going straight from fridge to chocolate once and they started breaking apart in the bowl.
- Let the hearts sit out briefly before dipping: Pull them from the freezer and wait 2 to 3 minutes before dipping — not long enough to get soft, just long enough to take the extreme chill off the surface. Dipping ice-cold hearts directly into warm chocolate causes the coating to crack as it contracts. That 2-minute wait fixes the problem completely.
- No mold? You can still make these: Roll the mixture into balls, place on parchment, flatten with your palm, and use a toothpick to create the heart indent at the top and a slight point at the bottom. They look more rustic than mold-made ones, but the flavor is identical. Freeze them just the same before dipping.
- Keep the chocolate warm as you work: The chocolate cools and thickens as you go, especially when you keep adding cold hearts to it. If it starts getting too thick to dip cleanly, microwave it in 10-second bursts and stir. A thinner chocolate means a cleaner, neater coat — thick chocolate creates blobs and the ratio of coating to filling gets off.
Variations
- White chocolate with pink tint: Melt white chocolate chips and stir in a drop of red or pink oil-based gel food coloring (not water-based — it makes chocolate seize). The result is a soft pink coating that looks completely Valentine's-ready without any extra decoration. Zainab requests this version every year and I have to admit it photographs beautifully too.
- Mint Oreo version: Swap the original Oreos for mint-flavored ones and dip in dark chocolate. Finish with crushed candy cane on top. The filling tastes like a thick, creamy thin mint — it's genuinely one of my favorite versions. This one works just as well at Christmas as it does on Valentine's Day.
- Golden Oreo hearts: Use Golden Oreos instead of the original chocolate ones. The filling comes out pale and vanilla-flavored rather than dark and chocolatey — completely different look, same method. Coat in pink candy melts and they look almost too pretty to eat. The vanilla filling with sweet pink coating is a combination my kids can't resist.
- Strawberry drizzle finish: After the main chocolate coating sets, melt a small amount of pink or white chocolate and drizzle it over the tops in thin lines. This takes about two extra minutes and makes the finished hearts look significantly more polished — like something you'd see in a bakery window. I do this when I'm packaging them as gifts.
Serving and Storage
Serving
Serve chilled or at room temperature — both work, though I prefer them slightly cold because the filling stays firmer and the chocolate coating has a better snap. Arrange them on a small tiered stand or in individual cupcake liners for a clean presentation. They look great on a Valentine's Day dessert spread alongside cookies and fruit. For gifting, pack 6 into a heart-shaped box lined with tissue paper, or a clear treat bag tied with a red ribbon. They make a much more personal gift than anything store-bought, and the cost per batch is genuinely low.
Storage
Store in an airtight container in the refrigerator for up to 5 days. Because of the cream cheese, they can't sit out at room temperature for hours — keep them chilled until you're ready to serve. You may notice a slight white bloom on the chocolate coating after a few days in the fridge; this is just condensation affecting the surface and doesn't change the flavor at all. To freeze: once the chocolate coating is fully set, lay them in a single layer on a parchment-lined tray and freeze until solid (about 1 to 2 hours), then transfer to a zip-lock freezer bag with parchment between layers. They keep frozen for up to 1 month. Thaw overnight in the refrigerator — not at room temperature, as condensation will dull the coating. Add any sprinkle decorations after thawing, not before freezing, because colors can bleed.

Frequently Asked Questions
Do I really need a heart-shaped silicone mold?
You don't strictly need one, but it does give the cleanest, most consistent results. Silicone molds are inexpensive — a few dollars at any kitchen or craft store, or online. If you don't have one, you can shape the mixture by hand: press it flat on parchment, use a small heart cookie cutter to cut shapes, or roll into balls and carve a rough heart shape with a toothpick. The handmade version looks more rustic but tastes completely identical.
Can I make these ahead of time?
Yes, and honestly this is one of the best things about this recipe. I almost always make them the day before I need them. They keep in the fridge for up to 5 days with no loss of quality — the filling stays creamy and the coating stays firm. If you want to get even further ahead, freeze them undecorated for up to 1 month, then thaw in the fridge overnight and add final sprinkle decorations just before serving.
Why did my chocolate crack when I dipped the hearts?
Almost always thermal shock — the hearts are too cold coming straight out of the freezer and the warm chocolate contracts sharply around them. The fix is simple: let the frozen hearts sit at room temperature for 2 to 3 minutes before dipping. You don't want them to soften, just to take the extreme chill off the surface. Also make sure your melted chocolate is warm and fluid but not steaming hot — that middle ground gives you a smooth, crack-free coating.
Can I use flavored Oreos instead of original?
Any Oreo flavor works with the exact same method. Mint Oreos make a peppermint chocolate filling that's incredible with dark chocolate coating. Golden Oreos give a vanilla filling that pairs beautifully with white or pink chocolate. Birthday Cake Oreos create a funfetti-style filling. Peanut Butter Oreos with milk chocolate coating are one of my personal favorites. Each variation feels like a completely different treat while requiring the same three-ingredient process.
Can I freeze these after dipping?
Yes. Once the chocolate coating is fully set, freeze them in a single layer on a parchment-lined tray until solid, then transfer to a freezer-safe bag with parchment between layers. They keep for up to 1 month. Thaw overnight in the refrigerator — never at room temperature, as condensation can make the coating look dull and sweaty. One important note: add sprinkles and decorations after thawing, not before freezing, since colors can bleed during the freeze-thaw cycle.

HEART OREO BALLS
Ingredients
- 24 Oreo cookies regular or chocolate
- 8 oz 225g cream cheese, softened
- 8 oz 225g semi-sweet or milk chocolate, melted
- Optional: pink or red sprinkles heart decorations
Instructions
- Crush Oreos: Place Oreo cookies in a food processor or zip-top bag. Crush until fine crumbs form.
- Mix with Cream Cheese: In a bowl, combine crushed Oreos with softened cream cheese. Mix until a smooth, uniform dough forms.
- Shape Hearts: Roll mixture into small balls and gently press into heart shapes using your hands or a heart mold.
- Chill: Place shaped hearts on a parchment-lined tray and refrigerate for at least 30 minutes to firm up.
- Coat with Chocolate: Dip chilled hearts into melted chocolate using a fork or toothpick. Allow excess chocolate to drip off.
- Decorate: While chocolate is still wet, add sprinkles or heart decorations.
- Set: Refrigerate until chocolate is fully set, about 15–20 minutes. Serve chilled.
Notes
- Make Ahead: Oreo balls can be stored in the fridge for up to 5 days or frozen for up to 1 month.
- Flavor Variation: Add a drop of peppermint or almond extract to the Oreo mixture for extra flavor.
- Serving Suggestion: Perfect for gift boxes, Valentine’s parties, or dessert platters.
I keep coming back to this recipe every February because it genuinely solves a problem — Valentine's Day dessert that looks thoughtful without requiring me to clear my entire afternoon. Three ingredients, one bowl, no oven. The chocolate shell, the creamy Oreo filling, the heart shape that Zainab insists on decorating herself — it's become one of those small traditions I actually look forward to.
What I appreciate most is how forgiving it is. The filling comes together in minutes, the mold does the hard shaping work for you, and even if the chocolate dip isn't perfectly even, a handful of sprinkles covers a multitude of imperfections. If you're looking for another no-bake recipe in the same spirit, my no bake coconut cream balls are worth making back to back with these — different flavors, same easy approach.
If you make these, I'd love to know which Oreo variation you tried. The mint version has a lot of fans in my house, but Zainab's pink white chocolate version is honestly hard to argue with. Happy Valentine's Day — or honestly, happy any day you need an excuse to make chocolate-covered Oreo filling. 🍫❤️
If you liked this recipe, here are a few more you might want to try next:
- No Bake Coconut Cream Balls — another three-ingredient no-bake treat that comes together in the same amount of time
- Lemon Blueberry Dump Cake (Easy 4-Ingredient Summer Dessert) — when you want something baked but still minimal


Comments
No Comments