
Queso Cheese Dip (Creamy, Velvety, and Ready in Minutes)
I made this queso for the first time on a whim during a movie night, and I genuinely wasn't expecting much. I had a block of processed cheese in the fridge, a can of diced green chilies, and about ten minutes before the movie started. What came out of that saucepan was so smooth and rich that my husband immediately asked if I'd bought it from somewhere. I hadn't. I'd just finally figured out the right ratio of milk to cheese — and kept the heat low.
Queso isn't something I grew up eating in Pakistan. Cheese dips weren't part of my childhood kitchen at all. But once my kids discovered tortilla chips, the request for "that melty cheese sauce" became a weekly thing. I've made dozens of versions over the past couple of years, and this is the one that works every single time — no fancy ingredients, no special equipment, just a saucepan and a whisk.
Saad will eat this with literally anything. Chips, obviously, but also poured over fries, drizzled on tacos, spooned onto nachos. If you need something equally crowd-friendly to serve alongside, my cilantro-lime avocado salsa has become a permanent companion on our snack table — the freshness of the salsa cuts right through the richness of the queso.
One thing to know going in: processed cheese really does melt better than real cheese for this particular dip. I know some people have strong feelings about that, but I've tested both and the difference is obvious. Real cheddar needs a little help from cornstarch to stay smooth — I'll explain that in the tips. Either way works, just go in knowing what to expect.

Why You'll Love This Recipe
- It comes together in under 15 minutes: From cold saucepan to warm dip on the table, this genuinely takes less time than heating frozen appetizers in the oven. I've made it while guests are already sitting down and nobody noticed the delay. The whole thing is maybe four steps, and two of them happen at the same time.
- The texture stays smooth and velvety: When you get the heat right, this dip has that glossy, pourable consistency that coats a chip without dripping off immediately. The first time I rushed it on high heat, I got a grainy, broken mess. Low and slow is what makes the difference here — I'll explain exactly what to watch for.
- The ingredient list is short and genuinely accessible: Everything you need is at Walmart or any regular grocery store. Velveeta-style processed cheese, milk, a few pantry spices, and a small can of green chilies. No specialty store required — which matters to me since I'm cooking for readers who may not have a well-stocked international grocery nearby.
- It works as a dip, a topping, and a sauce: I've used this same base recipe poured over nachos, spooned onto baked potatoes, drizzled on tacos, and stirred into pasta when I was out of ideas. Once you have the basic queso down, you'll start seeing uses for it everywhere.
- You can control the heat level exactly: My husband wants it spicy enough to feel something. Saad wants it mild. I make the base neutral and then split it into two small bowls — extra jalapeños go into one. Works every single time without any negotiation.
Ingredients
- 2 cups shredded cheddar cheese (or cubed processed cheese like Velveeta — both work, see tips)
- 1 cup milk (whole milk gives the best texture, but 2% works fine)
- 1 small tomato, diced
- 1 small jalapeño, seeded and diced (leave seeds in if you want more heat)
- ½ teaspoon salt
- ¼ teaspoon black pepper
- 1 teaspoon cornstarch, optional (helps thicken the dip and keeps real cheese from breaking)
- ½ teaspoon garlic powder
- ½ teaspoon onion powder
- ¼ teaspoon ground cumin
- 1 small can (4 oz) diced green chilies (optional but recommended — adds flavor without much heat)
Directions
- Step 1: Warm the milk first. Pour the milk into your saucepan and set it over medium-low heat. Let it warm up for about 2 minutes before adding the cheese. Starting with cold milk straight from the fridge is one of the things that caused my early batches to cook unevenly — warm milk helps the cheese melt in gradually without shocking it.
- Step 2: Add the cheese slowly. Add your shredded cheddar (or cubed processed cheese) in two or three additions, stirring constantly between each one. Don't dump it all in at once. Give each addition time to melt into the milk before adding the next. This is what keeps the texture smooth instead of clumpy.
- Step 3: Add cornstarch if using. If you're using real cheddar and want a thicker, more stable dip, whisk the cornstarch into 2 tablespoons of cold milk separately, then stir that slurry into the saucepan now. This step is optional with processed cheese, but I recommend it with real cheddar.
- Step 4: Season and add the mix-ins. Once the cheese is fully melted and smooth, stir in the garlic powder, onion powder, cumin, salt, black pepper, diced tomato, jalapeño, and green chilies. Give it a good stir and taste — adjust salt and heat here before serving.
- Step 5: Reduce heat and serve warm. Turn the heat to its lowest setting and let the dip sit for another minute, stirring gently. Serve immediately directly from the pan, or transfer to a small slow cooker on the warm setting if you're serving it at a party.

Tips for Success
- Keep the heat low the entire time: I cannot stress this enough, because I ignored it and paid the price. The first time I cranked the heat to speed things up, the cheese proteins seized up and the whole thing turned into a grainy, oily mess. Medium-low is as high as you should ever go, and once the cheese starts melting, drop it to low. There's no recovering from overheated cheese — you have to start over.
- Stir constantly while the cheese melts: This isn't a "set it and walk away" moment. Keep a wooden spoon in your hand and stir in slow circles from the moment the cheese hits the pan. It's maybe 5 minutes of active stirring — worth it. Stopping even briefly lets the cheese settle on the bottom and stick.
- Thin it gradually if it thickens too much: Queso tightens up fast once it starts cooling even slightly. If yours gets too thick while you're still cooking, add milk one tablespoon at a time and stir it in. Don't pour in a big splash all at once — that can make the texture go uneven. A little at a time gives you control.
- Season at the end, not the beginning: I add the salt after the cheese is already melted, not before. Processed cheese and even regular cheddar already have salt in them, so if you season early you risk overshooting. Taste the melted cheese base first, then decide how much salt it actually needs.
- Use a heavy-bottomed saucepan if you have one: I use a regular stainless saucepan I've had for years, but a heavier pan distributes heat more evenly and reduces the risk of hot spots that scorch the cheese. Any $20 saucepan from Walmart will work — you don't need anything fancy, just avoid thin, lightweight pans for this one.
Variations
- Spicy jalapeño queso: Double the jalapeños and leave the seeds in. You can also stir in a teaspoon of your favorite hot sauce right at the end. My husband makes his own bowl this way every single time we have queso — he says the mild version tastes "unfinished." If you want the heat to be fragrant instead of just sharp, add a pinch of cayenne along with the jalapeños.
- Meaty queso with chorizo: Cook about 4 oz of Mexican chorizo in a separate pan, drain the excess fat, and stir it into the finished queso. It turns this into something substantial enough to be a meal. I've served it over rice for the kids and honestly it disappeared faster than the chip version. If you can't find chorizo, seasoned ground beef works too — just add a little smoked paprika and cumin while browning it.
- Smoky chipotle queso: Swap the cumin for half a teaspoon of smoked paprika and add a teaspoon of chipotle paste (or one diced chipotle pepper from a can of chipotles in adobo). The smoky, slightly sweet heat is completely different from jalapeño heat and works beautifully with chips. I make this version when I'm serving it alongside something rich like my Philly cheesesteak sloppy joes — the smokiness ties them together.
- White queso (queso blanco): Use white American cheese or Monterey Jack instead of cheddar. The color is lighter and the flavor is milder and creamier. This is the version that tastes most like what you'd get at a Tex-Mex restaurant in the US. White American cheese from the deli counter — not the pre-sliced packaged kind — melts the most smoothly.
- Vegetable-loaded queso: Sauté half a diced onion and half a diced bell pepper in a little butter until soft, then stir them into the finished dip along with a handful of frozen corn. This adds color, texture, and a natural sweetness that works surprisingly well. Zainab prefers this version — she says the plain one is "too cheesy," which I still don't understand, but here we are.
Serving and Storage
Serving
Serve it straight from the saucepan into a small bowl while it's still hot — queso thickens noticeably within minutes of coming off the heat. Tortilla chips are the obvious move, but I also use this as a topping for nachos, tacos, and baked potatoes. If you're serving it at a party and need to keep it warm, a small slow cooker on the "warm" setting works really well. Stir it every 20 minutes or so to prevent a skin from forming on top. I like to serve it next to something fresh and acidic — a bowl of cilantro-lime avocado salsa on the side is my go-to because the brightness cuts through the richness.
Storage
Store leftover queso in an airtight container in the refrigerator for up to 3 days. It will solidify completely in the fridge — that's normal. To reheat, put it back in a small saucepan over low heat and add milk one tablespoon at a time, stirring constantly, until it loosens back to a pourable consistency. Microwave reheating works too: 30 seconds at a time, stirring between each interval, with a splash of milk added before you start. Don't freeze it — the texture turns grainy and separated after thawing and it really can't be saved.

Frequently Asked Questions
Can I make queso cheese dip ahead of time?
Yes, and it reheats well as long as you're gentle with it. Make it up to a day ahead, let it cool completely, then store it in the fridge in an airtight container. When you're ready to serve, reheat it slowly over low heat with a splash of milk, stirring constantly until smooth. Don't rush it with high heat or you'll get graininess.
Why did my queso turn grainy or oily?
Almost always a heat issue. When cheese gets too hot too fast, the proteins seize and the fat separates out — that's the greasy, grainy texture you're seeing. The fix is to always melt cheese over low heat and stir constantly. If you're using real cheddar instead of processed cheese, adding a cornstarch slurry (1 teaspoon cornstarch mixed with 2 tablespoons cold milk) helps stabilize it.
Can I use real shredded cheese instead of Velveeta-style processed cheese?
Yes, and the recipe card uses shredded cheddar for exactly that reason. Real cheese tastes better to most people, but it needs a little help to stay smooth — that's what the cornstarch is for. Mix 1 teaspoon of cornstarch with 2 tablespoons of cold milk to make a slurry, then stir it into the pan before adding your cheese. It makes a real difference in keeping the texture stable.
How do I keep queso warm during a party without it thickening up?
A small slow cooker on the "warm" setting is your best option. Transfer the finished queso into the slow cooker and leave the lid slightly ajar to prevent condensation from dripping in. Stir it every 20 minutes or so, and if it starts to thicken, add a tablespoon of warm milk and stir it in. I've kept queso warm this way for a full two hours without any problems.
Can I freeze leftover queso cheese dip?
I wouldn't. Dairy-based dips don't freeze well — the texture becomes grainy and separated after thawing, and no amount of stirring brings it back to smooth. Since this dip takes less than 15 minutes to make from scratch and the ingredients are inexpensive, it's easier to just make a fresh batch. If you need to stretch leftovers, refrigerate them for up to 3 days and reheat gently with added milk.
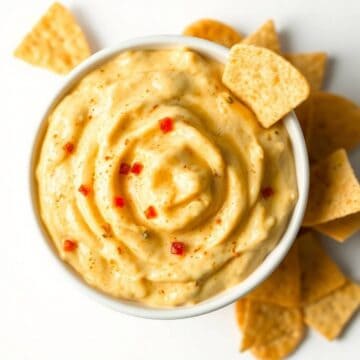
QUESO CHEESE DIP
Ingredients
For Queso Dip:
- 2 cups shredded cheddar cheese
- 1 cup milk
- 1 small tomato diced
- 1 small jalapeño seeded and diced
- ½ teaspoon salt
- ¼ teaspoon black pepper
- 1 teaspoon cornstarch optional, for thicker dip
Instructions
Melt Cheese:
- In a saucepan over medium heat, combine milk and shredded cheese. Stir until cheese is melted and smooth.
Add Mix-ins:
- Add diced tomato, jalapeño, salt, and black pepper. Stir to combine. If thicker dip is desired, mix in cornstarch.
Serve:
- Cook for 3–5 minutes until heated through. Serve immediately with tortilla chips or use as a topping.
Notes
- Make Ahead: Can be prepared and reheated gently before serving.
- Variations: Add cooked chorizo or diced green chilies for extra flavor.
- Serving: Serve with tortilla chips, nachos, tacos, or vegetables.
- Storage: Store in airtight container in fridge up to 2 days. Reheat slowly to prevent curdling.
This is one of those recipes I keep coming back to because it costs almost nothing to make and takes less time than deciding what to order for delivery. A block of cheese, a cup of milk, a few pantry spices — that's genuinely all you need. I make a double batch whenever we're having people over because a single batch disappears before everyone has even sat down.
I know this isn't authentic Mexican queso — real queso fundido is a different thing entirely, and I'm not pretending to make that. This is my weeknight, movie-night, "I need something warm and cheesy right now" version. It's built on what I've learned from failed batches, and it works reliably because I finally stopped rushing it. Low heat, slow stirring, warm milk — those three things changed everything.
If you want to build a full spread around this, try it alongside my cheesy steak bites and rotini pasta for a meal that's unabashedly cheesy from start to finish. No apologies. Sometimes that's exactly what the evening calls for. 🧀✨
If you make this, I hope it becomes as reliable in your kitchen as it's become in mine. Leave a comment and tell me which variation you tried first.
If you liked this recipe, here are a few more you might want to try next:
- Cilantro-Lime Avocado Salsa — bright, fresh, and the ideal partner for queso on a snack table
- Philly Cheesesteak Sloppy Joes — another cheesy, deeply satisfying recipe that works for any casual dinner
- Cheesy Steak Bites and Rotini Pasta — if you're already committed to a cheesy evening, go all in
- Spicy Sausage and Tortellini Soup — a warming bowl that works alongside crusty bread and a side of queso for dipping





Comments
No Comments