
Saad asked me to make this three weeks before Christmas. He'd seen a photo somewhere online — a pizza shaped like a Christmas tree — and absolutely would not let it go. So I tried it, and honestly? It's one of the most fun things we've made together in the kitchen.
The whole idea is simple: take store-bought pizza dough, cut it into a triangle, top it like a regular pizza, and let the kids go wild with the decorations. Red and green bell peppers for ornaments, olives, cherry tomatoes, fresh basil leaves along the edges like pine branches. It looks genuinely festive without requiring any special equipment or skill. I use a regular sheet pan I've had for years — nothing fancy.
We now do this every December. Saad handles the "ornaments" (pepperoni and olives), Zainab arranges the basil leaves around the edges and takes it very seriously, and I handle the dough and sauce. It comes together in under 30 minutes including bake time, which matters on December evenings when everything feels chaotic. If you're looking for more family-friendly dinner ideas around the holidays, my Cheesy Sausage Potato Soup is another one we make constantly this time of year.
One thing I'll tell you upfront: don't stress about the shape being perfect. The first time I made it, the triangle was a bit lopsided and one side of the trunk kept sliding. We laughed about it and ate it anyway. The point is the fun, not a perfect geometric tree.
Why You'll Love This Recipe
- Kids are actually excited to help: I've tried getting my kids involved in cooking plenty of times and it usually lasts about three minutes before someone wanders off. Not with this pizza. The decorating part holds their attention because it feels like a craft project. Saad spent twenty minutes arranging his pepperoni into what he called "a spiral galaxy ornament pattern." I didn't argue.
- It's on the table fast: From pulling the dough out of the fridge to sitting down to eat, this takes about 35 minutes. That includes shaping, topping, and baking. On a busy holiday weeknight when I haven't planned dinner properly, this is the kind of recipe that saves me. Store-bought dough does most of the heavy lifting.
- You can customize each section: Because the pizza is shaped like a tree with natural "sections," you can do different toppings in different areas. One half for the pepperoni lover, one half for the vegetable person. We split ours down the middle — Saad's side has pepperoni, Zainab's side is all vegetables. No negotiations required.
- It actually looks impressive without much effort: The Christmas tree shape does all the visual work. Add some red cherry tomatoes for ornaments and a few basil leaves along the edges and it genuinely looks like something you'd see at a holiday party. People always ask if it was hard to make, and the answer is no — but I let them wonder.
- No special tools needed: I've seen versions of this recipe online that call for cookie cutters and pizza wheels and all sorts of things. I use a regular knife to shape the dough and a spoon to spread the sauce. A standard sheet pan from Walmart works perfectly. That's it.
Ingredients
- 1 pizza dough (store-bought refrigerated tube, or homemade if you have it ready)
- 1 cup pizza sauce
- 1 ½ cups shredded mozzarella cheese
- ½ cup sliced pepperoni (or your preferred topping)
- Fresh basil or spinach leaves (for the tree branch look along the edges)
- Cherry tomatoes or sliced black olives (for ornaments)
- ¼ cup diced red bell pepper (optional, adds color)
- ¼ cup diced green bell pepper (optional)
- 1 tablespoon olive oil (for brushing the edges)
- ½ teaspoon Italian seasoning
Directions
- Step 1: Preheat the oven — Set your oven to 425°F (220°C) and line a baking sheet with parchment paper. Parchment is important here — it stops the dough from sticking and also makes cleanup much easier when cheese slides off the edges (it will).
- Step 2: Shape the dough — Roll or stretch the pizza dough out on the parchment-lined sheet. Use a knife or kitchen scissors to cut it into a large triangle shape with a small rectangle at the bottom for the trunk. Don't worry about perfect edges — rustic works fine and honestly looks more charming.
- Step 3: Spread the sauce — Spoon the pizza sauce over the dough in an even layer, leaving about half an inch clear around the edges. I use the back of a spoon in circular motions to get it even without tearing the dough.
- Step 4: Add the cheese — Scatter the shredded mozzarella over the sauce. Make sure you cover the whole tree — thin spots in the cheese mean thin spots in the finished pizza, and no one wants that.
- Step 5: Decorate the tree — Now the fun part. Place pepperoni, bell pepper pieces, cherry tomatoes, and olives across the tree in whatever pattern looks good to you. Tuck basil or spinach leaves along the outer edges to look like pine branches. Let the kids do this part — they'll take it seriously.
- Step 6: Brush and bake — Brush the exposed crust edges with olive oil and sprinkle Italian seasoning over the whole thing. Slide it into the oven and bake for 10–15 minutes, until the crust edges are golden brown and the cheese is bubbling and starting to spot.
- Step 7: Cool slightly and serve — Let it sit for 3–4 minutes before cutting. This helps the cheese set a little so it doesn't slide off the moment you slice. Cut into wedge-shaped slices following the tree shape and serve warm.
Tips for Success
- Don't skip the parchment paper: I tried greasing the pan directly the first time and the dough still stuck at the trunk where it was thicker. Parchment is just easier. You can find it at any grocery store — Walmart, Kroger, Aldi, wherever you shop.
- Let the dough come to room temperature first: Cold refrigerated dough fights you when you try to shape it — it springs back and you end up with a lumpy blob instead of a tree. Pull the dough out of the fridge about 15 minutes before you start and it'll stretch much more cooperatively.
- Keep the toppings light: I know it's tempting to load this up, but too many toppings weigh the dough down and you get a soggy center. A single layer of each topping is enough. The shape and the cheese do most of the visual work anyway.
- Watch it in the last few minutes: Every oven runs differently. Mine tends to run a little hot, so I check at the 10-minute mark. The crust edges should be golden, not pale, and the cheese should be bubbling with a few light brown spots. If the edges look done but the center is still pale, give it 2 more minutes.
- Use fresh basil at the end if you can: Dried basil goes into the oven fine, but if you have fresh basil leaves, add them in the last 2 minutes of baking rather than the beginning. They stay bright green that way and look much better for photos or for impressing your family at the table.
Variations
- Garlic butter base instead of sauce: Mix 2 tablespoons of melted butter with a minced garlic clove and brush it over the dough instead of pizza sauce. Then top with mozzarella and whatever toppings you like. This gives it more of a white pizza feel and it's honestly incredible — my husband prefers this version.
- Mini individual trees for parties: Instead of one big tree, divide the dough into 4–6 smaller portions and cut each one into a small triangle. Kids can decorate their own individual pizza trees, which works really well for birthday parties or holiday playdates. Adjust baking time down to about 8–10 minutes for smaller ones.
- Stuffed crust edges: Before adding sauce, lay string cheese sticks along the outer edge of the triangle and fold the dough over them, pressing to seal. Then top and bake as usual. The kids absolutely lose their minds over the stuffed crust pull. It adds about 5 minutes to prep but it's worth it.
- All-vegetable version: Skip the pepperoni entirely and use mushrooms, sliced cherry tomatoes, corn, and both red and green bell peppers. The colors are actually more festive without the meat — the red and green really pop against the white cheese. This is what I make when we have vegetarian guests over.
- Crescent roll version for extra flakiness: If you can't find refrigerated pizza dough, two tubes of crescent roll dough pressed together work surprisingly well. The texture is flakier and slightly richer, and it bakes faster — check at 8 minutes. Pillsbury crescent rolls are at basically every grocery store in the US.
Serving and Storage
Serving
Serve this warm, straight from the oven after a 3–4 minute rest. Cut along the tree shape into wedge slices — each slice naturally becomes a "branch" section, which makes it easy for little hands to pick up. We put a small bowl of marinara sauce in the center of the table for dipping. If you want a more complete holiday dinner spread, this pairs well alongside a big green salad or a warming bowl of soup like my Cheesy Sausage Potato Soup on a cold December night.
Storage
Leftovers keep in an airtight container in the fridge for up to 3 days. Don't microwave them — the crust goes completely soft and sad. Reheat in a toaster oven or regular oven at 375°F for about 5 minutes and you'll get the crust crispy again. Zainab actually loves the leftovers cold the next day, straight from the fridge, which I find baffling but she's consistent about it.

Frequently Asked Questions
Can I use homemade pizza dough instead of store-bought?
Yes, absolutely. Homemade dough works great and gives you a little more control over the thickness and flavor. I use store-bought on weeknights because it saves time, but if you have a dough recipe you like and time to make it, go ahead. Just make sure it's fully proofed before you try to shape it or it'll spring back on you.
How do I stop the pizza from sticking to the pan?
Parchment paper is your best option here. Line the sheet pan with it before placing the dough and nothing will stick. If you don't have parchment, lightly grease the pan with cooking spray or a thin layer of olive oil, but parchment is more reliable and makes cleanup much easier.
Can I prepare this ahead of time?
You can prep the toppings ahead — chop the vegetables, slice the olives, get everything in small bowls — and refrigerate them until you're ready to assemble. The dough is best shaped and baked fresh. If you shape it too far ahead and leave it sitting, it can get sticky and start to lose its shape. Assembly takes about 10 minutes, so I usually just do it right before baking.
What if my kids don't like some of the toppings?
That's honestly the best thing about this recipe — you can split the tree into sections and do different toppings in each part. We do half pepperoni, half vegetables every time. You can even let each kid "claim" a section and decorate it however they want. It sounds chaotic but it works, and they always eat the parts they made themselves.
Can I make this gluten-free or dairy-free?
Yes to both. Use a gluten-free pizza dough — Pillsbury makes one and most grocery stores carry at least one option in the refrigerated section. For dairy-free, swap the mozzarella for a plant-based shredded cheese. It melts a little differently but still works. Just check the bake time since gluten-free doughs sometimes need a few extra minutes.
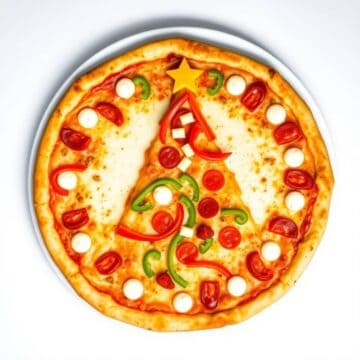
CHRISTMAS TREE PIZZA
Ingredients
- 1 pizza dough store-bought or homemade
- 1 cup pizza sauce
- 1 ½ cups shredded mozzarella cheese
- ½ cup sliced pepperoni or your favorite pizza toppings
- Fresh basil or spinach leaves for tree decoration
- Cherry tomatoes or olives for tree ornaments
- 1 tablespoon olive oil optional, for brushing
Instructions
Preheat the Oven:
- Preheat the oven to 425°F (220°C) and line a baking sheet with parchment paper.
Shape the Dough:
- Roll out the pizza dough into a large triangle shape to resemble a Christmas tree. Place it on the prepared baking sheet.
Add Sauce and Cheese:
- Spread a thin layer of pizza sauce over the dough, leaving a small border around the edges. Sprinkle the shredded mozzarella cheese evenly over the sauce.
Decorate the Tree:
- Arrange the sliced pepperoni (or other toppings) in the shape of a Christmas tree, placing them in layers from the base to the top. Use basil or spinach leaves for the tree’s branches and cherry tomatoes or olives for ornaments.
Bake the Pizza:
- Brush the edges of the dough with olive oil if desired for a golden finish. Bake in the preheated oven for 10–15 minutes or until the cheese is bubbly and the crust is golden.
Serve and Enjoy:
- Allow the pizza to cool slightly before cutting it into slices and serving.
Notes
- Customization: Get creative with toppings! Try using different vegetables or other meats to suit your kids' tastes.
- Make Ahead: You can prepare the dough and toppings ahead of time, then assemble and bake when ready.
- Allergy-Friendly: Use gluten-free pizza dough and dairy-free cheese for those with dietary restrictions.
- Serving Tip: Pair with a side of veggies or a fresh fruit salad to complete the meal.
This is one of those recipes that takes almost no effort but creates a genuinely memorable moment. I've made a lot of holiday food over the years — big biryanis, layered cakes, complicated cookies — and somehow this lopsided pizza triangle is the thing my kids talk about most. There's something about letting them build their own dinner that makes them proud of it in a way that a regular pizza night just doesn't.
I make a double batch of this when we have cousins over during the school holidays. One big tree isn't enough for a group of six kids — I've learned that the hard way. Two trees on two sheet pans, staggered in the oven by five minutes, and everyone gets plenty. The toppings cost almost nothing extra and the kids are genuinely entertained for a good chunk of the evening.
If you want to round out a full holiday dinner, this goes really well alongside my Cinnamon Roll Cookies for dessert — we do the pizza first, then the kids decorate the cookies while I clean up. It's become our December rhythm and I genuinely look forward to it every year. Give this Christmas tree pizza a spot on your table this season — I think it'll stick around for more than one. 🎄🍕✨
If you liked this recipe, here are a few more from forfoodiefriends.com worth checking out:
- Cheesy Sausage Potato Soup — a warming, hearty soup for cold holiday evenings
- Cinnamon Roll Cookies — a perfect follow-up dessert after pizza night
- Lemon Garlic Chicken Bites — easy, crowd-friendly bites that work as a side or starter
- Gorgonzola Stuffed Burgers — for the grown-ups who want something heartier at the holiday table
- Southern Candied Yams on the Stovetop — a holiday side that takes barely any effort and disappears fast





Comments
No Comments