
I made these for the first time on a freezing December afternoon when Zainab came home from school asking for hot chocolate. I didn't have the energy to stand at the stove, but I did have a full baking afternoon in me. So I thought — what if I made the hot cocoa and just... put it in a cookie? The result was better than I expected, and Zainab declared them "the best cookies in the whole house," which is high praise from a seven-year-old who's eaten a lot of cookies.
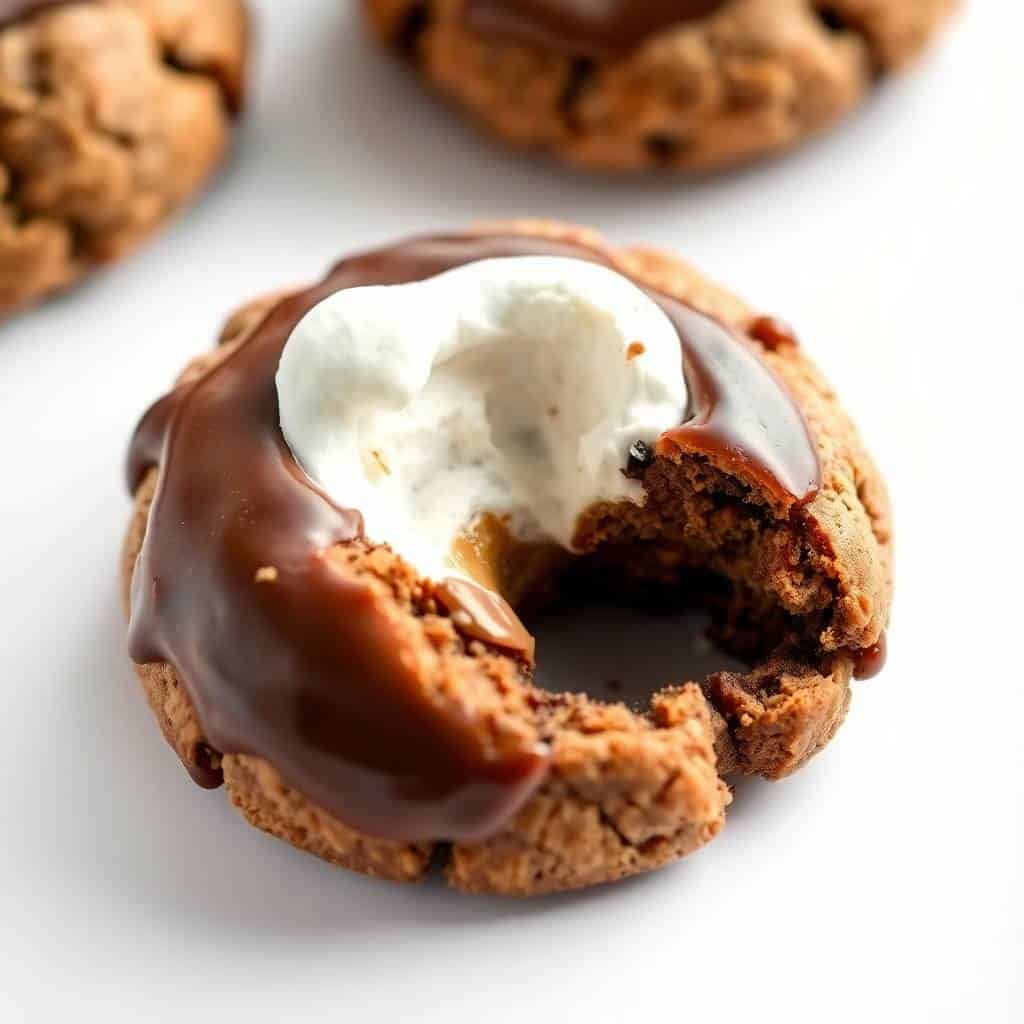
The concept is simple: a cocoa-heavy cookie dough, a marshmallow tucked in the centre, and just enough time in the oven for the marshmallow to go soft and gooey without completely disappearing. The cookie itself bakes up with slightly crisp edges and a fudgy middle — the texture you want from a proper chocolate cookie. The hidden marshmallow is the part that makes people do a double-take when they bite in. It's not a gimmick either; the combination of deep chocolate and melted marshmallow genuinely does taste like hot cocoa.
I've made these several times now — for Eid, for a neighbour's Christmas cookie exchange, and once just because it was a rainy Sunday. They disappear fast every single time. If you're looking for something a little different for holiday baking this year, these sit nicely alongside something bright and fruity like my Cranberry Lemon Cookies on a cookie tray.
One thing to set expectations on: these cookies look slightly underdone when you pull them out of the oven. That's intentional. If you wait until they look fully baked, they'll be dry and the marshmallow will have puffed out and caramelised rather than staying soft inside. Pull them at 9 minutes, let them sit on the tray, and trust the process.

Why You'll Love This Recipe
- The gooey centre is a genuine surprise: I know "hidden marshmallow" sounds like a Pinterest gimmick, but it genuinely works here. When you bite into the cookie, the marshmallow inside has melted into this soft, sticky pocket that tastes exactly like the marshmallow in a mug of hot cocoa. My neighbour asked me if I'd injected something into the cookies. I hadn't — it's just good technique.
- Deep chocolate flavour from real cocoa: These use half a cup of unsweetened cocoa powder, which gives the cookies a proper dark chocolate taste rather than a milk-chocolatey sweetness. You get that slightly bitter, roasty cocoa flavour that pairs so well with the sweet marshmallow. I've made them with both regular and dark cocoa powder — dark gives an even richer result if you can find it.
- No fancy equipment needed: I don't own a stand mixer. I cream the butter and sugar by hand with a wooden spoon, and it works fine as long as your butter is properly softened — not melted, just soft enough that your finger leaves an indent easily. The whole dough comes together in about 10 minutes of mixing.
- Great for gifting and sharing: I've packed these into tins lined with parchment paper and they've survived being carried across town without falling apart. They stay soft for several days in an airtight container, which makes them better travel cookies than something delicate like a tuile or a lace cookie. A quick 8-second microwave zap when you get them out brings the gooey centre right back.
- The chocolate drizzle is optional but worth doing: The base cookie is great on its own, but if you melt a handful of chocolate chips with a bit of butter and drizzle it over the cooled cookies, they look properly impressive. I do this when I'm making them for guests. For a random Tuesday with my kids, I skip it. Either way the cookie delivers.
Ingredients
- 1½ cups all-purpose flour
- ½ cup unsweetened cocoa powder (regular or dark — both work)
- 1 teaspoon baking soda
- ¼ teaspoon salt
- ½ cup unsalted butter, softened (not melted)
- ½ cup granulated sugar
- ½ cup light brown sugar, packed
- 1 large egg
- 1 teaspoon vanilla extract
- ¼ cup whole milk (or any milk you have)
- 12 large marshmallows, cut in half (standard Jet-Puffed size from Walmart or any grocery store)
- ½ cup semi-sweet chocolate chips (optional, for stirring into the dough)
- For the optional chocolate drizzle: ½ cup semi-sweet chocolate chips + 1 tablespoon butter
Directions
- Preheat and prep your trays: Set your oven to 350°F (175°C) and line two baking sheets with parchment paper. Having two trays ready means you can bake in batches without waiting — these cookies need to go onto a cool tray each time or the bottoms overcook before the centres set.
- Whisk the dry ingredients: In a medium bowl, whisk together the flour, cocoa powder, baking soda, and salt. Whisking is worth doing properly here — it breaks up any cocoa clumps and means you won't get pockets of flour in the finished cookies.
- Cream the butter and sugars: In a large bowl, beat the softened butter with both sugars until the mixture looks pale and fluffy — about 2 to 3 minutes by hand, less if you're using a hand mixer. Add the egg, vanilla, and milk and mix until everything is combined and smooth.
- Bring the dough together: Add the dry ingredients to the wet in two additions, stirring between each. Don't overmix — once you can't see dry flour, stop. If you're adding chocolate chips, fold them in now. The dough should be soft but not sticky. If it feels too soft to handle, refrigerate for 15 to 20 minutes.
- Shape and stuff the cookies: Scoop about a tablespoon of dough, roll it into a ball, and flatten it in your palm. Place a marshmallow half (cut side down) in the centre. Bring the dough up and around the marshmallow, pressing it closed at the top and rolling gently to seal any cracks. This part matters — any gap in the dough is a place the marshmallow can leak out during baking.
- Bake and rest: Place the stuffed cookies 2 inches apart on your prepared tray and bake for 9 to 11 minutes. The edges should look set but the centres will still look slightly underbaked — that's correct. Leave them on the tray for 5 full minutes before moving them to a wire rack. They firm up as they cool.
- Chocolate drizzle (optional): Once the cookies are fully cooled, melt the chocolate chips and butter together in a small bowl in the microwave — 30 seconds, stir, then another 20 seconds if needed. Drizzle over the cookies with a spoon or a fork. Let it set for about 10 minutes before stacking or packaging.
Tips for Success
- Seal the marshmallow properly or you'll regret it: The first batch I made had three cookies where the marshmallow burst out and caramelised on the bottom of the tray. It smelled amazing but the cookie itself lost the whole gooey-inside effect. Pinch the dough firmly closed, roll it gently between your palms, and check for cracks before it goes on the tray. A crack means a leak.
- Don't overbake — pull them early: I can't stress this enough. At 9 minutes, these cookies look underdone. The centres will still appear soft and the dough near the top might look glossy. That's exactly where you want them. They carry-cook on the hot tray for another 5 minutes after you pull them. If you wait until they look done in the oven, they'll be dry and chalky by the time they cool.
- Use fresh marshmallows from a recently opened bag: Old marshmallows that have been sitting open in the pantry go stiff and don't melt properly. I learned this when I grabbed a bag that had been open for a few weeks — the marshmallow inside the cookie stayed chewy rather than gooey. A fresh bag from Walmart or Costco makes a real difference.
- Soften your butter properly before you start: Cold butter won't cream properly and you'll end up with lumpy dough. I leave mine out on the counter for about 45 minutes before I start baking. If you forgot, you can cut the butter into small cubes and microwave it in 5-second bursts — but be careful, the line between softened and melted is thin and melted butter will make the cookies spread too flat.
- Chill the dough if your kitchen is warm: In summer (or if you have a warm kitchen), the dough can get soft and hard to work with after a few batches. Just pop the bowl in the fridge for 15 minutes. Cold dough is much easier to shape around the marshmallow and holds its shape better in the oven, which means less spreading and a thicker, fudgier cookie.
Variations
- Peppermint hot cocoa version: Add ½ teaspoon of peppermint extract to the dough along with the vanilla. It turns the whole cookie into something that tastes like a peppermint hot chocolate — which is a very specific cosy thing. I made these for a neighbour's Christmas gathering and someone asked me if I'd bought them from a bakery, which I'm still smug about.
- S'mores inside: Tuck a small square of graham cracker in alongside the marshmallow half before you seal the dough. The cracker softens during baking and gives you a genuine s'mores experience in cookie form. This is my husband's preferred version — he asks for these by name.
- Dark chocolate version: Swap the regular unsweetened cocoa for Dutch-process dark cocoa powder (the black stuff — sometimes labelled "black cocoa" or "extra dark"). The colour goes almost black and the flavour gets richer and more intense. These look dramatic on a cookie tray alongside something lighter like my Strawberry Crunch Cheesecake for contrast.
- Candy cane topping: Before baking, press a few crushed candy cane pieces into the top of each cookie. They melt slightly during baking and create a crunchy, minty sugar crust. This is a good option when you want a festive look without having to make the chocolate drizzle.
- Dairy-free version: Swap the butter for a plant-based block butter (I've had good results with Earth Balance) and use oat milk or almond milk in place of regular milk. Use dairy-free chocolate chips for the drizzle. The texture is very slightly different — a touch crisper at the edges — but the flavour holds up well.
Serving and Storage
Serving
These cookies are at their best when they're still slightly warm — the marshmallow centre stays soft and the chocolate is a little fudgy. I usually serve them about 20 minutes out of the oven when they've set but haven't gone fully cold. They pair well with an actual mug of hot cocoa if you want to lean fully into the theme, or alongside a flaky Pie Crust Cinnamon Roll for a proper baking-day spread. At room temperature they're still good, just a little firmer — a quick 8-second microwave blast brings the gooey centre back.
Storage
Store in an airtight container at room temperature for up to 5 days. Separate layers with parchment paper so the chocolate drizzle (if you added it) doesn't stick to the cookie below. For longer storage, freeze the baked cookies in a zip-lock bag for up to 2 months — thaw at room temperature for about 30 minutes, or microwave from frozen for 15 to 20 seconds. You can also freeze the shaped, stuffed dough balls before baking: freeze them on a tray first until solid, then transfer to a bag. Bake from frozen at 350°F for 12 to 13 minutes.

Frequently Asked Questions
Why did my marshmallow leak out during baking?
Almost always this comes down to gaps in the dough seal. After you wrap the dough around the marshmallow, look carefully for any cracks or thin spots — especially at the top where you pinched it closed. Press those spots firmly and give the ball a gentle roll between your palms before placing it on the tray. If your dough is too soft to work with, refrigerate it for 15 minutes first.
Can I make the dough ahead of time?
Yes — make the dough, wrap it tightly in plastic wrap, and refrigerate for up to 2 days. When you're ready to bake, let it sit at room temperature for about 15 minutes to soften slightly before trying to shape it. Stuff the marshmallows in just before baking rather than ahead of time — this keeps the marshmallow fresh and the dough easier to seal.
Can I use mini marshmallows instead of large ones?
Yes, you can tuck a small cluster of mini marshmallows into the centre of each cookie instead of half a large one. The result is slightly less dramatically gooey — you get more of a soft, melted pocket rather than one big marshmallow centre — but it still works well. Some people find mini marshmallows easier to seal inside the dough since they're smaller and more forgiving.
What kind of cocoa powder should I use?
Regular unsweetened cocoa powder works great and is what this recipe was developed with — the kind you'd find at any Walmart, Aldi, or Trader Joe's. For a deeper, richer flavour, Dutch-process or dark cocoa powder is excellent. Avoid hot cocoa mix packets — they have added sugar and powdered milk which will throw off the ratios in the dough.
Can I freeze these cookies after baking?
Yes, they freeze well. Let them cool completely first, then freeze in a single layer on a tray until solid before transferring to a freezer bag. This stops them from sticking together. They keep for up to 2 months frozen. To serve, thaw at room temperature or microwave for 15 to 20 seconds — the marshmallow centre softens back up nicely from frozen.

MARSHMALLOW-SURPRISE HOT COCOA COOKIES
Ingredients
For the Cookies:
- 1 ½ cups all-purpose flour
- ½ cup unsweetened cocoa powder
- 1 teaspoon baking soda
- ¼ teaspoon salt
- ½ cup unsalted butter softened
- ½ cup granulated sugar
- ½ cup brown sugar
- 1 large egg
- 1 teaspoon vanilla extract
- ¼ cup milk
For the Marshmallow Surprise:
- 12 large marshmallows cut in half
For the Chocolate Topping (Optional):
- ½ cup semi-sweet chocolate chips
- 1 tablespoon butter
Instructions
Preheat the Oven:
- Preheat your oven to 350°F (175°C). Line a baking sheet with parchment paper.
Mix Dry Ingredients:
- In a medium bowl, whisk together flour, cocoa powder, baking soda, and salt.
Make the Dough:
- In a large bowl, beat together butter, granulated sugar, and brown sugar until fluffy. Add the egg, vanilla extract, and milk, mixing until combined. Gradually add the dry ingredients to form a dough.
Shape the Cookies:
- Scoop tablespoon-sized portions of dough and roll into balls. Place them 2 inches apart on the prepared baking sheet. Flatten slightly and press a half-marshmallow into the centre, covering it completely with dough.
Bake:
- Bake for 8–10 minutes until the cookies are set around the edges. Cool on the baking sheet for 5 minutes, then transfer to a wire rack.
Prepare the Chocolate Topping (Optional):
- Melt chocolate chips and butter together until smooth. Drizzle over cooled cookies if desired.
Notes
Prepare and refrigerate the dough for up to 2 days. Freeze shaped cookie dough balls for up to 1 month. Customizing the Flavor:
Use flavoured marshmallows (like peppermint) for a fun twist or add a pinch of cinnamon to the dough for extra warmth. Serving Suggestions:
Perfect with a cup of hot chocolate or a cosy latte on chilly days. Allergy-Friendly Options:
Use plant-based butter and dairy-free chocolate for a dairy-free version. Storage Tips:
Store cookies in an airtight container at room temperature for up to 4 days. Freeze for longer storage.
These have become one of my go-to bakes for the colder months. There's something about the combination of deep cocoa and that soft marshmallow centre that just works — it's the kind of cookie that makes people stop mid-conversation to ask what they're eating. I've made them for cookie exchanges, packed them into tins for gifts, and made a half-batch on quiet weekday evenings when I just wanted something warm and chocolatey from the oven.
What I appreciate most about this recipe is that it's straightforward enough for a beginner but produces results that look and taste like you put in much more effort than you did





Comments
No Comments