
I first made this dessert for a family gathering about five years ago and genuinely did not expect it to disappear before I had a chance to serve seconds. It's one of those layered fridge desserts that looks like you put in serious effort but actually comes together in under 30 minutes of active work — no mixer required, no oven stress (well, barely), just a 9x13 dish and a bit of patience while it chills.
What makes this version work is the no-bake graham cracker crust, which I switched to after my original pecan-butter crust kept crumbling when I tried to slice it. The graham cracker base sets firm in the fridge, holds the layers cleanly, and has just enough buttery sweetness to balance the cream cheese layer above it. Three distinct layers, each one doing something different — that's what makes every bite interesting.
My husband requests this at least twice a month, which is saying something because he's usually more of a savory food person. Zainab, my daughter, is convinced it's her birthday cake every time I make it — she literally gets excited when she sees me pulling out the cream cheese. I usually make this on a Friday evening and let it chill overnight so it's perfectly set by Saturday lunch. If you're already planning a weekend meal, pair it after something like my Baked Ranch Chicken — the contrast of savory dinner and cold, creamy dessert is really satisfying.
One thing I want to set straight: the chill time matters. I've tried to rush this to two hours and the pudding layer slides when you cut it. Give it at least three hours, overnight is better. Also, let your cream cheese sit out for 15-20 minutes before you start — cold cream cheese clumps and no amount of beating fully smooths it out.

Why You'll Love This Recipe
- No baking required (mostly): The graham cracker crust sets in the fridge, not the oven, so this is almost entirely a no-bake situation. That's a big deal in summer when turning on the oven feels like a punishment. I've made this in July with the AC running and it was completely stress-free from start to finish. The only heat involved is melting butter, and you can do that in the microwave.
- Three distinct layers that actually stay separate: Some layered desserts end up as one blurry mess when you cut them. This one holds because the crust sets firm, the cream cheese layer is thick enough to act as a barrier, and the pudding stiffens fully during chilling. When you slice it with a clean knife, you see three clean layers every time. The first time I made it I was genuinely surprised by how neat the slices looked.
- Make-ahead friendly: I almost always make this the night before I need it. The layers actually improve overnight — the flavors settle into each other and the whole thing firms up beautifully. If you're bringing it to a potluck or a family dinner, you can make it 24 hours ahead and just pull it out of the fridge when you're ready to serve. No last-minute scrambling.
- Basic ingredients you already have: Cream cheese, instant pudding, Cool Whip, butter, graham crackers — these are all things I can grab at any Walmart or Aldi without hunting through specialty aisles. Nothing fancy, nothing that requires a specialty store. I've even used store-brand instant pudding with perfectly good results.
- Feeds a crowd from one dish: A 9x13 pan cuts into 12-15 squares depending on how generous you're feeling. I make a double batch for bigger gatherings because one pan genuinely disappears before everyone has gone back for seconds. It's the kind of dessert that goes fast no matter who you're feeding.
Ingredients
- For the Crust:
- 1 ½ cups crushed graham crackers (about 12 full crackers)
- ¼ cup granulated sugar
- ½ cup unsalted butter, melted
- For the Cream Layer:
- 8 oz cream cheese, softened (let it sit out 15-20 minutes first)
- 1 cup powdered sugar
- 1 ½ cups whipped topping (like Cool Whip), thawed
- For the Chocolate Layer:
- 1 box (3.9 oz) instant chocolate pudding mix
- 2 cups cold milk
- For the Topping:
- 1 cup whipped topping (like Cool Whip), thawed
- Shaved chocolate or chocolate chips, for garnish (optional)
Directions
- Make the Crust: In a bowl, combine the crushed graham crackers, sugar, and melted butter and mix until everything is evenly moistened — it should look like wet sand. Press the mixture firmly and evenly into the bottom of a 9x13-inch baking dish. I use the flat bottom of a measuring cup to press it down properly. Refrigerate for at least 10 minutes to set before adding the next layer.
- Make the Cream Layer: Beat the softened cream cheese and powdered sugar together until completely smooth — no lumps. Cold cream cheese will fight you here, so give it time to soften first. Gently fold in the 1 ½ cups of whipped topping, then spread this mixture evenly over the chilled crust. Try to spread it all the way to the edges without disturbing the crust underneath.
- Make the Chocolate Layer: In a separate bowl, whisk the instant pudding mix and cold milk together for about 2 minutes until the pudding thickens noticeably. Don't rush this step — you want it thick before spreading or it'll sink into the cream cheese layer. Pour and spread the pudding evenly over the cream cheese layer.
- Add the Topping: Spread the remaining 1 cup of whipped topping over the chocolate pudding layer, smoothing it out with a spatula. Scatter shaved chocolate or chocolate chips over the top if you want — I almost always do because it makes it look like you really tried.
- Chill: Cover the dish with plastic wrap and refrigerate for at least 3 hours. Overnight is genuinely better — the layers firm up and hold their shape when you cut. When you're ready to serve, slice into squares with a sharp knife dipped in hot water and wiped clean between cuts.

Tips for Success
- Soften the cream cheese before you start: I learned this the hard way — I once tried to beat cold cream cheese and ended up with a lumpy layer that never fully smoothed out. Take it out of the fridge at least 15-20 minutes before you need it. Room temperature cream cheese beats smooth in about 90 seconds, cold cream cheese stays lumpy no matter how long you beat it.
- Let the pudding thicken fully before spreading: If you spread the pudding while it's still loose, it slides under the cream cheese layer and you lose those distinct lines. Whisk for a full 2 minutes and let it sit for another minute before spreading. It should have some resistance when you pull the whisk out — that's when it's ready.
- Press the crust down firmly: A loose crust crumbles when you try to cut the dessert and every slice ends up messy. Use the bottom of a flat measuring cup or a drinking glass to really press the graham cracker mixture into the pan — pay attention to the corners especially. You want it compact enough that it holds together as a slab.
- Overnight chilling makes a real difference: Three hours is the minimum, but I've compared a 3-hour version to an overnight version side by side, and overnight is noticeably better — firmer layers, cleaner slices, and the flavors meld together more completely. If you have a party the next day, make this the evening before and just pull it out right before serving.
- Dip your knife in hot water between slices: This is a small thing that makes a big visual difference. A warm, clean knife glides through the layers without dragging the whipped topping into the pudding. Wipe the blade between each cut and your squares will look sharp and neat. Worth the extra five seconds per slice.
Variations
- Pecan-butter crust (the original): Before I switched to the graham cracker base, I used to make this with 1 cup of all-purpose flour, ½ cup softened butter, and 1 cup of chopped pecans, pressed into the pan and baked at 350°F for 15-20 minutes until golden. It's delicious and nuttier, but it requires more planning since the crust has to cool completely before you can build the layers. If you have the time, it's worth trying.
- Peanut butter layer: Stir ¼ cup of peanut butter into the cream cheese layer before spreading it on the crust. It adds a nutty depth that plays really well against the chocolate pudding. My husband prefers this version — he adds a drizzle of extra peanut butter on top just before serving, which honestly looks great.
- Mint chocolate version: Swap the regular chocolate pudding for instant chocolate mint pudding and top with crushed peppermint candies instead of chocolate chips. It tastes like a peppermint patty in dessert form. If you enjoy making things like peppermint macarons, you'll recognize the same flavor combination — cool mint with rich chocolate.
- Fruit layer twist: Add a layer of sliced bananas or fresh strawberries between the cream cheese layer and the pudding. The fruit cuts through the richness and adds something fresh. I'd add the fruit layer right before serving rather than during assembly if you're making it the night before — sliced bananas brown overnight.
- gluten-free diet crust: Use certified gluten-free graham crackers (they're available at most Walmart and Target stores now) in the same quantity and the recipe works perfectly. The texture is essentially identical — I've made it this way for a friend who can't have gluten and she couldn't tell the difference.
Serving and Storage
Serving
Serve this straight from the fridge — it holds its shape best when cold. Slice into squares with a warm, clean knife and lift pieces out with a flat spatula. I usually let it sit on the counter for about five minutes before cutting if the kitchen is cold, just so the crust isn't rock hard at the edges. It's a complete dessert on its own, but you can add a small dollop of extra whipped cream and a few fresh berries on the plate if you want it to look a little more dressed up. It's also really good alongside a cold iced caramel latte — the coffee bitterness pairs well with the sweet chocolate layers.
Storage
Cover the dish tightly with plastic wrap or transfer slices to an airtight container. Keeps well in the refrigerator for up to 4 days, though in my house it rarely survives past day two. For freezing, cut into individual portions and wrap each one in plastic wrap before placing in a freezer-safe container — it freezes well for up to 2 months. Thaw overnight in the fridge before serving. Don't thaw at room temperature or the layers get too soft.
Frequently Asked Questions
Can I make this the night before?
Yes, and honestly I recommend it. The layers set more firmly overnight and the whole thing slices much more cleanly than a version that only chilled for 2-3 hours. I almost always make this the evening before I need it. Just cover it tightly with plastic wrap and pull it straight from the fridge when you're ready to serve.
Can I use homemade whipped cream instead of Cool Whip?
You can, but Cool Whip holds its structure better during chilling because it's stabilized. Freshly whipped cream can deflate slightly overnight and the topping layer ends up thinner. If you want to use homemade whipped cream, stabilize it with a tablespoon of powdered sugar and ¼ teaspoon of cream of tartar per cup of heavy cream — it'll hold much better that way.
Can I freeze Chocolate Delight?
Yes. Cut it into individual portions, wrap each piece in plastic wrap, and store in a freezer-safe container for up to 2 months. Thaw in the refrigerator overnight — don't rush it at room temperature or the layers get too soft and watery. The texture after freezing is slightly different from fresh, but still very good.
What can I substitute if I don't have instant pudding mix?
Homemade chocolate pudding works, but it needs to be fully cooled and quite thick before you spread it — warm pudding will melt the cream cheese layer underneath it. Make it ahead, chill it until it's cold and firm, then spread it. Instant pudding is honestly easier here because it thickens as soon as you whisk it with cold milk, with no cooking required.
My cream cheese layer came out lumpy. What went wrong?
Almost certainly the cream cheese was too cold when you tried to beat it. This happened to me the first two times I made this dessert — I thought it wouldn't matter and it definitely did. Pull the cream cheese out of the fridge at least 15-20 minutes before you start, or even 30 minutes in a cool kitchen. It should feel soft and slightly yielding when you press it with your finger before you begin beating.
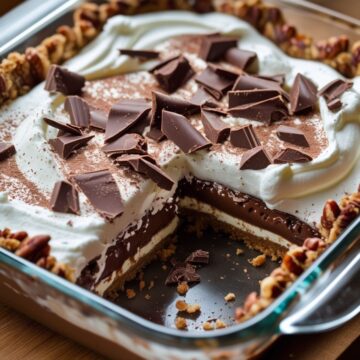
Chocolate Delight
Ingredients
For the Crust:
- 1 ½ cups crushed graham crackers
- ¼ cup sugar
- ½ cup melted butter
For the Cream Layer:
- 8 oz cream cheese softened
- 1 cup powdered sugar
- 1 ½ cups whipped topping
For the Chocolate Layer:
- 1 box (3.9oz) chocolate instant pudding mix
- 2 cups milk
- 1 cup whipped topping (for topping)
Instructions
- Prepare the Crust: In a bowl, combine crushed graham crackers, sugar, and melted butter. Press the mixture into the bottom of a 9x13-inch baking dish. Refrigerate for 10 minutes to set.
- Make the Cream Layer: Beat the softened cream cheese and powdered sugar together until smooth. Fold in whipped topping. Spread this mixture over the graham cracker crust.
- Prepare the Chocolate Layer: In a separate bowl, whisk together chocolate pudding mix and milk. Pour the pudding over the cream layer, spreading evenly.
- Top and Chill: Spread whipped topping over the pudding layer. Refrigerate for at least 3 hours or overnight to allow the layers to set.
- Serve: Slice and serve chilled, enjoy this rich and creamy dessert!
Notes
- Make Ahead: This recipe is perfect for preparing ahead of time! The chocolate delight can be stored in the fridge for up to 3-4 days, making it ideal for prepping for parties or weeknight desserts.
- Customizing the Flavor: You can get creative with this treat by adding mini marshmallows, crushed cookies, or chopped candy bars for a personalized twist. For a richer taste, try adding a drizzle of caramel or peanut butter on top.
- Serving Suggestions: Chocolate Delight is a versatile dessert. It’s great on its own, or you can serve it as a topping on ice cream or a sweet layer in parfaits. It also pairs well with fresh berries or whipped cream.
- Allergy-Friendly Options: For a dairy-free version, substitute the chocolate with dairy-free chocolate and use coconut cream instead of regular cream. If you're avoiding gluten, ensure that any cookies or crusts you use are gluten-free.
- Storage Tips: Store leftover chocolate delight in an airtight container in the fridge. You can also freeze it for up to 2 months, allowing it to thaw before serving.
This is one of those recipes I keep coming back to because it requires almost no skill, just a little patience with the chilling time, and the result looks and tastes like you worked much harder than you did. I've brought it to school events, made it for Eid gatherings, served it at casual weekend lunches — it always gets eaten completely and someone always asks for the recipe.
What I appreciate most is how forgiving it is. Forget to garnish with chocolate chips? Still looks fine. Spread the pudding layer slightly unevenly? Nobody notices once it's sliced. This isn't a fussy dessert. It's the kind of thing you can make while your kids are doing homework and still have it on the table looking put-together by the time company arrives.
If you're in a baking mood and want something on the fancier side to go with a festive spread, my Strawberry Puff Pastry Hearts are a good next project — they look impressive and are much easier than they appear. But for pure reliability and crowd satisfaction, this Chocolate Delight is hard to beat. Make it once and you'll understand why it keeps reappearing on my kitchen counter. 🍫❤️
If you liked this recipe, here are a few more you might want to try:
- Strawberry Puff Pastry Hearts (Easy Valentine's Treat)
- Peppermint Macarons
- Iced Caramel Latte
- Baked Ranch Chicken (Crispy, Juicy, and Ready in 45 Minutes)
- Chicken Cordon Bleu Stromboli





Comments
No Comments