
I made this cake for Zainab's birthday last year and honestly, I almost didn't attempt it. A layered mousse cake felt like the kind of thing you order from a bakery, not make on a Tuesday afternoon in your own kitchen. But I tried it anyway, and the look on her face when I brought it to the table made every step worth it.
What I love about this one is that the mousse layer is no-bake — you're only turning on the oven for the chocolate cake base, and that part is genuinely simple. The raspberry sauce is cooked down in about five minutes on the stovetop, and the chocolate mousse comes together by folding melted chocolate into whipped cream. Each component is manageable on its own. The assembly is where it gets impressive.
My husband is a chocolate person through and through, but even he said the raspberry cuts through the richness in a way he didn't expect to like. Zainab asked for it again for her school end-of-year party. I made a double batch that time because one cake disappears embarrassingly fast when there are more than four people in the room. If you've made my Creamy Strawberry Crunch Cheesecake and want something with a similar fruity-meets-creamy energy but with a baked cake base, this is it.
One thing to plan for: this cake needs at least four hours in the fridge before you can slice it cleanly, so make it the day before if you can. I learned that the hard way — my first attempt I pulled it out after two hours and the mousse just slid everywhere when I cut into it. Overnight is really the move here.

Why You'll Love This Recipe
- The chocolate cake base is genuinely moist: I've made chocolate cakes that come out dry and dense, and this isn't one of them. The hot water added at the end of mixing is the key — it loosens the batter and activates the cocoa in a way that gives you a soft, tender crumb. It bakes in 18 to 20 minutes per layer, which means you're not standing around waiting.
- The mousse is lighter than you'd expect: It's not heavy ganache — it's whipped cream folded with melted semisweet chocolate, which gives it that airy, almost cloud-like texture. It sets firm enough to slice cleanly but still feels soft when you eat it. My husband specifically asked me what made it so light, and the answer is just: don't overwork the fold.
- The raspberry sauce is three ingredients: Fresh or thawed frozen raspberries, a bit of sugar, and lemon juice. You cook it down, strain the seeds out, and it becomes this bright, tart sauce that cuts right through the richness of the chocolate. I've tried skipping it when I was short on time, and the cake is still good, but with it — different level entirely.
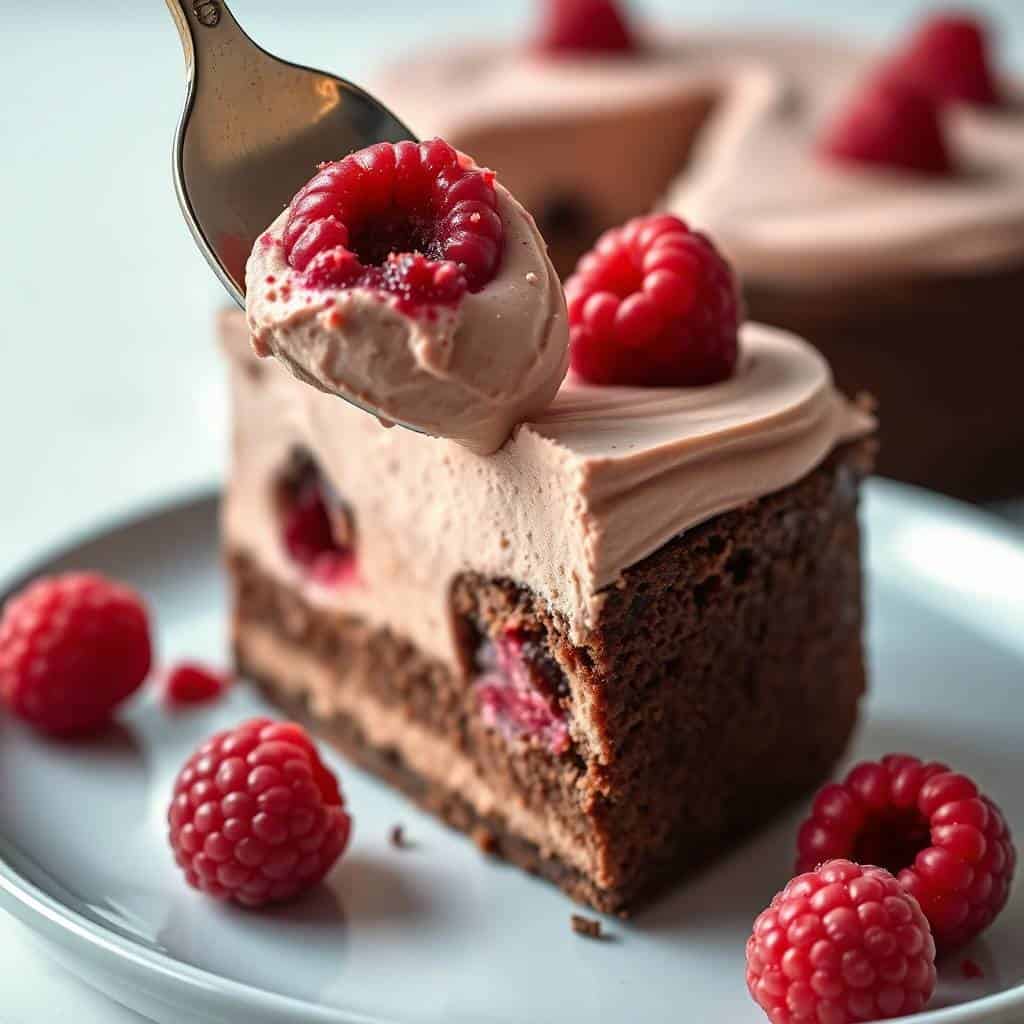
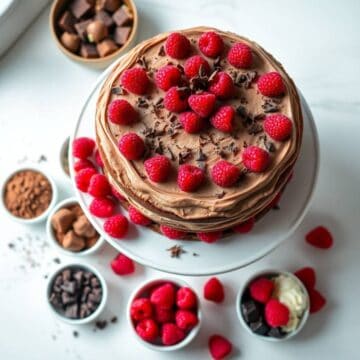
- It looks like it came from a patisserie: I'm not being dramatic. When you pull it out of the springform pan and pile fresh raspberries on top with some chocolate shavings, it genuinely looks like you spent hours on it. The layers are visible when you slice it — chocolate cake, mousse, raspberry, cake, mousse — and people always stop and look at it before they eat it.
- Most of the work can be done a day ahead: The cake layers can be baked the day before and wrapped at room temperature. The whole assembled cake actually tastes better the next day once everything has had time to set and the flavors have settled into each other. For a party, that's a huge relief — one less thing to do the morning of.
Ingredients
- For the Chocolate Cake Layers:
- 1 cup all-purpose flour
- ¾ cup granulated sugar
- ¼ cup unsweetened cocoa powder
- 1 teaspoon baking powder
- ½ teaspoon baking soda
- ¼ teaspoon salt
- ½ cup buttermilk
- ½ cup vegetable oil
- 2 large eggs
- 1 teaspoon vanilla extract
- ½ cup hot water
- For the Chocolate Mousse:
- 8 oz semisweet chocolate, chopped (a good bar from Trader Joe's or Ghirardelli works great)
- 1½ cups heavy whipping cream, divided
- ¼ cup powdered sugar
- 1 teaspoon vanilla extract
- For the Raspberry Layer:
- 1 cup fresh raspberries (or thawed frozen — just drain them well)
- 2 tablespoons granulated sugar
- 1 teaspoon lemon juice
- For Garnish:
- Fresh raspberries
- Chocolate shavings or curls (optional, but they make it look really special)
Directions
- Step 1: Bake the cake layers — Preheat your oven to 350°F (175°C). Grease and flour two 8-inch round cake pans — I line the bottoms with parchment too, just to be safe. Whisk together the flour, sugar, cocoa, baking powder, baking soda, and salt in a large bowl. In a separate bowl, mix the buttermilk, oil, eggs, and vanilla. Pour the wet into the dry and mix gently, then stir in the hot water last until the batter is smooth. Divide between the two pans and bake 18 to 20 minutes, until a toothpick comes out clean. Cool completely — don't rush this part.
- Step 2: Make the raspberry sauce — Combine raspberries, sugar, and lemon juice in a small saucepan over medium heat. Cook for about 5 minutes, stirring and mashing as the berries break down. Press through a fine mesh strainer to remove the seeds. Let it cool to room temperature before using — warm sauce will mess with the mousse layer.
- Step 3: Make the chocolate mousse — Melt the chopped chocolate in a heatproof bowl set over a pot of simmering water, stirring until smooth. Let it cool for about 10 minutes — you don't want it hot when it hits the cream. Whip 1 cup of the heavy cream with the powdered sugar and vanilla until soft peaks form. Fold the melted chocolate into the whipped cream gently and slowly, using a spatula. Stop as soon as it's just combined; overmixing deflates it.
- Step 4: Assemble the cake — Place one cooled cake layer on your serving plate or the base of a springform pan. Spread half the chocolate mousse evenly over the top. Drizzle with half the raspberry sauce. Place the second cake layer on top, spread the remaining mousse over it, and drizzle with the rest of the raspberry sauce.
- Step 5: Chill to set — Refrigerate the assembled cake for at least 4 hours, but overnight is better. Cover loosely with plastic wrap if chilling overnight so it doesn't pick up any fridge smells.
- Step 6: Decorate and serve — If you used a springform pan, remove the ring carefully. Pile fresh raspberries on top and scatter chocolate shavings over everything. To slice cleanly, dip a sharp knife in hot water, wipe it dry, and cut. Repeat between slices. Serve cold.
Tips for Success
- Let the chocolate cool before folding: This is the step I rush and then regret every time. If the melted chocolate is still warm when it hits the whipped cream, it deflates the cream and you end up with a dense, slightly greasy layer instead of something airy. I give it at least 10 minutes off the heat before I start folding. It should feel barely warm to the touch.
- Whip the cream to soft peaks, not stiff: Stiff peaks actually make it harder to fold and the mousse ends up lumpy. Soft peaks — where the cream holds a shape but the tip droops — give you the smoothest result. If you accidentally overwhip, add a splash of unwhipped cream and gently fold it in to loosen things back up.
- Use a springform pan for assembly: I tried assembling this freehand the first time — it was fine, but the edges were uneven and the mousse slid a bit before setting. A springform pan keeps everything contained while it chills, and you get clean, straight layers when you remove it. Any inexpensive 8-inch springform from Walmart or Aldi works perfectly.
- Cool the cake layers completely before assembling: Even slightly warm cake will start melting the mousse layer from the bottom. I usually bake the layers in the morning, let them cool on a wire rack for a couple of hours, then assemble in the afternoon. If you're in a hurry, 30 minutes in the fridge speeds things up.
- Strain the raspberry sauce properly: I know it's an extra step and tempting to skip, but raspberry seeds in a smooth mousse cake are distracting. A fine mesh strainer does the job in under a minute. Push the pulp through with the back of a spoon and you'll get a bright, clean sauce with zero grit.
Variations
- Dark chocolate mousse: Swap the semisweet chocolate for 70% dark chocolate if you want something more intense and less sweet. My husband prefers this version — it makes the mousse deeper and slightly bitter in a way that really plays off the raspberry. Just know the mousse will be a bit firmer since dark chocolate sets harder than semisweet.
- Mixed berry sauce: If raspberries are expensive or out of season, a mix of raspberries, strawberries, and blueberries works well. The flavor is a little less sharp but still fruit-forward and beautiful. Frozen mixed berries from Costco are actually what I use in winter — thaw them overnight in the fridge and drain well before cooking down.
- Add a splash of raspberry liqueur: If you're making this for adults, a tablespoon of Chambord or any raspberry liqueur stirred into the raspberry sauce takes it somewhere really elegant. This isn't authentic to any particular tradition — it's just genuinely good and the alcohol cooks off anyway.
- Gluten-free base: I've made this with a 1-to-1 gluten-free flour blend (Bob's Red Mill is what I use) for a guest who couldn't have gluten, and the cake layers came out fine — maybe slightly denser but still good. Make sure your cocoa powder and chocolate are certified gluten-free too, since cross-contamination can be an issue with some brands.
- Cookie crumb base: If you want to skip baking the cake entirely for a truly no-bake version, press a layer of crushed chocolate sandwich cookies (Oreos work perfectly) mixed with a little melted butter into the bottom of your springform pan. Let it set in the fridge 20 minutes, then pour the mousse on top. It's a completely different dessert but honestly one of my favorites — similar energy to my Strawberry Crunch Cheesecake in terms of texture contrast.
Serving and Storage
Serving
Serve this cold, straight from the fridge. I slice it with a knife dipped in hot water and wiped clean between each cut — it makes a big difference in how the layers look on the plate. A dusting of powdered sugar, a few fresh raspberries, and some chocolate shavings on top is all it needs. If you want to go further, a small spoonful of whipped cream on the side is lovely. This is a dessert that looks after itself once it's plated.
Storage
Keep leftovers covered in the refrigerator for up to 3 days. I press a sheet of plastic wrap directly against the cut edge of the cake so the mousse doesn't dry out. Do not freeze this cake — the mousse texture breaks down when frozen and thawed, and you'll end up with something watery and sad. If you need to make it ahead, assemble and refrigerate the whole thing overnight (without the final garnish) and add the fresh raspberries and chocolate shavings right before serving.

Frequently Asked Questions
Can I use frozen raspberries instead of fresh?
Yes, frozen raspberries work fine for the sauce — thaw them completely first and drain off the excess liquid before cooking them down. For the garnish on top, fresh is worth it since frozen berries turn soft and bleed color once thawed. I use frozen for the sauce all winter long without any issue.
How long does the mousse need to set before slicing?
At least 4 hours in the refrigerator, but I really recommend overnight if you can plan ahead. I tried slicing at the 2-hour mark once and the mousse just slid off the cake layer entirely. Overnight gives you clean, defined layers that look as good as they taste.
Can I bake the cake layers ahead of time?
Absolutely. I often bake them the day before and wrap each layer individually in plastic wrap at room temperature overnight. The next day I make the mousse and assemble everything. Breaking it into two days makes the whole project feel much less overwhelming, especially for a party.
What can I use instead of semisweet chocolate?
Dark chocolate (70% cacao) gives a richer, slightly more bitter mousse that pairs really well with the raspberry. Milk chocolate will make it noticeably sweeter and the mousse softer — it'll still set but the flavor is milder. I wouldn't use chocolate chips for this; they have stabilizers that affect how they melt and fold into cream.
Can I freeze this cake?
I wouldn't. The mousse is mostly whipped cream, and freezing breaks down that airy texture — when it thaws you get a watery, grainy layer instead of something silky. Keep it in the fridge for up to 3 days and it stays in great shape. If you need a make-ahead freezer dessert, this isn't the right recipe for that.
HEAVENLY RASPBERRY CHOCOLATE MOUSSE CAKE
Ingredients
For the Chocolate Cake Layers:
- 1 cup all-purpose flour
- ¾ cup granulated sugar
- ¼ cup unsweetened cocoa powder
- 1 teaspoon baking powder
- ½ teaspoon baking soda
- ¼ teaspoon salt
- ½ cup buttermilk
- ½ cup vegetable oil
- 2 large eggs
- 1 teaspoon vanilla extract
- ½ cup hot water
For the Chocolate Mousse:
- 8 oz semisweet chocolate chopped
- 1 ½ cups heavy cream divided
- ¼ cup powdered sugar
- 1 teaspoon vanilla extract
For the Raspberry Layer:
- 1 cup fresh raspberries or thawed frozen
- 2 tablespoons sugar
- 1 teaspoon lemon juice
For Garnish:
- Fresh raspberries
- Chocolate shavings
Instructions
Prepare the Cake Layers:
- Preheat oven to 350°F (175°C). Grease and flour two 8-inch round cake pans.
- In a bowl, whisk flour, sugar, cocoa powder, baking powder, baking soda, and salt.
- In another bowl, combine buttermilk, oil, eggs, and vanilla.
- Slowly add wet ingredients to dry ingredients, mixing gently.
- Add hot water last, stirring until smooth.
- Divide batter between pans and bake for 18–20 minutes. Cool completely.
Make the Raspberry Sauce:
- In a small saucepan, combine raspberries, sugar, and lemon juice. Cook over medium heat until raspberries break down, about 5 minutes. Strain to remove seeds and cool.
Prepare the Chocolate Mousse:
- Melt chocolate in a heatproof bowl over simmering water or microwave in short bursts.
- Whip 1 cup heavy cream with powdered sugar and vanilla to soft peaks.
- Fold melted chocolate into whipped cream gently until combined.
Assemble the Cake:
- Place one cake layer on a serving plate. Spread half the chocolate mousse evenly. Drizzle with raspberry sauce.
- Add the second cake layer and repeat mousse and raspberry sauce layers.
- Chill the cake for at least 4 hours or overnight.
Decorate:
- Top with fresh raspberries and chocolate shavings before serving.
Notes
- Make Ahead: Cake can be assembled and refrigerated overnight for best flavor and texture.
- Flavor Variations: Use dark chocolate for a richer mousse or add a splash of raspberry liqueur to the raspberry sauce.
- Serving Tips: Serve chilled with a dusting of powdered sugar or a dollop of whipped cream.
- Storage: Keep refrigerated, covered, for up to 3 days.
This is one of those cakes that I keep coming back to because it genuinely works every time I make it — and I'm not someone who says that lightly. The chocolate layers stay moist even on day two, the mousse holds its shape, and the raspberry sauce brightens the whole thing up in a way that stops it from being too heavy. It's become my go-to for birthdays and any time I want to bring something to a gathering that people will actually remember.
If you want to plan ahead, bake the cake layers the day before and do the mousse and assembly the next morning. By the time you need to serve it that evening, it'll have had a full overnight chill and will slice perfectly. I've brought this to three different gatherings now and someone always asks for the recipe before dessert plates are even cleared.
On the nights when I'm not making something this involved, a simpler no-bake


Comments
No Comments